How to connect a second hard drive to a computer. How to connect another hard drive to your computer Ways to troubleshoot wired internet connection problems
In this video, let's talk about twisted pair crimping (RJ45). But, the purpose of this video will not only be to tell you how to crimp a twisted pair cable, but how to compress a network cable so that two network devices can be connected to one cable!
First I would like to say that I will consider the implementation of this system for 3 situations:
This is home use when the network cable is connected directly between the computer and the router. We will connect a second computer or network device to the same cable.
Network in a small office, when the computer is connected to a wall outlet, and from the outlet the cable is connected directly to the switch. In this situation, we will connect two network cables to one outlet.
And the network of a large company where network cabinets are used and the network connection is as follows. The computer is connected to a power outlet, the cable from the outlet goes into the network cabinet and disconnects to the patch panel, and from the patch panel it is connected to the switch. Here we will also connect two network cables to one outlet.
And we can do all this by simply changing the connection scheme, or rather by re-wiring the network connectors according to the new scheme.
We will go from simple to complex, so let's start with the basics, and specifically with the home network.
As you hope you know, the network cable is crimped according to two standards, standard A and standard B, the vast majority uses standard B, I personally only once encountered standard A crimping, but more on that later. This diagram shows a cable crimp according to standard B, and according to this diagram, the computer is connected to a network device.
Crimping diagram for a network cable for a home network
In order to connect two computers, we must crimp 2 cables and connect them to the devices. But, as a rule, no one wants to do installation work and lay an additional cable, and in this situation we can simply re-crimp the existing cable in order to connect two devices to our network.
The fact is that in networks with speeds up to 100 megabits, only 4 wires are used for signal transmission, these are 1-2-3 and 6, therefore, we have 4 unused ones left, and we will use them to implement the task. We will simply connect 4 unused strands to the second connector, the result should be something like this! By the way, I told you how to restore the network according to the same principle if one of the veins was cut off!
If the specialists of the Internet provider laid the cable at your house, then most likely they installed a cable of 4 cores, since this cable is cheaper and in this situation our system will not help, since you need a cable with 8 cores.
On both sides, we crimp the connectors according to this scheme and connect them to computers and the switch (router). By the way, most likely the devices will not be close, so you will either need to cut the cable more or twist it, although this is not recommended.
Network cable crimping diagram for a small office
Here we crimp the cable from the side of the switch, as shown in the first example, and from the side of the socket, we crimp the connector that will be connected to the outlet in such a way that 2 cables come out of it, as shown here. Here the wires are small, since I made a patch cord here to connect between the patch panel and the switch, but the meaning is the same. In addition, you should know approximately the length of the cable that will be needed to connect the device.
By the way, when preparing the cable, it is advisable to immediately cut off unused cores on both sides, so as not to confuse the connection diagram later.
Network cable crimping scheme for a large company
Here I will consider the example of the network diagram that we implemented in
The logic here is exactly the same, only here we need 2 patch cords, one will also connect to computers and an outlet, and the second between the patch panel and the switch.
It is also worth immediately adding the changes made to the crossover table.
So, you have finally concluded an agreement with a new provider, and a cable with a plug has been brought into your apartment - a real window to the world. It remains only to connect it to a computer - and the Internet is at your service. However, if it were enough to insert the plug into the socket, you would not need to read this article.
Consider how to connect the Internet to a computer via cable, in the simplest case. Let's say you have only one computer, and you will use it as a router (if you suddenly need a tablet). Or (alternatively) you're going to later, so turn off the router to make remote access easier.
Let's say your computer has a network card (it doesn't matter if it's separate or built into the motherboard), and you just connected an Ethernet cable to its input. We assume that you are using the most up-to-date Windows 10. Although for the correct settings of Windows 8 / 8.1 or even 7, these instructions will also work: the principle is the same.
Of course, you can always call the master to do all the necessary work for you. But experts are not always free. In addition, on your own, you will not only save money on a call, but also learn how to set up the Internet on a computer via a cable. In our world, such knowledge can come in handy at any moment.
Dynamic vs. Statics
Now check with the provider which connection he offers on your tariff plan: dynamic or static.
When connected dynamically your IP address may change depending on the settings of the provider (and if you intend to subsequently connect to your workplace remotely, this may interfere with you). But manipulations with entering parameters are reduced to a minimum: the provider sets the IP address, subnet mask and the main gateway on its own. In this case, just insert the cable into the computer and that's it, Internet access will appear.
Static connection provides a static IP address assigned to your computer (or router if you choose to connect through one). In this case, you will have to manually enter the IP address, subnet mask and default gateway in the connection settings. Usually all these incomprehensible numbers and letters fit into the access agreement or an annex to it. If necessary, you can clarify them in the technical support service, naming your data.
In some cases, access also requires a login and a password (do not confuse Internet access as such with access to a personal account on the provider's website - data is required for a personal account).
How the connection is made
Let's consider the procedure step by step.
- Insert the plug of the Ethernet cable brought into the apartment into the appropriate port on the computer. Even if you have never done this before, you will not be able to confuse this type of connector and plug with something.

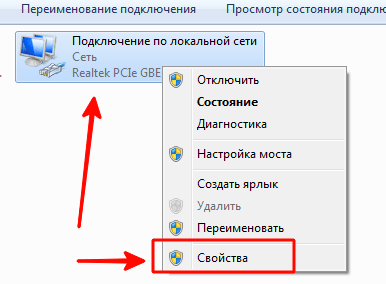
- Right-click on the Start button and find the section "Control Panel - Network and Internet - Network and Sharing Center". In the left column, select the "change adapter settings" tab. A list of your adapters will appear in the main window (more precisely, in our case, one “Local Area Connection” adapter). Use the right-click shortcut again and select Properties.
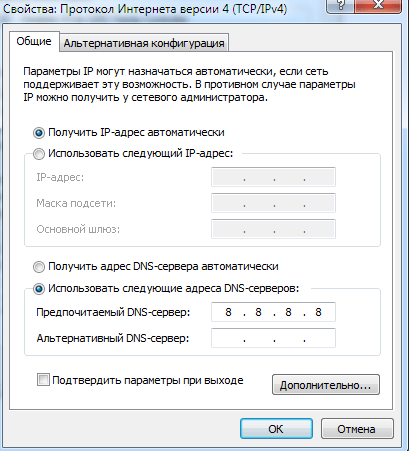
- A small pop-up window contains a whole column of different rows with properties. Select the line "IP version 4 (TCP / IPv4)" in them. While it is selected, click the Properties button below the list box.
Now our instruction forks. Have you checked with your ISP what IP is provided to you? If not, check right now.
- If dynamic, then trust the automatic selection in the IP address and DNS server settings.
- If it is static, then you will have to enter the values manually. As a rule, you need to specify "IP address", "Subnet mask", "Default gateway" and "DNS server". When you have completed entering the data, press the OK button to save your selection.
Important points:
- If a modem is required for the connection, enter its default address as the IP address; usually it is 192.168.1.1. If the modem has a different IP (which is rare), it is indicated on the bottom of the modem itself or in its instructions.
- Usually the provider provides DNS server information, but sometimes this is omitted. Then you can use generic:
1) Public DNS from Google: 8.8.8.8 or 8.8.4.4 - universal solution, usually suitable for all computers
2) OpenDNS - 208.67.220.220 and 208.67.222.222
3) Yandex DNS with its own anti-virus filter - 77.88.88.88 or 77.88.8.2 - if you trust Yandex's anti-virus policy (although sometimes it may consider a decent site unreliable)
4) Yandex DNS with a filter for pornography and other obscene content - 77.88.8.7 or 77.88.8.3 - although depending on what you actually need from the Internet, hehe.
- To reiterate, if remote access is important to you, make sure your ISP supports you so your IP won't change.
If your ISP offers L2TP access, this may require some additional steps on your part. Typically, the provider provides instructions for setting up this specific type of connection, but it also doesn’t hurt to duplicate it from our side.
So, to set up L2TP, you need to:
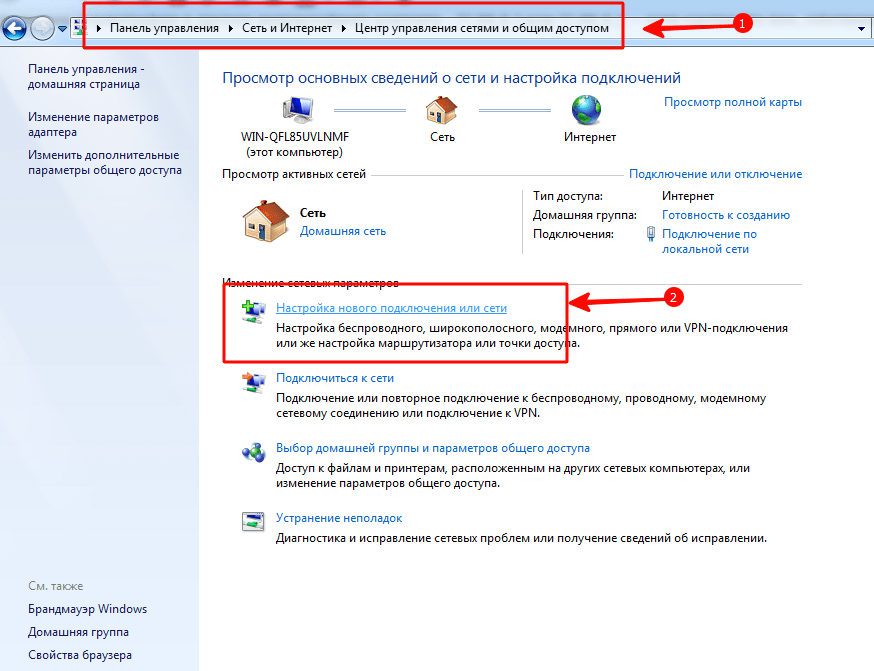
- Go to the section already known to us "Network and Sharing Center" and select the creation of a new connection
- Unlike the previous options, here you should go to "Connect to the workplace"
- When the system prompts you to create a new connection, select this item
- Select "Use my connection"
- Enter the server address provided by the provider. The option to connect immediately should not be selected. Assign a name that you like.
- In the next window, enter the username and password provided to you. Don't forget to check the box "Remember password"
- Connect now when prompted by the system
- Go back to "Adapter Properties" (as discussed above) and select the "Security" section
- In the "VPN Type" drop-down options, select "L2TP IPsec VPN". Below is the line "Data encryption", here you need to select "Optional",
- Under the "VPN type" line, click the "Advanced options" button
- Enter this same key in the "Key" field. It must be from your ISP.
- Everything, you can press “OK” with peace of mind and use the connection.
This instruction works for Windows 7 and newer versions.
Why all these difficulties? - you ask. Such a solution has advantages: for you - increased security of the connection (compared to a conventional LAN), for the provider - simplification of the billing system.
PPPoE setup
Before you set up the Internet on your computer, check with your ISP for the type of access it offers. Access via PPPoE requires not only the correct settings, but also authorization using a login and password. You will need this connection method if you do not use a modem or router, but insert the cable from the provider directly into the connector on the computer, without intermediaries.
To do this, you again go to the "Network Control Center" and select there, create a new connection with it.
In the wizard that starts, you select the first item - "Connect to the Internet" - and click "Next". Then, in the window that appears, you should select "High Speed (with PPPoE)".
There is one final step left. In the final window, you need to come up with a name for the connection and enter the login and password issued by the provider. If several people (for example, family members) use your computer, each under their own account, and you want to give them all access, then check the box "Allow other accounts to use this connection."
Now make sure your internet connection is working. And if so, hello world!
The black-and-yellow operator from the top three never ceases to amaze with the generosity of his offers. Senior tariffs of the legendary line "Everything!" with a monthly fee of 500 rubles, they now offer to distribute it to several phones and other devices at once. That is, now Beeline subscribers can connect several phones / smartphones or tablets at once for one tariff. Most importantly, it's free.
The proposal is so new that, perhaps, requires detailed consideration.
When is it convenient? Well, for example, if you don’t want to pay separately for a child’s phone, you can connect it to your tariff. There is an elderly relative who only occasionally calls - you can connect to your tariff. Many still have unused packages - now you can "split" a package of minutes / SMS / Internet traffic between several phones.
Significant advantages: one account, moderate subscription fee. Sufficiently large packages of services allow you to "share" if you have a noticeable unused volume of SMS, Internet traffic or minutes. A definite plus: if one of your family members is not a very active user of mobile services, but, at the same time, is connected to a package tariff.
Minuses: one of the "single-packet" can use all the traffic. That's probably all.
How does the offer work?
Option #1: I have three phones in my family. Tariffs - 300 rubles, 500 rubles and a tariff without a monthly fee with expenses of about 100-200 rubles per month. At the same time, in total, we pronounce about 600 minutes, send about 200 SMS and consume 3-4 GB of traffic. By connecting all three phones to one “All for 500” tariff, the subscription fee will be 500 rubles per month, instead of 900-1000 rubles, which are usually spent. In addition, on a tariff without a monthly fee, it will be possible not to be afraid of mobile Internet, which is quite expensive “at retail”.
Option #2: I have a smartphone with a 500-ruble package, plus one or two ordinary phones in the family. Connecting all three to one package will actually get rid of paying for these simple phones. If you count, then even two smartphones with packages can already provide savings (one of them, according to the terms of this offer, we recall, must be at least with a 500-ruble package).
And most importantly: for the tariff "All for 500" ( http://mariy-el.beeline.ru/customers/products/mobile/tariffs/details/vse-za-500/), "All for 990" ( http://mariy-el.beeline.ru/customers/products/mobile/tariffs/details/vse-za-990/) and "Absolutely Everything" ( http://mariy-el.beeline.ru/customers/products/mobile/tariffs/details/sovsemvse/) you can connect up to 5 (five!) numbers of your "family". Packages of minutes, SMS and Internet traffic will be shared between the numbers, and the subscription fee will be one. And do not think about how much you will spend on communication.
Every year the amount of information stored on the computer increases. As a result, the computer starts to boot for a long time and periodically freezes. And this is natural, because all data is stored on a hard disk, the memory of which is limited.
Users solve this problem in different ways. Someone transfers information to various media, someone turns to the master and asks to increase the computer's memory, and someone decides to connect a second hard drive to the computer. Therefore, let's figure out how, without the help of a specialist - on our own - to connect a second hard drive to a computer.
To get started, you need to completely shut down the system unit: disconnect all cables and power cable. Now you need unscrew the side covers sistemnik. We unfold it with the back towards us and unscrew the four screws on the sides. Slightly pressing on the side parts, move them in the direction of the arrow and remove.
Hard drives in the system unit are installed in special bays or cells. Such bays can be located in the back of the system unit at the bottom or in the middle, some hard drives are installed turned on their side. If your system unit has several cells for hard drives, install the second one not right next to the first one - this will improve its cooling.

Depending on the method of connection to the motherboard, internal hard drives are divided into two types: with IDE and SATA interface. IDE is an older standard, now all system units are designed to connect hard drives with a SATA interface. It is not difficult to distinguish between them: IDE has wide ports for connecting a hard drive and power supply and a wide cable, while SATA has both ports and the cable is much narrower.
Connecting a hard drive via SATA interface
If your system unit has a hard drive with a SATA interface, then connecting a second one will not be difficult.
Insert a second hard drive into a free slot and attach it to the case with screws.

Now we take SATA cable, through which data will be transferred, and connect it to the hard drive by either side. We connect the second plug of the cable to the SATA connector on the motherboard.

All system units have at least two SATA connectors, they look like the one shown in the picture below.

To connect to the power supply, a cable is used, the plug of which is slightly wider than that of a SATA cable. If only one plug leaves the power supply, you need to buy a splitter. If the power supply is not equipped with a narrow plug, you will need to buy an adapter.

Connect the power cable to the hard drive.

The second hard drive is installed on the computer. Replace the side covers of the system unit and secure them with screws.
Connecting a hard disk via an IDE interface
Although the IDE standard is outdated, IDE-based hard drives are still found. Therefore, we will further consider how to connect a second hard drive via the IDE interface.
To get started, you need install jumper on the hard drive pins to the correct position. This will allow you to determine in which mode the hard drive will work: master (Master) or slave (Slave). Usually, the hard drive that is already installed on the computer works in Master mode. It is he who is the main one and the operating system is loaded from it. For the second hard drive that we are going to install, we need to select the Slave mode. On the hard drive case, the pins are usually signed, so just put the jumper in the right position.

The IDE cable through which data is transferred has three plugs. One is located at the end of a long piece, blue, connected to the motherboard. Another one is in the middle, white, connected to the slave drive (Slave). The third, at the end of a short segment, black, is connected to the master disk.

Insert hard drive to a free cell. Then secure it with screws.

Choose free power supply plug and insert it into the appropriate port on your hard drive.

Now insert the plug which is located in the middle of the plume, to the hard disk port for data transfer. In this case, one end of the cable is already connected to the motherboard, the other - to the previously installed hard drive.

Connecting a second hard drive via the IDE interface is now complete.
As you can see, we did nothing complicated. Just be careful, and then you will definitely be able to connect a second hard drive to your computer.
And also watch the video