How to record a conversation on Skype. Programs for recording conversations in Skype
CallGraph Skype Recorder is a free program that will allow you, if necessary, to automatically record conversations on Skype. The program interface, although in English, is very simple. It doesn't weigh much and can be installed in just a couple of clicks.
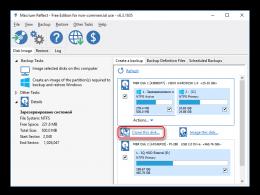
Download CallGraph Skype Recorder You can follow the link given at the end of the article, or from the official website, the address of which is underlined in the figure below.
Close Skype on your computer, then run the downloaded installation file. The installation wizard window will open, click “Next”.


The installer will suggest a folder where the program will be installed. If you want to choose a different path, click "Browse".


We are waiting for the installation process to complete. In the next window, you can check the “Run Call Graph” box and click “Finish”.

Immediately after installation, the following window will appear. In it you need to select a folder on your computer where the recorded files will be saved. Click OK.

The next window concerns the Firefox browser. Click OK.

The CallGraph Skype Recorder program window looks like this. Buttons "Record", "Pause" and "Stop", "Open page in browser", "Folder with files". The inscription below, "Waiting for Skype connection", means that the program is waiting for Skype to start.

Let's go to Skype. A message will appear at the top right that CallGraph Skype Recorder is asking for access, click “Give access”.

The program works in automatic mode. As soon as you start a conversation, she immediately records it. In this case, a message appears in the notification area “Recording started”. If you do not want the conversation to be recorded, click “Cancel Recording”.

The program window during recording looks like this. You can press pause during a call, or press stop to stop recording. At the bottom, indicators show the status of the speakers and microphone.

After you finish a conversation with the subscriber, the message “Recording finished” will appear in the notification area.

To listen to recorded conversations, click on the folder icon in the main program window.
If you want to open the additional menu of the CallGraph Skype Recorder program, right-click on its icon in the tray. By checking the “Disable all notifications” box, you can disable all notifications that appear in the lower right corner.
Let's look at the program settings; to do this, click on the "Configuration" button.

On the “General” tab, you can change the folder where the recordings will be stored. By unchecking the box "Automatically record Skype calls" You will disable automatic call recording.

On the “Recording” tab, you can mark with a marker in which format to record conversations. Additional settings are also available for MP3 format.

On the “Advanced” tab, in the “Discard records” field, you can configure the time for calls that need to be discarded. In the “Filename” field, select a format for naming the recorded files. When you are done with the settings, click "Apply" and "OK".

As you can see, there is nothing complicated, so you will quickly figure out how you can record conversations on Skype using the free CallGraph Skype Recorder program.
Rate this article:Skype users often need to record a conversation with an interlocutor. There are a sufficient number of recorders for this purpose. Which one should you choose? To answer the question, let's try to compare the properties and functions of some of them.
As a rule, developers allow each download for free so that users can try how to use it to record sound on Skype. Some, however, in the free version have time limits or reduced functionality. Others do their work completely free of charge.
When installing a program, especially a free one, carefully monitor the installation process and uncheck unnecessary components.
Connecting to Skype
The normal installation process may not be enough to start recording a conversation. Most recorders need to be connected to Skype.
The connection process is quite simple: launch the Skype recorder.
Open sequentially Tools / settings / additional (in the left panel) / control access of other programs to Skype. The access control window displays all running Skype recorders.

Select the one you want and click “Change”. Click on “Allow this program to use Skype”/OK/Save.

You may need to click one more time in Skype on the top panel.

Click “Give access.”
Now you can start recording.
In most programs, the automatic start and end of recording is configured: you select auto-recording (autostart) or the manual option, where you need to click “Start”, and when finished, click “Stop”.
At first glance, the presence of an auto-recording function seems more convenient. On the other hand, not every call requires turning on the recorder, and storing a lot of unnecessary audio files on the disk is irrational. They “weigh” a lot, and the disk is not rubber.
Common to all programs for recording a conversation from Skype is the display of standard start-stop buttons. Some have microphone and speaker indicators.
Programs differ in the number and variety of settings.

This is one of the most popular programs for recording conversations on Skype.
All settings are in the main window:
- Calling the save folder in Explorer.
- Selecting a folder for saving recordings. The default is the Recording folder in “My Documents”.
- Autostart with Windows
- Select mono, stereo or combined stereo sound
- Recording quality

Main window:
- Timer
- Save folder
- Microphone and speaker indicators
- Extras/Settings opens settings

Settings by line:
The “Encoder” tab is available only in the paid version:

- Selecting a file format
- Output file format
- Frequency
- Sound recording quality from Skype
- Real-time encoding
- Two-track recording
Main window:
- Recording history.
- Settings
- Reference

Record History Right-clicking opens a menu. You can listen to the selected file.
Settings:

- Boot with Windows
- Displaying a window at the beginning of a conversation
- Hide the window at the end
- Show story at end
- Open in tray

- Automatically
- Record both or just one person
- Save folder

- Mono – stereo
- Quality
- Frequency
Chat options:

The checkbox includes chat options:
- Chat is possible when you are online
- Messages arrive in statuses: offline, do not disturb
To save settings in each window you need to click the button Apply.
This program for recording calls on Skype is very multifunctional, and therefore has a wide variety of settings. There are videos, effects, and more.
The undeniable advantage of this program is the Russian interface.
To record a conversation, two settings are important:
- Are common
- Call recording


A modest program, no settings. Connects automatically, can be disabled manually. For quality, Windows Media Player gives a solid four.
Comparison of different programs
As you can see, none of the listed programs can boast of a complete set of tools that may interest the user.
Allows you to choose mono or stereo sound.
Provides two-track recording, as well as assigning an output file format.
It is distinguished by the ability to record only one side, displays chat parameters.
Emphasizes the warning about the start of recording and recording permissions.
The three most important options, with all the variety of available settings for recording a conversation on Skype, are available in all the programs presented, except CallGraph:
- Switch start of recording automatically/manually (except CallGraph)
- Setting the recording quality (which can be important if you need to record a voice and there is noise in the background)
- Purpose of the save folder (present in CallGraph)
If you use the recording function frequently, file size is also important.
All programs by default save the output file in the most common MP3 format.
The table shows comparative data based on the results of testing five programs. In all cases, the quality setting was set to 64 Kbps. Output quality parameters are given. The rating was given by Windows Media Player.
|
Program |
For free |
Settings |
file size |
||
|
Quality KB/sec |
|||||
|
15 minutes. records |
|||||
The programs, as you can see, are somewhat similar. The existing differences in options probably matter to some of you. In any case, there is plenty to choose from.
Whether you are participating in a webinar, conducting video conferences, or just your beloved grandson reading you a poem during a Skype session, in any such situation you can record the audio directly during communication.
How to record a conversation on Skype?


Nowadays Skype is not only a popular communication program, but also a tool for business people. And it often happens that during a conversation it is necessary to record the call. This can be done using a regular voice recorder, but in this case the quality of the recording will leave much to be desired. In this case, it will be impossible to record video. It is for these cases that special programs have been created that are capable of recording calls on Skype.
In our article we will look at several such programs and answer the question of how to record a conversation in Skype.
Recording a conversation on Skype
At the moment, there are many different programs that can record calls in Skype. One such program is Call Graph.
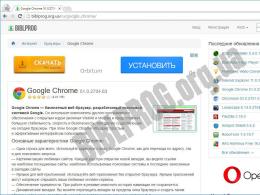
This program can record a call automatically. That is, the user will not need to enable it to record. The program records in mp3 format. Please note that this program is absolutely free. You can download it on the Soft112 website.
Once the installation is complete, the program will ask you to connect to Skype. After that you will be able to use it. It should also be noted that the program automatically converts files from wav to mp3 format.
The latest version of the program allows you to send files to dropbox.
Mp3 Skype recorder
This program also records Skype conversations automatically. You can download it from voipcallrecording.com. A distinctive feature of this program is the relatively small size of the installation file, which is only 2.4 megabytes. The user can configure the program so that it records a Skype conversation with the highest possible bitrate. The user can also schedule the program to automatically launch when making a call. You can adjust the mode, select stereo or mono. The recording of the program itself is carried out by pressing the rec button.
IFree skype recorder
This free program is one of the most popular programs for recording conversations on Skype. This is due to its very large functionality. You can download it from this site. 
The program itself has an intuitive interface. Call recording is done using several buttons. In this case, the user can configure the program so that it starts automatically when the operating system starts. This program also allows you to configure the bitrate, audio sampling frequency, answering machine with user recording, and select mono or stereo mode. The program records audio files in mp3 format.
Record calls and videos
There are programs that allow you to record both calls and videos in Skype. One such program is Free video call recorder. This program supports the Russian language and is absolutely free. You can download it, for example, from the DVDVideoSoft website.

Screen camera
Another type of recording video calls in Skype or other similar applications is the so-called screen camera. A representative of these applications is the screencam program. You can download it on the Screen Camera website.
 The program has a very simple interface. After the installation is complete, you only need to open the window and click the record button, then the program will automatically begin recording your actions that occur on the monitor screen. This way, you can record not only Skype conversations, but also all the manipulations performed. After you finish recording, the program will offer you editing in a special video editor. When editing is complete, the program will save the recording in the specified folder.
Beware of malware
It is worth noting that programs that offer call recording on Skype may be malicious. Typically, such programs have the word “Spy” in their name. These are so-called spy programs that record calls secretly. Often these programs are used by hackers to obtain secret data. Such a program is installed on the victim’s computer, after which it disguises itself and secretly records the call.
This way, the hacker will be able to find out valuable information, such as passwords and names, account numbers, etc.
In this regard, when installing programs of this kind, it is necessary to pay attention to the message that they are requesting access to the operating system of your computer. Also pay attention to signals from your antivirus. As a rule, an antivirus does not respond to such programs, since they are not inherently malicious. If the antivirus reacts to such a program, it should be removed immediately.
All the programs described above are absolutely free and also have localization. And most importantly, they are absolutely safe for your computer.
Skype is the most used program for communicating over the Internet. Using Skype and a laptop, you can conduct telephone interviews, round tables, create tele and video conferences, and also communicate in a regular chat.
But, regardless of the exact purpose for which Skype is used, one day you may need to record one or even several conversations and save them on your computer.
This will allow you to listen to them again over time or pass them on to someone else. But, unfortunately, Skype's functions do not include recording a conversation. This became the impetus for the development of third-party add-ons and programs that could replace the missing capabilities.
In general, there are various solutions, but the most optimal for the average user are MP3 Skype Recorder and iFree Skype Recorder. Both programs presented fully fulfill their main purpose; they are convenient and have an intuitive interface that will not be difficult for even an inexperienced user to understand.
Having studied the operation and characteristics of both options, I preferred the iFree Skype Recorder program. What makes it the best option is its user-friendly interface, flexible settings, several recording modes, and most importantly – excellent recording quality! This will be discussed in this article.
If you want to record a video from Skype, you need to use programs. These programs record both video and sound well.
In this case, Skype will not be different from any other program, everything that happens on the screen or just the program window is simply written to a file, read the article.
Let's take a closer look at iFree Skype Recorder
The program is in English, but it is very easy to work with. It is distributed under a free license and allows you to record all conversations, even conference calls. It can be used both to record the full version of a conversation, and for “one-way” sound recording (for example, only from the interlocutor’s side, or sound from the user’s microphone). All conversations are saved as an mp3 file.
For the impatient, I present a video tutorial:
The most current version can be found at the link:

With the advent of new versions of Skype, it may turn out that not a single add-on will work. Then you need to use screen recording programs.
Now launch Skype and then iFree Skype Recorder. If the program is launched for the first time, it will immediately want to connect to Skype itself. To do this, she will need access authorization, which must be confirmed manually.

The Skype window will pop up in front of your eyes, possibly with the window size changed, and there, in the window that appears, click “Give access.”
If everything went well, then at the bottom left of the program window your login and the phrase “Ready for Recording” will be written.

If it doesn't work, look at the end of the article.
Now the program will automatically capture and record all calls via Skype.
Call recording window
The program only works during calls, i.e. It won’t work to start writing something “just like that,” for example, by talking into a microphone. iFree can start recording in two modes:
- automatic (recording is activated when the conversation starts, and stopped after the end)
- manual (the user controls the start and pause of the recording process independently)
Now let's look at the program window:

1 – User status in Skype
2 – Start/Stop recording
3 – Pause/Resume recording
5, 6 – Program status. The text “Recording in progress” appears while recording is in progress.
7 – Dialog box displaying the recording history, ordered by the time the audio files were created. At any time, the user can select the desired audio file and listen to it (for this, the program has its own player), or go to the folder to transfer/delete an audio track

8 – Open a window with advanced settings (we will return to this later).
9 – Enable/Disable display on top of all windows.
10 – Help window. Essentially, the command simply calls up a page on the program’s official website, which briefly describes how to save records. The site only supports English.
iFree Skype Recorder Settings
The settings dialog can be called up by clicking on the classic “tools” icon (see No. 8 above). The following window should open:

The first tab, “General”, is a list of basic settings. Here you can configure several program launch algorithms. For example, for the program to start automatically when you turn on the computer, you just need to check the box "Start when I start windows".
In the same window, you can give the program a command, according to which, when launched, it will immediately be minimized to the tray (near the clock). To do this, check the option "Hide to system tray startup". The remaining items that are checked by default can simply be left untouched.
Go to the next tab “Call Recording”

Here you can specify when to record and what to record. The first block configures the start of recording:
- If you select Automatically (default), ALL calls will be recorded automatically.
- When selecting the “Manual” mode, the user can enable recording of conversations manually. To do this, press the button with a red circle (see button No. 2)
The second block allows you to select in which direction the recording will be made:
- both sides – sound is recorded from both sides, that is, incoming and outgoing. This way you can record the entire conversation
- my side – outgoing sound is recorded, that is, only your voice
- remote side – incoming audio is recorded, that is, only the voice of the interlocutor
Please note that when recording in both directions, the sound of the interlocutor will also be included in the recording through the microphone if you are not listening with headphones! If the quality suits you, then everything is fine.
And at the bottom you can see a path called “Recording folder”. This item is a place to save the created files. You can go to the folder (the “Open” button), or you can change the storage location (the “Browse” button).
In the “Mp3 Quality” tab, you can configure the quality in which the recorded audio will be stored:

I recommend choosing the “Mono” mode so that voices are guaranteed to sound from both speakers. Select the recording quality in the “Recording Bitrate” block not lower than 128 and the sampling frequency 48000 (the higher the better). The size of the resulting file also depends on these three parameters. But even with maximum settings, an hour of recording will only take up about 100MB of disk space.
The last tab “Chat reply” provides the ability to enable and configure an autoresponder for chat windows. Also, the program has “quick settings”. You can find them by right-clicking on the program icon (usually it is located at the bottom of the screen, on the right). This will bring up the following context menu:

Here you can find already familiar settings, such as selecting the recording direction, turning on/off automatic recording mode and answering machine. From here you can exit the program (“Exit”).
As you can see, understanding how the program works is not at all difficult. Even the lack of Russian localization will not be an obstacle to its development by any user, regardless of computer experience.
Possible problems
If something went wrong and access was not granted, the program window will display the messages “Searching for Skype” and “Waiting to access Skype...”
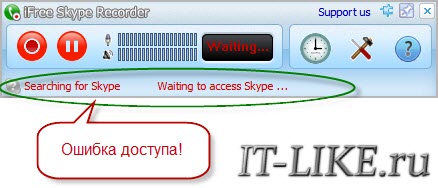
A message like this may pop up on your desktop:

In this case, you need to go to Skype settings and add rights manually. Let's go to the menu “Tools -> Settings -> Advanced” and click the “Control access of other programs to Skype” button.

If there is already an entry about the program, then click “Change” and allow the program to use Skype

If it was empty, then we try everything again: close iFree Recorder and Skype and try to launch it again, only this time first iFree, then Skype.
Among all Skype features, the ability to make video calls is the most popular. It brings a personal touch to the conversation and helps create the feeling that friends, colleagues or loved ones are in the same room with you, and not several thousand miles away. And often during such video calls, users need to record some moments (especially if Skype is used for work), that is, to record the conversation. Is it possible?
Directly - no. Skype developers are in no hurry to add this feature to their brainchild. However, third-party companies are actively developing and marketing applications that allow you to save a video conversation on Skype.
Without programs, recording a Skype conversation with picture and sound is not yet possible.
Rules for recording video in Skype
Before downloading recording programs and using them during communication, remember about Internet etiquette. We communicate more and more on the Internet, and here we have our own rules of politeness. Therefore, before you start recording a video call, you need to warn your interlocutor about this, otherwise you risk ruining your relationship with him.
In addition, there are already a number of countries where recording a conversation without notification not only violates Internet etiquette, but is also punishable by law.
Now, knowing this, you can move on to considering popular solutions that allow you to record video on Skype.
Record video on Skype using Free Video Call recorder
The Free Video Call recorder program for recording video from a computer is very popular among those who regularly record video conversations on Skype. At least because it was designed specifically for this.
This program is freely available on the Internet. You can download it for free from the official website or third-party trackers.
Step 1 – Installation. When installing this program on your computer, carefully read the text in the windows: there will be a suggestion to install additional programs. If you don't need them, uncheck them before moving on to the next step.
Step 2 – Setup. Most likely, Free Video Call recorder will be in English during the first launch. To change the language to Russian, open the “Tools” menu, then “Languages”, and select Russian in the list that opens. Also, when you launch the program for the first time, a message will appear asking you to notify your interlocutor of your intention to record the conversation. Check the box next to the text “Don’t show again” so you don’t see this message in the future.
Step 3 – Record.
The program interface is quite simple and intuitive. The red button records. Black – stops recording and saves the file. A button with two bars allows you to temporarily pause the recording of a video call or pause it. You can select the recording mode and output folder where the recorded video file will be placed. Working with it is simple: you need to start a conversation, click on the red button, and then save the video to your computer by clicking on the “Stop” button. Step 4 – View.
The video will be saved as mp4 and the audio as mp3. You can find it by clicking on the “Show in folder” button.
Recording video on Skype using On-Screen Camera
Screen Camera is another popular program for recording conversations. It's also free, simple, and easy to install.
The main advantage of this program is that the user himself chooses which parts of the screen to record, that is, the potential recording area is not limited to the window with the video of the interlocutor.
Download the download file and run it. During the process, it is recommended to check the box next to the “Add shortcut to desktop” command.

After installing the program, launch it and select the “Screen Record” option.

From this menu, select a recording mode - fragment, window or full screen - and adjust the video size.
To start recording video via Skype, dial the person you are talking to and wait until their image appears on the screen. After this, you can click on the “Record” button in the “Screen Camera”.
The final video can be viewed in the “Created Video” section.
The program also has the ability to edit videos - cut out the necessary fragments, add audio tracks and titles.
The Screen Camera program also allows you to export video in the desired format. Once you've edited your project, select "Create Video" and the program will offer you options for saving the video.