Transferring data from a flash drive to a hard drive. How to recover data from the hard drive of a faulty laptop
After purchasing a new HDD or SSD, the first question that arises is what to do with the operating system currently used. Not many users have the need to install a clean OS, but on the contrary, they want to clone an existing system from an old disk to a new one.
So that the user who decides to update the hard drive does not have to reinstall the operating system, it is possible to transfer it. In this case, the current user profile is saved, and in the future you can use Windows in the same way as before performing the procedure.
Usually those who want to divide the OS itself and user files into two physical drives are interested in transferring. After the move, the operating system will appear on the new hard drive and will remain on the old one. In the future, it can be removed from the old hard drive by formatting, or left as a second system.
First, the user needs to connect the new drive to the system unit and make sure that the PC has detected it (this is done through the BIOS or Explorer).
Method 1: AOMEI Partition Assistant Standard Edition
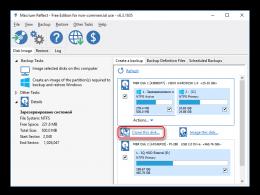
Unlike the previous two programs, in Macrium Reflect you cannot pre-allocate a free partition on the drive where the OS will be transferred. This means that user files on disk 2 will be deleted. Therefore, it is best to use a clean HDD.
- Click on the link "Clone this disk..." in the main program window.
- The Transfer Wizard will open. At the top, select the HDD from which you want to clone. By default, all drives may be selected, so uncheck the drives you don't want to use.
- Click on the link at the bottom of the window "Select a disk to clone to..." and select the hard drive to which you want to clone.
- Once you select disk 2, you can use a link with cloning parameters.
- Here you can configure the space that will be occupied by the system. By default, a partition will be created with no free space. We recommend adding at least 20-30 GB (or more) to the system partition for correct subsequent updates and Windows needs. This can be done using controls or by entering numbers.
- If you wish, you can select the drive letter yourself.
- It is not necessary to change the remaining parameters.
- In the next window you can configure the cloning schedule, but we don’t need this, so just click "Next".
- A list of actions that will be performed on the drive will be displayed, click "Finish".
- In the window asking you to make restore points, agree or reject the offer.
- The OS cloning will begin and you will be notified when completed "Clone completed", indicating that the transfer was successful.
- Now you can boot from the new drive, having first made it the main one for booting in the BIOS. How to do this, see Method 1.


We talked about three ways to transfer an OS from one drive to another. As you can see, this is a very simple process and you usually won't encounter any errors. After cloning Windows, you can check the disk's functionality by booting your computer from it. If no problems are observed, you can remove the old HDD from the system unit or leave it as a spare.
As demands for increased storage space and data security on computers have increased, external hard drives have become a popular data storage option. Most computers and operating systems make it easy to transfer data to an external hard drive. Using an external hard drive will reduce the likelihood of data loss or theft. Additionally, data can be archived and stored on an external hard drive so that it does not take up space on the main hard drive. In most cases, transferring data from your computer to an external hard drive is as simple as inserting the drive into your computer, selecting the files on your computer that you want to transfer, and copying them to the external drive.
To transfer data to an external hard drive, first select an external hard drive that will suit your storage needs. Depending on the type of data, you may need a hard drive with a very large capacity. If you have a lot of pictures, videos or music files, an external hard drive with plenty of space is a great idea. If you plan to transfer data such as documents, a smaller external hard drive will be sufficient. Some external hard drives are small enough to fit on a keychain, which is great for travelers who need to read small files on the go.
External hard drives are connected to the computer with a cable, which often connects to the Universal Serial Bus (USB). External hard drives are also available with other connections such as FireWire. Make sure your computer supports connecting an external hard drive. USB ports are common to most computer systems.
To transfer data, start by connecting an external hard drive by inserting it into the appropriate port. Most computers will recognize the hard drive as a new device, and then test it to determine what it is. The computer will assign a letter to the portable hard drive. This will allow you to transfer data to it just like moving files on your computer.
Select the data you want to move, determine whether you want to copy it to an external hard drive, or whether you want to delete the entire data from the main hard drive. In many cases, you will be able to view the contents of a folder on each drive, and determine which files need to be copied or moved, showing the target to the external hard drive; you can then simply drag and drop the files you want so they can move from one window to another. You can also cut or copy files from the source location and paste them to the destination drive.
Many USB devices are also hot-swappable, meaning they can be plugged in and turned off while the computer is on. To remove a device, use the Disconnect Device from Computer utility. This ensures that the device is not damaged when you unplug and disconnect it. When transferring data, you'll want to make sure it doesn't get lost, so be sure and wait a bit until the computer says it's transferred and you can safely disconnect your external hard drive.
An external hard drive can be used to transfer data from multiple computers. The drive can be connected to any computer with an appropriate port that recognizes the drive. The data on the disk can be seen and manipulated at the user's discretion. This allows multiple users to share the same external hard drive. Plus, it makes portable data quite useful on the go.
External hard drives are much less vulnerable to virus attacks and spyware because they are not permanently connected to the computer. When transferring data, make sure it has been scanned so that you don't inadvertently introduce viruses to your external hard drive.
Has your laptop suddenly crashed? You can't boot Windows, or even run a recovery system from a CD. It is possible that the laptop is so damaged that it is impossible to boot Windows. What to do in such a situation to restore necessary files?
There are two possible solutions to this problem, and we'll look at both. The first thing you need to do is remove the hard drive from the laptop. While this may seem like a daunting task, it is actually a fairly simple process. At the bottom of your laptop, you can see a plastic case that covers your hard drive and RAM. Some laptop models have icons showing where the hard drive and memory slot cover are located. The hard drive is usually located under a large rectangular cover.
Open the cover using a Phillips screwdriver. Typically the cover is held in place by 1-2 screws. Once you lift the lid you will see a 2.5 inch portable hard drive. The hard drive is connected to the motherboard via 2.5 IDE or SATA interface. Open all the mounting screws that hold the hard drive and simply pull it out of the connectors.
The next thing to do is determine the type of hard drive. This can be done using the image below, it shows the difference between IDE and SATA drives.
HDD 2.5" IDE (PATA) interface |
HDD 2.5" SATA interface |

Once you have determined the type of your hard drive, you can recover data using one of two methods:
1. You can connect your laptop hard drive to USB external enclosure"pocket" as shown below. These adapters are available for both IDE and SATA interfaces. They cost about 80-100 UAH. This is the easiest way to recover data like a laptop hard drive will work like external usb drive. Simply insert the hard drive into the adapter case and connect it to any USB port on another computer. The drive will be detected as a regular drive. Open "My Computer" in Windows and you will see familiar partitions on the disk that you had in your laptop. Just copy the necessary files or folders from your laptop’s hard drive to your computer’s hard drive. This completes the recovery of your data.

USB to SATA 2.5 adapter
2. This method assumes that you have access to a desktop PC that has an IDE or SATA interface. If your laptop has hard drive with SATA interface, then it can be connected directly to the SATA connector of the computer. SATA connector for data transfer and power connector, exactly the same as on a laptop and system unit.
Recovering data from a portable drive is a very simple procedure, just like connecting a flash drive to a computer.
Recovering files from HDD IDE 2.5
If your laptop has a 2.5" hard drive with an IDE interface, you will need a special cable to convert the 2.5" IDE to a 3.5" connection.

Adapter ide 2.5 to 3.5
Connect the 2.5 IDE side of the cable to the hard drive from the laptop and the 3.5 side to a free one IDE connector on the computer. Once the hard drive from the laptop is connected to the computer's motherboard, you can turn on the PC and you will see that a new hard drive has been detected. After that, this disk can be viewed and all data can be transferred to another partition.
The user may need to transfer content from one hard drive to another. This is not difficult to do - you just need to connect a second hard drive to the computer and transfer the data.
Instructions
The Windows operating system is, according to most users, one of the most reliable systems. Most likely it is.
But let's face it - anything can take it out of normal operating condition.
Viruses, Malware, low-quality software, Microsoft’s own updates, drivers, incompatible hardware, and a million other reasons why Windows sometimes “delights” its users with blue screens.
Next, you can choose one of several versions of this distribution. We will select the version based on the desktop environment MATE, 32-bit. But you can choose anything - any distribution will suit our purposes.
Advertising
Next, we will be asked to select a mirror to download based on your location. If you are in Russia, you can choose a mirror "Yandex Team", if in another country, choose a server that is closer to you.

Download Universal USB Installer
There are many programs that allow you to burn an image of a Linux distribution to a flash drive. We will use one of them called Universal USB Installer. It is very easy to use, does not require installation, and allows you to select a recording profile for a specific distribution.
The program download page is located at this address.
Try to download from there, otherwise you may end up on a fraudulent link and install something completely different from what you expected.
Writing an image to a flash drive
Now run the program you just downloaded − Universal USB Installer. In the picture below, we see the window in which we will configure the recording. There is no need to be afraid of this window; its complexity is deceptive. In fact, it couldn't be simpler.
Let's look at its settings.

- Step 1: Select a Linux Distribution from the dropdown to put in your USB flash drive. — This item asks us to choose which “family” of Linux our image belongs to. We downloaded Linux Mint, so we choose it accordingly. If you downloaded, say, Ubuntu, then in this drop-down menu you should select it. Otherwise, the program will not “see” the image file.
- Step 2: Select your linuxmint*.iso— This step invites us by clicking on the button
- Step 3: Select your USB Flash Drive Letter Only- here we are asked to select our flash drive. If for some reason the flash drive is not in the list, try checking the box on the right. Here you should also check the box to format the flash drive (make sure you don’t have anything important on it).
- Step 4: Set a Persistent file size for storing changes- quite an interesting point. It allows you to make the disk image “changeable” - additionally install programs, save documents to the Desktop and folders, Russify Mint, etc. We recommend setting the slider to at least 1 Gigabyte (approximately). This will make your flash drive more convenient.
- Treasured button
That's all the troubles. You can drink coffee again. The process will take some time. It all depends on the flash drive, the speed of the hard drive, and the friend’s computer as a whole.

Now the only thing left is to boot from this very flash drive. If you succeeded in everything described above, most likely this will not be a problem for you.

Working in Linux Mint or how to extract data from a laptop hard drive.

After a couple of minutes of downloading, you will receive a fully functional system with which you can transfer data from one of your disks to another. To do this, you just need to open the file manager, find your disks on the left side of it and open them (mount them). And then everything is the same as in Windows -

Epilogue
Nobody said that the second method would be simple. On the contrary, there are easier and more convenient ways. There are plenty of alternative options. There are also ready-made assemblies based on Windows itself.
This method is not a panacea. This is just one way.
But, as mentioned above, in addition to what everything was started for, this system has everything for comfortable work. Browser, email client, image and video viewers, photos. There is also an office suite called Libre Office (a good replacement for Microsoft Office) and much more.
When checking this method, Neoshibka.Ru encountered problems with rights. Files created in Linux Mint (for example, screenshots) did not want to be opened in Windows 8, which for some reason complained about the length of the name and, understandably, write protection. Most likely the author forgot to mention this.
In order for everything to go well, immediately after the first boot of Linux Mint, you need to open a terminal and enter the following commands in turn:
sudo adduser
Then answer a couple of system questions and set a password.
sudo adduser neoshibka sudo //where neoshibka is your username

After this, you need to end the session and log in as your user with the password that you entered a little earlier.