How to format a flash drive with the raw file system. Recovering a Raw Disk
Situations when an unreadable RAW format appears on a computer or laptop instead of a regular partition are very unpleasant for the user. And many simply do not know what to do to bring the disk to normal condition, since the system initially does not recognize the RAW format of HDD disks. How to fix this problem? To do this, you can use several recommended tools, including Windows tools and specialized programs.
RAW format - what is it?
Some users mistakenly believe that the appearance of this format is solely due to the fact that the RAW file system appears instead of the usual one. We restore the disk by rolling back the system state to the previous state, and... the result is zero! Why?
Yes, only because the RAW format is not a file system, but rather the absence of one. This is why the operating system does not see the hard drive or logical partition (damage may also affect partition tables).
Sometimes the system can perceive a damaged HDD, but there is no information that should supposedly be present on it. That is, it is there, but it is impossible to read it. However, often when you try to access such a partition, Windows immediately displays a message about the need to format it before further use. Unfortunately, formatting does not always give the desired effect, and the information is destroyed. It will be very difficult to restore it later, although special programs can be used. But this is not the best method that allows you to convert the RAW format of HDDs. How to fix the situation with saving information? For such purposes, you should first turn to the system’s tools, which will be discussed separately.
Why is the format changing?
Among the reasons that cause the replacement of the desired format with an unreadable one, the main place is occupied by purposefully acting viruses, power surges, sudden power outages in the process of performing some system or user operations, etc.
It also happens that the system defines the hard drive as RAW, files and folders seem to be displayed, but it is impossible to do anything with them (copy, open, move, delete). In this case, you cannot even format the partition, change the volume label, or change its conditional or actual size.
RAW format of HDD disks: how to fix it using the simplest method?
The very first thing to do is to use the command console and run as administrator. You can call it from the “Run” menu (Win + R) using the cmd line.
The chkdsk command is used as a universal tool for restoring the format without data loss. Please note that if the system partition is damaged, you can only call the command line if you boot from removable media such as a LiveCD, a Windows installation disk, or from a bootable flash drive. As a rule, the combination Shift + F10 is used to open the console.

To run the command itself, you need to know the drive or partition letter (the so-called volume label). Let's say the damaged partition in the system is designated by the letter “D”. In this case, the command to be written will look like this: chkdsk d: /f. After entering it, you need to press the Enter key and wait for the file system recovery process to complete, after which you must restart the computer.
RAW format of HDD disks: instructions for using partition management tools
Windows has another powerful tool in the form of the Disk and Partition Management utility. It, along with the above command, is capable of restoring the RAW format of HDDs. How can I fix the partition format using it? It's also easy. It’s just worth considering that this technique is designed exclusively for those cases when there is no data in the section.

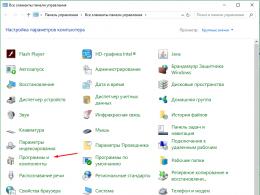
First, through computer administration or using the diskmgmt.msc command in the Run console (Win + R), you need to call the built-in Disk Management system utility. Next, on the selected partition that has a damaged format, you should right-click and select the formatting line from the context menu.


If the system displays an error or formatting error message, in order to restore a RAW disk, initialization will first be required, followed by the creation of a simple volume. After completing these steps, formatting will be performed, and the disk or partition can be used again for your needs.
Using the TestDisk application
Interesting opportunities for recovering the HDD format are provided by the free TestDisk utility, which is designed as a portable version and does not require installation on the hard drive.

After launching the program in simulating DOS mode, you need to select the Create line, and then specify the disk that was converted to RAW format (you need to select the disk, not the partition). Next, the section style is set (this is usually done automatically).

At the next stage, select the analysis line (Analyze), press Enter, then Enter again with the Quick Search item selected.

In the analysis results, partitions for recovery will be marked in green with the letter P, those to be deleted will remain gray with the letter D. If you need to change the attribute from P to D, arrows are used.

To continue, press the Enter key again, select the Write button from below, then use Enter again, and press Y (Yes) to confirm the action. When the conversion is complete, all that remains is to restart your computer.
MiniTool Data Recovery utility
This program is also capable of restoring the RAW format of HDD disks. You can fix it as follows.

After launching the utility, a tool called Lost Partition Recovery is selected, the RAW partition is specified, and Full Scan is activated.

At the end of the scan, all files and folders that are in the partition with the changed format will be shown. They can be copied to another location, and then formatted in the application itself, or use the methods described above for this.
According to most experts, the program is good in everything (it works quickly, reliably and stably), but it has one huge drawback - it belongs to the category of shareware applications. The limitations in the trial version include the fact that using this utility it will not be possible to recover partitions larger than 1 GB (but you can also find distributions with activators on the Internet, although their use is illegal from the point of view of international law).
Recovering partitions in DMDE
DMDE is another program for converting disks and partitions of any type from the RAW system to the normal format.

In the application, you select a physical disk with a RAW format (do not uncheck the partition display line!), which can be visually identified by underlining, color mark, size or file system, after which you need to select it and click the open volume button just below. Next, you should check the contents by clicking the show sections button. If this is exactly what is required, the restore button is then used, then the operation is confirmed, and at the end of the process the “Apply” button is pressed. To avoid errors, although this is not required, it is advisable to reboot the system.
A few final words
These are the main methods for restoring a damaged HDD format. Only the most popular tools and programs were listed here. You can find many other interesting utilities on the Internet, but all of them, as evidenced by reviews from experts and users, work on similar principles.
When changing the format on the system partition, the same methods are used, but in this case the boot is done from removable media, and the main tool is exclusively the command console or portable versions of the above-described applications (for example, TestDisk).
As you know, if the structure of the file system of a logical disk is damaged in any way, the operating system and all programs that are accustomed to a clear and harmonious structuring begin to experience difficulties in determining the type of file system of the damaged partitions. In such cases, a meaningful entry appears in the “logical disk properties” line: RAW. Here are just a few possible reasons for its occurrence: hardware failure, software failure, virus invasion.
For one reason or another, incorrect values for a logical disk appear in the partition table (for example, MBR), or damage occurs in the system boot sector or in the MFT area (main file table in the NTFS system). You can try to correct minor errors in system data; if things are really bad, you can at least restore the necessary files.
Fix bugs? Maybe!
At its core, RAW is not a separate file system type. Your disk was and remains formatted in FAT or NTFS. However, it will no longer be possible to work with it according to the standard scheme - the disk simply will not open or will require formatting. And if you intend to save as much information as possible stored on a broken disk (yes, it hasn’t disappeared anywhere yet!), we strongly do not recommend agreeing with the latter. It may not be possible to return the “FAT” or “NTFS” entry to the disk properties. But it’s easy to recover all the necessary information from it!
So, first, let's find out whether our file system is actually RAW. We check the “properties” of the disk through the context menu in the “My Computer” tab. If the “type” line says “local disk” and the “file system” line says “RAW”, it’s time to start the data recovery process. By the way, for this it is better to choose a proven and effective recovery program. If your data is really important to you, it is better not to be seduced by dubious offers with promises of all kinds of “bonuses”.
Second life of the system...
RS Partition Recovery is a reliable tool for recovering data from inaccessible, formatted, broken disks. In most cases, the program is capable of recovering partition data even after severe damage, reconstructing a logical drive, and resuming system operation literally from scratch!
Even if you managed to format a disk with a damaged structure, it is possible to save your data! The “deep analysis” function used by RS Partition Recovery will scan and analyze all fragments of data saved on the disk, and based on them, it will recreate the partition structure and return the disappeared files in a form completely suitable for further use.
How to do this?
A smart program can bypass the blocking of access to the partition structure, which is activated after the system is converted to RAW. Moreover, if you did not have time to format the disk, recovery will be really quick and painless. If the goal is to get your data back after formatting, just be patient. The results of RS Partition Recovery are worth it!
Just download and install the program (on any disk or other media except the one being restored), start scanning the required disks. In a new program window you will see all files available for recovery. Save them - also on any disk other than the one being restored.
The “Preview” functions and sorting files according to various parameters will make working with recovered information faster and more convenient. Use a competent program - and forever forget about all the unpleasant emotions associated with the word “RAW”!
How to recover a disk partition?
It doesn’t matter what kind of drive it is: a computer hard drive, a portable USB hard drive or a USB flash drive. The cause of the failure can most often be viruses. In this case, when you try to open the disk, Windows reports some unfortunate information that cannot please you in any way, for example: " The drive in the device [drive letter] is not formatted. Should I format it?"
If the disk file system is recognized as RAW, reading data, assigning a volume label, and other operations with this partition (for example, defragmentation or checking for errors) become impossible. In this case, the operating system displays the size of the partition and, when accessing it, offers to format it:
If you are faced with a similar situation, then under no circumstances press " Yes", if the disk contains the necessary files. After formatting, they can, of course, also be recovered with the help of professionals or specialized file recovery programs, but the likelihood of success may decrease, and it is still better to do this from the very beginning.
If you look at the properties of this flash drive, you can see its zero size and RAW file system:

RAW- designation for an undefined file system, in operating systems of the Microsoft Windows NT line. In fact, RAW is not a file system, and defining a partition's file system as RAW means that the partition was not recognized by any of the file system drivers installed on the system (for example, FAT or NTFS). This usually means that the partition is not formatted or the file system structure is damaged.
RAW file system– the type of file system of a logical disk determined by the operating system (and other programs) in case of partial destruction in the file system structure, for example, such as FAT or NTFS.
Possible reasons defining the file system as RAW:
Damage to the file system structure occurs as a result of computer or program failures, as well as due to the activities of various types of malicious programs. The following damages can be identified:
- incorrect values for the partition in the partition table (for example, in the MBR);
- partial destruction in the boot sector of the file system;
- destruction in the area of the main file table MFT (for the NTFS file system);
- When formatting a partition, the file system may appear as RAW.
One possible reason is that erroneous data is written to the boot sector or MFT. If most of the file system structures remain intact, there is a high probability of file system recovery.
If you look at the zero (boot) sector of the disk, you can see that not everything is good:

Anyone who is a maniac or a fairy can figure it out and manually correct the zero sector. It’s not a fact that it will work out the first time and you won’t lose anything extra. It is best to use a program that does not care about the displayed RAW file system and shows all the files and folders on the flash drive in its interface in the form of a familiar explorer.
There are several ways to save files from the RAW file system:
1. Using the program MiniTool Power Data Recovery
As a result, all the files were copied to another disk, the problematic hard drive was formatted, after which the files were returned to their place. This is the most reliable way if you are not fairies :). This has been written in detail .
The disadvantage of this method is that you need to have enough free space on another disk to temporarily store all the files from the damaged disk. This method also takes quite a long time.
2. Using the utility Check Disk
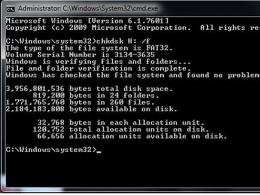
Open the Start menu -> Run -> type in chkdsk E: /f, where instead of the letter E is your letter of the damaged drive.


Depending on the size of the disk (flash drive), after a few minutes the disk will be visible as a normal disk with the NTFS file system instead of RAW, and all the files are in place!
Attention! This method is applicable only to flash drives and hard drives with the NTFS file system! If you had a FAT or FAT32 file system, then restoring a RAW disk using this method will not work.
3. Using the TestDisk program
If the first two methods are not applicable, use this option.
TestDisk can:
- Correct the partition table, restore deleted partitions;
- Restore FAT32 boot sector from backup;
- Rebuild (reconstruct) the FAT12/FAT16/FAT32 boot sector;
- Correct FAT table;
- Rebuild (reconstruct) the NTFS boot sector;
- Restore NTFS boot sector from backup;
- To restore MFT using MFT mirror;
- Define backup SuperBlock ext2/ext3/ext4;
- Recover deleted files on FAT, NTFS and ext2 file systems;
- Copy files from remote FAT, NTFS and ext2/ext3/ext4 partitions.
All users encounter bad situations when working at a computer, no matter what anyone says, sooner or later this happens. One of the problems is a malfunction of the hard drive. In a Windows system, you can find the disk file system - RAW. In fact, this designation is not a file system, as it indicates a disk error. The system tries to recognize the specified disk structure, and if this fails, the disk is marked as RAW.
Before using the drive, you need to format it;
- The disk properties indicate the RAW file system;
- A window appears about the absence of a sector;
- Other error messages.
Reasons for the appearance of RAW
- Incorrect shutdown of the computer;
- Unstable voltage;
- Poor SATA connection to the hard drive;
- The presence of so-called “bad” blocks (bad blocks);
- Cable damage;
- Damage to system files;
- The presence of virus software in the system;
- Hard drive failure.
The danger of this problem is that if you format or do another incorrect action, you will completely clear the partition. This will, of course, restore the disk's functionality, but this method is almost always not useful. Now let's try to figure out how to convert a RAW system to NTFS without losing data.
At first, you need to use the simplest methods to solve the problem. As practice shows, many problems are solved by restarting the computer. If the failure turns out to be serious and this procedure did not help, read the following points.
#2 – Checking cable connections
If you have a desktop computer, then completely turn off the power, open the system unit and check the connections of the wires to the hard drive and system board. Try disconnecting them and reconnecting them.
Carefully examine each wire, make sure that they are all intact and not damaged.
If you do not have a computer, but a laptop, you can also open it and check the internal components. If you lack repair skills and proper prevention, you should turn to professionals.
If you have a hard drive connected via USB, the easiest method is to connect it to another USB connector.
Try the above methods and then move on to software solutions.
#3 – Using the CHKDSK utility
In Windows, as a utility for checking the drive, there is one that corrects file system problems. This will come in handy for us.
We launch the command line as administrator (you can right-click on the Start menu and select the appropriate item);
Enter the command "chkdsk D: /f"(the /f attribute allows the utility to correct errors on drive D);
As a result, you will receive a fixed partition with NTFS and saved data, or this method will not give a positive result.
#4 – Checking the integrity of system files
As I said above, the problem may be hidden on the system side, that is, the system files are damaged. Sometimes their integrity can be restored. We read:
- Launch the command line;
- Enter a simple command - sfc /scannow
- We are waiting.
As a result, one of two answers is displayed: the scan did not reveal any integrity violations, or some files cannot be recovered.
#5 If the system does not boot
If the system disk has come under attack, or due to RAW partitioning Windows for some reason refuses to work normally, all of the above actions with the command line are performed using a boot disk or flash drive, or safe mode.
The first option is this: you create a bootable USB flash drive with the version of Windows that you have, for example, “ten”. After booting, you get to the point where you need to select a partition to install the system. In this window you press keys Shift+F10. A command line window appears. Execute all the above commands.
What to do if you don't know the drive letter?
In this case, we will use the diskpart utility:
- On the command line enter the command diskpart ;
- Next we enter list disk to display disks;
- Now we register list volume– display of disk partitions;
- In the window you will see all your partitions, then look at the file system type volume. We are interested in RAW and the drive letter (Name).
Now you can run commands to check the disk and restore integrity. For now, these are the only options for restoring the drive without deleting data.
#6 Use antivirus utilities
The RAW procedure in NTFS without data loss can be implemented using anti-virus programs. Of course, you can check your computer with installed antiviruses, such as Avast, Windows Defender and others. It won't be effective. You need to download the following utilities and check your PC with everyone:
#7 Regular hard drive formatting
So we come to the method where we have to completely clear the partition. This is done only if there is nothing important on the disk, or all the options described at the beginning of the article did not help. Let's try to convert RAW to NTFS.
Press the keyboard shortcut Win+R and write the following:
diskmgmt.msc
The disk management utility will immediately launch, where the volume in the RAW system will be indicated. Right-click on it and select from the context menu "Format".
#8 Using the Recuva utility
Download the program from the Internet, install and run. At the top, in the drop-down section, select the problematic section that needs to be fixed.
Press the button "Analysis" and wait.
Depending on the number of files on the disk and its size, over time a large list of files that you can recover will appear in the window. Simply tick the required volumes (everything is possible) and, by right-clicking on any object, select the option "Restore selected".
This way you can recover files deleted after formatting.
#9 Using MiniTool Power Data Recovery
There is a good utility for working with disks. It’s easy to find on the Internet, download and install, so I won’t dwell on such things.
Having launched the program, go to the section "Lost Partition Recovery".
Select a partition with the RAW file system and press the button "Full Scan". We are waiting for the file search process to complete.
Select the files you want to save and click "Save".

Specify the location to save the data.
When the files from the disk are restored, you can safely format it.
#10 Advanced option: TestDisk utility
Let's consider the last option as one of the more difficult ones. You need to download the TestDisk utility.
Find the file in the archive with the tool testdisk_win.exe, which you run with elevated privileges. Something like a command line opens.
- Use the arrows to select an option "Create" and confirm with the Enter key.
- Use the arrows to select a disk with the RAW file system, and confirm the action with the ENTER key.
- At the next stage, immediately press Enter.
- Choose an option "Analyse" .
- Click on the option "Quick Search" .
- After displaying damaged volumes (in our case RAW). Then press the key "r" to display the data of this section or sections.
- Use the arrows to select an option "Write"- press Enter.
- If the volume is unsuccessfully found, select the option "Deeper Search" and repeat all the commands again.
Imagine inserting a flash drive into your computer and seeing a message: “To use the drive in drive F:, first format it. Do you want to format it? If it's a new flash drive, no questions asked, but what if there was data on it? Then don’t rush to agree to formatting - perhaps there is a chance to save them.
First of all, you can try to take a chance and fix errors using Windows. To do this, open the console as administrator and write:
Chkdsk f: /f
Naturally, f: will need to be replaced with the current disk name. The /f option means error correction during scanning.
If the operation was successful, you can try opening files. But it may also happen that you will see the error “Chkdsk is not valid for RAW disks.” Don't despair, we have a couple more options in stock. Let's use a special program DMDE.
DMDE is a very cool program that is useful for searching, editing and restoring data on disks. The developer reports that it uses clever algorithms, thanks to which it can restore directory structures and files in difficult cases when other programs do not give the desired result.
DMDE has a disk editor, a simple partition manager, the ability to image and clone disks, rebuild RAID arrays, and so on. Paid editions support the recovery of files and directories without restrictions, but the free version is also very good and in many situations helps just as well.
After launching the program, select our media.

A partition window opens, where we double-click to select a full scan.

After a quick scan, you need to go one level higher to the “Found” folder and click “All found + reconstruction”. A dialog will open where we select “Rescan current file system” and wait for the end of the operation.

After scanning, DMDE will show a list of found files. We look through the folders and choose what to restore. Unfortunately, you cannot restore entire folders in the free version. To restore one file at a time, right-click and select “Restore object”, then indicate where to restore and click OK.

It is worth noting that file names are generated automatically and often do not correspond to the original ones. Don't be surprised if some files come out broken or artifacts appear in your photos. By the way, images can sometimes be restored using one of the special utilities. For example, Recuva, R-Studio and “PhotoDOCTOR”. To my great surprise, the latest program restored almost dead photographs in very good quality and with a minimum of artifacts - many of its competitors could not cope with this.
In general, good luck in your recovery! But it’s better, of course, to immediately rewrite all data from temporary media and make backups.