Reset the Windows Update agent and service configuration. How to “fix” Windows Update Reset Windows 10 Update settings
Hello Vladimir! I have a whole saga with restoring the storage of original Windows 10 components. I need your advice, I think I will understand you, since I consider myself an experienced user!
Windows 10 installed on my laptop works with significant errors. I decided to check the integrity of system files using the sfc /scannow tool, but the error came up: “ Windows Resource Protection has detected corrupted files, but is unable to repair some of them" As I understand it, this error means that the integrity of the Win 10 system components storage itself (WinSxS folder) has been compromised. Then I decided to check the integrity of this very repository with the command , came out message " " . Accordingly, I restore the storage with the command, this command restores the component store using Windows Update, and again I get the error« Failed to download source files. Specify the location of the files needed to restore the component using the Source option».
It’s not clear why the error came out this time, because I have the Internet. Okay, I think I'll use it for recoverycomponent storage tool PowerShell and ISO image of Windows 10, downloaded the Windows 10 distribution and connected it to the virtual drive, launched PowerShell and entered the command: Repair-WindowsImage -Online -RestoreHealth -Source F:\sources\install.wim:1(where bThe letter “F” corresponds to the letter of the connected image with Win 10, and the number “1” corresponds to the edition index in the Win 10 PRO image (that’s what I have installed), but once again I failed -« Error: 0x800f081. Recovery failed. The recovery source was not found or the component store cannot be recovered».
On one well-known forum they suggested that there is no need to connect Windows 10 ISO image to virtual drive, but needs to be mountedISO image with Win 10 files into a folder using the command: Dism /Mount-Wim /WimFile: F :\sources\install.wim /index:1 /MountDir:C:\WIM /ReadOnly(Where WIM, this is an empty folder on the C: drive where you mount ISO image, and F:\sources\install.wim is the location of the install.wim image file ), but here too I made a mistake during installation"Error: 11. An attempt was made to load a program that was in an incorrect format.».
In short, I gave up and don’t know why I can’t do anything.
Recovering a damaged Windows 10 Component Store using DISM
Hello friends! The purpose of this article is to tell novice users in detail how to restore a damaged Windows 10 component store in various critical situations.
If you want to check the integrity of system filesin your operating system, the built-in utility will help you with this “ sfc /scannow » , but if it gives an error: "Windows Resource Protection has detected corrupted files but is unable to repair some of them,"
that means in yours OS The integrity of the system component storage itself (the contents of the folder) has been compromised. In this case you need to check integrity of the component store with the command " Dism /Online /Cleanup-Image /ScanHealth»,
if during this checkVarious errors will also appear, for example:« Component storage is recoverable»,
«
Error: 1910 The specified object export source was not found»,
« Error: 1726 Remote procedure call failed»,

then in this case you need to first restore the component store, and only then restoreintegrity of system files using"sfc /scannow" , this is where the fun begins, since there are a lot of nuances, let's look at them all.
We use it to restore damaged storage CDeployment Image Servicing and Management (DISM) system
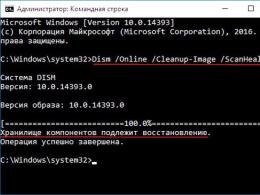
Launch an administrator command prompt and enter the command:
DISM /Online /Cleanup-Image /RestoreHealth
- This command restores the component store using Windows Update (you must have internet access), the missing components will be downloaded from Microsoft servers and restored to your system.
Restore completed successfully

But if this command produces error 0x800f0906 "Failed to download source files. Specify the location of the files needed to restore the component using the "Source" option or

another one will come out error 0x800f081f« Could not find source files. Specify the location of the files needed to restore the component using the Source option»

That's what you need use for storage recovery.
Download the Windows 10 distribution kit from the Microsoft website and connect it to the virtual drive (in my case (G:)), then go to the folder sources and look at the compression of the Windows 10 image file,

usually install.esd , remember this, it will come in handy when entering subsequent commands (if in your case you come across a fileinstall.wim, then read the information at the end of the article).

Accordingly, enter the following command:
Where G:- letter of the virtual drive with Windows 10,
Install.esd- Win 10 image file,
/limitaccess- a parameter that blocks access to the update center (after all, we use the Win 10 distribution for recovery)
The restoration was completed successfully. The operation was completed successfully.

This is the way you and I Restored damaged Windows 10 component storage!
The component storage has been restored, now we restore the integrity of Windows 10 system files using the “sfc /scannow” command.
Windows Resource Protection detected damaged files and successfully repaired them.
The integrity of Windows 10 system files has been restored!

Another way to restore a component store using a VHD virtual hard disk file
Friends, but I want to tell you that in particularly difficult cases, when entering the command
Dism /Online /Cleanup-Image /RestoreHealth /Source:G:\Install.esd /limitaccess you will again receive an error, for example: “Error: 1726 Remote procedure call failed”,

in this case you need to do this.Create a virtual hard disk and unpack the contents of the install.esd image file onto it, then run the command:
«»,
Where D: - letter of the connected VHD virtual disk with deployed Windows 10 files.
As a result, the component storage will be restored using the operating system files unpacked onto the VHD virtual disk.
Go to Disk Management and create a VHD virtual disk.
“Action”-->“Create virtual hard disk”

Check the “Dynamic Expandable” option.
The size of the virtual hard disk is 20 GB.
Click on the “Browse” button.

In Explorer, select the location to save the virtual hard disk.
I'll select drive (F:). I assign a name to the virtual disk - “Win10” and click the “Save” button.


The created virtual disk is represented in Disk Management as unallocated space (Disk 1) of 20 GB in size.

Right-click on Disk 1 and select “Initialize Disk”

By and large, it doesn’t matter which box you check: MBR or GPT.
I will check the box “Table with GUID partitions (GPT)” and click “OK”

After initializing the disk, we create a simple volume on the unallocated space.

A new volume (G:) has been created.

Operating system archives - install.esd or install.wim may contain several other archives (releases) of operating systems (Pro, Home, etc.) and these images are assigned indexes 1, 2, 3, 4. To find out which Images located inside our install.esd file, enter the command:
Dism /Get-WimInfo /WimFile:G:\sources\install.esd
Where G: letter of the virtual drive with Windows 10,
Sources\install.esd - address of the install.esd image file in the Win 10 distribution.

Windows 10 PRO is installed on my computer and that is what I want to restore. The Win 10 PRO image I need has index 1.
Enter the command:
Dism /apply-image /imagefile:G:\sources\install.esd /index:1 /ApplyDir:D:\
Where G:\sources\- address of the install.esd file location,
index:1- Windows 10 PRO index,
D : - connected virtual disk VHD (partition D:).
The operation was completed successfully.

The install.esd file (Win 10 PRO) is deployed to a VHD virtual disk (partition D:).

Well, now we restore the component storage and count the Win 10 operating system files unpacked onto the VHD virtual disk (partition D:) with the command:
Dism /Online /Cleanup-Image /RestoreHealth /Source:D:\Windows /limitaccess
The restoration was completed successfully. The operation was completed successfully.

This is another way we restored the damaged Windows 10 component storage! T Now we restore the integrity of Windows 10 system files using the “sfc /scannow” command.
At the end of the article you will need the following information:
If in the Windows 10 ISO image, in the sources folder, you come across the install.wim file instead of the install.esd file, then the recovery command will change slightly:
Dism /Online /Cleanup-Image /RestoreHealth /Source:G:\install.wim /limitaccess(component store restore command).
It is impossible to come up with a single operating system that could satisfy the needs of all users at the same time. Although Windows 10 was declared as the best OS at the moment, it still cannot be called ideal. To keep the system up to date, it is necessary to install updates, but even during this process, problems often arise in the “ten”.
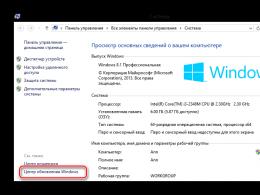
Where is Update Center located in Windows 10
In Windows 10, developers decided to experiment a little by adding an “additional control panel” called Settings. With this they killed two birds with one stone. Firstly, the classic “Control Panel” has been relieved of some elements, including the “Update Center”. Secondly, the basic computer settings that users most often change were collected in one place.
You can open “Update Center” in Windows 10 by following the path: “Windows Settings” - “Update and Security” - “Windows Update”.
Find "Update" in the "Update & Security" section of "Windows Settings"
There are several ways to open Windows Settings:

Problems with Update Center
Oddly enough, the process that is responsible for the security of the operating system often fails. When updating the OS and its components, you may encounter various errors, freezes when trying to update, and the disappearance of the “Update Center” from the settings panel.
Why does Update Center freeze or work with errors?
There are many reasons for problems with Update Center, but the main ones can be counted on one hand:

All of the above can lead to fatal problems not only with the operating system, but also with the computer’s hardware.
Windows 10 Update Troubleshooter
The developers made sure that simple Update Center problems could be solved using standard methods. For example, a person who uses the update service eventually came to his senses and decided to turn it back on, but forgot how to do it. The Windows Update Troubleshooter service can help with this situation and similar problems.
This service is located in the “Troubleshooting” section in the “Control Panel”:
- Right-click the Windows icon in the lower left corner of the screen and select Control Panel.
Using the Windows context menu, open Control Panel
- Change the view to large or small icons. Go to Troubleshooting.
Go to "Troubleshoot"
- Click on the link of the same name in the “System and Security” item to launch the error correction wizard.
- Click the "Next" button in the wizard window. All subsequent work will be done by the program itself. Errors that the master can handle will be corrected by him himself.
- Review the completion report.
Upon completion of his work, the troubleshooter will provide a report
Video: how to fix Update errors using Windows tools
"Update Center" in Windows 10 does not download updates, downloading stops at percentage points
There are often cases when Update Center refuses to download updates or gets stuck at some percentage during download. These errors usually occur due to corruption of the update cache or some error occurring in it. To solve this problem, you need to clear the cache:

Video: how to clear the update cache in Windows 10
Popular Windows 10 Update errors and their fixes
Update Center, as a rule, assigns a special code to errors, which can be used to find a solution to the problem.
Error code 0x80248007
Error code 0x80248007 means that Windows Update is missing some minor files or the OS has licensing issues if you are using a pirated or unactivated copy of Windows. In the second case, the solution will, of course, be to activate the OS. The first one will help you with the Windows Update Troubleshooter. Don’t forget to restart your computer after the wizard finishes.
Error 0x80080005 indicates that the files required for the update are not currently available.
Error code 0x80080005 means that some update service files are not available
This error may also occur due to Microsoft servers being unavailable. Try disabling your antivirus software and downloading updates again.
If this doesn't help, check your hard drive for errors. To do this, enter three commands in the Command Line:
- sfc /scannow;
- exe /Online /Cleanup-image /Scanhealth;
- exe /Online /Cleanup-image /Restorehealth.
Be sure to wait until the command finishes running and only then run the next one.
If both of these methods do not solve the problem, reset the Update Center settings to factory settings, as shown in the instructions below.
Error code 0x800705b4
Code 0x800705b4 indicates that an Internet connection error occurred while the update service was running. Check the connection cable: it may be bent or damaged by pets. If the physical connection is normal, check your Internet software settings:
- Right-click on the network icon in the lower right panel. From the menu, select Network and Sharing Center.
Through the icon on the taskbar, open the “Network and Sharing Center”
- Select the connection through which the Internet is supplied to the computer, click the Ethernet or “Wireless Connection” link. It depends on your connection type.
Open the properties of the active Internet connection
- Click Properties.
The “Properties” button displays the entire range of connection settings
- Select "IP Version 4 (TCP/IPv4)". And click "Properties" again.
Go to properties "IP version 4 (TCP/IPv4)"
- Change the DNS server checkbox to the second position and manually enter your preferred DNS server:

- Accept the changes with the “OK” button. Restart your computer.
If the cause of the error is not in the provider, the instructions should help.
Error code 0x80070057
Error 0x80070057 is one of the “standard” database errors. To eliminate it you need to:
- Scan your computer for viruses.
- Check the disk for errors.
- Delete the update cache.
Do everything similarly to the methods described above.
Error code 0x8024402f
Error 0x8024402f in most cases indicates that the “Windows Time Service” is disabled, and this leads to time resynchronization. The service must be enabled and the computer restarted.
- Call the context menu of the “This PC” icon and click “Manage”.

Error code 0x80070643
Error 0x80070643 occurs when you try to update a .NET Framework component.
There are two solutions:
- download the .NET Framework repair tool and try to restore the service;
- uninstall .NET Framework and install a new and clean distribution without errors.
Error code 0x8024401c
Errors with code 0x8024401c are divided into two types: simple and complex. Of course, having received such an error, it is difficult to understand what type it is, but treatment still needs to start somewhere. The first step will be to run the troubleshooter, if the error is simple, then the repair wizard will correct and eliminate it. If this method does not help, then the error can be considered complex. To deal with it, you will have to return the factory settings to the Update Center.
How to reset Windows 10 Update components to factory settings
A situation may arise where it will be difficult to return all the settings back, but it’s worth a try. To do this, call the “Command Line”:
- Write the commands one by one that will disable all services associated with the Update Center:
- net stop bits;
- net stop wuauserv;
- net stop appidsvc;
- net stop cryptsvc.
- Enter the Del command “%ALLUSERSPROFILE%\Application Data\Microsoft\Network\Downloader\qmgr*.dat”, which will delete the necessary files from the specified directory.
- Enter the command cd /d %windir%\system32, which will start re-registering the Update Center files.
- Enter the names of each of the following files in turn:
- regsvr32.exe atl.dll;
- regsvr32.exe urlmon.dll;
- regsvr32.exe mshtml.dll;
- regsvr32.exe shdocvw.dll;
- regsvr32.exe rowseui.dll;
- regsvr32.exe jscript.dll;
- regsvr32.exe vbscript.dll;
- regsvr32.exe scrrun.dll;
- regsvr32.exe msxml.dll;
- regsvr32.exe msxml3.dll;
- regsvr32.exe msxml6.dll;
- regsvr32.exe actxprxy.dll;
- regsvr32.exe softpub.dll;
- regsvr32.exe wintrust.dll;
- regsvr32.exe dssenh.dll;
- regsvr32.exe rsaenh.dll;
- regsvr32.exe gpkcsp.dll;
- regsvr32.exe sccbase.dll;
- regsvr32.exe slbcsp.dll;
- regsvr32.exe cryptdlg.dll;
- regsvr32.exe oleaut32.dll;
- regsvr32.exe ole32.dll;
- regsvr32.exe shell32.dll;
- regsvr32.exe initpki.dll;
- regsvr32.exe wuapi.dll;
- regsvr32.exe wuaueng.dll;
- regsvr32.exe wuaueng1.dll;
- regsvr32.exe wucltui.dll;
- regsvr32.exe wups.dll;
- regsvr32.exe wups2.dll;
- regsvr32.exe wuweb.dll;
- regsvr32.exe qmgr.dll;
- regsvr32.exe qmgrprxy.dll;
- regsvr32.exe wucltux.dll;
- regsvr32.exe muweb.dll;
- regsvr32.exe wuwebv.dll.
- Start Winsock with the netsh winsock reset command.
- Revert your proxy settings using the netsh winhttp reset proxy command.
- Start the Update Center services and its accompanying services:
- net start bits;
- net start wuauserv;
- net start appidsvc;
- net start cryptsvc.
- Restart your computer.
Working with Windows Update is easy. Problems that arise can be solved on your own, without involving professionals. And keeping the system up to date will save your time and ensure data security.
Today we’ll look at how to reset Windows 10 to factory settings and roll back the system to the state of just the installed operating system. The topic requires detailed consideration due to the virtual absence of these functions in previous editions of Windows and the concept of storing an image to roll back the state of the operating system.
The beauty of the “ten” here is that to implement the procedure described above you do not need an installation disk, a bootable flash drive with software like True Image, or an image of a working system.
Attention, you should proceed to follow the instructions only as a last resort, when the only solution to the problem is to re-install Windows 10. When the instructions fail, simply install the operating system, making sure that no data is damaged in the process.
All emerging and possible problems accompanying the process of rolling back the “tens” are discussed in the last section. If you encounter one of them, move to the bottom of the page.
Before you learn how to reset Windows 10, you should know why you should reset it in the first place. Returning the operating system to its original state is necessary in cases where it is not functioning properly and a return to normal operation is not possible.
The function is also a complete replacement for reinstalling Windows 10, but with some advantage: saving personal files (documents, application settings).
Performing a reset from a running system
This method of resetting the “tens” is only possible when it starts. Everything is done quite simply.
1. Call up the new “Options” menu (this is most quickly done using the “Win + I” combination).
2. Click on the “Update and Security” element.
3. Go to the “Recovery” subsection.

4. In the first section of the window that appears, click on the “Start” button.
It happens that the operating system reports that it is unable to find the files required to perform an operation. In this case, go to the next section of the article.
5. Select the most suitable option from those proposed (the first is recommended, but it all depends on the situation).

Next comes the branching: if you chose the second method, you will be prompted to format the disk or simply clean it. Here too, everything depends on the situation. For example, when you are going to sell a computer, the option of completely wiping the disk is better, but the process can take a long time if the hard drive is large or there are many bad sectors on the surface of the magnetic plate.
6. In the last window, click “Reset” if you haven’t changed your mind.

The button will start the process of automatic installation of the operating system, during which the PC will restart 2-3 times. As a result, the computer will start with the new operating system.
When you select the option to save personal data, the Windows.old directory will appear on the system partition, where a copy of all files from the previous Windows 10 is stored (for example, the contents of the desktop, the “Downloads”, “My Documents” directories).
Clean installation of "tens" using the Refresh Windows Tool
One of the first Windows 10 August updates for 2016 introduced the Refresh Windows Tool, which allows you to roll back the operating system or reinstall it while saving user documents.
The utility copes with system rollback in situations where the first method did not work for some reason.
1. As before, go to the recovery options.
2. In the last section, click on the icon “Find out how to start over with...”.

3. After this, the Microsoft website will open in the browser, where at the bottom you need to click: “Download the tool now.”

4. After downloading, launch the application, agreeing to the terms of its use.
5. Select the option to save personal information or set the method for deleting it, which we reviewed in the previous section.
All other actions are carried out automatically.

The completion of the process may be delayed due to many factors (computer performance, no fragmentation of files on the system volume, damage to some sectors of the system disk, a significant amount of information has been selected).
After booting your computer with clean Windows 10, it is a good idea to perform the following procedure:
- call the command interpreter Win+R;
- enter “cleanmgr”;
- execute the command;
- Click on the “Clean up system files” icon.

As a result, you can free up to 23 GB or more of disk space.
Resetting the system when it won't start
In this section we will look at how to reset Windows 10 if it refuses to boot. This is where motherboard or laptop manufacturers' tools, or a bootable flash drive or system recovery disk, come in handy.
For devices whose users acquired licensed Windows 10 when purchasing a computer, there is a basic method for resetting it. This is the use of a certain key combination to roll back the device.
In most cases, when a system rollback is required, the computers were not purchased with a licensed “top ten”, so you will need a recovery disk/flash drive. You need to boot from it into recovery mode.

1. Having started in the recovery environment, click on the troubleshooting item.

4. In the operating system selection menu, select Windows 10.
5. If you are confident in your actions, click on the “Return the computer to its original state” icon.
6 Afterwards, we get acquainted with the list of actions that will be performed automatically.
This means deleting applications, resetting system settings to factory settings, and then installing Windows 10.
7. Click “Return to original state” if you are sure of the need to perform the operation.
This will start the system recovery process, which is accompanied by a reboot of the computer.
Tip: if you changed the BIOS settings (changed the priority of boot devices) to boot from bootable media, change their order back.
Possible problems with resetting Windows 10

It happens that when you try to roll back the “ten” to its original state and restart the computer, a window appears with the text “Problem when returning the computer to its original state. No changes were made." The error indicates problems with the resume files located in the WinSxS directory (they are damaged, missing, or have been modified by the author of the assembly). If, after an unsuccessful attempt, the “ten” starts up properly, be sure to check the system files for integrity and the hard drive for damaged sectors.
If all else fails, perform a clean installation of the operating system, remembering to take care of important information on the system disk.
The second common mistake is asking to insert a CD (flash drive) with operating system installation files. For these cases, the Refresh Windows Tool was developed, which was discussed in the second section of this article. Another solution may be to use a flash drive/disk with Windows 10 installation files of the same bit depth and edition as the operating system installed on the computer.
The second option for the action algorithm, if it was not possible to return the operating system to its previous state due to the lack of media with recovery files, is to register your own image with a snapshot of the system to restore it. But at the same time, the “ten” must work properly, because operations are carried out in its environment.
- Download the Windows 10 disk image file.
- We mount it through the virtual drive emulation tool and copy the “install.wim” file located in the “sources” directory to the “ResetRecoveryImage” folder created on any partition other than the system one.
- Instead of a physical drive emulator, you can use any archiver.
- We launch the command line with administrative privileges and enter a command like “reagentc /setosimage /path “D:\ResetRecoveryImage” /index 1”, where the path to the directory created in the third step is “D:\”.
These actions create and register a recovery image in the system.

After successful completion of the operations, we again launch the automatic reinstallation of Windows 10, having previously called it a backup copy. This will speed up the process of reverting to the current OS state if problems arise.
If you have any questions, other problems or new solutions, do not hesitate to write about it in the comments.
Windows 10 differs in many aspects from previous Microsoft operating systems, including the location of system files, as well as the presence and access to special features and functionality of the OS. The Update Center has also undergone certain changes, which will be discussed below. However, setting up Windows 10 System Update itself has not become more complicated, but on the contrary, it has become simpler and more convenient.
Windows 10 Update- a program with which the operating system is updated to more current versions, and also downloads updates for related programs. Without it, the operating system on your computer will quickly lose its relevance and will not have many additional features that appear over time.
Location
Previously, this program could be accessed through the Control Panel, but now no user finds it there. Now the Update Center can be opened through the menu " Start" In it you need to go to the section “ Options", from there to the section " Update and Security" In this submenu you can easily find this program and update your system with it.
How to check for updates
To make sure that your system has updates, you need to click the button Checking for updates, which will show all the updates found and suggest their installation. In addition, there are not many properties that can be adjusted in the basic settings. You can configure a wider range of parameters if you click on the item “ Extra options" Not every build of Windows 10 supports this method. It is available in Pro, Education and Enterprise versions.
How to set up Update Center
The automatic operating system update process is configurable and can be disabled in several ways. The methods below allow you to quickly do this without the need to install additional utilities.
Using the built-in Services program

Using the Registry Editor
- Open the Registry Editor using the Win + R key combination.
- Type regedit command
- There, go to the folder " Auto Update", located along the path " Hkey_Local_Machine» → « Software» → « Microsoft» → « Windows» → « CurrentVersion» → « WindowsUpdate».
- In the menu that appears, double-click on the item “ AUOption" After that, set it to 1. This means that Update Center will stop checking for new versions of Windows programs. If you want to enable updates again, just change the value to 0.
It is possible that such a parameter will not exist, then you need to write it down yourself. Just right-click on a section of the field and select to create a separate parameter with the DWORD type. Name it the same as indicated here.

In the Advanced Options menu
Go to the Update Center menu according to the guide above. Select " Extra options" and go to the window " Notify about reboot" There select " Defer updates».
It is worth saying that with this method of disabling, updates will still be installed.
You can enable automatic updates from here.
Possible problems
Sometimes it may happen that a previously working update center stops functioning for unknown reasons. Below are the most common problems with this program and solutions if suddenly the update service does not work.
Solving problems using the Troubleshooting Manager in Windows 10
Modern Windows operating systems have a built-in way to deal with application failures and problems. You can also use it to deal with problems with Update Center not working.
- Go to the menu " Start».
- In the search field write " Troubleshooting».
- Double-click on the icon that appears. A window will open with the menu “ system and safety" There, at the very bottom, click on the item “ Troubleshooting».
- In the menu that appears, click " Additionally", check the box " Accept corrections automatically" and confirm running as administrator.
- After that, click Next and wait. After some time, the repair process will complete and “ Update centre» will resume work.
Error "Service Registration is Missing or Corrupt"
This problem occurs if a proxy server is registered on your computer without permission to update. There are two ways out of this situation: do not use a proxy for updates, or set the permission in the system itself.
Restarting Update in Windows 10
In the operation of this program, situations sometimes arise when the error is not corrected by the Troubleshooting Center, as well as by other methods.

Thus, the most effective method of solving the problem is to reset the Update Center system and restore it to default.
To do this you need to do the following:

Upon completion of this procedure, the Update Center will be reinstalled along with all related services. This way, the system will stop crashing and start updating.

In general, this is all that can be said about Update Center in Windows 10. Its work, of course, is somewhat different from what it was before, however, it still performs the same functions as before the new OS from Microsoft. In addition, in the tenth version of Windows it is located in a different place, which changes the procedure for setting it up and debugging it.
Video on the topic
If errors occur when downloading or installing updates, resetting Windows 10 Update most often helps. In this article, we will describe standard methods on how to reset Update Center and solve problems with updates.
There are several known ways to reset Windows 10 Update:
- Using the troubleshooter
- Removing the SoftwareDistibution folder
- Executing the script
Let's look at these methods in order.
Helps in 2 cases out of 10 and can indicate errors in the component store and the central processing center itself, even if there are none. Not the best solution to the problem, but sometimes it helps. Rare, but it helps. Considering Microsoft’s statement that all troubleshooters (that’s what these troubleshooting tools are called) are improved and “learn from mistakes,” this was not noticed during the entire time the system was used.
If you need to run the Windows Update Troubleshooter, go to Control Panel - Troubleshooting - All Categories and run the desired tool as Administrator.
Deleting a folderSoftwareDistribution
Solves 5 out of 10 problems with updates. SoftwareDistibution – the folder where downloaded updates, the Update Center cache and its logs are stored. Deleting this folder solves installation errors, but not downloading updates.
The folder is located along the path C:\Windows\SoftwareDistribution

Before you can remove it, you must stop the Windows Update service or run the following command in Command Prompt as Administrator:
Net stop wuauserv

Executing the script
A universal tool for solving update problems for both Windows 10 and Windows 8.1 and 7. Solves 8 out of 10 problems related to the update center. There are 2 options for using the script:
Download the script from the Microsoft forum
Go to Microsoft's Technet download page or download the archive from the direct link. Unpack the archive and run the ResetWUEng script as Administrator.
The first page warns about possible consequences (the script can not only reset the CO), to agree, press the key « Y". There will be 17 actions to choose from, but we only need one, under the number 2. Press 2 and the Enter key. The running processes will be displayed on the screen and upon completion a window with 17 options will appear. Select 17 to reboot and press Enter.

Note: Some antiviruses may complain about this script, but by opening it with Notepad, you can make sure that there is nothing suspicious in its contents.
Creating a script yourself
Making a script to reset Windows Update is quite simple; first we need to open Notepad (notepad.exe) and copy this text there:
@echo off::Update center reset::site:: Checking and Stopping the Windows Update services set b=0:bits set /a b=%b%+1 if %b% equ 3 (goto end1) net stop bits echo Checking the bits service status. sc query bits | findstr /I /C:"STOPPED" if not %errorlevel%==0 (goto bits) goto loop2:end1 cls echo. echo Cannot reset Windows Update since "Background Intelligent Transfer Service" (bits) service failed to stop. echo. pause goto Start:loop2 set w=0:wuauserv set /a w=%w%+1 if %w% equ 3 (goto end2) net stop wuauserv echo Checking the wuauserv service status. sc query wuauserv | findstr /I /C:"STOPPED" if not %errorlevel%==0 (goto wuauserv) goto loop3:end2 cls echo. echo Cannot reset Windows Update since "Windows Update" (wuauserv) service failed to stop. echo. pause goto Start:loop3 set app=0:appidsvc set /a app=%app%+1 if %app% equ 3 (goto end3) net stop appidsvc echo Checking the appidsvc service status. sc query appidsvc | findstr /I /C:"STOPPED" if not %errorlevel%==0 (goto appidsvc) goto loop4:end3 cls echo. echo Cannot reset Windows Update since "Application Identity" (appidsvc) service failed to stop. echo. pause goto Start:loop4 set c=0:cryptsvc set /a c=%c%+1 if %c% equ 3 (goto end4) net stop cryptsvc echo Checking the cryptsvc service status. sc query cryptsvc | findstr /I /C:"STOPPED" if not %errorlevel%==0 (goto cryptsvc) goto Reset:end4 cls echo. echo Cannot reset Windows Update since "Cryptographic Services" (cryptsvc) service failed to stop. echo. pause goto Start:Reset Ipconfig /flushdns del /s /q /f "%ALLUSERSPROFILE%\Application Data\Microsoft\Network\Downloader\qmgr*.dat" del /s /q /f "%ALLUSERSPROFILE%\Microsoft\Network\ Downloader\qmgr*.dat" del /s /q /f "%SYSTEMROOT%\Logs\WindowsUpdate\*" if exist "%SYSTEMROOT%\winsxs\pending.xml.bak" del /s /q /f "%SYSTEMROOT %\winsxs\pending.xml.bak" if exist "%SYSTEMROOT%\winsxs\pending.xml" (takeown /f "%SYSTEMROOT%\winsxs\pending.xml" attrib -r -s -h /s /d " %SYSTEMROOT%\winsxs\pending.xml" ren "%SYSTEMROOT%\winsxs\pending.xml" pending.xml.bak) if exist "%SYSTEMROOT%\SoftwareDistribution.bak" rmdir /s /q "%SYSTEMROOT%\SoftwareDistribution .bak" if exist "%SYSTEMROOT%\SoftwareDistribution" (attrib -r -s -h /s /d "%SYSTEMROOT%\SoftwareDistribution" ren "%SYSTEMROOT%\SoftwareDistribution" SoftwareDistribution.bak) if exist "%SYSTEMROOT%\ system32\Catroot2.bak" rmdir /s /q "%SYSTEMROOT%\system32\Catroot2.bak" if exist "%SYSTEMROOT%\system32\Catroot2" (attrib -r -s -h /s /d "%SYSTEMROOT%\ system32\Catroot2" ren "%SYSTEMROOT%\system32\Catroot2" Catroot2.bak) :: Reset Windows Update policies reg delete "HKCU\SOFTWARE\Policies\Microsoft\Windows\WindowsUpdate" /f reg delete "HKCU\SOFTWARE\Microsoft\ Windows\CurrentVersion\Policies\WindowsUpdate" /f reg delete "HKLM\SOFTWARE\Policies\Microsoft\Windows\WindowsUpdate" /f reg delete "HKLM\SOFTWARE\Microsoft\Windows\CurrentVersion\Policies\WindowsUpdate" /f gpupdate /force: : Reset the BITS service and the Windows Update service to the default security descriptor sc.exe sdset bits D:(A;;CCLCSWRPWPDTLOCRRC;;;SY)(A;;CCDCLCSWRPWPDTLOCRSDRCWDWO;;;BA)(A;;CCLCSWLOCRRC;;; AU)(A;;CCLCSWRPWPDTLOCRRC;;;PU) sc.exe sdset wuauserv D:(A;;CCLCSWRPWPDTLOCRRC;;;SY)(A;;CCDCLCSWRPWPDTLOCRSDRCWDWO;;;BA)(A;;CCLCSWLOCRRC;;;AU)( A;;CCLCSWRPWPDTLOCRRC;;;PU) :: Reregister the BITS files and the Windows Update files cd /d %windir%\system32 regsvr32.exe /s atl.dll regsvr32.exe /s urlmon.dll regsvr32.exe /s mshtml .dll regsvr32.exe /s shdocvw.dll regsvr32.exe /s browseui.dll regsvr32.exe /s jscript.dll regsvr32.exe /s vbscript.dll regsvr32.exe /s scrrun.dll regsvr32.exe /s msxml.dll regsvr32.exe /s msxml3.dll regsvr32.exe /s msxml6.dll regsvr32.exe /s actxprxy.dll regsvr32.exe /s softpub.dll regsvr32.exe /s wintrust.dll regsvr32.exe /s dssenh.dll regsvr32. exe /s rsaenh.dll regsvr32.exe /s gpkcsp.dll regsvr32.exe /s sccbase.dll regsvr32.exe /s slbcsp.dll regsvr32.exe /s cryptdlg.dll regsvr32.exe /s oleaut32.dll regsvr32.exe / s ole32.dll regsvr32.exe /s shell32.dll regsvr32.exe /s initpki.dll regsvr32.exe /s wuapi.dll regsvr32.exe /s wuaueng.dll regsvr32.exe /s wuaueng1.dll regsvr32.exe /s wucltui .dll regsvr32.exe /s wups.dll regsvr32.exe /s wups2.dll regsvr32.exe /s wuweb.dll regsvr32.exe /s qmgr.dll regsvr32.exe /s qmgrprxy.dll regsvr32.exe /s wucltux.dll regsvr32.exe /s muweb.dll regsvr32.exe /s wuwebv.dll regsvr32.exe /s wudriver.dll netsh winsock reset netsh winsock reset proxy:: Set the startup type as automatic sc config wuauserv start= auto sc config bits start= auto sc config DcomLaunch start= auto:Start net start bits net start wuauserv net start appidsvc net start cryptsvc
Then save this file. When saving, specify File Type: All Files, and in the title indicate “name” . bat(for example, wu.bat), so that this file is executable and the script can be reproduced.

After saving, open the file as Administrator and wait until the procedure is completed, then restart the computer.
We hope that this instruction was useful to you and helped you resolve the Windows Update issue.