Where is the hard drive inserted in the computer? Creating a local drive D in Windows
Hello dear readers.
Probably every computer user knows what CD/DVD drives are. Especially one that dates back to the era of soft media. Today, on such portable memory you can usually see installation files of the operating system, movies or games. Previously, this was almost the only way to transfer large volumes of information at that time. And today, some companies offer applications on these types of devices. In this article I will tell you how to install the program on a computer from a disk?
Already today " World Wide Web"developed as never before. This allows you to receive almost all software in a matter of minutes. But sometimes some users still encounter a situation when they need to install an application from a disk on their computer or laptop. To do this, we make several movements:
No drive( )
Sometimes there is a problem when devices simply do not have the appropriate connector. What to do if there is no disk drive? Then you need to insert the metal-coated plastic into another computer, copy all the files from it to a flash drive, and then use a portable USB memory for installation.
Specialized programs( )
Some users often have problems with the location of special software in the system that relates to car diagnostics - OBD 2, ProScan, ELM327 and many others.

It, like everything else, comes on a disk along with elements that are connected directly to the car. How to properly place it in the system is indicated in the attached instructions.
If something is not clear to you, you can watch a video on this topic:
Sometimes problems arise with the Victoria software, which is used to check the hard drive for problem areas. This usually happens due to incompatibility. Before you start, just find the right version.
Hello friends! One month of summer has already passed, and I haven’t really had time to rest yet, but oh well, there are still two months of rest ahead :). Today I want to tell you with an example, how to partition a new hard drive during the Windows 7 installation process.
Let's start creating sections. First, let's create a partition for the operating system (drive C). I made 100 GB, click “Create” and enter the size, I entered 100,000 MB (but after creation it will be less than 100 GB, so I then wrote 120,000 MB, and the partition turned out to be 117 GB). I think this is quite enough for the OS. It all depends on the size of the hard drive, you can allocate more or less, but don’t skimp. Enter the size and click “Create”.
The system will ask you to allocate more space for the reserve area, agree.
This will be the local drive D. For it I specified the size 270 GB. Click “Apply”.. Since this was the last section, I indicated the size of the entire remaining unallocated space. And of course we press
Disk– removable storage medium. It may contain programs, text, graphic and music files, videos. Usually the user has no problems inserting the disc into computer, but there may be nuances.
Instructions
In order to insert a disc into a CD or DVD drive, press the Eject button on the system unit case or on the remote control (translated from English as eject, push out). Place the disc on the ejected deck so that the side with the information is facing down, press the Eject button again or lightly push the deck towards the body computer A.
If you can't insert a disc, make sure the device is physically connected. If the cables are in the correct sockets and you have no doubt about the correctness of their connection, use the “Device Manager” component. The CD/DVD-ROM settings for this equipment may be set to “Disabled”.
Press the Windows key or Start button and open Control Panel. Under the Performance and Maintenance category, select the System icon. Another option: while on your desktop, click on the “My computer» right mouse button. Select "Properties" from the context menu. You can also immediately select the “Device Manager” item in the drop-down menu (the same can be done by accessing the component through the “My computer" in the Start menu).
If you called the “System” component, go to the “Hardware” tab in the window that opens and click the “Device Manager” button in the group of the same name, an additional window will open. If you initially selected the “Device Manager” item in the context menu, the desired window will be available immediately.
Find the DVD and CD-ROM drives branch in the list and expand it by clicking on the “+” icon. Right-click on the name of your disc reader and select “Properties” from the drop-down menu. In the properties window, open the “General” tab and use the drop-down list in the “Device Usage” group to set the value to “This device is in use (enabled).” Confirm your choice with OK and close the windows.
To avoid making mistakes when choosing a new hard drive, you must follow certain rules. Naturally, you need to be able to correctly connect the hard drive to the computer. Otherwise, you can damage not only the hard drive, but also other PC devices.

You will need
- - IDE-SATA adapter.
Instructions
Start by identifying the connectors that are used to connect the hard drives. These can be IDE and SATA ports. Turn off the computer and open the cover of the system unit. If your hard drive is connected via a narrow channel, then purchase a new SATA drive. If you use a multi-core wide connector to connect the hard drive to the motherboard, then you need a hard drive with an IDE port.
Pay attention to the power type of the hard drive. This can be a white quad port or a black wide connector. Some motherboard models allow you to connect both types of hard drives at the same time. Typically, in such situations, the IDE channel is intended to connect a DVD drive, but it can also be used to work with a hard drive. Buy a special SATA-IDE adapter if you need to connect a hard drive of a certain format.
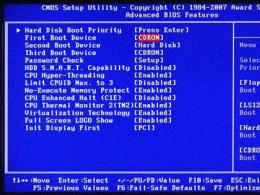
Install the hard drive into the designated slot. Secure the device with screws. Connect the required connectors. When working with new motherboards, it is better to connect the main hard drive to the SATA1 channel. Turn on your computer. Open the BIOS menu. Go to Boot Options. Make sure that the boot will be performed from the hard drive on which the operating system is installed. If you use different types of hard drives, make sure that the SATA/IDE Mode item is active. Otherwise, one of the disks may not be detected. Restart your PC.
After logging into the operating system, open the “My Computer” menu. Wait for the connected equipment to be automatically detected. Format the new hard drive. This is necessary for the correct operation of the device.
Anyone can insert a disk into a laptop. After all, this is obvious. But is everyone doing it right? Maybe there are some secrets or recommendations? In this article we will try to describe the entire process in as much detail as possible, as well as give recommendations for proper operation of the drive.
How is that right?
The answer to the question: “How to properly insert a disk into a laptop?” - very simple.
1. Press the button on the drive, after which the tray is released with a characteristic click.
2. Since the tray usually protrudes forward a couple of centimeters, we manually pull it out until it stops.
3. Carefully, without touching the optical (laser) head, insert the disc into the round disc holder until the latter is completely fixed. The disc must be inserted with the label (picture, design, inscriptions, non-glossy side) facing up. That is, the optical (laser) head must have access to the “shiny” surface, since it is on it that all information is recorded.
4. Carefully insert the tray back until it clicks.
5. To remove the disk, you need to do everything from the first point, but we don’t insert the disk, but carefully pull it out.

Do not use force under any circumstances. If the tray won't close or the disc won't fit into the holder, you're doing something wrong. Start all over again, but more carefully.
Correctly inserting a disk into a laptop drive is not difficult. But what if your laptop’s drive is different from the one described above?
How to insert a disk into a laptop if the drive does not have a pull-out tray?
Some laptops have slot-type optical disc drives and do not have a disc tray. But don’t be scared - there is nothing complicated or unusual in this situation. Insert the disc into the laptop, as is the case with the tray version, with the label facing up. Insert the disk into the slot of the drive, but do not push it by force, and do not push it very quickly until you feel a soft stop. Then the drive will pull it into itself.
For slot drives, you need to find a special button, which in most cases is located in the part of the laptop where the keyboard is located.
Emergency cases
Sometimes there are cases when the disc tray does not come out of the drive - maybe the button is broken or the release mechanism is damaged. Do not rush to take your laptop to a service center. It may well be that the drive can still serve without faulty parts. So, how to insert a disk into a laptop if some mechanisms are faulty?
1. All popular operating systems have a function that does the job of a physical button. For example, in Windows OS, to do this, you need to open Explorer, select the drive, and right-click on it. In the context menu that appears, select and click the “Extract” line.

2. For the second option we will need a needle or paperclip. If you look closely, you can see a small hole in the disc tray cover. You need to insert a needle or the tip of a paper clip there and press lightly. Most likely, after these steps the tray will open. You can remove the disk in the same way.

Unfortunately, drives without a tray do not have special holes. And if the first option did not help you, then feel free to take your laptop to the service center.
What else you need to know
Tips for users.
- Do not attempt to disassemble the optical drive yourself. This is a complex device with many small parts. Therefore, you can completely break it beyond repair.
- When purchasing, choose a laptop with a tray drive. Such drives are more common; if replacement is necessary, they will cost less and are technically easier to replace.
- Do not wipe the laser heads with improvised materials. The latter are made of special soft plastic and are easily scratched. For this purpose, there are various products that can be purchased in specialized stores.
- Do not keep the disc in the drive just like that, unless necessary. First, the laptop will drain battery power. Secondly, parts wear out faster this way.
- Before inserting the disk into your laptop, make sure that it is not heavily scratched or deformed. A bad disk can cause the drive to fail.
The most important element of any bicycle is the brakes. Human life and health largely depend on them. In this article we will talk about what brake pads (types) there are, how to install disc brakes on a bicycle and adjust them - set them up.
HOW TO INSTALL DISC BRAKES ON YOUR BIKE YOURSELF
Before considering the question of how to install disc brakes on a bicycle, let's understand a little about what a hydraulic disc brake system is.
As a rule, the components of a hydraulic disc brake are: a brake lever, a hydraulic line, a rotor (brake disc), a caliper (having reservoirs for brake fluid, under the pressure of which the brake pads come into contact with the rotor), an adapter, through which the caliper is attached to the bicycle frame.
Hydraulic disc brakes have a significant advantage over mechanical ones in efficiency. This is due to the fact that the fluid in the hydraulic lines does not change its density, does not compress or deform, unlike a mechanical brake cable.
There are open and closed types of hydraulic brakes. The disadvantages of closed ones include the need for adjustment during operation.
A decrease or increase in the volume of brake fluid, for example, due to temperature, causes the need to adjust the position of the brake pads. Also, the brake pads should be adjusted when they are partially worn.

Open type brakes do not have this problem. Since their design provides an expansion tank filled with brake fluid (located, as a rule, at the brake lever). Such brakes do not require adjustments during operation.
The presence of modulation (smooth movement of the handle at the beginning of the stroke and powerful adhesion of the pads to the rotor at the end) is influenced by the number of pistons in the caliper.

When it comes to choosing a specific model, it makes sense to consult with its owner. After all, different riding styles require different braking systems.
Smooth and light are suitable for cross-country riders, powerful and clearly controlled for downhill or freeride, and well-modulated for dirt jumping and, at the same time, as light and powerful as possible.
After the first adjustment, the pads, relative to the brake disc, themselves take the correct position. But this does not apply to models with one piston. They require regulation, almost like mechanical ones. For example, Hayes Sole. This model is not considered the best among hydraulic brakes.
Preliminary preparation of open-type hydraulic disc brakes is as follows:
- The brake system needs to be filled with oil. Shimano brakes use mineral oil. Avid, Hayes, Helix brakes use DOT brake fluid.
- The process of bleeding the brakes involves squeezing air out of hydraulic lines, cylinders and brake reservoirs, forcing oil through them.
- Then the caliper is adjusted so that the brake pads do not hit the rotor.
- Installing disc brakes on a bicycle is carried out in the following sequence:
- We attach the brake levers to the steering wheel and adjust their position using a hexagon;
- We install the rotor on the hub, put the wheel in place, tighten it with bolts or eccentrics;
- Screw the adapter tightly; it is possible to use a thread locker;
- We install the caliper, but do not tighten the hexagons so that it “floats”.
- By pressing the brake lever, we check whether the brake pads extend equally when pressed.
- By pressing the brake disc with the pads, the caliper will be in the right place. To help him, you should try to turn the wheel back and forth.
- Alternately tighten the bolts. If the bolts have been greatly loosened, you will have to gently release the handle again and sharply press it.
- Having pressed the caliper, you need to sharply press the handle 15-30 times to bring the pads to the brake disc at a working distance.
- With the handle released, spin the wheel and check if there is any friction between the rotor and any of the pads. If there is, you need to loosen the clipper bolts and move it slightly towards the rubbing pad.
- Then we tighten the bolts back and check if there is a need, repeat the above steps.
HOW TO ADJUST DISC BRAKES ON A BIKE: INSTRUCTIONS
Setting up disc brakes on a bicycle is not a complicated process. Now see for yourself. Let's find out how to set up disc brakes on a bicycle yourself, without turning to specialists for help:

- Having secured the wheel, you should center the caliper in relation to the rotor by selecting and installing washers of various thicknesses, which are included in the kit, between the mounts on the frame and the caliper.
- The position of the caliper changes depending on how tightly you tighten the bolts. Accordingly, the thickness and number of washers will need to be selected to a fraction of a millimeter.
- In the case where the rotor comes into contact with both pads and friction occurs, the pads need to be moved apart. To do this, slightly unscrew the special hexagon on the caliper, and the brakes will begin to operate later.
- If you want to achieve less brake lever travel, you need to screw in the hexagon. It may be an uneven brake disc that will need to be aligned.
- While carrying out the robot, do not turn the bike over to avoid air getting into the system. Also, do not press the handle if there is no oil in the system and the rotor is not between the brake pads, otherwise they will compress, after which you will have to remove the caliper and open the brake pads with a screwdriver.
- When all operations are completed, tighten all the bolts again. When checking the robot, we carefully ensure that the brake disc does not warp or move when pressing the brake lever.
ADJUSTING THE MECHANICAL DISC BRAKE
- Since mechanical disc brakes are more sensitive to wheel axis displacement, bolts or eccentrics should be tightened while sitting on the bike or pressing the front shock absorber. Otherwise, in the future, when making small jumps, friction between the rotor and the pad may occur when driving.
- Screw the adapter tightly. We install the caliper using the instructions given above. We extend one of the blocks by screwing in a screw half a turn, which adjusts its position.
- On Hayes brake systems, before performing this operation, you need to unscrew the locking hexagon, and after all adjustment is completed, return it to its original position.
- Gently press the caliper to the rotor so that its plane coincides with the plane of the stationary pad.
- Then alternately tighten the caliper mounting bolts. We carry out the above steps with the jacket and cable disconnected. Make sure that the plane of the pad does not move relative to the plane of the brake disc.
- Tighten both hexagons and return the pad adjusting bolt to its original position.
- After this, we spin the wheel, checking for friction. If there is no friction, the static block can be moved out slightly with the adjusting bolt and vice versa.
- We press the movable block, pulling up the lever to which the cable is attached. The rotor will shift slightly towards the static block, but only slightly!
- We place the cable and the jacket in the desired position in the lever, the outer block should be pressed. Lightly tighten the corresponding bolt.
- Gently press the brake handle before the start of the working stroke, which will bring the cable into the desired position in the lever. Tighten the cable fastening and check for pad friction. We slightly tighten the adjustment on the handle if the block is rubbing and vice versa.
The brakes need to be adjusted so that the adjustment on the handle is turned out minimally, therefore, it is better to correct the position of the cable on the caliper lever. This way the threads of the handles will be protected from damage.
BRAKE PADS FOR BICYCLES, WHAT ARE THERE ARE
The safety of cycling and the effectiveness of its braking system directly depend on the brake pads used. Let's look at what types of brake pads there are for bicycles, their advantages and disadvantages.
Depending on the design and price range, the pads are divided into varieties. And first of all, on the two main types of brakes: rim (V-brake) and disc.
PADS FOR V-BRAKE SYSTEMS
There are these types:
Disposable - their design consists of a bolt with spacer washers, a metal plate and a rubber base. They have a short service life, but are also inexpensive.
Cartridge - their design consists of a bolt with spacer washers, a metal plate and cartridge pads, which are removed by pressing the cotter pins. The rubber base can be replaced.

There are pads for both dry and wet weather. The degree of wear of rim brake pads can be determined by special marks (grooves).
Worn pads should be replaced promptly to avoid damage to the rim. Note that both cartridge and disposable pads are suitable for V-brake rim brakes. And here the rule applies - the more expensive, the more effective.
PADS FOR DISC TYPE BRAKE SYSTEMS
On the market, brake pads for disc brakes are available in metallized (Sintered) and organic (Resin). And these types have both their advantages and disadvantages.

The choice of the appropriate pad composition can be determined by factors such as the weight of the cyclist, weather and trail conditions, riding style, and rotor size.
METALLIZED BRAKE PADS
Consist of an alloy of metal-containing substances.
Advantages:
- more resistant to frictional heat than organic brake pads;
- work more efficiently in wet track conditions;
- I have more resources.

Flaws:
- create noise;
- long-term grinding in;
- modulation is relatively worse;
- The caliper heats up instead of dissipating heat through the rotor.
These brake pads are preferable for heavier riders. Suitable for use on wet roads in mud and rain. On long descents they retain their power, although they have worse modulation.
They work noisily, but due to the greater rigidity of the composition they have a noticeable advantage in service life. Therefore, when starting to select brake pads, first of all, consider the conditions in which you will use them.
ORGANIC BRAKE PADS
They contain organic substances and rubber.
Advantages:
- low noise;
- grinding in occurs quickly;
- better modulation level;
- transfer heat to the rotor, protecting the caliper from overheating.

Flaws:
- shorter service life;
- work less efficiently on wet, muddy roads.
It is preferable to use light-weight riders in disciplines that require frequent and prolonged braking, such as cross-country. Sensitive braking is due to good modulation.
Due to the softer composition, wear occurs faster. Not suitable for use on dirty roads, as even slight dust impairs their performance.