What to do if the system unit does not start. Why the computer does not turn on and how to determine what is broken
Your computer won't start? There can be many reasons for this, but the most likely is the lack of power in the system. Do not rush to call technical support and call the wizard, you can fix the problem yourself.
External factors
The first thing to do is check the condition of the wires. See if the power wire is connected to the network or to the system unit - it is likely that you touched it and it popped out of the socket. As a rule, a pulled cord is the most common answer to the question of why the computer will not start. So, in order not to look stupid in the eyes of the master, first of all inspect the wires. It is also possible that there is simply no current in the outlet. How to find out? Try connecting any other device to it, such as a night light or a hair dryer. If they don't work, then that's the reason. Check if the system unit is turned on (the switch is located at the back). Is your PC connected to an uninterruptible power supply? In this case, try connecting it directly to the outlet. If after that the computer does not start, you should proceed to a more detailed inspection.

Guarantee
If you carefully store all the documents, and you still have a guarantee, the best option would be to contact a specialist - he will diagnose it completely free of charge. Has the warranty period passed a long time ago, or you just can't find the paper you need? No problem. You can also determine the cause of the problem yourself.
System unit
Your computer won't start? Remove the back cover from the system unit and look inside. First of all, you need to check if the standby voltage LED is on (as a rule, during normal PC operation, it blinks green or red). If the lights go out, it's safe to say that the problem lies in the power supply. It should be emphasized that in any action aimed at independent work with PC parts, precautions must be observed: all wires must be disconnected from the mains, otherwise you risk getting a current discharge.

Checking the power supply
Have you completed all of the above manipulations, but the computer does not start? So, it's time to move on to more active actions. Check the standby voltage (this can be done using a tester, of course, provided that you have one). Disconnect the pin connector from the motherboard, put the tester in position to measure voltage and connect the red end to the purple wire, and the black end to any black wire. In this case, the voltage should be about five volts. If the tester readings differ from this number, the PSU will have to be replaced.
Why won't the computer start?
Don't have a tester? No problem. Close the green and black contacts of the connector using tweezers. After all these manipulations, the power supply should turn on (you will understand this by the fan running inside). If this does not happen, it means that the power supply has become obsolete, and it needs to be replaced. It is also possible that it is too weak and the computer does not have enough power to start. To test this hypothesis, you will need to disconnect all devices: mouse, printer, scanner, keyboard, etc. Only the processor with the cooling system should remain on the motherboard. Now try to start your computer. Did he turn on? This means that the PSU is not enough power.
Slow speed, application errors, occasional sudden reboots. All this pales in comparison to the much worse problem - the inability to start the system at all. A situation where pressing the power button is not accompanied by any activity or leads to a short squeak of sensors, flashing LEDs and subsequent shutdown. What to do then?
The computer does not turn on. Common Causes and Solutions
Faulty or underpowered power supply
This part of the system is traditionally considered one of the most vulnerable, because when assembling a computer, most users focus on a processor with a video card, and less important (in their opinion) components are taken on the cheap. They don't see the difference between a $40 600W PSU and a $100 PSU. That's just cheap power supplies usually do not meet the declared characteristics, being much weaker. In addition, they fail faster - it is very important to take a responsible attitude to. If the system stopped starting after replacing one of the components with a more powerful version, then the reason may lie in the lack of power of the PSU. If you suspect that the block is damaged, use a voltage tester. By connecting the black and red wires, you should get about 5V, black and yellow - about 12V. A deviation of no more than 7-8% is allowed.
Overheat
Raising the temperature of the system or its individual components to a critical level activates protective mechanisms that restart / turn off the computer. This is usually caused by one of two reasons:
- Faulty or insufficient cooling. With insufficient cooling, everything is clear - you need to replace it with a more powerful one. But the faults can be different. If you do not clean the system unit for a long time, an impressive layer of dust and dirt will accumulate on the fans, motherboards and radiators, which will prevent heat dissipation. You should also change the thermal paste on the processor from time to time (if overheating is observed, and the cooling works at full capacity with a cold radiator, this is the reason).

- Incorrect system and BIOS settings. This item refers to those who like to squeeze an additional 5-10% of performance out of the computer using the so-called "overclocking". Inexperienced users mindlessly increase the multiplier and voltage of the elements, which is why they overheat. If the system refuses to boot, you can try to go into the BIOS and reset all the values \u200b\u200bto the default ones.
Problems with the monitor or video card
Many look at the black screen of the monitor, hear the sound of spinning coolers, but still believe that the system does not start due to software errors. And the problem may lie in the inability of the cable to conduct a video signal to the monitor. The connectors may be bad or not connected there, the cable is damaged (accidentally stepped on, bent), the video card is out of order. It is far from always that a floating sign about the absence of a signal flashes on the monitor, and it can break itself, although this does not happen often. For a simple user who does not have special equipment at his disposal, it is best to diagnose the problem using the “poke method” - try connecting a different cable, use the built-in video card to check, check the monitor settings (on some models you have to manually specify the type of incoming signal).
Failure of the power / reset buttons
A wire may be disconnected or some contact may be damaged, due to which the power-on command will not reach the motherboard. You should find a place on the board where the wire from the button is connected and carefully close the contacts, for example, with a screwdriver. If the system starts, the reason lies in the power buttons or the connecting wire.
Other
Serious problems can be indicated by a characteristic squeak when you try to turn it on. This is a kind of "Morse code" for owners of personal computers, in which error codes are encrypted. Many manufacturers have different codes, so you should look for information on specific models or lines of motherboards.
These were the most popular, but far from the only reasons for the inability to turn on the computer. Also, the PC may not turn on due to mechanical damage to the circuits, leakage / evaporation of the electrolyte from the capacitors, malfunctions in the central nodes, and so on. In such situations, a simple user will not be able to cope with diagnostics and repair - you will have to carry the system unit to a service center.
Have a great day!
Failure to understand the nature of certain computer problems often leads to errors in diagnostics, without which qualified repairs are impossible. And you should approach the search for a problem from its exact description. A malfunction that is described by the words: “when you press the power button (power), the computer does not turn on, but the fans work” is called the absence or initialization error. It should not be confused with "not turning on" - complete inactivity on pressing power, since the causes of these two problems are usually different.
Initialization, in this case, is the readiness of the equipment for operation. And if any of the devices critical for starting a PC refuses to start, we will observe a characteristic picture:
- after turning on the system unit, a loud noise of the fans is heard (they rotate at a constant high speed);
- the keyboard and power indicators light up and do not go out;
- the screen remains black.
Nothing else happens.
Causes
According to statistics, the most common source of such a problem is the following:
- damage to the BIOS - a program stored in the CMOS flash memory chip on the motherboard responsible for booting the PC, as well as for checking and coordinating the operation of all its devices at the start stage;
- a failed processor or a malfunction of its power supply system;
- inoperability of RAM (RAM) or incompatibility of installed RAM strips with each other;
- malfunction of the system logic chips (chipset) on the motherboard, especially often the north bridge.
Other reasons that can also give such a “clinic” include damage to the elements of the motherboard, leading to destabilization of the power supply of devices, a defect in the solder contacts of microcircuits, a power supply with a “drawdown” of voltage along individual lines, a dead CMOS battery, and other problems equipment installed on the PC. However, this is less common.
It is also important to understand that this problem is never the result of software failures in the operating system. Because it won't even start downloading.
Diagnostics
What can the user do in such a situation? Even without special equipment, you can try to solve the problem at home. It is enough to know how to use a screwdriver.
Reset BIOS settings to factory settings
This is the easiest and, at times, very effective way to troubleshoot computer boot problems. If your case is not the most difficult, perhaps it will help.
- turn off the computer power and remove the system unit cover.
- Locate the coin cell battery on the motherboard and remove it from the socket.
- close the contacts of the battery socket with each other, for example, with a screwdriver;
- reinstall the battery.
There is another option to reset the BIOS - a jumper (jumper) Clear CMOS. It must be removed and for 15 - 20 seconds. and move to two adjacent contacts, then return to its place. Sometimes the jumper is called differently: CL_CMOS, CCMOS, CLRTC, CRTC, etc.
After doing these operations, connect the power to the computer and try to turn it on. If the problem is fixed, its cause lay in the incorrect BIOS Setup configuration.
Turning off all unnecessary
If the first method did not help, move on. Let's try to exclude the influence of equipment that is not necessary for a successful PC start. To do this, you need to prepare a table covered with insulating material (polyethylene, rubber, plastic, wood, etc.) on which you will assemble the stand.
Let's get started:
- power off the PC and remove the case cover;
- remove the expansion cards from the motherboard slots, disconnect the power wires and interface cables from it, remove the memory strips;
- remove the motherboard from the case, put it on the table and inspect for artifacts - swollen capacitors, overheating traces (darkening and deformation of plastic parts), mechanical damage and other defects;
- if there are no artifacts, install one memory bar in the slot, connect a video card (if there is no built-in one), a monitor, a previously removed bootable hard drive and a power supply;
- turn on the power supply to the mains;
- close the contacts of the power button with a screwdriver - Power Switch (can be signed as ON, PWR_ON, PC_ON) - this action is similar to turning on the computer by pressing this button.
If you see the operating system loading on the monitor, then one of the disconnected devices is causing the failure. Well, if nothing happens except for the rotation of the fans, let's try to figure it out in more detail.
- Start the system. Gently touch the processor heatsink and large board components - chips, mosfets, etc. - they should normally be warm. Strong heating (do not burn yourself!) - indicates a malfunction of the elements (soldering defect, short circuit), and the complete absence of heating (room temperature) indicates, most likely, that the node does not receive supply voltage.
- Power off your PC. Remove the memory bar, remove the oxide layer on its contacts by rubbing with a school eraser, blow through the slot where it was, and install it back. Turn on your computer. If the problem is solved, the reason was in poor contact between the RAM and the board connector. If you don’t dare, install the bar in another slot - perhaps he is to blame.

Replace parts with known good parts
None of the methods helped? The last thing that can be done at home is to replace PC devices in turn with working ones, of course, compatible with your system. However, there is a risk of damaging them.
If there is no such possibility or desire, and also if the described problem occurs on the laptop, the only remaining option is to contact the service center.
Let's find out the reasons why the computer does not turn on: the speaker does not beep or beeps. That is, when the computer does not show any signs of life when the power button is pressed, or if it does, it is not what we would like. The reasons can be both the simplest - there is no power, or complex - the device (memory, HDD, etc.) has failed.
Before we start dealing with this problem, you need to check the simplest:
- Is there a plug in the socket
- Is the network filter enabled
- Is the light off?
- Pay attention to the monitor. Maybe the computer is turned on, but the monitor itself is turned off through the button or there is no power. Whether the cable from the monitor (VGA or DVI) is connected.
Of course, the above is mandatory for you to see what is happening on the computer, but sometimes users do not pay attention to these points, thereby creating other complexities that are more time-consuming.
220V does not come
Power may not be supplied to the computer if:
No voltage at input- for example, the socket is faulty. It's easy to check - connect from another outlet, or plug a known-good electrical appliance into this outlet. For example, a kettle, a hair dryer or a surge protector with an indicator. Usually it is with a surge protector that I determine whether the socket is working or not, if it is on, then everything is in order with it. We think further.
Behind the system unit, there is a special button on the power supply. You need this button to be in position "1" - on, if "0" - off. If this button is missing, then you do not take any action at this stage.
The power cord may come off- move it, or pull it out and reconnect it.

So, we made sure that everything is in order with the cable, let's move on.
Monitor and video card
If you pressed the power button on the computer, it made noise - it turned on, then you need to check the cables from the system unit to the monitor. Very often, the cables come off the monitor, so you don’t see anything on the monitor, but in fact the computer is turned on and working.
From the system unit there must be a cable that transmits the image to the monitor and a cable from the surge protector that supplies power. If everything is in order with these cables, then pay attention to the video card (if you have an external one).
If the graphics card is faulty, the monitor will display a "No Signal" popup. For starters, it's worth checking the VGA or DVI cable, this is already what kind of connection you have. Check if it is firmly inserted, if the contact pins are bent. Pull out the video card and clean the contacts with an eraser.

If all else fails, try to pull it out and switch the cable to the video card built into the motherboard, if there is one, of course.
Iron malfunctions
It all starts with the power button, and we'll start with it. Now you need to open the cover of the system unit and look for breaks in the wires. Be sure to check it out!
BIOS signals
When you press the power button, the POST self-test program starts and if it does not pass (the equipment is not connected or bad contact), the download simply stops, and the speaker (speaker) starts beeping. Their sequence depends on the BIOS. They can be used to determine the source of the error.
You will always find these signals in my article: "". If you find out which device is faulty, try replacing it with another one, borrow it from friends or neighbors. In the event that everything works, you can buy this component.
Broken wire for the Power button
From my own experience, I can say that this problem is rare, but it should not be discarded to the last stage of testing. If you have a wire break from the Power button, then you will not turn on the computer and therefore make sure that everything is in order with the wire that comes from this button.
I once tested a computer that didn't want to turn on. It seems to have done everything possible, but there was no reaction from the computer. Then I removed the front cover from the system unit and found a broken wire there. In a couple of minutes I connected it, wrapped it with electrical tape and it unquestioningly turned on. Apparently, someone had already taken it apart before me and accidentally pinched this wire, thereby tearing it when the front cover was closed.
So, if you have removed the cover of the system unit, then do not be too lazy to open the front cover as well.
Power Supply
Now there is a choice to buy a power supply and of course people buy what is cheaper, because they think that this will not affect the operation of the computer in any way. If you buy a cheap Chinese power supply, then you can say that your computer will live next to a powder keg that can explode at the most inopportune moment.
Note: it is better to save money, for example, on a computer case and buy a normal power supply.
The power supply is a very important component in the computer, as it supplies energy to all computer devices. Therefore, if your computer does not turn on - a black monitor screen, then the power supply may be the cause of this breakdown.
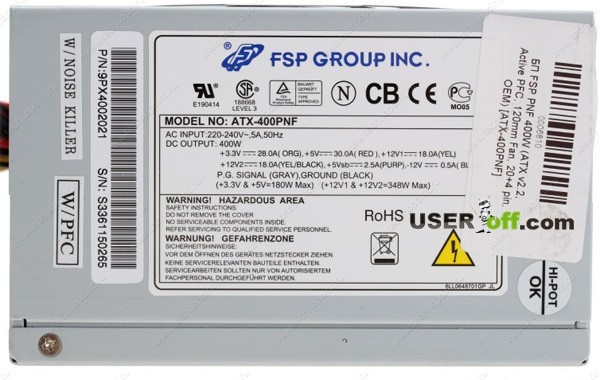
In this section, we will experiment, but if you have a spare power supply or borrow it from another computer (neighbor or friend), then it is better to immediately connect another power supply to your computer. Thus, you will save your time. At a minimum, its characteristics should be the same as yours or better - it will be most correct. You can find all the data on the power supply on the sticker that is on it.
The very first thing you can do is unplug the power cable from: the drive, floppy and hard drive. Next, disconnect the video card, if you have an external one, and remove the RAM from the motherboard. Then try to turn on the computer. If the computer is buzzing, it turns on, then turn it off, connect one device, then turn on the computer, if it turns on, then connect another device, etc. You must understand which device did not allow the computer to turn on.
To check the power supply you will need a voltage tester. Eh, sighed users who do not have this device. I understand you, but still there are people who have purchased it, since electronics failure is not uncommon. We take a tester and a connector of any power that comes out of the power supply and measure the voltage. There should be 5V between black and red, and 12V between black and yellow.
If, when testing the power supply, the voltages differ from the numbers that I named above, then it's time to go to the computer store for a new one. By the way, there are allowable deviations when measuring voltage. Approximately 5% is allowed. If you have, for example, 11.9, then everything is in order with your power supply and you need to look for the problem elsewhere.
If you want a modern power supply, then buy 400 - 500 watts. Take the average.
Often problems arise due to the discharge of the battery, which is located on the motherboard. If you recently had cases when your computer lost time, then most likely you need to change the battery. The price of the battery is small and you can buy it at any computer store.

To check the battery, remove it and check the voltage in it or simply replace it.
If the computer beeps and does not turn on, then it is possible that the memory strips are faulty. There is also a small chance that the computer does not make any sounds due to the fact that the speakers are not working. Remove the memory from the slot on the motherboard and clean the contacts with an eraser. Put them back in place and try to turn them on, if it still does not turn on, pull them out again and stick one at a time. Perhaps one of the lines is faulty.
If there are other connectors on the motherboard that you did not use to connect the RAM module(s), then try using them.

BIOS
So, another option is what to do if the computer does not turn on. If you have recently made any changes to the BIOS, then now you need to return the default settings. Of course, the question is how to do it if you don't see anything?
You need to disconnect the battery from the motherboard, connect the power to the computer and press the power button several times. Next, leave the computer without a battery for 20-30 minutes and then plug it back in.
If some inscriptions appear on the monitor screen when you turn on the computer, but Windows does not boot, then you can go into the BIOS and find the function to reset the settings to factory settings. After that, do not forget to save the changes made to the BIOS by pressing the F10 button (usually).
Motherboard
So we came to the very last section of this article, as well as the most disappointing one - the motherboard. If your motherboard is broken, then its repair can cost a pretty penny.
If you are going to repair it, then think, is there any point? Sometimes its repair can exceed 50% of the cost and then the question arises, is it not easier to buy a new one?
So that you don’t have a question - why the computer doesn’t turn on and what to do in this situation, carry out preventive maintenance with it once a year - clean out the dust and replace the thermal paste every 2-3 years (approximately). By the way, the dust in the computer greatly interferes with the operation of the computer, and once you have opened the system unit, then clean everything from the inside.
If, after pressing the power button, the PC does not make any sound, the fans do not spin, and the LED indicators do not light up, first of all, make an external inspection of the power source, namely, check whether the power cord is securely connected to the socket and connector in the unit, and whether power supply switch in the "ON" position.
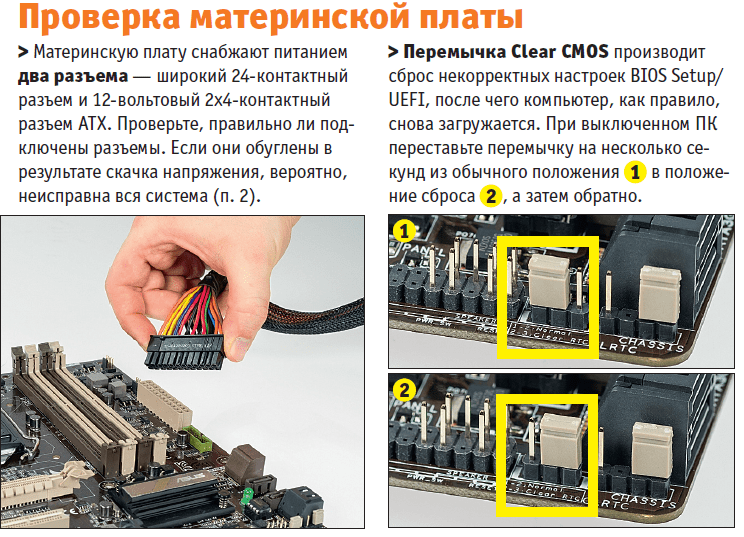
Next, check for loose power wires in the motherboard connectors, which can happen on desktop PCs when manipulated by non-professionals or during strong vibrations. First, open the case cover on the left and see if the cables from the power supply to the motherboard are connected correctly. Disconnect the wide 24-pin connector and the 12-volt four- or eight-pin auxiliary power connector for the processor and inspect them. If contacts are burned, it may be a power surge or a power supply failure. It is possible that this affected all components of the system, which may entail the purchase of a new computer.
 Button failure.
 Short both power button pins on the motherboard with a paper clip to check for a faulty computer case power button.
If everything is in order on the power supply side, check that the power and reset buttons on the case are connected to the motherboard correctly and that they have an easy move - the small two-pin connectors should be firmly connected to the pins. Disable the "Reset" button and try to turn on the computer (if this works, then the reset button is faulty and should remain disabled).
If that doesn't work, unplug the power button. Further, if the system can be started by closing both contacts, for example, with a paper clip, then the power button is faulty. In this situation, connect the reset button and use it later as an ON/OFF switch. Otherwise, you will have to take the system unit to the workshop for diagnostics.
2 PC works but monitor stays off
If the fans and LEDs are working but the monitor screen is blank and remains black, check its power source and make sure the OSD display setup menu is displayed when you press the appropriate key. If not, then the monitor is defective - this can be checked by temporarily connecting another display (or TV using an HDMI cable).

If the OSD menu is displayed, switch inputs using the Source button on the monitor or the appropriate menu item until the desired connected input is set. Then switch output modes with the PC turned on by holding down the "Win" key and double-clicking "P" - this allows you to switch to the next of the four modes. Wait a few seconds and switch a total of four times to check if the image is displayed in one of the modes. If these steps fail, replace the monitor cable and try another available interface (such as HDMI or VGA instead of DVI) to see if the connectors or cable are bad.
Finally, the most time-consuming method is to see if installing or replacing the video card will help (for starters, this may be an old or borrowed video card). If all these attempts fail, there is probably some other hardware problem that you can diagnose with the following steps.
3 BIOS won't start/freezes
A blinking cursor on the screen when the PC starts up or a freeze during BIOS initialization can indicate various problems with the hardware. First of all, check if all connectors (for example, CPU cooler) are properly connected to the motherboard and if all coolers are working. If necessary, replace the defective ones. The motherboard speaker in certain cases gives out important information in the form of beeps, the meaning of each of which is explained in the motherboard user manual. However, this requires that this little speaker is properly connected to the "Speaker" connector of the motherboard (make sure of this or use a special POST card for diagnostics).
The symptoms described may also indicate incorrect BIOS Setup settings - this problem can be easily fixed by resetting the settings to factory settings. The procedure is described in the motherboard manual. In most cases, this requires, with the computer turned off, to set the jumper labeled "Clear CMOS" on the board to the reset position for a few seconds, and then move it back.
The absence of an image on the screen may be caused by a malfunction of the monitor, PC or cable between them.
The next suspect is RAM: check each module individually (if only one is installed, try inserting it in another slot) and replace the faulty one if necessary.
Then disconnect all non-essential hardware from the USB, PCIe, and other ports on the computer. If after that it starts, gradually plug everything back - and try until you find the culprit.
If all else fails, the motherboard and/or CPU is probably damaged, and you need to get ready to purchase new devices.
 4 Windows won't start
Computer goes through BIOS initialization, but gives a message that the boot disk was not found? First of all, check if the SATA power cable and data cable of your HDD or SSD are properly connected. Then try connecting the drive with a different cable to one of the other ports. If it doesn't appear in BIOS Setup/UEFI (to check, press "Del" when booting the computer, go to "Advanced Chipset Features" or another similar section and see if the drive is recognized on one of the SATA channels), try connecting the HDD via the SATA interface or in a USB case to another computer. If this does not work, then the disk is damaged, and, most likely, only a professional service can restore the data at a fairly high price.
If the drive appears in BIOS Setup or is still readable on another computer but is no longer bootable, then you must first run the recovery system and back up your data due to the risk of file system errors or hardware failure. Then repair the bootloader of the operating system: boot the computer from the Windows installation media (insert DVD or USB drive, press "F12" or similar key after power on, select the media from the boot menu). Launch Command Prompt. Then type: "bootrec /fixMBR" "Enter", "bootrec /fixBoot", "Enter". If that doesn't work, open the console again and type "bootrec /rebuildBCD", "Enter". If that doesn't work, it's likely that your Windows has been so damaged by file system or hard drive corruption that it needs to be reinstalled - best on a new drive, as the old one will no longer be reliable after a failure.
5 Unable to sign in to Windows
 Problems with drivers.
 If Windows does not start, try uninstalling failed drivers or unmounting related hardware in safe mode.
If Windows starts loading but cannot finish loading, you have two options: either take an extended break (for example, large Windows updates may take several tens of minutes, depending on the system, to complete all operations on reboot), or even if nothing happens after an hour or the problem is not related to Windows updates, boot into safe mode. This mode is offered as an option after a sudden power failure. In other cases, immediately after starting, press "F8" (in Windows 10 - "Shift + F8"). If problems with updates prevent startup, Windows will cancel them, after which the system should boot normally. In addition, in this mode, you can update or remove software and drivers, the installation of which probably led to the problem.
In other cases, start the System Configuration tool in safe mode, on the Services tab, activate the option "Do not display Microsoft services" and uncheck all other displayed services.
Now turn off in the "Startup" tab (Windows 7) or in the Task Manager on the "Startup" tab (Windows 8 and 10) all automatically loaded programs. If that doesn't work, remove any unnecessary devices. As a last resort, before starting the reinstallation, run the command prompt as an administrator in safe mode (type "cmd" in the start menu search box, right-click on "cmd.exe" and select "Run as administrator") and type "sfc /scannow" - this will check all system files and, if necessary, replace them with the original ones.
Photo: manufacturing companies; CHIP Studios, Kai Hendry/Flickr.com