What program to format the hard drive. Proper formatting of the hard drive
Formatting a hard drive may be necessary when you need to clear the hard drive of absolutely all the information that is stored on it. This can be done with a standard Windows tool, but the use of specialized programs is more priority.
The need to format the hard drive may arise when reinstalling the operating system, viruses that can only be eliminated by formatting or purchasing a new hard drive.
There are several programs for this, and one of the most popular and convenient is Acronis Disk Manager. This is a multifunctional utility that can be useful to an ordinary user more than once. For example, to create and delete partitions, change their size and position, restore partitions in case of failures or errors. But we are most interested in another possibility - formatting the hard drive.
The program performs a full high-level format, during which the surface of the drive is checked, and then the file system table is written.
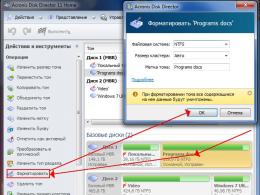
Using the program is quite simple. First, you need to install it, of course. Then select the drive that we are going to format. We select this disk with the left mouse button, in the menu on the left we find and select the item Format.
A window appears that prompts you to select the type of file system that the disk will receive when formatted, the cluster size and will give you the opportunity to view more detailed information.
If you don't know which settings to choose for options File system and Cluster size, leave everything as it is set by default - Acronis knows what is required of it.

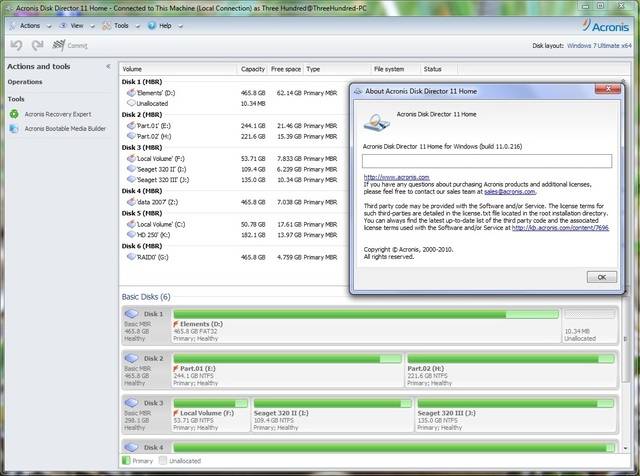
The screenshot shows that Disk 1 is selected and the Program Docs section
If you need to format the drive on which the operating system is installed, you will have to use another method. Windows won't let itself be removed so easily, so most likely if you try to use the above method, you will get an error message. The method that will be discussed next. also relevant for those users who purchased a hard drive in a store, installed it in a computer, but the operating system refuses to see it.
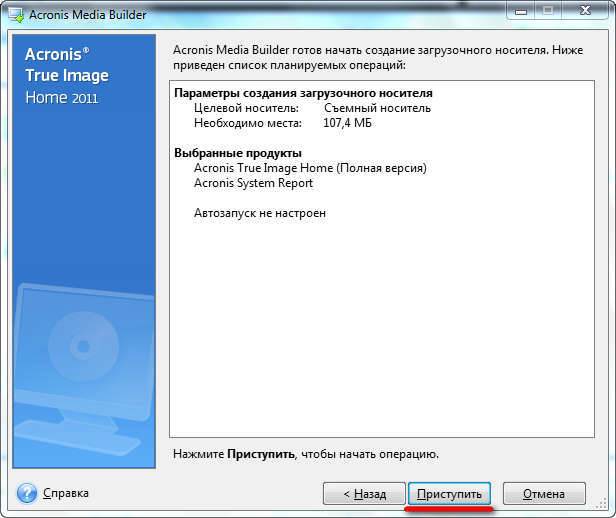
So, we need to put the program on external media, for example, on a USB flash drive. We connect it to the PC, in the program itself, select the item Facilities and run Bootable Media Builder.

This same wizard will open, with which we will work.

First step- Select the way to present discs. We select the option that is highlighted in red in the screenshot.

Second step- Linux kernel parameters. We skip it by pressing the button Further.

Third step- selection of boot components that will be written to your USB flash drive. We put all the checkboxes and go to the next step.

Fourth and final step- Select the type of boot disk. Select our carrier and click Further.

After that, we restart the computer and set the BIOS to boot from the USB flash drive. You can read about how to do this here by finding the section in the article BIOS setup.
After you boot from the flash drive, format the disk in the way that was described at the very beginning of this article. Good luck!
Formatting is the process by which media is marked up, that is, a file system is created. For the user, this usually means that there is a complete removal of information that was previously contained on the media. In the article, we will look at how the hard drive is formatted through the BIOS.
Suppose you have a hard drive connected to your computer that needs to be formatted, and you need to format it through the BIOS, for example, if the computer does not have an operating system installed.
If we talk about formatting, then as such this procedure cannot be performed only through the BIOS, since this menu does not provide for the possibility of erasing connected drives. However, if you use special utilities that can be run through the BIOS, then the task already becomes doable.
Formatting a hard drive via BIOS
Below we will consider two methods available to each user that will allow you to format a hard drive through the BIOS. Each of the methods will use additional tools in its work (nowhere without them), and you just have to stop at the most suitable one.
Method 1: Formatting the Hard Drive Through the Windows Setup Menu
This method is the most common, since today many users have a boot disk or flash drive with any Windows distribution kit.
As you can already understand, you will need a bootable device that contains the Windows Installer. In this case, we will not install Windows, but we will run the setup program through the BIOS, in which the formatting process will start.
The nuance is that using the Windows Installer you can perform an exceptionally quick format - no additional settings are provided here. In addition, the size of the Windows Installer is much larger than the utility in the second method.
1. First of all, you will need a boot disk or flash drive. In the event that you do not have either one or the other, the most convenient thing is to burn a bootable USB flash drive with the distribution kit. For example, on the official Microsoft website at the link below there is a special utility that will download the Windows distribution to your computer, and then allow you to easily and quickly burn it to a USB flash drive, thereby making the flash drive bootable.
2. Once you have a boot device in hand, you need to connect it to the computer on which the hard drive will be formatted, and then enter the BIOS. As a rule, for most computers, entering the BIOS is done by quickly pressing a special hot key at a very early stage - this is most often F2, Del or F1.
3. Once you get into the BIOS, you will need to find the "Boot MENU", in which you can set the boot device that will start up first. In different BIOS versions, this item may be located in different ways and have a slightly different name variation, but the essence is the same. In our case, the item we need is in the menu "Advanced BIOS Features" - "First Boot Device", where you need to set the name of the flash drive as the first boot device (if the name of the flash drive is not displayed, select USB-HDD) or CDROM (if you are using a Windows disk).
4. When the desired settings are set, you just have to exit the BIOS, after which the computer will restart, and as a result, the Windows setup menu will be displayed on the screen.
5. After selecting the language, a window will appear on the screen in which you will need to select the drive on which Windows will be installed. Select the disk with one mouse button, and then click on the button below "Disk Setup".
6. The screen will display an additional set of options where you need to select an item "Format".
7. A warning will appear on the screen stating that formatting will delete all data from the disk. If you agree with this, please click "OK" to continue.
The process will start. Once the formatting is completed, a message will appear on the screen indicating that the procedure was completed successfully.
Method 2: Formatting a disk using Acronis Disk Director
In the event that you do not have bootable media with Windows OS, then it is better to immediately proceed to this method, since in this case you will need to write much less information to a disk or flash drive (3-4 GB versus 15 MB).
Popular Tool Acronis Disk Manager allows you to carry out complex work with hard drives even if the computer does not have an installed operating system. The utility is paid, but it has a free demo version that will allow you to verify the capabilities of this program and, of course, complete the formatting task we set.
Download Acronis Disk Director
1.
After downloading the utility from the official website of the developer, you will need to install it on your computer, and then launch it.
2. Connect a flash drive or disk to your computer, on which the Acronis Live-CD will be written. In the left area of the program window that opens, click the button "Acronis Bootable Media Builder".
3. A utility window will appear on the screen, in which you need to click on the button "Further".
4. Leave the settings presented in the next window as default.
5. Specify the components that will be written to the bootable media (in our case, for example, the component for 64-bit systems will be used, but if you do not know the bit depth of the computer, select both).
6. Finally, you will need to choose where the utility will be written: directly to a USB flash drive or saved as an ISO image for later burning it to disk. Since in our case a USB flash drive is connected to the computer, we select it and proceed further.
7. If you need to add drivers, the program will prompt you to do so in the next step.
8. Click the button "Continue", to start burning bootable media.
9. The burning of the bootable media will begin, which will take a little time, since the size of the utility being written does not exceed 20 MB. As soon as a message about the successful completion of the process is displayed on the screen, the USB flash drive or disk can be removed from the computer and connected to the one on which the hard disk will be formatted through the BIOS.
10. You will need to enter the BIOS and set your boot device as the primary one. How to do this was described in the first method from the second point to the fourth, so we will not stop at this stage.
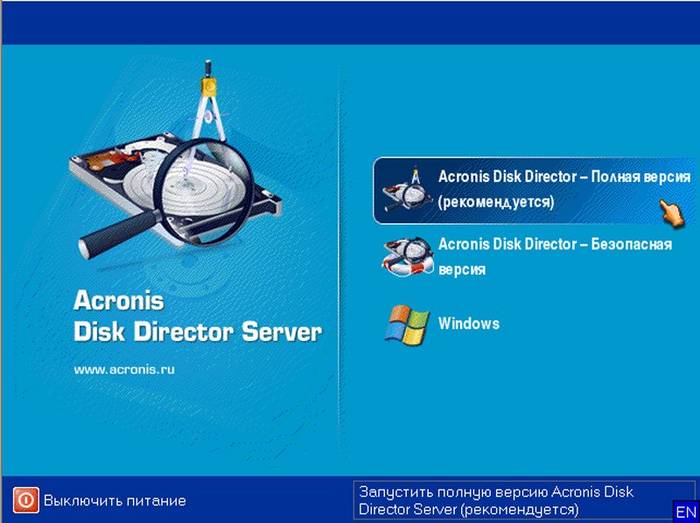
11. The Acronis window will appear on the screen. To continue working with the program, you will need to select the desired utility. In our case, only one version was recorded, so we choose Acronis Disk Manager.
12. The utility will begin downloading, which may take a few minutes. A disc browser window will appear on the screen, showing the available discs. Click the button to continue. "OK".
HDD Low Level Format Tool- a free utility for complex formatting of hard drives, flash cards, memory cards.
The program performs low-level formatting of storage media, that is, it destroys all partitions, all user data and MBR. After such a deletion, no cybercriminal will be able to recover data from the media!
Low-level formatting completely removes data from the drive, filling the free space with zeros. Even after serious failures, this formatting method can bring the drive back to life.
Main features of HDD Low Level Format Tool:
- Low-level formatting and the ability to resize the drive within 281,474,976,710,655 bytes.
- Support for a large number of interfaces, including S-ATA (SATA), IDE, SAS, SCSI, USB (where without it!), Firewire. Any of these types of media will be formatted quickly and efficiently.
- Supported manufacturers include: Hitachi, Seagate, Toshiba, IBM, Samsung, Fujitsu, Western Digital and many more.
- Low-level formatting of flash cards (SD, MemoryStick, MMC formats). It is enough to insert the card into the desktop card reader and run the utility.
- Support for working in UltraDMA mode.
- Function of fast clearing of the information.
- Display SMART data. The only limitation is the fact that the application does not work with external hard drive boxes and external chassis.
- If error warnings appear when copying information.
- If you are using a disc with a different type of controller.
- If you have tried absolutely everything, however, not a single recovery method has yielded positive results.
List of popular free programs for various types of formatting hard drives (HDD, SSD, RAID) and removable media (USB, Firewire, SD). In this article, you will learn how to properly format a hard drive, learn about various types of HDD formatting - including low-level. We will also choose a good program for partitioning a hard drive.
HDD formatting methods - from simple to complex
Formatting is a simple operation that can be performed by inexperienced users. Next, I will tell you how to format the HDD yourself - from simple to complex, depending on your skills and PC proficiency.
Using standard Windows tools for formatting
The Windows XP-10 operating system has built-in tools to perform this operation. Formatting a hard drive is done like this:
- Open "Explorer" (or another file manager),
- Go to the "My Computer" section
- Click on the desired disk
- Select "Format"
- Next, click on the “Start” button
This is the easiest way to format your computer without additional tools. For all its simplicity, however, all steps must be performed consciously, clearly understanding why you are doing this. Before giving your consent to formatting, carefully check whether the correct disk is selected.
Perhaps the video tutorial shows more clearly how to format the disk.
Alternative formatting method in Windows 7 / 8 / 10
- Different systems have different paths to Disk Management - the easiest way is to open the search for programs and enter "management". When the system gives you a search result, find "Computer Management" and open it
- In the menu on the left, go to "Disk Management"
- Right-click on the desired partition and select Format. Since the process takes place inside a running OS, the "Format" menu item will be inactive on the system partition
- Next, select a label for the new partition, the type of the future file system and the required cluster size (if you don’t know what size you need, leave “default”)
- For high-level formatting, you can leave the "Quick Format" checkbox active. If deep cleaning of the contents of the section is required, then uncheck this box.
- After pressing the "OK" button, the system will ask for confirmation - click "OK" again
Formatting a hard drive through the Windows command line
To start formatting, open a command prompt (console) on your computer. To do this, use the key combination WIN + R, in the Run window that appears, enter the CMD command, press ENTER.
Note. To format a drive through the command line, you will need administrator rights (). Start - CMD - open the context menu by clicking on the application icon "Command Prompt" - Run as administrator. If you try to format the drive without administrator rights, you will fail: access will be denied. In general, watch the video where I show how to format as an administrator.
For formatting through the console, use the following commands:
Format drive letter
Press Enter. We carefully read what is written in the console, perform further actions with the hard disk according to the situation.
Full HDD Format via HDD Low Level Format Tool
Low-level formatting will optimize the HDD structure. This is useful in preparation for reinstalling the operating system. At the same time, you can solve problems with bad sectors of the hard drive.
HDD Low Level Format Tool is suitable for low-level formatting. The utility will help you format your computer hard drive, external HDD, tablet SD card and other storage devices.
In addition to the basic functions, HDD Low Level Format Tool can be used to read SMART scores, check for read errors, disk usage time, and more.
How fully format hard drive:
- After installation, run the program HDD Low Level Format
- In the Drive selection window, select the hard drive (if several HDDs are connected to the PC). The easiest way to distinguish one hard drive from another is by volume. Click Continue
- Go to the LOW-LEVEL Format tab
- For quick formatting (deleting partitions and MBR records), select the Perform quick wipe option.
- To completely format the hard drive, the above option must be ignored.
- Before completely formatting a hard drive, check that the correct drive is selected. Only after that press the Format this device button.
AOMEI Partition Assistant
AOMEI Partition AssistantThe program offers a number of useful features, including low-level formatting of hard drives and most types of removable media. The interface resembles standard Windows tools, so it will not be difficult to figure it out:
- The main window automatically displays the disk with the installed OS. If you need to format another device, select it by clicking the "Disk" item in the top menu
- In the lower block of the left menu, select "Erase Hard Drive"
- When you click this button, you will be prompted for the number of passes of the operation. If in the future it is planned to restore destroyed data, then select a value from 1 to 7. If you specify a parameter of 8 or more, it will be almost impossible to restore information from the device
- Confirm your choice by clicking "Yes"
- Formatting to start will require a system reboot - there is no turning back after clicking the Reboot Now button, so make sure you select the correct drive and the correct operation settings
After restarting the computer, the program will perform all the specified actions and you will have a clean hard drive at your disposal.
DiskWipe
DiskWipe is a great solution for situations where the data on the media needs to be destroyed beyond recovery. The program uses several proven algorithms (Dod 5220-22.M, US Army, Peter Guttman), and advanced settings allow you to choose the depth of formatting. According to the developers, the program does not contain hidden viruses, etc., and does not transfer user data.
DiskWipe
Formatting the desired device using DiskWipe is extremely simple:
- Run the program. In the block on the left you will see all devices available for formatting
- Select the desired device and click "Wipe Disk" in the top menu
- The advanced settings will open with predefined default values. For full and irreversible formatting, you can check all available fields with checkmarks, and in the right block, specify "Highest"
- After selecting the settings and clicking "OK", the formatting of the selected device will start
Paragon Partition Manager
A test period of 30 days allows you to evaluate the capabilities of the program and format the necessary devices in various modes. Since Paragon Partition Manager has several options for working with partitions (partitioning, restoring, and others), it is distributed shareware.
Paragon Partition Manager
The formatting process is intuitive:
- In the main window, click "Partition Manager" in the menu on the left, then select "Launch Partition Manager"
- From the proposed list of devices, select the one you need, open the context menu with the right mouse button, and click "Format Partition"
- Specify the type of future file system and volume name, then click "Format"
- The procedure will be queued - to apply the changes, you must click on the green checkmark in the top menu
- After confirming the operation (the “Yes” button), it will no longer be possible to stop its execution
Separately, it is worth noting the fact that Paragon Partition Manager not only formats the device, but also creates a new partition with the specified file system, so after the system boots, the disk can be used without additional steps.
reference Information
What is formatting?
Formatting a disk is the process of marking a storage device such as a hard disk drive (HDD), memory card, CD/DVD, or other storage medium. The formatting operation is equally useful for new and worn-out HDDs.
A disk that has no partitioning is absolutely useless. In addition to the fact that you apply markup to the disk, formatting almost permanently deletes all data (although there are many programs for recovering after formatting). Therefore, you need to be careful and prepare in advance for formatting the hard drive.
Over the years of operation of the operating system (Windows, Mac OS, Linux), the hard drive turns into a "garbage dump", since many programs leave their files on the disk, and after uninstallation, their "roots" still remain on the HDD. As a result, the system is slow and unstable. There are various freezes, slowdowns, the disk clicks, makes noise - it behaves inappropriately. After reformatting, the hard drive is optimized and starts working better. Many devices last a long time without this procedure. I advise you to insure and format your hard drive at least once a year.
Sooner or later formatting the drive is inevitable. However, before doing this, it is very important to update or reinstall the operating system on the computer. Along with the removal of unnecessary files, you get a completely clean environment without defects, harmful viruses, unused programs, data that lead to conflicts. Thus, before reformatting the hard drive, we reinstall the OS.
Before formatting, back up any important data to another drive. As already mentioned, during the execution of this procedure, various service information, labels are written to the disk, which allow further information to be written to the HDD without hindrance.
Steps to Format a Hard Drive
low level– at this stage, the base markup is applied to the disk at a low level. Typically, this is done by the hardware developer. In this case, special tracks, service data, are applied to the disk. This information remains on the hard drive almost forever - it can only be overwritten using proprietary utilities. These programs can only replace service data. By the way, if you perform a low-level formatting of the hard drive, then you will not be able to recover data later, unfortunately or fortunately. Therefore, if you aim to destroy information, then you can use this format. Read about low-level formatting
Section breakdown. It is clear that storing data on a disk without partitions is quite inconvenient. For some logical organization, the HDD is divided into special zones, disks - drive C:, drive D: and so on. For these purposes, both utility utilities built into the OS and external programs for formatting a hard drive, which I have written about more than once, can be used.
high level. In the process of this type of reformatting, boot sectors, file tables are created.
Types of disk formatting
You may know that the standard system tools provide 2 methods by which you can format a hard drive - external or internal:
quick format: takes less time, allows you to carry out the procedure as is. The bottom line is that with this type of computer formatting, the files in the file table are overwritten with zeros, while the data is stored as if nothing had happened, you can later restore it. Also, with this method, you do not optimize the file structure, and if there were defects on the hard disk, you will not fix them with the fast method.
regular formatting: Longer and deeper hard disk formatting. Data on an internal or external drive is completely destroyed, the file system is checked for possible errors, damage. bad sectors, bad blocks. Thus, with the usual way of reformatting, you kill two birds with one stone, although you lose a little more time.
When you need to transfer partitions without losing data or format your hard drive, it is better to resort to auxiliary tools. Now there are many packages for data recovery and formatting work. Naturally, you can take advantage of the capabilities of Windows, but sometimes you cannot do without auxiliary programs. We will consider one of these below.
What opportunities does it give?
The format function allows you to start the “life” of the computer on the selected device from scratch. It erases absolutely all information on the media: user profiles, previously installed programs, OS. But most importantly - along with them and viruses.
Thanks to this somewhat radical method of clearing a USB data drive, you can install a new OS on a formatted device or reinstall an old one.
By its nature, this process is divided into two subspecies:
- high-level (software);
- low-level (hardware).
In the first case, the file system and tables are regenerated.
In the second, information about the position of the sectors (clusters) located in it is applied to the surface of the hard disk at the hardware level.
This allows the head of your HDD (Hard Disk Drive) to more accurately navigate its surface.
Video: format the hard drive
Working with HDD using Windows
High-level formatting is easily done using standard Windows tools. In order to carry out a similar procedure on any external device, just insert it into the USB connector and right-click.
In the context menu that appears, select the format function, then select the file system, and start the cleaning process. This way is the fastest possible solution.

However, in order to remove the operating system from the hard drive, if it is present on the computer in a single instance, a little more knowledge is required: its removal is possible only through the debug mode and using special command line operators ( cmd), which may not be for everyone.
It is performed in several steps:

From now on, we have two options for further action:
- the existing set of tools, using the program, click the settings, and then formatting;
- or press a combination of two keys - Shift and F10. A standard command prompt will open.
And again a series of actions:

After successfully formatting, we will need to update the information about the existing disks and re-set the partition sizes for them. But high-level cleaning of the hard drive is not the best option, especially if it has bad sectors: performance is significantly reduced, and periodic freezes and other “charms” become an integral part of the work. And only special applications will help with low-level formatting.
Acronis Disk Director hard disk formatter
Acronis Disk Director is perhaps the best hard drive formatting software available today. User-friendly interface, high reliability and high-quality results make this application the #1 tool in the prevention of "ailments" of your HDD.
Used by professional computer gurus, it allows you to perform many operations when working with a storage medium. Delving into the very structure of the program, it is easy to understand why it is so loved and even revered by many people whose activities are somehow related to computer craft.
Acronis is a full-fledged and, importantly, convenient tool for working with a hard drive, which has been known to the public for more than a year. Let's find out why.
Program features
The Acronis Disk Director arsenal is aimed at facilitating the user's communication with the computer hardware as much as possible. This is manifested in everything: detailed tips will help beginners, who are just mastering it, not to stumble during this process, and the possibility of absolute control over the actions taken will allow professionals to achieve exactly what they want to get in the end.
Acronis Disk Director is a universal program for deep formatting a hard drive. Thanks to it, partitioning disks will not seem like something complicated, as it would be with the same standard Windows tools.
You can always, with mathematical precision, allocate exactly as much space for the future disk as you think there will be enough.
In addition, it is possible to turn ready-made sections into:
- primary- those from which the operating system will be loaded, first of all;
- active- additional operating systems are installed on them;
- brain teaser- acting as a repository for programs, data and other personal information.
Functions
The previous section is not enough to fully reveal the potential of this program, because in addition to its capabilities, it also has a number of useful functions.
Let's take a closer look at them:
- free conversion of HDD partitions between static and dynamic volumes;
- saving a backup of the current operating system: having an archive with a backup on an external medium, you can avoid the need to install programs again after cleaning - just unzip the file and your system will be back in service;
- recovery of previously deleted partitions;
- converting a boot record from MBR to GPT and vice versa without using the command line.
Looks good, doesn't it? However, it is striking that all this really works, moreover, without fail and is equipped with fairly detailed instructions and help that will help you find a solution to almost any question posed to the program.
Work process
As mentioned earlier, cleaning a disk from the data on it can occur both at the hardware and software levels. But exactly how it happens is a small mystery, but quite interesting.
Let's start from the smallest to the largest. There are two types of high-level version: fast and full. With fast, the file system of the storage medium is completely overwritten.
The most modern standard is the NTFS file system, which is characterized by high performance and ease of organizing data storage.
Full high-level formatting pre-scans the entire hard drive for bad sectors, and then tries to fix them. And only then the file tables are written to the device itself.
The low-level version redistributes the space available on the disk surface by re-creating tracks (tracks), on which the control program is subsequently reinstalled. This method takes the most time, but is considered to be in demand for the most effective restoration of the solid state drive.
After carrying out one of the above procedures, there is only one file system on the disk - all partitions will have to be created by hand, manipulating the free space of your hard drive.
Acronis Disk Director is the best way to cope with this task. It is possible to run this program both from under the OS shell and by booting from a flash device. If everything is clear with the first option, then for the second we will need to enable support for booting the computer from drives in the BIOS. How to do this was described above in the "Formatting the HDD using Windows" section.
Let's go through the whole procedure step by step:

Acronis pros and cons
The program is paid, but the developer has provided the possibility of using a trial (demo) version of their own product. It is noteworthy that, despite the limited period of use, there are no such restrictions: the user can enjoy the full functionality of this program for the entire period. Of the minuses, only a fairly “decent” cost of the program for an ordinary user can be distinguished.
The pluses include:

Taking into account all the features of Acronis Disk Director, it is impossible not to highlight that this particular application will help you most effectively clean up external or internal storage devices of any level, partition them into partitions, and much, much more. Its quality and reliability are growing with the release of each new version, the functionality is constantly expanding, and the possibilities are increasing.
>