Bootable flash drive WinSetupFromUSB. How to create a bootable Windows flash drive
Good day!
Quite a lot of questions arise when creating bootable flash drives (well, in general, in the space around this topic 👀).
Especially now, when there are more and more PCs / laptops on sale that come without a CD drive (and sometimes without a pre-installed Windows OS). Those. I am leading to the fact that it is not so easy to do without a bootable USB flash drive / disk ...
One of the most convenient programs for preparing and creating installation (bootable) media is WinSetupFromUSB. The most important criterion why the choice fell on it is functionality, free of charge and ease of use.
Judge for yourself, the utility is able to create bootable USB drives that will work on a variety of PCs and laptops: i.e. universal option, suitable for both UEFI and BIOS.
In general, even if you do not understand the latest encryption, I will say this - the boot drive we created (in this article) should allow you to boot on most computers / laptops.
So, let's get down to business...
How to create a bootable USB flash drive for Windows 10
❶ What you need to get started
1) WinSetupFromUSB utility
In my opinion, this is one of the best utilities for creating bootable flash drives. Firstly, it is free and does not need to be installed, and secondly, it works great and supports most operating systems (Windows XP, 7, 8, 10), sees all the drives connected to the system, and allows you to easily format them.
In addition, it can make multi-boot media (with multiple OS), keeps an event log, etc.

Where to download the WinSetupFromUSB program: on the official website (the link is given above), I recommend choosing the latest version (currently it is 1.8).
Also, a very important plus is (already mentioned a little higher) that WinSetupFromUSB allows you to create bootable USB flash drives that can boot both in BIOS and UEFI (i.e., a kind of universal option that will work on the vast majority of computers).
♦
2) Bootable ISO image with Windows 10
In general, such an image can now be downloaded even from the official Microsoft website. It is highly desirable to use an ISO image on which there is one specific version of the OS (with one bit depth). Let me explain with an example:
- good choice: " Windows 10 Home x64" ;
- bad option: "Windows 10 - 20 in 1 (x86 + x64)" - with all these assemblies (from craftsmen), with different versions of bitness, with several versions of the OS, there are a lot of errors and problems (both when creating installation drives, and when they are subsequently used).
♦
3) A flash drive of at least 4 GB (preferably 8 GB or more)
The most common USB flash drive is 4-8 GB (preferably 8 GB, because many ISO images with Windows 10 are larger than 4 GB).
👉 Remarque!
How to choose (what to look for when choosing a flash drive).
❷ Run WinSetupFromUSB
Downloaded program file WinSetupFromUSB(from the official site) is a regular archive packed with 7-Zip. In order to extract all the program files from it, you just need to run it.


There are two versions in the program folder: for x64 and x32 systems. If you don't know what OS you have, try running both files one by one (if you open the wrong file, the program simply won't start, giving an error).

❸ Set boot image recording settings
1) To get started copy everything you need from a flash drive, with which we will work (during the recording of Windows - everything will be deleted from it). Next in WinSetupFromUSB click the button Refresh so that the program "sees" your drive (see arrow-1 on the screen below).
2) Then check the boxes next to the following items: Auto Format it with FBinst, FAT 32, align, Copy BPB (as shown in rectangle-2 on the screen below). By doing this, we will format and bring the flash drive to the boot type.
3) In line 3 (see screenshot below) "Vista/7/8/10/Server 2008/2012 based ISO" indicate your boot image with windows 10(if there is a warning, as I have in the screenshot below, just agree. This window says that the image with Windows is more than 4 GB and such a file cannot be written to the FAT 32 file system (note: the WinSetupFromUSB utility will break it, so everything is fine here ☺)).
4) Well, to start the utility - press the button GO.

WinSetupFromUSB Settings
By the way, below is another screenshot of how all the settings look, only without my underlining.

❹ We confirm and give consent to format the flash drive
After pressing the button GO- the utility will warn you that all data on the flash drive will be deleted. Therefore, once again I advise you to first transfer all the data, make a backup.

By the way, as many as 2 warnings (usually) ...

While WinSetupFromUSB is running, it is better not to launch resource-intensive applications (games, video and photo editors, etc.) and not close the program window (sometimes, some people think that it is frozen, because it does not show signs of life ☺. But this is not so, in the lower part of the window, a small green bar "fills up", the inscriptions about the state of the process change - these are the indicators).
If the drive was successfully created (and no errors occurred during the process) - you should see a small window with one short phrase Job Done(work completed). Now the flash drive can be used ...

❺ Checking how the flash drive works
To test the drive, I used a relatively modern laptop with UEFI. Calling the Boot Menu - the laptop showed that it sees the USB flash drive (as well as the one installed on the Windows hard drive). I tried booting from a flash drive.
👉 Note!
Instructions on how to enter . It may be required when you need to boot, for example, from a USB flash drive.


So here it is, and difficult, and simple at the same time.
M multi-boot flash drive, equipped with a distribution kit of several operating systems, anti-virus live-disk, the necessary programs that work offline from bootable media - this is a universal tool for solving various problems and tasks with a computer that ordinary users have to deal with every now and then. What to say about IT-specialists, most of whose professional life is the restoration of the working capacity of computer equipment.
Flash drive, which brings together various bootable software solutions, will replace a bunch of different optical boot disks. A single multi-boot flash drive can be used to neutralize viruses blocking computer startup, to reinstall the operating system, to restore it from a backup, to allocate hard disk space, and to solve other problems. Ready-made images are available for download on the Internet live-discs with a selection of various software for solving computer problems. But, of course, it is better to prepare a universal rescue tool on your own, choosing the contents of a bootable USB flash drive for your individual needs and preferences.
The program can create flash drives with various bootable software WinSetupFromUSB for Windows. It can complete a selection of bootable media based on the bootloader Grub4dos . We will use it to create a multiboot flash drive. And, accordingly, we will consider this whole process in detail below.
1. Contents of a multiboot flash drive
First of all, you need to prepare a distribution kit for a multiboot flash drive. In our case, we have a flash drive with a small volume by modern standards - just 8 GB. Therefore, it will be equipped with only the necessary tools. And this is the distribution Windows versions 8.1 , 10 and old XP , antivirus live-disk from Avira, disk space allocation manager and free backup. We prepare for recording on a flash drive ISO- images of bootable media of the selected software and installation disks of operating systems.
2. Download WinSetupFromUSB
WinSetupFromUSB is a free program. Download the latest version from the official website. At the time of writing this article, the current version 1.6 . WinSetupFromUSB works portable, without installation on the system. All you need to do is unpack the downloaded archive and launch the program shortcut in accordance with the bitness of the current Windows.
Download the WinSetupFromUSB program from the official website:
http://www.winsetupfromusb.com/downloads/
3. Formatting a flash drive
Next stage - flash drive formatting. This process can be carried out as regular Windows tools. (team "Format" in the context menu called on the flash drive in the explorer) , and inside WinSetupFromUSB. Let's consider the last option.
In the program window at the top, select the desired flash drive if there are several of them connected to the computer. Activate the option checkbox "Auto format it with FBinst". After that, its additional options will be revealed. Of these, you only need to decide on the future file system of the flash drive - NTFS or FAT32. If the distribution kit prepared for writing to a USB flash drive contains files whose weight exceeds 4 GB, you must select a file system NTFS. If not, leave FAT32 default.
The FAT32 file system must also be left if the multiboot flash drive is intended, among other things, to work with computers based on BIOS UEFI. In this case, it will not be necessary to disable the function. secure boot, and the distribution kit contained on the flash drive 64 -bit Windows 8.1 and 10 set to GPT-disk partition.
WinSetupFromUSB prepares a universal bootable flash drive - also for computers with a regular BIOS, and for devices based on BIOS UEFI. But the interface UEFI sees only bootable flash drives formatted in FAT32. Some programs can bypass these restrictions and create bootable UEFI- flash drives with file system NTFS, but WinSetupFromUSB, alas, is not one of them.
So, we decide on the file system and click the button below Go.
In the warning window about erasing data on the flash drive, click "Yes".

And again we press "Yes" another warning window.

In a few seconds we will see the inscription Job done- Job is done. We press "OK".

Now you can start adding the contents of the multiboot flash drive. The order in which you add images of operating system installation disks and bootable software media is not important. It is only important to adhere to the appropriate column in the central part of the window WinSetupFromUSB.
4. Adding a Windows distribution
Adding a Windows distribution kit is possible in two forms of the program window. One of the forms is designed to add images of Windows installation disks, starting from the version Vista , the other one is for installation files Windows XP and older versions of the system. In our case, we first add an image to the corresponding form Windows 8.1. Put a checkmark on this form and use the browse button to specify the path to ISO-image. A set of a multiboot flash drive is formed in stages: each distribution kit is added and recorded in a separate order. Click the button Go.

We are waiting for the completion of the process and click "OK".

Now we check the same form with a checkmark and use the browse button to add another Windows distribution. In our case, this is the installation disk. Windows 10. For the same version of Windows, you can add its various editions one by one - 32 - and 64 -bit. We add, we press Go, we are waiting for the completion of the process.

5. Nuances with Windows XP
The presence of an installation disk on the flash drive Windows XP it may be necessary in rare cases to reinstall the operating system on very old PC builds. But the process of creating a bootable USB flash drive with this version of the system through WinSetupFromUSB has its own nuances. In the program interface, the upper form is used to add the distribution kit of Windows XP and earlier versions of the system.

This form's browse button does not add a normal ISO distribution image. Before content ISO-image must be opened in a virtual drive. In systems Windows 8.1 and 10 this is done by regular means - on ISO-file, the context menu is called and the command is selected.

V Windows 7 and earlier system mounts ISO-images possible through third-party programs such as Alcohol 120% or Daemon Tools. Connected content ISO-image is transferred to a separately created folder.

And this folder is already in the process of creating a bootable flash drive is added to the program window WinSetupFromUSB.

The next step is to accept the license agreement.

And only then start recording.

Another nuance is the need to integrate drivers for SATA-controller in distribution Windows XP, if it does not initially contain them.
6. Adding bootable software media
ISO- images of the distribution kit of the operating system linux , live -drives based linux and WinPE, bootable media of various programs using the browse button are added to the active form "Linux ISO/Other Grub4dos compatible ISO". After adding ISO-image a small window will appear Boot menu name, in which you can set the name of how the bootable media will be displayed in the bootloader menu Grub4dos. In our case, specify the path to the anti-virus image live- the Avira disk. Click the button Go and wait for the recording to complete.


And then the image.

7. Flash drive testing
One of the benefits of the program WinSetupFromUSB is built-in ON to emulate computer hardware - QEMU. Via QEMU you can immediately, without leaving the current operating system, test a USB flash drive - even a regular bootable one, even a multiboot one. At the bottom of the WinSetupFromUSB window, check the option box and click Go.

A QEMU window will open, in which everything will happen as on the monitor screen after booting from a USB flash drive. The first thing we see is the bootloader menu Grub4dos. Using the navigation keys or numbers according to the software serial numbers in the list, we can select one or another bootable media, live-disk or operating system installation process.

The Windows installation disks will be combined into two partitions. One will contain distributions Windows XP and older versions of the system, in the other - versions of Windows, starting from Vista. Each of the sections leads to the window of the additional boot menu for the corresponding versions and editions of Windows.

The free program WinSetupFromUSB, designed to create a bootable or multiboot USB flash drive, I have repeatedly touched on in articles on this site. In addition, many other thematic resources can draw your attention to this tool, as one of the most functional in terms of writing bootable USB drives.
Where to download WinSetupFromUSB
First of all, I want to draw your attention to the fact that by asking the appropriate query in the search engine, you will most likely stumble upon a site that will have a lot of incomprehensibly leading green Download buttons, and after the desired download link is found , it turns out that when installing WinSetupFromUSB, several more "junk" programs of dubious usefulness were installed on the computer.
To prevent this from happening, just go to the official website of the program Http://www. winsetupfromusb. com/downloads/ and download it. A little less than a month ago (October 17, 2013), the final version 1.0 was released, and we will consider it (before that, WinSetupFromUSB 1.0 beta6 and beta8 were the most commonly used).
Update 2015: The current version is 1.4, the work with the program has not changed. Below in the article is a video instruction on using WinSetupFromUSB 1.4.

By the way, the program does not require installation: you need to unpack the archive with it and run the desired version - 32-bit or x64.
How to make a bootable USB flash drive using WinSetupFromUSB
Responsive2(width:300px;height:300px)@media(min-width: 500px)(.responsive2(width:336px;height:280px))
Despite the fact that creating a bootable USB flash drive is not all that can be done using this utility (which actually includes at least 3 additional tools for working with USB drives), this task is still the main one. Therefore, I will demonstrate the fastest and easiest way to do it.

In the main window of the program, in the upper field, select the USB drive to which the recording will be made. Please note that all data on it will be deleted. Also check the AutoFormat it with FBinst box - this will automatically format the flash drive and prepare it to be bootable when you start. In fact, this can be done manually using the Bootice, RMPrepUSB utilities, but, as I said, the instruction is for beginners and we will use the easiest way.
Note: However, you should check the box for automatic formatting only if you are writing images to a USB flash drive for the first time using this program. If you already have a bootable USB flash drive created in WinSetupFromUSB and you need to add, for example, another Windows installation to it, then just follow the steps below without formatting.
The next step is to specify what exactly we want to add to the flash drive. It can be several distributions at once, as a result of which we will get a multi-boot flash drive. So, tick the desired item or several and specify the path to the files needed for WinSetupFromUSB to work (for this, press the button with the ellipsis to the right of the field):
- Windows 2000/XP/2003 Setup - we use it to place the distribution kit of one of the specified operating systems on a flash drive. As a path, you need to specify the folder in which the I386 / AMD64 folders (or only I386) are located. That is, you either need to mount an ISO image with the OS in the system and specify the path to the virtual disk drive, or insert a Windows disk and, accordingly, specify the path to it. Another option is to open the ISO image with an archiver and extract all the contents to a separate folder: in this case, you will need to specify the path to this folder in WinSetupFromUSB. That is, usually, when creating a bootable Windows XP flash drive, we just need to specify the drive letter with the distribution. Windows Vista / 7/8 / Server 2008/2012 - to install these operating systems, you need to specify the path to the ISO image file with it. In general, in previous versions of the program it looked different, but now they have made it easier. WinPE. It is unlikely that a novice user will need it.LinuxISO / Other Grub4dos compatible ISO - it will be required if you want to add an Ubuntu Linux distribution (or other Linux) or any disk with utilities for restoring a computer, checking for viruses and similar, for example: Kaspersky Rescue Disk , Hiren's Boot CD, RBCD and others. Most of them use exactly Grub4dos. SysLinux bootsector - designed to add Linux distributions that use the syslinux bootloader. Most likely not useful. To use, you need to specify the path to the folder in which the SYSLINUX folder is located.

After all the necessary distributions have been added, we simply press the Go button, answer the two warnings in the affirmative and start waiting. Note that if you are making a bootable USB drive that has Windows 7 or Windows 8 present, when you copy the windows. wim, it may appear that WinSetupFromUSB is stuck. It's not, be patient and wait.
Update 2015: The latest version of WinSetupFromUSB introduced the ability to burn ISOs larger than 4 GB to a FAT32 UEFI flash drive.

This completes the instructions for using WinSetupFromUSB. All that's left for you is to put the boot from a USB flash drive into the BIOS of the computer and use the newly created drive and boot from it. As I said, these are not all the features of the program, but in the vast majority of cases the described items will be enough.
WinSetupFromUsb is a multifunctional freeware tool for creating bootable USB files for the Windows operating system, most Linux distributions, various rescue, antivirus and minimally equipped ready-to-run operating systems like WinPE. In addition, the utility has the functionality of creating multi-boot media based on flash memory, which includes several of the distributions listed above. Such media may include the Gparted hard disk volume editor and a set of SisLinux boot loaders for loading CD and magnetic disk images, if necessary, added to the flash drive by the program itself.
Creating a bootable USB flash drive using WinSetupFromUsb
The application has a simple intuitive single-window interface without toolbars that burden beginners. The utility does not actually have any menus, except for links to its own Internet resource and the button to exit the program. Despite the lack of Russian-language localization, working with winsetupfromusb is quite simple and convenient. The user manual is posted on the developer's website and is distributed only in English, which does not hinder the use of the software.
Additional tools:
- the program is equipped with an integrated editor for creating a menu of multiboot media - FBinstTool;
- a tool for generating bootables - Bootice;
- the most powerful utility for creating bootable flash drives, which has an impressive number of supported functions, OS, bootloaders, devices and other tools - RMPrepUSB;
- utility for cutting and collecting files;
- a pair of archivers (7z and upx);
- Grub4DOS bootloader editor and many others. Based on this, it follows that the program is a shell that combines the functionality of a large number of tools that allow you to work with bootable media. Application features:
- availability of powerful tools for work;
- event logging during user actions;
- free distribution of the utility and the tools included in it;
- support for creating multi-boot media.
How to download winsetupfromusb final rus
It is recommended to download WinSetupFromUsb 1 4 and its latest editions from the official Internet resource. Search engines often lead to sites where if not a virus or a broken link under the “Download” button is located, then it’s definitely an installer offering to watch ads, install additional applications, or replace the start page.
The current version at the time of this writing is WinSetupFromUsb 1 6 dated November 28, 2015. Some changes have been made to it regarding: the corresponding inscriptions and the imdisk package has been updated to make the application compatible with this edition of the OS.
Installing winsetupfromusb is not required: we download the utility via a direct link from the developers' server, run the installation file, which is a self-extracting 7z archive, and specify the unpacking path. Let's download from here.
Self-extracting 7z archiveAfter the decompression of the archive is completed, you can use WinSetupFromUsb.
WinSetupFromUSB is a program for automating the process of installing various Live-CD assemblies and operating systems on a flash drive or USB-HDD. It uses the Grub4dos bootloader with multiple boot options. For example, let's create a bootable Kingston 1Gb flash drive with the ability to install Windows from it.
To get started, downloadWinSetupFromUSBWe make sure that our flash drive does not have the necessary information.
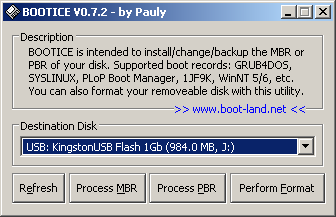
1. Run the program itself and select our flash drive.
2.
Now we have to prepare the flash drive for installation. Create a partition and make it bootable. To do this, you can use two utilities Bootice and RMPrepUSB.
For example, let's use Bootice. Click on the button Bootice and choose Perform Format.
3. In the next window, select USB-HDD mode (Single Partion) and press next step.
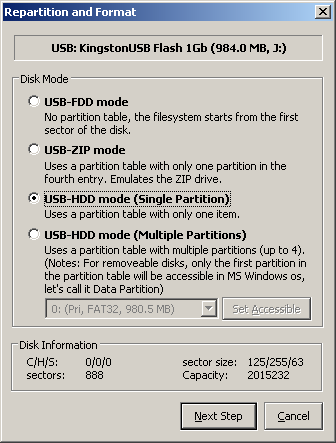
4. Here we select the disk label and the NTFS file system. and format the flash drive to NTFS. This will allow you to slightly increase the speed of reading files in the text mode of the installation (for some flash, the opposite effect of slowing down is possible).

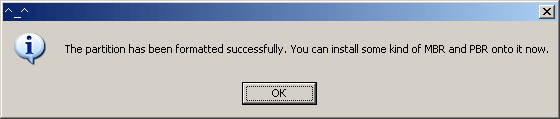
5. Click OK, the program will issue a warning that the flash drive will be formatted.

6.
Next, we confirm the actions of the program several times. Click on OK.
7. After creating the partitions, close the Bootice window and return to the main program window.
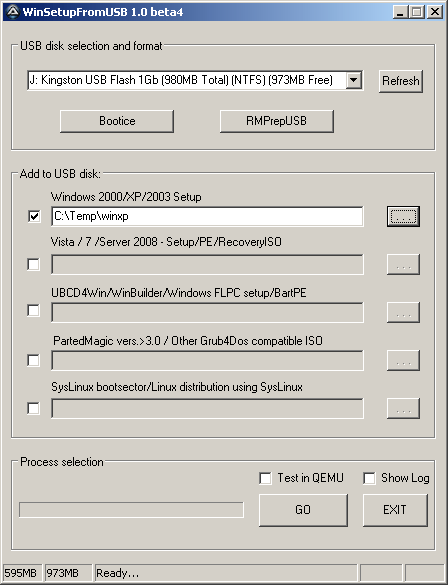
We put the flag in front Windows 2000/XP/2003 Setup and select the place where the Windows XP installation files are unpacked. Having an ISO image of Windows XP, you can easily unpack with WinRar.
8.
Click on the button GO(before starting, you can check the flag Show Log and observe in a separate window all the actions performed by the program).
At the end of the work, the utility will issue job done.
After booting from a flash drive, the Grub4Dos boot menu will appear, in which you select
Windows 2000/XP/2003 Setup, and then First part of Windows XP Professional SP3 setup from partion 0.
After the first stage of installation and reboot, you need to boot from the flash again and now select Second part of 2000/XP/2003 setup / Boot first internal hard disk
If we do not do this, the installer will lose the location of the installation files on the flash drive and the installation will end with an error.
Congratulations, you have created a bootable flash drive using WinSetupFromUSB!


