Create a cartoon with different scenes. All stages of creating a cartoon on a computer at home
Previously, even a simple animation had to be worked on by a team of professional animators. Yes, and such work was carried out in specialized studios with a set of appropriate tools. Today, any user of a computer, or even a mobile device, can try himself in the field of animation.
Of course, for serious projects, you will have to use full-fledged software complexes, but simpler tasks can be handled using simpler tools. In the same article, you will learn how to create a cartoon online and what Internet services you need to interact with for this.
There are many resources for frame-by-frame animation on the web, but without some artistic talent, nothing significant can be created with their help. However, if you try, you can get a fairly sane result as a result of working with an online editor.
Note that the bulk of the relevant tools assume that you have . Therefore, if there is none, do not be lazy and install this multimedia solution. It's very simple and won't take much of your time.
Method 1: Toonator
The most easy-to-use tool for creating short animated videos. Despite the relatively meager functionality, everything here is limited only by your imagination and skill. An example of this is the numerous users of the resource, among whose works you can find really remarkable cartoons.

However, there is one “BUT” here: you can save your cartoons on the resource as much as you like, but for downloading you will have to spend "Spiders"— the service's own currency. You can earn them by participating in regular Toonator contests and drawing cartoons on the "topic of the day", or simply buy them. The only question is what you like more.
Method 2: The animator
A similar solution for working with frame-by-frame animation online. The toolkit of the service, in comparison with the previous one, is wider. For example, The animator allows you to use all RGB colors and manually change the frame rate in the video.
Unlike the previous one, this web tool is in English. However, you should not have any difficulties associated with this - everything is as simple and clear as possible.

As you can see, unlike the previous service, The animator allows you to freely download your own work. And in terms of ease of use, this solution is in no way inferior to Multator. However, a large Russian-speaking community has formed around the latter, and this particular fact can seriously affect your choice.
Method 3: CLICK
A more advanced resource for creating animated videos. Click offers users not just to draw each frame, but to combine a variety of elements: all kinds of stickers, inscriptions, backgrounds and popular cartoon characters.
Despite the rather wide functionality, using this web tool is simple and convenient.

Method 4: Wick
If you want to create really complex animation, use the Wick service. This tool in its functionality is as close as possible to professional solutions of this kind. In general, we can say that the service is what it is.
In addition to full support for vector graphics, Wick can work with layers and interactive JavaScript animations. With it, you can create really serious projects right in the browser window.
Wick is free and open source and does not require registration.
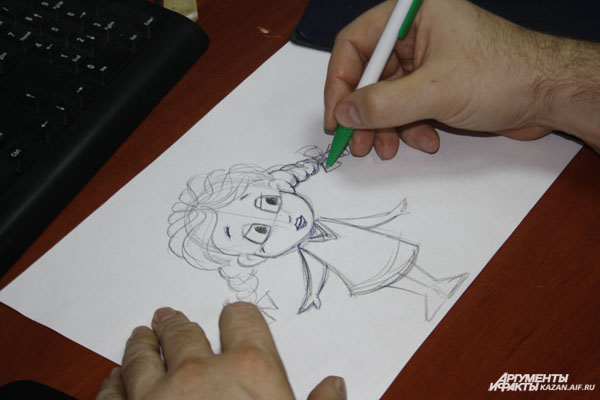
 Aliya Sharafutdinova went to "Tatarmultfilm" to understand the intricacies of the production process.
 In order to give people a fairy tale, it is no longer necessary to color kilometers of paper - artists draw on tablets and computers. However, the most complex, creative component remained the same. Even if the cartoon is created based on a well-known work, first of all, you need to think about the appearance of the characters and the details of the plot.
Our guide through the fairy-tale world was chief studio directorSergey KIATROV. He has been in animation since 1996.
The master says that the cartoon begins with one scene, from which the plot of the future story unfolds. If the sketch is successful, a script is written, where the scene of action is described in detail, the characters of the characters and dialogues are worked out. The total script for a 3-4 minute cartoon is 70-85 pages.

“I can add my own elements to the content,” Kiatrov continues. - To be honest, I wrote off the main character of the cartoon "Waterman" (based on the tale of the Tatar poet G. Tukay) from my neighbor, but he does not know about it yet. (laughs) The character turned out to be hooligan, he jumps from the bungee, although this is not in the work.

The appearance of each character is thought out to the smallest detail: facial features and figures, costume, items of use. All this creates a complete image.
The harmony of the plot is given by a clear sequence of actions: not a single cartoon is filmed without a storyboard. This is an illustration in the form of a comic book of each scene of the future picture.
The next step is to create drawings. The studio uses the translation technique. This means that the components of one scene - the characters (and sometimes their body parts), background, houses, trees will be created separately. The more details - the easier it is to give movement to the elements. Then all this is collected and mounted together in Adobe After Effects.

Cartoon characters are drawn by each studio artist. “It turns out about 30 options, from which we choose the best together. We are working on it. We like negative characters more - they are more characteristic. For example, Div from "Kisekbash" ( evil sorcerer from an old Kazan legend. - Note. ed.),” explains animator Denis SADIKOV.

Further, the director divides each element of the thick storyboard among several artists. It is very difficult to reproduce "cartoons" exactly. Therefore, it is important that scenes with certain characters are drawn by a limited circle of specialists.

“Here, for example, I create a boy,” says artistNelya ABDEEVA. - I choose according to the scenario, what poses, what facial expressions he has here. I draw it on a tablet in Adobe Photoshop, selecting the "pencil" function. Then I paint."
“Modern technologies are very convenient. You do not need to rethrow everything if one element did not work out. For example, here the boy has a short neck. I select only the head in the program and edit,” the artist continues.

After the drawings are ready, you need to teach the characters to move.
“The beauty of the cartoon is that it does not have to be subject to the physical laws of our world,” the director explains. - But if you do this, in all animation studios they take this bouncing ball as a basis. On his example, the frog I created also moves.
Denis Sadykov: - How would a regular ball fall from a height in a cartoon (shows). What if it was cast iron? We see that he is heavy (shows) And if it were a watermelon, he would burst .... And if he is an actor? (laughs and shows) This is one example ... "


How to make a character cry or wave his hand, says a gesture specialist Denis Sadykov. He has many years of experience. “For the first time I made an animation for the video of the Piknik group. It was a plasticine mouth,” he recalls.

Denis Sadykov:- “At the moment I am working on the cartoon “Talk Duck”. Now I'm drawing a scene where a chatty duck meets a hedgehog. Different parts of the hedgehog's body are drawn separately. Let's say palm, hand, elbow. Then we open everything in the "After Effects" program, attach the body parts to each other. This is necessary so that he can move his hand. When meeting, the hedgehog waves to the chatty duck, such as "hello."

For one step of the boy in a frame lasting several milliseconds, 12 drawings are needed. The lower the speed of movement, the more illustrations you need.

“Animation is painstaking, hard work that requires perseverance and patience: today I did only 10 seconds for the whole working day,” admits Denis Sadykov. “But if you love work, everything works out and brings joy!”


Sergei Kiatrov: - “This picture is 12 frames per second. Such a wonderful horse runs. And her last and first frame are the same. Our eye sees an intermediate stage, when the horse's legs are tucked in - if this is not the case, the horse is moving too fast. Here, for example, 24 frames per second. we see that the legs began to ripple.
ArtistDasha MITROFANOVA explained to us how to create a sequence of actions and using the example of a scene in which a boy shakes off his clothes after bathing, created in TVPaint Animation.

“According to the script, he went behind a tree. We see only his hands, - explains the artist. - I must say that each movement of an animated character is at least 10 drawings and whole weeks of work. In my case it is 38 frames, each one is a separate image. Then I reproduce and correct my shortcomings so that the movement is alive, smooth and effective.
And the artist Polina Grechkina, perhaps the most ambitious task - she creates a general plan for the cartoon. If each movement of the hero in the frame is several illustrations, then the background for the entire scene is usually one. In addition, separate elements are also created - layers in Photoshop: houses, trees, the sun, which will be superimposed on the background during installation.

Polina Grechkina:- “When editing, for example, it will be one layer, the second layer will be a character. If he goes, the camera will move behind him. No need to redraw the background every time. For example, if a character has to enter against the backdrop of a forest, then on the frame he must go behind a tree. That is, the forest is one layer, the tree is one layer, and between them is a layer with a character.
After the image is ready, you need to teach the characters to speak. Sounding cartoons sometimes has to be done several times: the actors and the director understand the characters' characters and the circumstances of the plot in different ways. Then the voices are edited, synchronized and assembled into single audio tracks. “For voicing animals, we usually call the actors of the Theater for Young Spectators: in children's performances there are often animals among the characters,” explains the chief director. “To voice human characters, we turn to the artists of the Galiaskar Kamal Theater.”
When all the scenes are ready, the specialists sit down for the final editing of the cartoon. This is the fastest and most difficult process - you have to reluctantly cut out finished scenes. However, the main result is at stake - the real story of small "live" characters created by animators.
Many people liked to watch cartoons in childhood, and at an older age, many have retained this habit. At the same time, for many people, no, no, and the thought of creating their own cartoon slips through. After all, in this case, one could tell some kind of story, describe some new world, or create a character that has long been entrenched in the head, but has not been implemented in other works.
In addition, in times of mass dissemination of high technologies, the creation and rendering of a cartoon ceased to be such a fantastic task, if you make a little effort, then almost anyone can handle them.
By the way, this is why you can involve children in the process, who can help invent the world and characters, and working together on a cartoon can help you better understand each other.
How to create a cartoon yourself on a computer - all the steps
In this section, all the stages of creating a cartoon will be analyzed in detail, you should definitely read each of them carefully so that later you do not grab your head because something was not fully thought out.
Coming up with an idea
Before you shoot a cartoon at home, you need to go through the preparatory stage.
This is the stage from which not only the creation of a cartoon begins, but almost any creative activity. At the same time, it is necessary well appreciate their starting conditions.
It should be taken into account how experienced the user is in this matter and how much time, effort and money he is generally willing to spend on this project. In case this is one of the initial experiments on creating something like this, then it is worth stopping at a simple cartoon, with a small number of characters and a short duration.
For starters, you should implement a small project with well-written and traced characters than to take on a global cartoon with a large number of characters and their complex interaction. In addition, such an experience will allow you to roughly estimate your strengths, time and resources, which will help you better plan your next cartoon.
The second step in thinking about an idea should be the duration of the work. If this is the first attempt at writing, then you can create a cartoon from 1 to 5 minutes, such a duration will not scare viewers on the global network and they will be able to get acquainted with creativity. In addition, for such a short period of time, fewer resources will be required, it will be possible to better think over the heroes and everything else.
In case it is planned small animated series, then each cartoon can be from 10 minutes to 25 minutes long. A full-fledged film should take from an hour to two, but this is clearly not worth taking on a swoop, it's better to practice on something smaller.
When the duration is chosen, it remains to be determined for which age group it will be, who will be its main audience. Of course, it is believed that cartoons are mostly watched by children, but teenagers and adults will also not refuse to watch a good work. From audience age the main idea and action on the screen will depend very much. Serious philosophical or tragic topics are best raised in adult cartoons; for a younger audience, you should choose something simpler in perception and more dynamic.
Creating an idea for a cartoon should be based on personal experience. In the case of a serious work, you can take memories of some difficult moments and overcoming them, while a light or humorous one should take well-known situations and add something unusual to them. In any case, an idea taken from personal experience will be much easier to describe and implement, and viewers may like the fact that something familiar is happening on the screen. 
However, it is not really worth it thoroughly describe real life. It is best to connect the imagination and transfer the situation to an unusual place or to unusual characters. At this stage, fantasy will help a lot, which will allow you to squeeze a typical situation of standing in a traffic jam into a fantasy setting.
You also need to clearly present the character and type of the protagonist. This is especially important in a short work, where it should be immediately clear what kind of character it is and what to expect from it. In a long cartoon, it will be possible to show the features of the character gradually, it will develop over time.
Script writing
Now that the main points have formed in my head, you can start writing the script. This is a very important stage, especially if the work is long and contains dialogues. In this case, you will have to create full script with a description of events and interactions between the characters. This is also necessary because you will have to voice dialogues, for which you will have to invite other people, and they should know not only the words, but also in what situation and on behalf of which character they voice them, so as not to get ridiculous overlays. 
In the absence of dialogue or a short duration, you can simply sketch out the main scenes and stages, as well as briefly describe the actions that take place in them so as not to get confused. You should not immediately rush to implement the first scenario, it is better to let it lie down for a couple of days, and then take a fresh look at it. During this time, new interesting ideas can come to mind.
Determine how to create
Now the user needs to decide way of creating cartoon. It can be completely drawn, in which case you will need to draw each scene of the cartoon, and each character separately on a computer or paper, and then apply animation to it. You can also make a plasticine cartoon. In this case, the characters will have to be sculpted and placed on a painted background. After that, each scene will have to be filmed using special equipment. 
In both cases, it will not be so easy to do this the first time without any experience. So when creating the first cartoon, you should proceed from your skills, and if they are approximately equal in both areas, then you should choose simply based on your preferences. In any case, the processes are quite different and it will take some time to understand all the intricacies. If in the case of plasticine you need special equipment, a camera, a table for shooting and a computer to bring it all into one film and voice acting, then with a drawn cartoon you only need a computer, but this will not make it easier. 
This will require good modeling skills, drawing animation, because you have to create models of each character, and then place them on your own created scene, and then animate. All this requires the presence of specific programs that are very demanding on computer resources. The ability to draw and create models will also come in handy, although some of them can be taken from open sources.
Choosing a program for creating animation
In this case, everything will depend quite heavily on what type of animation was chosen. In the case of plasticine models, it will be possible to get by with just a couple of programs for video editing and sound overlays like Adobe Premier. 
If you plan to make cartoons on a computer in 2D or 3D animation, you will need several programs for creating models and various graphics. In this case, you should first take on familiar programs, you should not immediately download super-sophisticated professional applications, it will be much more difficult to figure them out. In any case, our site contains descriptions of many programs for and modeling, so it's worth reading their descriptions and choosing the one that you like best.
cartoon storyboard
The user is now ready to start storyboarding. In essence, she is small drawings, which will help to better imagine what is happening in the frame, where the hero is heading and what will happen next. 
After the storyboard is done, you can proceed to the next step in creating a cartoon with your own hands.
Creating backgrounds and decorations
No character action takes place in a vacuum (unless it's a space odyssey, but there should be a ship in the background, or at least stars), so you'll have to think about the setting as well. Thereafter need to draw it so that you can put it under the plasticine figures. 
Or you will have to create all the scenery using computer graphics. Not worth it overload scenes different objects, this can adversely affect both the perception of the background by the viewer and the time it takes to create and process the project. In any case, the background should be well thought out and drawn no less thoughtfully. 
Soundtrack and voice acting
Actions also should not take place in absolute silence, so it is worth choosing or recording a background that matches the environment, let the noise of the forest, the clatter of hooves or the noise of passing cars be heard. The background must not be empty and must harmonize with everything that happens in the frame and not leave unnecessary questions, forcing the audience to think out the little things.

Installation of the finished project
After all the elements are in hand, you can proceed to the final touch - the installation of the project. At this point, you need to bring everything together footage taken, then overlay on this video track background sound accompaniment and voices of the characters. At the same time, everything needs to be set up so that it looks good and organic. This stage will take a lot of time, as it is a long and painstaking work.
Create cartoons on your Android phone
It is unlikely that it will be possible to make a full-fledged cartoon on an Android phone, however, some points can be worked out using applications. For example, Rough Animator will allow the user create simple models and animation, which can be useful for short projects that use fairly simple models. 
The Lyan 3D utility will help you create more complex 3D models and textures, as well as animate them. 
With this application, you can create something more serious, however, it will be more convenient to work on a stationary device.
Creating a cartoon can be a long and complicated process. But if you're passionate about seeing your own cartoon stories on screen, the end result will be worth the effort. Here's what you need to do if you want to create your own cartoon.
Steps
Part 1
Idea search-
Consider your resources. Perhaps your imagination is limited and your budget and talent are limitless, or vice versa. When you're thinking about a new idea for a cartoon, consider how much you can put into the process and how much creativity you have.
- If you're new to this, you might want to stay away from plots that require complex animation scenes, such as large-scale battles or complex vehicles. Before taking on a project of this magnitude, hone your animation skills and gain experience.
- Also keep in mind that depending on the complexity of your cartoon, you will need different equipment. A plasticine cartoon with more than 20-25 characters and 4 sets will need more materials and devices than a celluloid cartoon with one episode. If you have a very limited budget, opt for a short and simple cartoon.
-
Think about the length of the cartoon. Depending on the target market, it may differ. If you decide on the length of the cartoon at the beginning, it will be easier for you to come up with a plot that fits into this framework.
- If you want to create a cartoon that can become an animated series, it should be either 11 or 20-25 minutes long.
- Animated films can run from 60 to 120 minutes.
- If all you want to create is one cartoon (not a series) for the Internet, you can make it for 1-5 minutes. If it is longer, it may turn viewers away from watching.
-
Decide on the target audience. Despite the fact that most cartoons are created for children, there are many films for teenagers and adults. You should be guided by the characteristics of the age group and other demographic characteristics in the process of creating a cartoon.
- For example, a tragic cartoon (say, about the death of a loved one) is more suitable for a slightly older audience. If your cartoon is for the younger generation, you'd better choose a theme that's a little easier to understand, more specific.
-
Build on your experience. In other words, write about what you know. Many authors write stories based on events, feelings, or relationships that they once experienced. Make a list of things that happened to you that could be the basis for your cartoon.
- If you want to create a cartoon with a serious idea, remember the events that made you stronger and tougher: unrequited love, the loss of a friend, dedication to achieve the impossible, and so on.
- If you want to create a more humorous cartoon, take a day-to-day situation as the basis, such as waiting in traffic or feeling like an email is about to arrive. Embellish the situation and comically convey its complexity.
- You can also use a ready-made humorous story to create a light cartoon.
-
Turn on your imagination. Of course, there are many plots that are not related to real moments of life. You can use your interests and imagination to create completely new environments. In this case, you need to include enough details that are relevant to the audience so that they can understand the actions of the characters and the story as a whole.
- Viewer-relevant details are topics that affect everyone. For example, most people can be touched by the topic of growing up, whether the story is set in a real modern world, surrounded by a space future, or in the world of fantasy characters.
-
Create a charming main character. Make a list of character traits that you would like to see in the main character. Write both positive and negative traits so that the hero is not too perfect.
- This is an important step. It doesn't matter how simple or complex your cartoon is. Whereas a longer, more serious film needs more character development, a short humorous cartoon needs a character with a clear purpose and clear personality traits that allow him to respond to conflict in a unique way.
-
Try your hand at animation using celluloid film. This is the traditional method of creating cartoons. You will need to hand draw each frame on a piece of celluloid film and then photograph them with a special camera.
- Celluloid animation is guided by almost the same principle as the cinemagraph. A series of drawings is made, and each of them is slightly different from the previous one. If they are shown quickly one after the other, the differences between them create the illusion of movement.
- Each image is drawn and painted on transparent celluloid film.
- Use your camera to take pictures of these drawings and edit them with animation editing software.
-
Try your hand at puppet animation. This is another traditional type of animation, but is less commonly used than celluloid animation. Plasticine animation is the most common form of puppet animation, but there are other types of puppets that you can use to create such a cartoon.
- You can use shadow puppets, paper puppets, sand animation, or anything else that can change position.
- Every movement should be small. Always take a photo after you've made a new move.
- Edit images by viewing them together, quickly alternating one after another. When you observe them in this way, you will notice things that need to be corrected.
Now I will tell you how to make a cartoon at home.
I don't do computer animation, ie. drawn on a computer (flash, three de and te pe), so I will not touch it. These cartoons are made from photographs, that is, in fact, all of these are varieties of stop-motion techniques. From the equipment you need a digital camera, a tripod (although there are ways to do without it, about them below) and a computer (for editing).
Techniques you can try at home:
1) Translation
We cut out the characters from paper and move them on the plane.
It might look like this:
Or so
Or so
2) Plasticine animation.
We sculpt characters from plasticine, they can be either flat (then the technique is close to translation) or voluminous (then the technique is close to puppet animation)
I work with plasticine very little, well, somehow it happened.
But here is the caterpillar.
And here is a dinosaur and a man
3) Subject animation.
Cubes, designers, cars, trains, little animals and little men are suitable here.
All sorts of self-built city houses, etc. are very cool.
4) Loose animation.
Not only sand, but also all sorts of cereals, beads, coffee, etc. etc.
Among other things, fussing with bulk substances is very calming and relieves stress well.
5) Pixilation.
The main actors here are you. You can ride a chair like a car, pass through walls, and even fly.
Creating a cartoon at home includes two main steps:
1. Shooting.
2. Installation.
SHOOTING
To shoot, you will need a camera, a tripod, good lighting (a lamp) and, in fact, what you are going to shoot, and a background for this. And it can be almost anything.
Timing: I usually do 6 frames per second, sometimes 4 (it also depends on the program in which you will later mount your cartoon, but more on that below).
Accordingly, at a speed of 6 frames per second for a minute of the film, you need to take 240 photos (there, of course, there will be all sorts of pauses and credits).
The tripod needs to be fixed. I stick it to the floor and the table with paper tape. All skewers on the tripod must be tightly screwed to prevent any movement of the camera.
In principle, you can try without a tripod, then the camera is simply placed on the table or you can tape it, for example, to a stepladder (but this, frankly, is a nightmare). When I started, I didn't have a tripod.
The result looked like this:
There is also such a thing - a clamp tripod, with it you can fasten the camera to a table or stool, it’s quite convenient, I must say (but I don’t have it, and my friends used it for cartoons very successfully)
It is better to immediately set a small size of photos, I do 640 by 480 pixels at maximum resolution. If you forgot and took large photos, then, before editing, do not forget to reduce them.
Now you need to install the light. If you work with natural light (from a window), be prepared for the fact that it will change unexpectedly - for example, a cloud will block the sun (especially if you set the shutter speed and aperture manually); if the mode is automatic, then the camera should adjust itself, but my camera in auto mode gives completely ugly colors.
Artificial light is easier to work with. He is the same all the time. I have a 40 watt energy-saving lamp that gives 240 watts of light, it has a standard base, and it is screwed into a regular clothespin lamp. It is also convenient to work with adjustable (bending) table lamps and floor lamps.
Now we need to frame the frame. If you are shooting on a flat surface, you will need a suitable sheet or fabric for the background. If your characters are voluminous, then you need either scenery or a suitable background. The background, as a rule, also needs to be fixed, especially with respect to a tripod. This can be done with paper tape, pins, etc. That is, if you are shooting on a table, the legs of the tripod should be tied directly to the table top. Please note that the frame does not get superfluous and mark the boundaries of the frame. I usually do border markings right on the background sheet.
Put the main character on the background (for example, you have a blue sheet and a boat on it), check all the camera settings: photo size, shooting mode, light, colors, frame borders, tripod immobility - tighten all the knobs on the tripod again. Remove the main character.
You can start shooting.
First of all, take a couple of frames of an empty background. Then we should have characters.
For example, at the beginning a hedgehog comes. We put the hedgehog near the border of the frame, let the tip of the nose appear in the frame. We take pictures. We move the hedgehog forward about a centimeter, take a picture. Don't forget to keep your hands out of the frame when taking pictures! After shooting 10-15 frames, scroll through the frames in viewing mode at a fast pace, something like this movement will look like in your cartoon. We draw conclusions - like how it moves, do not like it; Errors are usually immediately noticeable. We continue: move, shoot, move, shoot.
Take at least 30 frames per episode-element (for example, a car arrived and left) (5 seconds at the output), otherwise it will be too short and indistinct for the viewer.
Once you've shot whatever you want (remember we need 360 frames for a minute at 6 fps), you can think about credits and a title. Of course, you can make them later during editing, but it is much more interesting to make them in the style of a cartoon: for example, mold them from plasticine or write on paper right under the camera. If you are writing, then put the sheet on the background and write one or half letters, and do not forget to take pictures.
When everything is filmed, it's time to move on to the second part of the process - editing.
INSTALLATION.
Let's agree right away, I haven't worked with sound at all yet, I just select the music that suits my mood, so it's useless to ask me anything about the voice acting.
Animation from photos can be made in any editing program (program for working with video). Almost everyone has Windows Movie Maker (hereinafter referred to as Movie) on their computer right away, I will tell you about it and about Sony Vegas (hereinafter referred to as Vegas), which I now use. All the rest, in general, work by analogy.
First of all, you download all the photos to your computer and put them in a separate folder. Then open a photo editor that allows batch conversions, and take photos of the desired size (if you didn’t do it right away) and rename so that all files have sequential numbers in a row (this is not necessary for Movies, it is necessary for Vegas and others).
Then you open your editing program, put your sequence of photos on the video track, setting the desired speed, on the audio track - the right music, save the file and proudly show it to everyone. Hooray!
And now in more detail and with nuances.
Let's start with the Movie.
Open the program, import your photos.
Set the frame rate, go to the "service" then "Parameters".
You need to select an image duration of 0.125 and a transition duration of 0.25
Then you select the desired photos and drag them with the cursor to the "Video" track
Then import the music you want and drag it to the "Sound or Music" track
Cut the music to the desired length
Save, to do this, click "File", then "publish movie"
Next, follow the prompts.
Now about Vegas. In general, almost the same, some important points
Open the program, click "File" and "Properties"
Here you need to set the frame sizes (like your photos) and the frequency (this is the number of frames per second)
Next, to insert photos, click "File", then "Import", then "Data", open the desired folder, select the first frame you need, select it, check the box below "Open a sequence of still frames", in the box "Range "the first number is the number of the frame you have chosen, the second number (on a white background) is the number of the last frame in the sequence, by default - the last file in the folder, if you do not need all the files, enter the number of the last one you need instead.
Then, similarly with the Movie: your sequence appears on the video track (if it does not appear, you need to drag it there), import the desired music ("File", "Import", "Data", select the file), paste it on the audio track, cut to desired length
Save the file: "File", "Create As"
Select the video tab, the parameters in the red box should be as in the picture
Next, click "OK", then "Save", wait until the file is calculated, watch and enjoy the result.


