Shared folders, network computers, flash drives, drives are not displayed on the "Network" tab of Windows Explorer. Shared folders, network computers, flash drives, drives are not displayed on the "Network" tab of Windows Explorer Problems with smb windows 10
In the dialog boxNew registry propertiesselect the following:
- Action:Create
- Bush: HKEY_LOCAL_MACHINE
- Section path:SYSTEM\CurrentControlSet\Services\Lanman Server\Parameters
- Parameter name:SMB1
- Value type:REG_DWORD.
- Meaning: 0
This will disable the SMB version 1 server components. This group policy must be applied to all required workstations, servers, and domain controllers in the domain.
Note. WMI filters can also be configured to exclude unsupported operating systems or selected exclusions such as Windows XP.
Attention!Be careful when making changes on controllers where legacy systems such as Windows XP or later Linux and third party systems(which do not support SMB version 2 or SMB version 3 protocols) requires access to SYSVOL or other shared folders where SMB version 1 has been disabled.
Disable SMB client version 1 with group policy
To disable the SMB version 1 client, the registry key service key must be updated to disable MRxSMB10 from starting, and then the dependency in MRxSMB10 must be removed from the entry for LanmanWorkstation so that it can be started in a standard way without asking for MRxSMB10 on first run.
This update replaces the default values in the following two registry entries
HKEY_LOCAL_MACHINE\SYSTEM\CurrentControl Set\services\mrxsmb10
Parameter: Start REG_DWORD: 4 = Disabled
HKEY_LOCAL_MACHINE\SYSTEM\CurrentControlSet\Services\LanmanWorkstation
Parameter: DependOnService REG_MULTI_SZ: “Bowser”,”MRxSmb20″,”NSI”
Note. By default contains MRxSMB10 which is currently deprecated as a dependency
To configure using Group Policy:
- open Management Console group policies . Click right click Click the "Group Policy Object (GPO)", which should contain the new preferred item, then click Edit .
- In the console tree under Computer configuration expand the Settings folder, then expand the Windows Settings folder.
- Right-click the Registry node, click New, and select Registry Item.
In the dialog box New registry properties select the following:
- Action: Update
- Hive : HKEY_LOCAL_MACHINE
- Key path: SYSTEM\CurrentControlSet\services\mrxsmb 10
- Parameter name: Start
- Value type: REG_DWORD.
- Data value : 4
Then remove the dependency in MRxSMB10 that was disabled
In the dialog box New registry properties select the following:
- Action: Replace
- Hive : HKEY_LOCAL_MACHINE
- Key path: SYSTEM\CurrentControlSet\Services\Lanman Workstation
- Parameter name: DependOnService
- Parameter type REG_MULTI_SZ
- Data value :
- bowser
- MRxSmb20
Note. These three lines will not have markers (see below)
The defaults contain MRxSMB10 in a large number of versions of Windows, so replacing them with a multivalued string will remove MRxSMB10 as a dependency for LanmanServer and go from the four defaults to just the three values described above.
Note. When using the Group Policy Management Console, you do not need to use quotation marks or commas. Just enter each entry on a separate line as above
Reboot required:
Once the policy is applied and the registry settings are entered, SMB version 1 will be disabled after a system reboot.
annotation
If all settings are in the same Group Policy Object (GPO), then Group Policy Management will display the settings below.
Testing and validation
Once configured, give the policy permission to replicate and update. Since this is required for testing purposes, run gpupdate /force from the CMD.EXE line and then scan the target machines to ensure that the registry settings are applied correctly. Verify that SMB version 2 and SMB version 3 are working for all systems in the environment.
Attention! Don't forget to reboot the target systems.
annotation
This article describes how to enable and disable Server Message Block (SMB) version 1, SMB version 2 (SMBv2), and SMB version 3 (SMBv3) in the SMB client and server components.
A warning. It is not recommended to disable SMB version 2 or 3 protocol. Disable SMB version 2 or 3 protocol only as a temporary troubleshooting measure. Do not leave SMB version 2 or 3 disabled.
On Windows 7 and Windows Server 2008 R2, disabling SMB version 2 will disable the following functionality.
- Request aggregation, which allows multiple SMB 2 requests to be sent as a single network request.
- High volumes of reads and writes to make optimal use of fast networks.
- File and folder property caching, where clients store local copies of files and folders.
- Long-lived handles that allow you to transparently re-establish a connection to a server in the event of a temporary outage.
- Improved message signatures where the HMAC SHA-256 hashing algorithm replaces MD5.
- Improved scaling for sharing files (significantly increased the number of users, shares and open files to the server).
- Support for symbolic links.
- A client soft-lock lease model that limits the amount of data transferred between the client and server to improve performance on high-latency networks and increase SMB server scalability.
- Support for large MTUs to fully utilize 10 Gigabit Ethernet.
- Reduced power consumption - Clients that have files open to the server can be put to sleep.
- Transparent failover, in which clients fail over to cluster nodes during maintenance or failure without disruption.
- Scaling - with the provision of parallel access to shared data on all nodes of the cluster.
- Multichannel provides bandwidth aggregation network channel and network resiliency in the various channels available between client and server.
- SMB Direct - Provides support for RDMA networks for very high performance, low latency, and low CPU usage.
- Encryption - provides end-to-end encryption of data and protects it from interception in untrusted networks.
- Directory leasing improves application response times in branch offices through caching.
- Performance optimization for random reads and writes of small amounts of data.
Additional Information
How to enable and disable SMB protocols on an SMB server
Windows 8 and Windows Server 2012
Windows 8 and Windows Server 2012 introduces a new cmdlet Windows PowerShell Set-SMBServerConfiguration . It allows you to enable or disable the SMB version 1, 2, and 3 protocols on the server.Notes . Enabling or disabling SMB version 2 on Windows 8 or Windows Server 2012 also enables or disables SMB version 3. This is due to the use of a common stack for these protocols.
After running the cmdlet
- To obtain Current state SMB server protocol configuration, run the following cmdlet:
Get-SmbServerConfiguration | Select EnableSMB1Protocol, EnableSMB2Protocol
Set-SmbServerConfiguration -EnableSMB1Protocol $false
Set-SmbServerConfiguration -EnableSMB2Protocol $false
Set-SmbServerConfiguration -EnableSMB1Protocol $true
Set-SmbServerConfiguration -EnableSMB2Protocol $true
Windows 7, Windows Server 2008 R2, Windows Vista and Windows Server 2008
To enable or disable SMB protocols on an SMB server running Windows 7, Windows Server 2008 R2, Windows Vista or Windows Server 2008, use Windows PowerShell or Registry Editor.Windows PowerShell 2.0 or later PowerShell
- To disable SMB version 1 on the SMB server, run the following cmdlet:
Set-ItemProperty -Path "HKLM:\SYSTEM\CurrentControlSet\Serv ices\LanmanServer\Parameters" SMB1 -Type DWORD -Value 0 -Force
- To disable SMB version 2 and 3 protocols on an SMB server, run the following cmdlet:
Set-ItemProperty -Path "HKLM:\SYSTEM\CurrentControlSet\Serv ices\LanmanServer\Parameters" SMB2 -Type DWORD -Value 0 -Force
- To enable SMB version 1 on the SMB server, run the following cmdlet:
Set-ItemProperty -Path "HKLM:\SYSTEM\CurrentControlSet\Serv ices\LanmanServer\Parameters" SMB1 -Type DWORD -Value 1 -Force
- To enable the SMB version 2 and 3 protocols on the SMB server, run the following cmdlet:
Set-ItemProperty -Path "HKLM:\SYSTEM\CurrentControlSet\Serv ices\LanmanServer\Parameters" SMB2 -Type DWORD -Value 1 -Force
Registry Editor
Attention ! This article contains information about modifying the registry. It is recommended that you back up the registry before making any changes. and learn how to restore it in case a problem occurs. additional information about the creation backup, repair, or modify the registry, see the following article in the Microsoft Knowledge Base.To enable or disable the SMB version 1 protocol on the SMB server, configure the following registry key:Registry subkey: Registry entry: SMB1
REG_DWORD: 0 = disabled
REG_DWORD: 1 = enabled
Default: 1 = enabled
Registry subkey: HKEY_LOCAL_MACHINE\SYSTEM\CurrentControl Set\Services\LanmanServer\Parameters Registry entry: SMB2
REG_DWORD: 0 = disabled
REG_DWORD: 1 = enabled
Default: 1 = enabled
sc.exe config lanmanworkstation depend=bowser/mrxsmb20/nsi
sc.exe config mrxsmb10 start= disabled
- To enable the SMB version 1 protocol on an SMB client, run the following commands:
sc.exe config mrxsmb10 start= auto
- To disable SMB version 2 and 3 protocols on an SMB client, run the following commands:
sc.exe config lanmanworkstation depend=bowser/mrxsmb10/nsi
sc.exe config mrxsmb20 start= disabled
- To enable SMB version 2 and 3 protocols on an SMB client, run the following commands:
sc.exe config lanmanworkstation depend=bowser/mrxsmb10/mrxsmb20/nsi
sc.exe config mrxsmb20 start= auto
- These commands must be entered in command line with elevated privileges.
- After making these changes, the computer must be restarted.
SMB or Server Message Block is a network communication protocol for sharing files, printers, and other various devices. There are three versions of SMB - SMBv1, SMBv2, and SMBv3. For security reasons, Microsoft recommends disabling SMB version 1 as it is outdated and uses technology that is almost 30 years old. To avoid infection with ransomware viruses like WannaCrypt, you need to disable SMB1 and install updates for operating system. This protocol is used by Windows 2000, Windows XP, Windows Server 2003 and Windows Server 2003 R2 - so network file access will not be available for these OS versions. The same applies to some network storage, scanners, etc.
Disable SMB1 from Control Panel
Start -> Control Panel -> Programs and Features -> Turn Windows features on or off
Disable ‘Support public access to SMB 1.0/CIFS files
Disabling SMB1 via Powershell
Open a Powershell console with administrator rights and enter the following command:
Set-ItemProperty -Path "HKLM:\SYSTEM\CurrentControlSet\Services\LanmanServer\Parameters" SMB1 -Type DWORD -Value 0 –Force
Disable SMB1 using the Windows Registry
You can also disable SMBv1 by running regedit.exe and moving on to the next section:
HKEY_LOCAL_MACHINE\SYSTEM\CurrentControlSet\Services\LanmanServer\ParametersCreate a DWORD in this section SMB1 with meaning 0 .
Values for enabling and disabling SMB1:
- 0 = Off
- 1 = Enabled
After that you need to install the update MS17-010. The update was released for all versions of Windows, including the no longer supported Windows XP and Windows Server 2003.
In conclusion, I would like to say that, despite installed antivirus and regular updates of the operating system, if your data is dear to you, you must first of all think about backup.
Why and how to disable SMB1 in Windows 10/8/7
By default, Windows 10 and Windows Server 2016 still support SMB 1.0. In most cases, it is only required to ensure the operation of legacy systems: Windows Server 2003 and older. In the event that there are no such clients left in your network, new Windows versions it is desirable to disable the SMB 1.x protocol, or completely remove the driver. Thus, you are protected from a large number vulnerabilities that are inherent in this outdated protocol (which is once again evidenced by ), and all clients accessing SMB balls will use new, more productive, secure versions of the SMB protocol.
In one of the previous articles, we cited the client and server side. According to the table, older versions of clients (XP, Server 2003, and some older *nix clients) can only use the SMB 1.0 protocol to access file shares. If there are no such clients left on the network, you can completely disable SMB 1.0 on the side of file servers (including AD domain controllers) and client stations.
File server access audit via SMB v1.0
before turning off and complete removal SMB 1.0 driver. On the side of the SMB file server, it is desirable to make sure that there are no outdated clients on the network that connect to it via SMB v1.0. To do this, enable auditing access to the file server over this protocol using the PowerShell command:
Set-SmbServerConfiguration –AuditSmb1Access $true
After a while, study the events in Applications and Services -> Microsoft -> Windows -> SMBServer -> Audi t for client access using the SMB1 protocol.
Advice. The list of events from this log can be displayed with the command:
Get-WinEvent -LogName Microsoft-Windows-SMBServer/Audit
In our example, the log recorded access from client 192.168.1.10 using the SMB1 protocol. This is evidenced by events with EventID 3000 from the SMBServer source and the description:
SMB1 access
Client Address: 192.168.1.10
Guidance:
This event indicates that a client attempted to access the server using SMB1. To stop auditing SMB1 access, use the Windows PowerShell cmdlet Set-SmbServerConfiguration.
In this case, we will ignore this information, but we must take into account the fact that in the future this client will not be able to connect to this SMB server.
Disabling SMB 1.0 on the server side
The SMB 1.0 protocol can be disabled on both the client side and the server side. On the server side, the SMB 1.0 protocol provides access to network folders SMB (file balls) over the network, and on the client side, it is needed to connect to such resources.
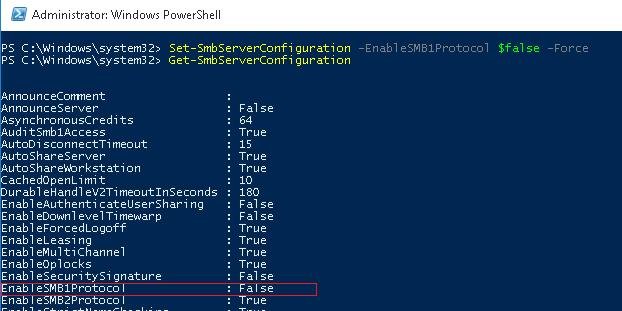
Check if the SMB1 protocol is enabled on the server side using the following PowerShell command:
 As you can see, the value of the variable EnableSMB1Protocol = True.
So, disable support for this protocol:
Set-SmbServerConfiguration -EnableSMB1Protocol $false -Force
And using the Get-SmbServerConfiguration cmdlet, make sure that the SMB1 protocol is now disabled.
To completely remove the driver that handles SMB v1 client access, run the following command:
Disable-WindowsOptionalFeature -Online -FeatureName SMB1Protocol -Remove
It remains to reboot the system and make sure that support for the SMB1 protocol is completely disabled.
Get-WindowsOptionalFeature –Online -FeatureName SMB1Protocol

Disabling SMB 1.0 on the client side
By disabling SMB 1.0 on the server side, we have ensured that clients will not be able to connect to it using this protocol. However, they may use an outdated protocol to access third-party (including external) resources. To disable SMB v1 support on the client side, run the commands:
sc.exe config lanmanworkstation depend=bowser/mrxsmb20/nsi
sc.exe config mrxsmb10 start= disabled
So, by disabling support for the outdated SMB 1.0 on the client and server side, you will completely protect your network from all known and not yet found vulnerabilities in it. And the vulnerabilities in Microsoft Server Message Block 1.0 is found fairly regularly. The last significant vulnerability in SMBv1 that could allow an attacker to remotely execute arbitrary code was fixed in March 2017.


