How to run the realtek program. Realtek HD Manager: where to download, how to install, configure and find
In this small article I will talk about setting realtek hd manager.
In my practice, I met moments that sometimes there are problems with this driver because users do not know how to configure it correctly.
However, this driver may cause a sound problem. If realtek hd manager not set correctly, the sound will be lost or the microphone will not work.
realtek hd manager it is a driver based on modern technologies. This driver supports all formats and has the ability to connect different devices such as a subwoofer, headphones, etc. T.
I want to warn you in advance that this realtek hd driver may not be installed on older versions of the motherboard.
There is still such a situation, this driver can be installed on some old motherboards, but the capabilities of this dispatcher will be limited.
In order to set up the realtek hd manager, you must download and install the realtek sound driver.
It can be downloaded on the official website or obtained when updating drivers using programs.
But first, let's check if the computer has this driver. To check, we go to the start, open the toolbar and in the window that opens, click sound and equipment.
If there is a driver, then at the end of the menu list should be realtek hd manager,
if it is not there, then you need to download http://www.realtek.com.tw/downloads/
And so we went to the official website of the developer, downloaded this driver and installed it. After everything is ready, configure this driver. To open realtek hd manager again, go to the toolbar, open the equipment and sound, and below is our dispatcher. We double-click on it and the dispatcher will open.

The interface and appearance may differ on different motherboards. But the essence of their work is the same. This window is divided into three main sections - "speakers", "microphone" and "analog". In this article, the main topic will be this setting section "analog" where you can control your computer's connectors such as speakers, microphone, etc.
Socket assignment realtek hd manager
This window also has two subsections - "back panel" and "front panel".
On standard motherboards, there are three connectors in the back panel and two connectors in the front panel. It depends on the motherboard model and manufacturer. Now consider the standard version.
If you want to check the assignment of the speaker jack in realtek hd manager. Basically it's a nest with a green color
Double-click on the green nest and the destination selection menu will open. In the menu that opens, select the option "output to the front speakers."

If you want to connect headphones, then select "headphones".

In this scenario, the sound will do its job. In order to choose the right microphone jack, double-click on the pink jack
and in the window that opens, select the option "microphone input"

The front speaker and microphone input is rarely used in practice, since it is usually not connected to the motherboard.
If you still decide to use the front speaker connector, then you need to change some settings realtek hd manager.
To do this, in the "analog" sidebar, click on the following icon in the form of a folder
And in the window that opens, put a tick in the checkbox "disable front panel jack detection"

And after such manipulations, the front panel is activated.
During the installation of the sound card driver, provided that it is built on a Realtek chip, the "Realtek HD Manager" icon appears in the control panel, as well as in the system tray near the clock.
Realtek HD icon in system tray
Through it, you can fine-tune the sound of your computer by setting parameters such as speaker configuration, equalizer, sound effects, and so on.

Realtek HD Manager Main Window
But not all users can find the "Realtek HD Manager" icon on their computer or laptop, and now we'll figure out why this happens.
Reasons for the absence of the Realtek HD manager
Below is a list of the most likely and possible reasons why the Realtek HD manager is missing from the computer in the control panel, as well as in the system tray:
- After installing Windows, the Realtek HD manager simply wasn't installed;
- The computer or laptop has a non-Realtek sound card;
- Realtek HD Manager has been removed.
First you need to make sure that you have a Realtek sound card installed. To do this, you need to open the item “Sound, game and video devices”.

Realtek card in device manager
There should be a device that includes the word "Realtek" in its name.
If there is no such device there, then this means that you have a sound card from another manufacturer, for example VIA, and the Realtek HD manager simply should not be in the control panel or in the system tray.

Sound card manufacturer VIA
If a device named Realtek is present in the device manager, then you need to either go to the official website of the manufacturer and download the sound card driver in the support section, which will be called Realtek Audio Driver.
Question: Realtek HD High - Definition Audio Codecs Manager (Software) does not start
Good day!
After the update of Windows 10, the Realtek HD manager stopped working, there were no hidden icons in the control panel!
It was in autoloads, etc ...
I decided that most likely this is a clumsy update of Windows 10! Reinstalled, but the result is the same!
What could be the problem? Why Realtek won't start?
Thanks in advance
Answer: How about deleting the old Realtek driver?
Added after 37 minutes
Thanks, it helped!
Question: There is no sound. Audio device on the High Definition Audio bus
people help no sound Audio device on the High Definition Audio bus tell me what to do or where to find
Answer: I'm sorry I got it wrong.
It's called - Audio Azalia x86 v6.0.15618
Question: High Definition Audio Controller (Microsoft) This device cannot be started. (Code 10)
Help, I don't know what to do anymore. I reinstalled Windows from x32 to x64 and the sound disappeared. Driver installed, updated, reinstalled Windows. In the sound it says that the equipment is not installed, but in the device manager:
This device cannot be started. (Code 10)
(Operation failed)
The requested operation was not completed.
Please help me as soon as possible.
Answer: then pichalka (
Question: [Solved] Realtek Manual Equalizer Missing in Windows 7
Tell me who knows Why did the Realtek drivers in Windows 7 no longer have the ability to manually set the equalizer settings? Can someone recommend a different version of the drivers?
There is only a set of presets (rock, pop, live, etc.). Win XP had both presets and manual settings...
Very uncomfortable without it! The sound of music and movies can also be adjusted in the player, but the player will not help when playing games, and I don’t like how the available preset options sound.
I have Windows 7 Pro (final) x32, ASUS P5K motherboard with built-in Realtek ALC883 High Definition Audio Controller. Sound driver version Realtek HD Audio Codec Driver R2.37 (Vista, Windows7 32/64).
Answer:
Quote 9119 :
Question: Installing the new Realtek HD driver does not launch Realtek Windows 7 Manager
I decided to install Windows 7 SP1 64bit. From the official site Realtek installed the latest driver (R2.82). There is sound, but there is no dispatcher. And I need him.
In the folder along the path C:\Program Files\Realtek\Audio\HDA, "executives" also do not start - just stupidly nothing happens.
Before that, there was Windows 10 of the latest build, everything worked there, I remember the same driver downloaded from the Realtek website and everything was buzzing with the dispatcher.
I solved the problem by deleting this driver and installing the old driver (Realtek Audio Driver V6.6.4.2 for Windows Vista/7 32bit & 64bit.(WHQL)) from the ASUS website, and the manager appeared, everything is fine.
But I still want to get to the bottom of the truth, why is the new driver not installed normally with a working dispatcher on Win7?
Nurse - Asus M5A97EVO
FX-6100
8gb
gtx660
Answer: mythorns, I have the same problem on Windows 10, the solution is the same
Quote mythorns:
Question: The section Audio inputs and outputs in the device manager is missing
Good afternoon everyone! I had such a problem: on an HP Envy dv6 laptop, the sound worked with a slight delay, that is, all media was played after 5 - 10 seconds. Updated the driver - didn't help either. After some thought, I decided to reset the system to its original state (I wish I hadn't done this). When I reset everything, it turned out that the sound drivers were not installed (Realtek High Definition Audio are not installed), and the Audio Inputs and Audio Outputs tab is completely missing in the Device Manager. What to do - I do not know ?! Rebooted everything - same thing. I downloaded various programs for finding and updating drivers - nothing helped, when updating firewood I write an error: the device connected to the system does not work!
Answer: why didn’t they carry it when there was a problem and a guarantee? however, this is a rhetorical question.
Take it to a decent service center for a diagnosis.
Question: Lost sound, exclamation marks on high definition audio bus devices
I ran into such a problem: the sound disappeared, and spontaneously, I didn’t download or install anything ... as usual, I turned off the computer in the evening and went to sleep, and the next day I start the computer, Windows loads as usual, but there is no sound ... I searched all the forums , checked all the necessary services - everything is running (automatically), updated the drivers, both for the sound card and for the vidyuhi ... The only thing that happened was a warning that the wines were activated. ends and micros services. Edge stopped working, and after a couple of days the sound disappeared (sys. re-activated) In the device manager in the sound. and games. only webcam devices, and in the system devices there is an error:
All components are working properly, because. if you reboot to 8.1 (for games), everything is fine with sound
Answer: Dok16, in some ways he is right, only after deleting it is better to reinstall them
Q: Realtek HD manager has no playback device options
Good day! After updating Windows 10, there was one problem. Before that, I used speakers and headphones at the same time: the speakers are connected at the back, the headphones are in the front panel. Everything would be fine, but before the sound was played simultaneously on 2 devices without switching in the system (it only adjusted the volume on the devices themselves), and now only the speakers work by default, the headphones mute the speakers when connected. I searched on the Internet that in the realtek hd manager you need to check the "assign front and rear output devices ..." in the settings to solve the problem. But! there are no such checkboxes in the settings, I have already reinstalled 5-6 versions of realtek. What do you suggest? how to proceed. The option of clicking headphones back and forth does not suit, since everything was ok before.
Answer: You didn't get the point of my problem, I need to quickly switch between the playback device in the panel, which is in the screenshot. And now the headphones are not displayed there, although they are connected and working.
Question: Installing the Realtek HD Audio Driver
Hello!
I decided to update the sound driver, went to the website of the manufacturer of the mat. board (MSI ZH77A-G43), chose Win10 x64 and downloaded the driver. The standard procedure for installing this driver is to remove the old one, reboot, install and reboot went fine, but after the last reboot, the sound did not appear. Device manager shows "Audio device on high definition audio bus" instead of Realtek driver, device status says "This device is not configured correctly (Code 1). The specified file cannot be found." When I try to automatically find the driver on the network here, it also writes that "file not found", it is impossible to roll back the driver, when choosing a previously installed driver, it also gave an error.
Disconnected and uninstalled the device, removed the installed driver and everything related to Realtek HD Audio from the computer, cleaned the CCLeaner registry, rebooted. Realtek HD Audio Driver! ". The device manager shows the same device, but the error code has changed - "Drivers are not installed for the device (code 28). The specified file cannot be found." If you remove the device and immediately start the installation, the driver will install without error and prompt you to restart the PC, but, as before, after rebooting, the device will again be displayed in the task manager with error code 1.
Actually, the question is what to do with it? Rolling back the driver / system will not work. Thanks in advance for your reply!
Answer: Yes, I've tried turning it off and on.
Thank you all for the answers in the topic, but no more answer is required, I rearranged the system, there is sound.
Answer: Disable all installed browser extensions and check the issue
The well-known company Realtek has long managed to occupy its huge niche in the computer equipment market, specializing in the production of drivers for computer sound cards. They allow you to adjust the sound and make the sound surround. The most famous of them is the Realtek HD dispatcher program.
Realtek HD Audio Drivers are standard drivers for HD Audio Codec audio cards and some other Realtek cards. The manager is a package that integrates all audio drivers and is suitable for Windows 7 and the relatively new Windows 8 operating system.
The Realtek HD program will come in handy for people who cannot imagine themselves without listening to music. Other than that, recording professionals can use it just as well. This program is able to further expand the boundaries of the sound of audio equipment, and it can be either a professional speaker system or a regular subwoofer with speakers.
The equalizer settings are easily adjusted as you wish - in addition to the user mode, the dispatcher offers several types of sound to choose from: "Rock", "Pop", "Club" and others. And these modes of potential are much higher than the standard ones. In addition, in just a couple of clicks, you can choose the environment around you as you wish (bathroom, colosseum, fireplace).
Before you start using the Realtek HD program, be sure to update the drivers of your audio devices by visiting the company's official website on the Internet (http://www.realtek.com.tw/downloads/). This procedure is necessary because the manager is sensitive to drivers that are already installed.
As for the assessment of the Realtek HD dispatcher, it has many positive aspects:
- It is able to support absolutely all the latest audio formats;
- Has a deep bandwidth;
- Allows you to connect and provides support for audio devices that use Plug and Play technology;
- Accurately and professionally recognizes speech, and also performs its input;
- Provides software support for 3D audio based on Sensaura algorithms.
However, in addition to the pluses, the dispatcher has one minus:
- The thoughtfulness of the control panel of the program leaves much to be desired.
What to do if there is no Realtek HD manager?
If you do not have a Realtek HD manager on your computer, then you can download it on the Internet for free, but more on that later. First, let's check if this program is really missing on your computer. Where can I find the realtek hd manager? Everything is very simple.
We go to the following address: "Start - Control Panel - Hardware and Sound".

We look, if it is not here, then you need to download and install the dispatcher from the official site.
Where can I download?

You can download the Realtek HD dispatcher program on the official website by clicking on the link: www.realtek.com.tw.


We agree to the terms by checking the box next to I accept to the above. And click the "Next" button.

We get to the download page of the program, which can be downloaded from any of the six servers. Download Realtek HD.

Run the file you downloaded earlier. The program installation process has started.

Where necessary, click the "Next" button.

At the end of the Realtek HD installation, the wizard will ask you to restart your computer. We press the "Finish" button.

After the computer has rebooted, we look to see if we have Realtek HD. To do this, go to the address: "Start - Control Panel - Hardware and Sound", at the bottom there should be "Realtek HD Manager".

To open or launch the Realtek HD Manager, you need to go to the above address and double-click on the corresponding inscription. The dispatcher will start.
The appearance of the dispatcher may differ (the photo above is the dispatcher on my laptop, and at the beginning of the article - on the computer), but in general the program menu is the same.
How to setup?
Setting up the Realtek HD manager is quite simple. Let's go over the main menu items.

When you start the program, at the top we have two main sections - "Speakers" and "Microphone" (1). In the "Main volume" subsection (2), you can adjust the volume of the speakers, as well as add or decrease the volume in the left or right speaker.

In the sound effects tab, you can customize the environment by choosing from the list the one that suits your conditions, for example, a living room, a living room, a concert hall, a hangar, etc.
Adjust the equalizer or choose an already preset option, for example, pop, live, club, rock.
If something does not work out, by clicking on the "Reset" button, all settings can be returned to the standard ones.

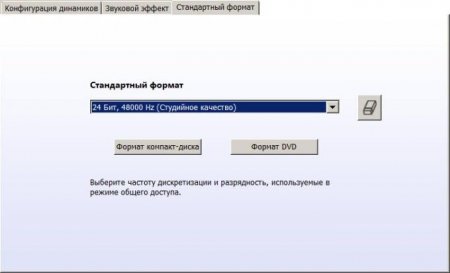
In the "Standard format" tab, you can select the sound quality (frequency and bit depth).

In the "Microphone" section, the sound of the microphone is adjusted. You can set the microphone sound, turn on the microphone gain, noise and echo suppression, select the sound quality format.

You can also find out in the manager which version of the sound driver is installed on the computer, the version of DirecrX, which audio controller is used and the audio codec. To do this, just click on the "i" icon in the upper right corner.
If you are running Windows XP, Vista, or 7 and your computer is equipped with a Realtek audio chip, then you must also have the Realtek firmware installed. To activate it, go to the start menu and type "Realtek" in the search box. When it appears in the Realtek HD Audio Manager search results, click on its name to open it. If it is not listed, then most likely you do not have an audio driver installed or you have an outdated version. In the article we will tell you how to install the driver, as well as correctly configure the sound settings.
Installing Realtek Manager
This procedure is necessary if you do not have the Realtek audio driver installed or if you have an outdated version.Download the appropriate driver from the Realtek website or your PC manufacturer's website.
Unzip the archive and run the "setup.exe" file to launch the installer.
Note: if the pop-up window "Windows cannot verify the publisher of this driver" appears, click the "Install..." button to proceed with the installation.
Once the installation is complete, you will need to restart your system for the changes to take effect.
If the Realtek® software is properly installed, you will see the Realtek® HD Audio Manager icon on the system tray. Double click this icon to display the Realtek® HD Audio Manager.
Realtek Audio Utility User Guide
The Realtek® audio codec provides 8-channel audio support, Jack-Sensing, S/PDIF OUT support, and Realtek®'s patented UAJ® (Universal Audio Jack) technology for all audio ports to eliminate cable connection errors.Realtek® HD Audio Manager for Windows 8 / Windows 7 / Windows Vista
This version of Realtek HD Audio Manager supports Intel and other motherboards that have the Realtek audio engine installed.
Note: The configuration option tabs are for reference only and may not match what you see on your screen. In a Windows® 8™ / 7™ / Vista™ environment, Realtek® HD Audio Manager automatically detects devices connected to analog/digital ports and displays the appropriate configuration option tabs. In addition, the manager's interface may differ slightly depending on the model of the installed sound card, as well as the driver version. For instance:

Speakers tab
The first thing you'll see is the device volume slider. In the panel on the right, you will see the options for connecting audio output devices.

digital output
To set digital output options:
Click on "Advanced device settings". Here you can enable or disable the separation of the front and rear inputs (front/rear mic, front/rear line-in).

Next, 4 sub-tabs will be available to you: Speaker Configuration, Sound Effects, Room Correction, and Standard Format.
To set speaker options:

Microphone configuration
To configure the microphone, go to the "Microphone" (Mic in) tab. At the top of the main window, you will see the microphone gain and volume options. Adjust the slider to a comfortable size.
Click the Set Default Device button to set the port as the default audio input device.

In this section, 2 sub-tabs will be available to you: "Microphone Effect" and "Standard Format":
- Click the Microphone Effect button to adjust the noise reduction, echo cancellation, and conference mode settings when recording audio.
- Click the Default Format button to select the default audio output format.
Click the information icon in the upper right corner of the (sometimes lower) Realtek® HD Audio Manager window to display information about the sound driver version, DirectX, sound controller version, and audio codec.

Realtek HD Audio Drivers are standard drivers for HD Audio Codec audio cards and some other Realtek cards. The manager is a package that integrates all audio drivers and is suitable for Windows 7 and the relatively new Windows 8 operating system.
As for the assessment of the Realtek HD dispatcher, it has many positive aspects:
However, in addition to the pluses, the dispatcher has one minus:

Where can I download?

You can download the Realtek HD dispatcher program on the official website by clicking on the link: www.realtek.com.tw.


How to setup?


The well-known company Realtek has long managed to occupy its huge niche in the computer equipment market, specializing in the production of drivers for computer sound cards. They allow you to adjust the sound and make the sound surround. The most famous of them is the Realtek HD dispatcher program.
Realtek HD Audio Drivers are standard drivers for HD Audio Codec audio cards and some other Realtek cards. The manager is a package that combines all audio drivers, and at the same time fits the windows 7 system and the relatively new windows 8 operating system.
The Realtek HD program will come in handy for people who cannot imagine themselves without listening to music. Other than that, recording professionals can use it just as well. This program is able to further expand the boundaries of the sound of audio equipment, and it can be either a professional speaker system or a regular subwoofer with speakers.
The equalizer settings are easily adjusted as you wish - in addition to the user mode, the dispatcher offers several types of sound to choose from: "Rock", "Pop", "Club" and others. And these modes of potential are much higher than the standard ones. In addition, in just a couple of clicks, you can choose the environment around you as you wish (bathroom, colosseum, fireplace).
Before you start using the Realtek HD program, be sure to update the drivers of your audio devices by visiting the company's official website on the Internet (http://www.realtek.com.tw/downloads/). This procedure is necessary because the manager is sensitive to drivers that are already installed.
As for the assessment of the Realtek HD dispatcher, it has many positive aspects:
- It is able to support absolutely all the latest audio formats;
- Has a deep bandwidth;
- Allows you to connect and provides support for audio devices that use Plug and Play technology;
- Accurately and professionally recognizes speech, and also performs its input;
- Provides software support for 3D audio based on Sensaura algorithms.
However, in addition to the pluses, the dispatcher has one minus:
- The thoughtfulness of the control panel of the program leaves much to be desired.
What to do if there is no Realtek HD manager?
If you do not have a Realtek HD manager on your computer, then you can download it on the Internet for free, but more on that later. First, let's check if this program is really missing on your computer. Where can I find the realtek hd manager? Everything is very simple.

We go to the following address: "Start - Control Panel - Hardware and Sound".

We look, if it is not here, then you need to download and install the dispatcher from the official site.
Where can I download?

You can download the Realtek HD dispatcher program on the official website by clicking on the link: www.realtek.com.tw.


We agree to the terms by checking the box next to I accept to the above. And click the "Next" button.

We get to the download page of the program, which can be downloaded from any of the six servers. Download Realtek HD.
How to install Realtek HD?

Run the file you downloaded earlier. The program installation process has started.

Where necessary, click the "Next" button.

At the end of the Realtek HD installation, the wizard will ask you to restart your computer. We press the "Finish" button.

After the computer has rebooted, we look to see if we have Realtek HD. To do this, go to the address: "Start - Control Panel - Hardware and Sound", at the bottom there should be "Realtek HD Manager".
How to open (launch) Realtek HD manager?

To open or launch the Realtek HD Manager, you need to go to the above address and double-click on the corresponding inscription. The dispatcher will start.
The appearance of the dispatcher may differ (the photo above is the dispatcher on my laptop, and at the beginning of the article - on the computer), but in general the program menu is the same.
How to setup?
Setting up the Realtek HD manager is quite simple. Let's go over the main menu items.

When you start the program, at the top we have two main sections - "Speakers" and "Microphone" (1). In the "Main volume" subsection (2), you can adjust the volume of the speakers, as well as add or decrease the volume in the left or right speaker.

In the sound effects tab, you can customize the environment by choosing from the list the one that suits your conditions, for example, a living room, a living room, a concert hall, a hangar, etc.
Adjust the equalizer or choose an already preset option, for example, pop, live, club, rock.
If something does not work out, by clicking on the "Reset" button, all settings can be returned to the standard ones.

In the "Standard format" tab, you can select the sound quality (frequency and bit depth).

In the "Microphone" section, the sound of the microphone is adjusted. You can set the microphone sound, turn on the microphone gain, noise and echo suppression, select the sound quality format.

You can also find out in the manager which version of the sound driver is installed on the computer, the version of DirecrX, which audio controller is used and the audio codec. To do this, just click on the "i" icon in the upper right corner.
Realtek HD
It will not be difficult to download Realtek High Definition Audio Driver Audio Driver to your computer in order to install or reinstall. The freely distributed Realtek HD software has all the necessary functionality for the correct and fast operation of audio-video players when playing music, video clips, movies, TV shows, online TV, computer games, as well as programs for working with microphones, synthesizers, musical instruments. Positive ratings, reviews and comments in social networks, forums and other Internet resources, as well as advice on how to download Realtek HD sound drivers for Windows 10, 8.1, 7, Vista, XP on the site http://programmywindows.com are welcome . Link: http://programmywindows.com/ru/drivers/realtekhd
Briefly about Realtek HD
Realtek audio chips are installed in many computers, laptops, netbooks. Realtek's High Definition Audio Drivers work with PCI audio cards, peripheral audio devices, and built-in audio processors. Successfully download Realtek High Definition Audio Driver for windows 7, 8, 8.1, 10, as well as Vista, or XP SP 3 (32-bit and 64-bit) for free and install on a PC everyone can, without making any effort and without spending a lot of time . These drivers will be useful to all users who have just installed or decided to reinstall Windows. If there are difficulties with the sound, or it does not play at all, then updating the Realtek High Definition Audio Driver will come in handy.


First you need to download, install or update the sound card drivers, and when the appropriate sound driver is installed, after rebooting, start working with multimedia data, whatever they are. The functionality of the Realtek High Definition Audio Driver allows you to watch video clips, movies or online TV, listen to music, play computer toys, use a microphone to record speech, sing and voice communication. The advantages of Realtek HD Audio Driver for windows include:
Friendly interface and convenient settings - Work with all current audio formats - Automatic configuration of Plug and Play devices - Support for DirectSound 3 D, A 3D and I3D L2, Soundman and SoundEffect - Wide bandwidth - Support for 24-bit stereo recordings / 192 kHz and multi-channel 5.1 and 7.1 Dolby Digital, - 10-band equalizer for perfect sound tuning, - emulation of the audio environment in computer games, - compatibility with various electronic musical instruments,
Error-free speech recognition when using the appropriate software.
As a result of regular updates of Realtek Audio Driver HD, the quality is constantly improved and the features are improved. Recommended without leaving http://programmywindows.com/ now, Realtek High Definition Audio Driver free download to enjoy good sound in movies, series, TV programs, video clips, CD, DVD, FLAC, MP3 music, playing games, using musical instruments and microphones, for example, to record an author's song and music or sing karaoke.
How to smartly download Realtek
It is not enough just to download free Realtek HD sound drivers for windows 10, 8.1, 8, 7, Vista, XP SP 3 (x86 and x64) on a PC or laptop. To run the Realtek HD audio driver, you need the appropriate hardware, which means your computer must use a compatible chip. You can find out what kind of sound card or microcircuit is installed in the computer visually by examining the computer boards, or without opening the case, in the Hardware section of the Control Panel of the Windows operating system, or using specialized software, for example, DriverPack Solution. The following markings are suitable: ALC260 - ALC275, ALC660 - ALC670, ALC882 - ALC889 and the like. Markings ALC101, ALC201 - ALC203 (A), ALC250, ALC650 - ALC658, ALC850, VIA686, VIA8233, VIA8233A indicate that you need to download Realtek AC97 for windows 7, 8, 8.1, 10, Vista, and XP SP 3 ( 32-bit and 64-bit), also from Realtek.
Download driver Realtek High Definition Audio Russian version
programmywindows.com
Realtek HD Manager: where to get and how to set up sound?
Almost all modern motherboards are equipped with integrated sound cards, most of which are developed by the Taiwanese corporation Realtek Semiconductor. Due to the popularity of the product, it is inevitable that there will be all sorts of operational issues, often related to audio playback settings. Realtek HD Manager will become the "hero" of our story.
The "creativity" of your PC

The level of effective productivity of the built-in sound card depends primarily on the modification of the hardware codec. At the same time, the configuration of the computer and the potential of the functionality implemented in it allow the integrated chip to use the full force of its “power”. Modern motherboards have 7.1 (multi-channel surround sound) "musical ability". However, the principle of converting an analog signal into a digital one and vice versa remains unchanged and works according to the same scheme: hardware codec - south bridge - processor. Of course, the final quality of the audio signal depends on the coherence of actions and the rated power of each individual element in the chain of “sound generation”. At the same time, the Realtek HD controller is a kind of DJ remote control, through which the user can influence the favorable sound of this or that multimedia material. However, let's go in order.
Crackling, noise and other interference

The not-so-pleasant sound of computer speakers can be due to a number of reasons:
Stereo speakers, as well as audio device components, are of poor quality, which is often confirmed by the cheapness of the product. It is possible that the cord or the connected limit switch is damaged. Electrical appliances located close to the speakers can be causal sources of an unpleasant background. Rattling and crackling from the speakers can be caused by excessive volume levels.
As an option: if connected incorrectly, the speakers emit background noise or a quiet fuzzy sound.
Needless to say, the Realtek HD manager is unlikely to be useful in the event that the malfunction is purely technical in nature. Of course, software "troubles" sometimes happen. It is worth noting that often the two causal bases of poor sound at the first stage of diagnosis remain erroneous. After a series of tedious experiments, the user may find that the problem was precisely in the sound driver. Therefore, the most universal way out of a difficult situation is to reinstall the software. So, let's move on to the main topic of our review.
Realtek HD Manager Installation and Configuration: Step by Step Guide

You are probably aware of the fact that installing software requires following standard windows usage procedures. In other words, for the correct implementation of the software into the operating environment, it is necessary to close all active applications, and given the fact that you will be installing drivers, you simply cannot avoid the reboot process. By the way, when installing from the official POST server, you will have to go through the mode twice.
Step number 1: find, download and "register"
First of all, you need to install the driver itself. Of course, if the sound works for you, then the system has the necessary software solution. However, standard windows drivers are somewhat limited in their “sphere of influence”, and meanwhile, the Realtek High Definition Audio Driver package will help you get full access to the functionality (it is recommended to install the latest version). After installation, an additional speaker icon in dark colors will appear in the system tray.
Step #2: Setting Up Drivers

Make sure your speakers or headphones are connected to the audio output jack (green). Then:
Go to the control panel. Now go to the "Sound" tab. Disable all devices that are not part of the installed package (be guided by the name).
Perform the same actions by going to the "Record" tab.
Step #3: Launch the Realtek HD Manager
windows 7 and 8 version of the OS from Microsoft is by far the most promising, so all actions are based on the example of these systems.
Double-click the right mouse button on the dark speaker icon (system tray). In the utility interface that opens, you need to specify the speaker configuration that meets your requirements. Let's stick with the example: desktop speakers. So, in the upper left side, select: stereo. If there is a checkmark next to the "Virtual Surround Sound" item, uncheck it. In the upper left corner of the window, click on the gear icon. Check the box next to "Split all inputs".
The volume level and sound balance can be adjusted using the slider indicators located in the bottom block of the interface. 
The Realtek HD manager always monitors active connections and alerts the user with a corresponding message box when the configuration changes. You can configure this option by clicking on the “wrench” icon.
Step #4: Playback Effects
In this menu, which is activated when you click on the Sound Effects tab, there are two basic blocks: ambience and equalizer. The two basic, interrelated settings can be layered on top of each other to create a unique sounding output. The templates represented by musical styles can be edited. In order to do this, you need to click on the "mixer" icon and make your preferred changes in the 10-band equalizer, to save the project you need to click on the "flopy" icon.
Step #5: Room Correction

With filigree accuracy, the same Realtek HD dispatcher will competently help to designate angles, an acceptable distance, as well as the power of perception of audio accompaniment. How to set up 5.1 sound? The question will exhaust itself, because everything is schematically clear, and to activate the editing process, you just need to check the box "Enable the correction function ..." By the way, the distance is measured in feet by default, you can switch to an acceptable footage by clicking the appropriate button on the right side of the window.
Step #6: Choosing an Acceptable Quality
The necessary parameters for playing audio streams can be specified by applying blanks: CD or DVD format. Using the individual checkboxes located above each of the presented standards, select the parameters that suit you best. In case you want to return to the default settings, click on the “closed padlock” icon. 
By the way, information about the software version can be viewed using the "i" button, which is located in the left corner under the already familiar "gear" icon. After all, updating is an important part of a software upgrade.
Finally
So we have discussed what is Realtek HD Manager. Now you understand the essence of the setup process. However, within the framework of the article, only the standard functions of the program were considered. It is worth noting that the Taiwanese driver is indispensable when using various video and photo editors. For example, in Skype - the well-known, "still free video messenger" - it is unrealistically difficult to set up a microphone using standard windows drivers. If your system has "realtek" software, there are no problems, and the quality of decoding will always remain at its best. If someone from your relatives or acquaintances does not know how to set up the Realtek HD Manager, please kindly provide support with awareness in the matter.
Sound not working on Realtek High Definition Audio - prerelease.ACTIVEPEOPLE.SU
Problem:
The audio driver is not installed, it gives a message with the following content: "Installation of the Realtek HD Audio driver failed."
Description of the solution to the problem:
Universal Audio Architecture (UAA) High Definition Audio Driver version 1.0a for windows Server 2003, windows XP and windows 2000
http://support.microsoft.com/kb/888111
see also for x64 bit versions
http://support.microsoft.com/Default.aspx?kbid=901105
Download and install the update
kb888111.exe (see attachments at the bottom of the page)
Addition (for XP SP3 x32):
In the "Device Manager", we also find and delete (if any) "RealTek audio device" (or something with a similar name).
Don't know how to open "Device Manager"?Start → Run (WinKey+R): "%windir%\SYSTEM32\devmgmt.msc"
- HKEY_LOCAL_MACHINE\SOFTWARE\Microsoft\Updates\windows XP\SP3\KB888111
- HKEY_LOCAL_MACHINE\SOFTWARE\Microsoft\windows\CurrentVersion\Uninstall\KB888111WXPSP2
- HKEY_LOCAL_MACHINE\SOFTWARE\Microsoft\windows\NT\CurrentVersion\HotFix\KB888111WXPSP2
- HKEY_LOCAL_MACHINE\System\Current Control Set\Enum\HDAUDIO, you may need to allow editing the Enum section before deleting this branch.
X:\Drivers\Audio\MSHDQFE\Win2K_XP\US,
Is the kb888111 update file not on disk? Download it from the following links (windows XP SP2 versions only): Description pageUpdate kb888111xpsp2 (Russian version) (705.7 Kb)
Description of possible problems. I put kv888111, I put firewood. After the reboot, the device is found on a new one, offering to search for a driver. Auto search does not find anything. After installing kb888111xpsp2, the button for installing from a specified location is not available. In these cases, you need to try to do the following: Unpack the kb888111.exe file into a folder by right-clicking on the file and choosing "Extract to" (7Zip or WinRAR must be installed). Then, in the device manager, manually update the unknown device driver from the newly created folder with the contents of the self-extracting update archive kb888111.exe. After the above steps, the unknown device will become a normal installed and will be called something like this: "Microsoft UAA Bus Driver for High Definition Audio".
Disable "Microsoft UAA Bus Driver for High Definition Audio"
check the picture (at this moment you can hear a sound signal from the speakers, signaling the device is turned off, i.e. the sound will work). After disconnecting, uninstall "Microsoft UAA Bus Driver for High Definition Audio" check the picture
X:\Audio\Realtek\Setup.exe,
where X is the letter of the CD/DVD drive in the system.
Your path to the installation file may be different.
It will not be difficult to download Realtek High Definition Audio Driver Audio Driver to your computer in order to install or reinstall. The freely distributed Realtek HD software has all the necessary functionality for the correct and fast operation of audio-video players when playing music, video clips, movies, TV shows, online TV, computer games, as well as programs for working with microphones, synthesizers, musical instruments. Positive ratings, reviews and comments in social networks, forums and other Internet resources, as well as advice on how to download Realtek HD sound drivers for Windows 10, 8.. Link: website/ru/drivers/realtekhd
Briefly about Realtek HD
Realtek audio chips are installed in many computers, laptops, netbooks. Realtek's High Definition Audio Drivers work with PCI audio cards, peripheral audio devices, and built-in audio processors. Successfully download Realtek High Definition Audio Driver for Windows 7, 8, 8.1, 10, as well as Vista, or XP SP 3 (32-bit and 64-bit) for free and install on a PC without any effort and without spending a lot of time . These drivers will be useful to all users who have just installed or decided to reinstall Windows. If there are difficulties with the sound, or it does not play at all, then updating the Realtek High Definition Audio Driver will come in handy.
Interface and functionality Realtek HD
The user-friendly interface allows you to quickly figure out the settings and get down to business. The fact that the management of the Realtek driver is correctly Russified allows you not to waste time translating and studying the interface, menus, windows, settings and features.

First you need to download, install or update the sound card drivers, and when the appropriate sound driver is installed, after rebooting, start working with multimedia data, whatever they are. The functionality of the Realtek High Definition Audio Driver allows you to watch video clips, movies or online TV, listen to music, play computer toys, use a microphone to record speech, sing and voice communication. The advantages of Realtek HD Audio Driver for Windows include:
Friendly interface and convenient settings,
- work with all current sound formats,
- automatic configuration of Plug and Play devices,
- support for DirectSound 3 D, A 3D and I3D L2, Soundman and SoundEffect,
- wide frequency bandwidth,
- support for stereo recordings 24 bit / 192 kHz and multi-channel 5.1 and 7.1 Dolby Digital,
- 10-band equalizer for perfect sound tuning,
- emulation of audio environment in computer games,
- compatibility with various electronic musical instruments,
- error-free speech recognition when using the appropriate software.
As a result of regular updates of Realtek Audio Driver HD, the quality is constantly improved and the features are improved. Recommended without leaving the site now, Realtek High Definition Audio Driver free download to enjoy good sound in movies, series, TV programs, video clips, CD, DVD, FLAC, MP3 music, playing games, using musical instruments and microphones, for example to record your own song and music, or to sing karaoke.
How to smartly download Realtek
It is not enough just to download Realtek HD sound drivers for Windows 10, 8.1, 8, 7, Vista, XP SP 3 (x86 and x64) for free on a PC or laptop. To run the Realtek HD audio driver, you need the appropriate hardware, which means your computer must use a compatible chip. You can find out what kind of sound card or microcircuit is installed in the computer visually by examining the computer boards, or without opening the case, in the Hardware section of the Control Panel of the Windows operating system, or using specialized software, for example, DriverPack Solution. The following markings are suitable: ALC260 - ALC275, ALC660 - ALC670, ALC882 - ALC889 and the like. Markings ALC101, ALC201 - ALC203 (A), ALC250, ALC650 - ALC658, ALC850, VIA686, VIA8233, VIA8233A indicate that you need to download Realtek AC97 for Windows 7, 8, 8.1, 10, Vista, and XP SP 3 ( 32-bit and 64-bit), also from Realtek.
Select a driver according to OS from the list below. The software for working with a sound card is installed in the same way as an ordinary program. For full operation, you need to restart your computer. The package comes with Realtech Soundman, Sound Effect and Media Player.
A complete description of the parameters, as well as instructions for configuring the built-in Realtek sound cards. Setting playback, recording, 3D sound. Windows Vista/7/8
2012-02-17T18:19
2012-02-17T18:19
Audiophile's Software
Copyright 2017, Taras Kovrijenko
Full or partial copying of the text is allowed only with the written permission of the author.
Prologue
This time I will touch on a topic that is relevant, so to speak, for beginner enthusiasts - that is, for those who have not yet got hold of a discrete sound card and want to get the most out of an integrated one.
1. Educational program
To begin with, a brief educational program. Who does not know, or does not fully understand what is hardware audio codec, carefully read the relevant Wikipedia pages:
Have you read? Fine! And now it would be even very nice if you read my two articles:
Well, now we can start.
2. What we have
So, at my disposal is Windows 7 SP1 Ultimate x64 (the setup described in the article is suitable for all operating systems, starting with Vista), the ALC887 codec built into the motherboard (ASUS P7H55-V) (there is a datasheet), an external amplifier connected to the rear connectors and microphone (green and pink jacks, respectively). Please note that we will configure the output card stereo sound by analog interface.
3. Software installation
First of all, you need to install the drivers. Of course, most likely Windows itself has already found and installed the drivers for the sound device, however, in order to gain access to all the functionality, as well as for peace of mind, we will install the driver package directly from Realtek, the latest version of which you can download on the corresponding page of my website. By the way, the settings specified here were checked on the R2.67 driver version.
Download the drivers, perform a simple installation procedure (by running HD_Audio/Setup.exe), restart the computer.
After loading the OS, a brown speaker icon should appear in the system tray:
4. Driver settings
First of all, let's go to Windows Control Panel->Hardware and Sound->Sound and, after making sure that our headphones or speakers are connected to the green socket of the sound card, we turn off all unnecessary devices, and make our connected device the default device:

At the same time, we will do the same with recording devices:

Now double click on the tray icon. If there is no icon, we look for it in hidden icons, if it is not there either, we go to Control Panel->Hardware and Sound->. One way or another, the dispatcher window should open:

Here we immediately set the speaker configuration (stereo), set our analog device as the default device (after which the corresponding button will go out), turn off, if, God forbid, it is turned on, surround sound.

By clicking the button in the form of a yellow folder, you can configure disabling the detection of front panel connectors:

Also note that the connected connectors are displayed in bright color - in our case, speakers are connected to the green output, a microphone is connected to the pink input. Here is one very important detail: double-clicking on the connector icon, you will see a window with a choice of the type of connected device. This is important because if you choose "headphones", then the codec will use a special additional amplifier (otherwise the sound in the headphones will be too quiet), for connected active speakers or external amplifiers, you should select "Front Speaker Out". Here, the automatic pop-up of this window is also enabled when the device is connected to any of the card slots:

Using the "i" button, you can open a window with information about the driver version, DirectX, audio controller and codec version, and turn on / off the display of the icon in the system tray:

Now turn off the effects:

The “Room correction” settings for the stereo configuration are not available, which is actually strange - in the same console from THX (which is included, for example, in the Creative X-Fi driver package), you can adjust the distance and angle of the direction to the speakers relative to your location, which can be very useful when you are not sitting directly in front of the speakers, or if they are not symmetrically positioned relative to you. Well, okay, let it be on the conscience of the developers.
The last tab duplicates the control panel settings (however, most of the settings from the Dispatcher are also in the control panel):

Here you can set the parameters of the system mixer - with what sample rate and bit depth Windows will mix all played sounds. Set to 24 bit, 96 kHz. Why - I will tell further.
Since I am constantly bombarded with questions about how to set up a microphone (which, in my opinion, should cause a minimum of confusion), I will still focus on setting up recording devices. Their settings, by the way, as well as playback devices, are on separate tabs at the top of the window. Let's start with the stereo mixer:

Everything is elementary here. This device records everything that you hear through the speakers, i.e., the finished audio stream that Windows sends to the sound card. It is brought to the indicated form (since the mixer works with a sampling frequency of 96 kHz, then we will put the same number here).
But our main recording device is, of course, the microphone:

So, we set the recording volume to the maximum, and turn off the microphone gain (then, if necessary, you can turn it on). Also, very often people complain that they reproduce the sound perceived by the microphone, so that this does not happen - turn off the playback. To your taste - noise filtering, echo cancellation. On the tab , again, the recording format is set:

Considering the characteristics of the recording path, the standard 16 bit/44.1 kHz is enough here.
5. Setting up foobar2000
In principle, the work done is enough to provide the highest (for this card) sound quality in any player. But for the really paranoid, I will give foobar2000 settings. We will need, in fact, the player itself and several plugins for it - WASAPI output support and SoX Resampler. Well, or you can download my assembly, in which everything is already available.
So, in the player output settings (File->Preferences->Playback->Output) select WASAPI:, bit depth set 24 bit:

When outputting via WASAPI Exclusive, all sound card effects (if they are enabled) are bypassed, as well as the Windows mixer (for which we specified the sample rate).
Now let's move on to the DSP settings:
 Here we add the SOund eXchange resampler and Advanced Limiter to the chain. In the settings of the resampler, we set the frequency to 96 kHz.
 And now - why 96 kHz. I did a series of experiments and this is what I found out. In the front speaker output mode, if the volume control is set to more than 90%, when playing a test signal udial(sampling frequency - 44.1 kHz) strong distortion is heard. Distortion disappears if you either lower the volume, or switch to headphone mode, or resample the audio to 96 kHz.
It is difficult to judge the reasons for this phenomenon according to the available data, but we can draw conclusions and play it safe twice: output all audio at a sampling rate of 96 kHz, and do not increase the volume to more than 90%.
And a few words about the need to configure foobar2000. In principle, it is possible to output sound to the "DS: Primary Sound Driver" device. In this case, resampling will be performed by Windows tools (the resampler is not the worst there), besides, all other sounds will not be turned off (as when playing through WASAPI Exclusive). In addition, by selecting this device, Windows will output sound to the device that is set by default in the control panel, which can be convenient (for example, when one of the devices is turned off, the sound automatically switches to another). So the choice is yours - convenience, or confidence in quality.
6. The resurrection of 3D sound and hardware mixing
And of course, I haven't forgotten about the gamers. Since in Windows, starting from Vista, there is no access to hardware stream mixing (all operations are performed by Windows, and then a single stream is output to the sound card), the developers came up with a special program similar to Creative ALchemy, but for Realtek - 3D SoundBack. It connects to hardware resources through the OpenAL interface, emulating for the specified programs Windows emulates a DirectSound device (as in Windows XP), and then simply converts DirectSound (or DirectSound 3D) commands to OpenAL commands, as a result - we get real EAX 2.0 in games, as well as the ability to convert multi-channel audio to stereo with surround effects.
To run the program, open the folder .../Program Files/Realtek/3D Sound Back Beta0.1, in file properties 3DSoundBack.exe tab "Compatibility" install Windows Vista SP2 compatibility mode:

Now run this file. To add an application - click AddGame, enter the name and address of the folder containing the program's executable file. For instance:

After adding, do not forget to select the added application and click the button enable.
Now the specified application will use the emulated DirectSound device by default and will have access to the hardware resources of the sound card:

Epilogue
Well, another grandiose article is completed. By the way, I was thinking: in a good way, this article should have been written one of the first ... However, at that time I still would not have had enough knowledge to describe everything in such detail, so it could be the best.
If something is not clear, there are some questions - ask, comment. Good luck!
Sponsor Information
EvroTechnika: a network of household appliances stores. On the site http://euro-technika.com.ua/ you can get acquainted with the range of modern 8-core smartphones (using a convenient catalog) and place an order here (with delivery or pickup).
If you are running Windows XP, Vista, or 7 and your computer is equipped with a Realtek audio chip, then you must also have the Realtek firmware installed. To activate it...
If you are running Windows XP, Vista, or 7 and your computer is equipped with a Realtek audio chip, then you must also have the Realtek firmware installed. To activate it...