1s if in the list of values. Personnel records and Classifiers
Nomenclature in 1C 8.3 means materials, semi-finished products, equipment, services, returnable packaging, workwear, etc. All this data is stored in the Nomenclature directory. You can get to it from the “Directories” section, subsection “Goods and Services”, item “Nomenclature”
You will see a list of directory positions that has a multi-level hierarchical structure.

In this article we will take a step-by-step look at all the instructions for initially filling out items in 1C 8.3 using an example
For ease of use of this reference book, 1C Accounting uses groups (folders). They combine nomenclature that has common characteristics. In each group, in turn, it is possible to create subgroups (similar to file system on the computer). The number of hierarchy levels is set by the programmer, but initially there are no restrictions.
Let's create new group. In the list form of the “Nomenclature” directory, click on the “Create group” button.

Specify the name of the group to be created. You can also fill in its type, but it is not necessary.

As you can see in the figure below, the group we created was placed in “Materials”. If you need to move it to another group or to the root, open context menu and select "Move to group". A window will open where you will need to specify a new location.

Creating a new item
Let's move on to adding the nomenclature itself. To do this, in the directory list form, click on the “Create” button. A card of the new item will open in front of you.

Fill in the “Name” field. The value in the “Full name” field will be entered automatically. Please note that the full name is displayed in reports, printed forms documents, price tags, etc. The “Name” field is used for convenient search of items in the program.
If necessary, fill in the remaining details:
- The “Item type” and “Included in group” fields are filled in automatically from the data of the group in which the new item item is created. They can be changed if necessary.
- The value in the “Unit” field is the storage unit for the balances of this item.
- The tax rate specified in the “% VAT” detail can, if necessary, be changed during the generation of documents.
- "Sales price" is indicated by default on sales documents. This setting can be changed by clicking on the hyperlink “?” next to this field.
- In the “Production” section, you can indicate the cost item for a given item and its specification (for finished products), in other words, the composition.
- Depending on the specifics of the nomenclature, the remaining sections, such as “Alcohol products” and “Imported goods”, are filled in.
After you have filled out the card for the item you are creating, you need to write it down.
What is the type of item in 1C 8.3 and how to configure them
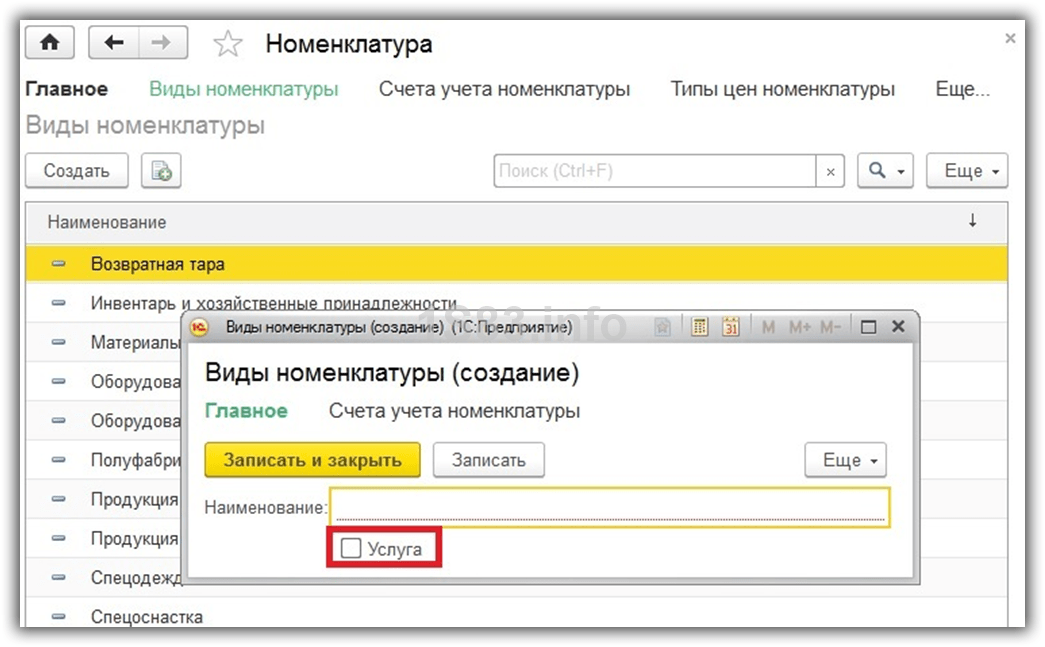
In order to configure the types of nomenclature, click on the corresponding hyperlink in the list form of the “Nomenclature” directory.

Types of nomenclature are required for separation nomenclature items. Each type can be assigned its own. It is very important to avoid duplicates in this directory, which could lead to malfunction item accounting accounts.
When installing a standard configuration from the supplier, this directory will already be filled in with the main types of items. If the item type is a service, do not forget to put the appropriate flag when creating it.
Item accounting accounts in 1C 8.3
To generate accounting entries, you need to set up accounting accounts. This can be done from the list form of the “Nomenclature” directory by clicking on the “Item Accounting Accounts” hyperlink.

In the standard configuration of 1C Accounting 3.0 this register already filled. But if necessary, it can be adjusted manually.
Accounting accounts can be configured:
- according to a specific nomenclature item;
- by nomenclature group;
- by type of nomenclature;
- by warehouse;
- by warehouse type;
- by organization;
- throughout the nomenclature, specifying an empty link as the value.

If different accounting accounts were configured for a specific item and for it, then the account will be taken from the item. In such cases, consolidated accounts have lower priority.
Setting item prices
One item can have several prices. They differ in types, such as wholesale price, retail price, etc.
Go to the “Nomenclature” directory element card and follow the “Prices” hyperlink.

A list will open in front of you, in which you can for a specific type on a specific date. Simply indicate the price in the appropriate column and then click on the “Record prices” button. An item price setting document will be created automatically, and you will see a link to it in this list.

Watch also the video about nomenclature:
Setting up accounting parameters in 1C 8.3 is one of the first actions you must take before starting full-time work in the program. The correct operation of your program, the availability of various functionality and accounting rules depend on them.
Starting with version 1C:Accounting 3.0.43.162, the interface for setting up accounting parameters has changed. Also, some parameters began to be configured separately.
Go to the "Administration" menu and select "Accounting Settings".

This settings section consists of six items. Next we will look at each of them. All of them allow you to influence the composition of subaccounts for certain accounts and subaccounts.

Initially, we already have flags set in two items that cannot be edited. You can also additionally enable maintenance by accounting methods.

This setting was also completed. The item “By item” cannot be used, but other settings can be edited if necessary. The list of accounts and subaccounts that are affected by these settings is shown in the figure below.

Here the management of subaccounts 41.12 and 42.02 takes place. By default, only warehouse accounting was installed. It is predefined and we cannot edit it. Besides this type accounting can be maintained according to the nomenclature and VAT rates.

Cash flow accounting
This type of accounting will necessarily be carried out according to the account. It is also recommended to additionally take into account in 1C 8.3 the movements of DS according to their items for additional analytics on management accounting.

You can keep records of this type of settlement both for employees as a whole, and for each individual. These settings have a direct impact on subaccounts 70, 76.04 and 97.01.

Cost accounting will necessarily be carried out by item groups. If you need to prepare audited statements in IFRS, it is advisable to also keep records of cost elements and items.

Salary settings
To go to this settings package, you need to follow the hyperlink of the same name in the accounting parameters form. Many of the settings here should be left at default, but you still have a lot of room for action.
General settings
To complete the example, we note that salary and personnel records will be maintained in this program. Of course, there are limitations here, but if your organization does not have many employees, then the functionality of 1C:Accounting will be quite sufficient.

You will see a list of settings for each organization that is accounted for in the program. Let's open the settings for Confetprom LLC.
Here you can indicate how wages will be reflected in the accounting system, the timing of their payment, vacation reserves and any special territorial conditions.

Let's go back and follow another hyperlink.

Among other things, you can also change the way the list of employees is organized in documents and make settings for printed forms.

Allows you to configure lists of types of charges and deductions. Initially, they are already filled with some data.
Also in this section 1C, you can enable the availability of functionality for sick leave, vacations and executive documents. The setting is available only if the database does not contain organizations that employ more than 60 people.
The last setting is very useful, since when editing all its amounts will be recalculated automatically.

This section is necessary to indicate methods for allocating labor costs and mandatory insurance contributions from the payroll to accounting accounts. Initially, these settings are already filled in, but, of course, you can adjust them.
Personnel records and Classifiers
There is no point in describing these last two sections in detail, since everything here is intuitive. Classifiers are already filled in and often leave these settings untouched.

Other settings
Let's go back to the accounting parameters form and briefly consider the remaining settings items.

- Payment terms for suppliers and buyers determine after how many days the buyer’s debt to us will be considered overdue.
- Printing of articles– setting up their presentation in printed forms.
- Filling in prices sales allows you to determine where the price will be inserted into the relevant documents.
- Type of planned prices influences the substitution of prices in documents related to production.
Some of these 1C 8.3 settings were previously made in the accounting parameters. Now they are placed in a separate interface. You can also find it in the “Main” menu.

The setting form is shown in the figure below. Here, going through sections, you can set up income tax, VAT and other data.

Full syntax (click to expand)
ListValues
Description:
A list of values is an object that is not stored in the database, which allows you to build to solve interface problems dynamic sets values and manipulate them (add, edit, delete elements, sort). It can be filled with values of any type, i.e. In one list, the types of stored values can be different. One example of using this object is organizing the selection of a specific document from a list of possible documents generated using a complex algorithm.
Collection items: ValueListElement
It is possible for an object to bypass the collection using the operator For each... From... Cycle. The traversal selects the elements of the collection.
It is possible to access a collection element using the [...] operator. The index of the element is passed as an argument ( numbering from 0).
Properties:
Methods:
Designers:
| &OnClient Procedure ExecuteCode(Command) /// How to create a list of values in 1s 8.3, 8.2 List = New ValueList; /// How to add an element to the list of values in 1s 8.3, 8.2 // add method parameters:// - meaning // - performance // - mark (required) // - picture (required) List. Add( 1980, // element value "The year of Vasya's birth"// performance ) ; List. Add(1985, "The year of Yulia's birth") ; // values can be different types List. Add("Polina" , "Child's name" ) ; /// How to insert an element into a list of values in 1s 8.3, 8.2 // insert into position No. 2 (elements are numbered starting from 0) // element with value 2010 and representation // "The year their joint daughter was born" List. Insert(2, 2010, "The year their joint daughter was born") ; /// How to bypass elements of the list of values in 1s 8.3, 8.2 For Each Element From List Loop Report( Element. Representation + ": " + String(Element. Value) ) ; EndCycle ; /// How to clear the list of values in 1s 8.3, 8.2 List. Clear() ; List. Add("Monday"); List. Add("Tuesday"); List. Add("Wednesday" ) ; /// How to find out the number of elements of a list of values, as well as /// get a list element by its index in 1s 8.3, 8.2 // numbering from scratch For Index = 0 By List. Quantity() - 1 Cycle Report(List[Index]) ; EndCycle ; /// How to find a list element by its value in 1s 8.3, 8.2 ValueTuesday = List. FindByValue("Tuesday"); /// How to find out the index of an element in a list in 1s 8.3, 8.2 Report(List.Index(ValueTuesday)) ; // 1, since numbering starts from zero /// How to sort a list by its values in 1s 8.3, 8.2 // was: Monday, Tuesday, Wednesday List. SortByValue(SortDirection.Descending) ; // became: Wednesday, Monday, Tuesday /// How to remove an element from a list of values in 1s 8.3, 8.2 // remove the first element // parameter: list element // or element index// you can do this List. Delete(List[ 0 ]) ; // or so // List.Delete(0); /// How to shift an element of a list of values in 1s 8.3, 8.2 // move the zero element forward one position // was: Monday Tuesday List. Move(0, 1); // became: Tuesday Monday /// How to make a copy of a list in 1s 8 ListCopy = List. Copy() ; Colors = NewValueList; Colors. Add("Red" ) ; Colors. Add("Green" ) ; Colors. Add("Blue" ) ; /// How to upload list values into an array in 1s 8.3, 8.2 ArrayColors = Colors. UnloadValues() ; /// How to load list values from an array in 1s 8.3, 8.2 Colors. LoadValues(ArrayColors) ; End of Procedure /// How to make a modeless selection of a value from a list /// values in 1s 8.3, 8.2&On the Client Procedure How to Make a Non-ModalValueSelection(Command) Colors = New ValueList; Colors. Add("Red" ) ; Colors. Add("Green" ) ; Colors. Add("Blue" ) ; // procedure AfterSelectingElement is defined just below AlertAfterElementSelection = New DescriptionAlerts( "AfterElementSelection", ThisObject ) ; Colors. ShowElementSelection( NotificationAfterElementSelection, "Choose your favorite color") ; End of Procedure &On Client Procedure After Element Selection(Element, Parameters) Export If Element<>Undefined Then Report(Element.Value) ; EndIf ; End of Procedure /// How to make a modeless marking of values from a list /// values in 1s 8.3, 8.2&On the Client Procedure How to Make a Non-Modal Marking of Values (Command) Colors = New List of Values; Colors. Add("Red" ) ; Colors. Add("Green" ) ; Colors. Add("Blue" ) ; // procedure AfterMarkingElements is defined just below AlertAfterMarkingItems = New DescriptionAlerts( "AfterMarkingItems", ThisObject ) ; Colors. ShowTagItems( AlertAfterTagItems, "Choose your favorite colors") ; Colors. FillNotes(True) ; End of Procedure &On Client Procedure After Marking Elements(Elements, Parameters) Export If Elements<>Undefined Then For Each Color From Elements Cycle If Color. Mark Then Report(Color.Value) ; EndIf ; EndCycle ; EndIf ; End of Procedure /// How to make a modal selection of a value from a list in 1s 8.3, 8.2&On the Client Procedure How to Make a ModalValueSelection(Command) Colors = New ValueList; Colors. Add("Red" ) ; Colors. Add("Green" ) ; Colors. Add("Blue" ) ; SelectColor = Colors. SelectItem( "Choose your favorite color") ; If SelectColor<>Undefined Then Report(SelectColor.Value) ; EndIf ; End of Procedure /// How to modally mark values from a list /// values in 1s 8.3, 8.2&On the Client Procedure How to Make a Modal Mark of Values (Command) Colors = New List of Values; Colors. Add("Red" ) ; Colors. Add("Green" ) ; Colors. Add("Blue" ) ; If Colors. MarkItems( "Choose your favorite colors") Then For Each Color From Color Cycle If Color. Mark Then Report(Color.Value) ; EndIf ; EndCycle ; EndIf ; // this is how you can set all the marks at once // list to a specific value Colors. FillNotes(True) ; End of Procedure /// Download and run these examples on your computer |
IN new version 1C 8.3.5 improved work with list settings.
Now settings look simpler, use them convenient and, most importantly, now list settings are saved.
Also, to make it easier for users, setting up lists is as similar as setting up reports.
And the conditions by which the list is selected are additionally automatically displayed in separate lines at the bottom of the settings. This allows you to quickly turn on and off individual elements selection. There is an option to automatically include these same settings in the main list form. If desired, the user can independently indicate which settings he wants to see (which ones he uses most often) in the form of a list.
As mentioned above, all list settings (selections, sorting, grouping and conditional formatting) are now saved automatically. But other than that settings now you can save and manually, giving them some clear name. As a result, for the same list, the user can store several options for setting it up. This feature will be very useful for complex lists that use various options conditional design.
 Search in lists.
The search mechanism in lists has been redesigned. Search has become more convenient and understandable.
The first external difference is that now there are forms in the command panel two new elements: “Search bar” and “Search control”.
As before, to find something, you just need to start typing the words you are looking for on the keyboard. The cursor will automatically move to the search bar and the characters you type will be displayed in it. In this case, the platform will search in all columns of the list simultaneously using several values (string fragments). To make it easier to navigate search results, the platform highlights found string fragments.
A very convenient new search option is to search by number without taking into account leading zeros. For example, to find an invoice with the number 000000011, just type “11” on the keyboard (or in the search bar):

The command has been returned to the platform "Search by current value". It is now possible to easily find all rows of a table that contain the same value as the selected cell. And above the table are displayed the values by which the table rows were found. It became clearly visible that the table does not show all the data, but only some part. And the values searched for, you can now easy to remove or change to other values.
Another convenient point is that the platform remembers the current values used to search. These values are stored in search history, which is accessible through the search control button. Therefore, at any time it is possible to return back to the search values that were used before.
Advanced Search.
The search mechanism that existed in the platform before remains, and is now called “Advanced Search”. Has changed a bit appearance its dialogue and the ability to search by the beginning of a line has been added.
There is a separate command to call an advanced search and, in addition, the platform uses it when the values that have already been searched change.
Selecting a period.
The period selection dialog has been redesigned. This dialog is used in reports to specify the period for which data should be shown. The same dialog is also used in document lists to search for documents relating to a specific period.
Selecting a list of documents by period can be considered one of the ways to search for them - search by date. Therefore, the period setting command is placed in the search control.
When first opened, the dialog prompts you to select one or more months of the current, previous or subsequent year. Can choose a few months, selecting them with the mouse. You can also specify the start date and end date, or you can go to another page of the dialogue and select one of the standard periods available in the platform. And to make it easier to navigate, the periods are grouped by intervals: day, week, decade, etc.
In addition to primitive data types that can be found in any programming language, there are unique types in 1C. Each of them has its own properties, methods, functions, purpose and nuances of use in the system. One of these types is a dynamic list, which greatly facilitates many applied tasks. That is why developers must know and be able to handle this universal tool.
Features of dynamic lists in 1C
Purpose of this type consists of displaying information from any database tables, regardless of its type. The mechanism was created on the basis of SKD and has similar capabilities. But this does not mean that you will necessarily have to write a request in the 1C language, although this opportunity exists and should be used. You can simply specify the table whose information interests you and 1C will independently generate a simple query.
To see how a dynamic list is formed and what data it shows, you need to open the managed forms where it is located in the configurator: in the list of details, use the context menu to open its properties and pay attention to the “Custom Request” item. If there is no checkbox, then the “Main table” parameter reflects the database table from which the data is taken. Otherwise, the dynamic list reflects the data of a custom query, which can be seen by opening the list settings.
The custom query scheme is much more commonly used, as this provides an excellent opportunity to combine and display a wide variety of data. Most often, this mechanism is used to reflect warehouse balances, item prices, receipts, expenses or purchases. It must be used with caution, as the speed of operation is complex queries may fall.
Another useful property of a dynamic list opens when you click on the “List Settings” inscription. This menu allows you to make information more accessible and understandable even when using a standard set of fields end users. Regardless of whether the request is arbitrary or not, you will see the “Settings” tab, where you can specify:
- Dynamic list selection;
- Groups;
- Sorting;
- Decor.
The use of parameters makes dynamic lists universal and quite flexible. You can also link them to details on a managed form, and the data will change depending on the parameters selected by the user. The use of these mechanisms can be understood and appreciated by considering examples of real-life problems.
As an example, consider the task of reflecting the remains of nomenclature on a controlled form. In real practice, such orders occur quite often in various configurations, and a dynamic list is ideal as a tool. For this task we will have to use a custom query, dynamic list parameters and its settings.
For greater clarity, let's create a separate external processing and place a dynamic list on it. To implement our plans, the table with the nomenclature will not be enough, so we need to allow an arbitrary query. In it we will describe the left connection of the directory with the list of items and the register of balances and set the directory as the main table. This scheme will allow users, working with a dynamic list, to add or change items.


Since our request used the “CurrentDate” parameter, we need to set its value before using processing. To do this, in the form module in the “When CreatedOnServer” procedure, using a standard command, assign it the “CurrentSessionDate” function. We also need to display the dynamic list on the control form and change the order of the fields for clarity. Drag the “Nomenclature Remaining” attribute into the form elements (left top part) and use blue arrows to change the order of the fields in the table on the form.
&On the Server Procedure When Created on the Server (Failure, Standard Processing) Nomenclature Remains. Parameters. Set ParameterValue("CurrentDate", CurrentSessionDate()) EndProcedure
Already at this stage, we can open our external processing in 1C and see that the dynamic list is working. We can look at balances, create items and groups, and search. Often customers ask to add the ability to choose the date on which they will see balances. In the case of a form with a dynamic list, this is achieved through an additional field and setting parameters using it.
Add the “DateRemaining” attribute of the “Date” type and transfer it to the form elements. In the field events, we create the “On Change” event and write the code for setting the “CurrentDate” parameter used in dynamic request. So that when opening the form the user immediately understands on what date he sees the balances, we will make small changes to the “When CreatedOnServer” procedure.


As a result, our Dynamic List form can reflect balances as of any date.
We have considered only a small part of the capabilities of this toolkit, but this is already enough to understand the convenience of this type of dynamic list. A similar mechanism is used for many tasks, but it is most often found in typical configurations in controlled forms:
- Selection;
- Lists.
To receive a dynamic list and its request in standard managed forms, the developer needs to open the desired form in the configurator. In the details section, find the details with the “DynamicList” data type (most often it is highlighted in bold). Its properties contain the request text, selections and other settings.