How to check the health of the hard drive on a laptop. Programs for checking the hard drive for errors
Despite the fact that recently solid-state drives are increasingly gaining the niche of the main memory module of computers and laptops, their market share is not so great. The good old mechanical hard drives are much cheaper and are still popular today. However, they have the ability to fail, like any other technique. This article is devoted to the question of how to check the hard drive for serviceability at home without resorting to the help of service centers. Moreover, here are the options, thanks to which it will be possible to restore the performance of a partially damaged hard drive.
A little about the hard drive itself
A classic laptop or computer hard drive is a few so-called "pancakes" with a ferromagnetic coating, on which information is written with the help of heads, and with their help it is read. These discs spin at high speeds ranging from 5400 to 10,000 rpm. For comparison, the industrial cutting tool, commonly referred to as a "grinder", has the same rotation speed. Impressive?
It is during rotation that reading or writing occurs. But if the hard drive is hit or pushed at the time of operation, the heads can make an almost imperceptible scratch on the surface. And although it is small, the clusters in this area become unreadable, and the computer tries to access them again and again. As a result, after unsuccessful attempts to read information, it freezes. How to check your disk for such areas?

Victoria testing program
One of the popular utilities for testing hard drives is Victoria. Although it can also be run from under the operating system, today we will learn how to check the hard drive for health through BIOS. The website of the manufacturer of this utility has information on how to make a bootable disk or USB flash drive with it. In the BIOS of a laptop or computer, you need to set the boot from removable media, after which, turning on your device with the bootable media connected, you will see the interface of this program. Select your hard drive by pressing the "P" key on your keyboard and start scanning it with the "F5" key.
Now you can go and mind your own business. Depending on the volume of the disk, scanning will take from 1 to 3 hours. As a result, on the right side you will see the legend of the disk map, which will indicate the number of sectors of each type. If there are sectors readable for more than 1.5 s, or bad sectors in the frame below, then the hard drive is faulty, it needs to be restored or replaced. So, in your arsenal there is already one way to check the health of a hard drive on a laptop or computer.

Testing via HDD Regenerator
You have to prepare bootable media in the same way by downloading the utility from the developers' website. This utility is easier to use, but works a little longer. It is believed that this is the best way, since it is easier to check the hard drive for health with it, moreover, it provides more information.
To start the scan, select your drive by entering its number from the list. After that, you need a menu item called Normal Scan. In the next submenu, select Scan, but do not repair. Then everything is according to the standard scheme: you can go about your business. After a period of time, get a map of the hard drive, on which you can see exactly which areas are damaged. If the disc is OK, the entire card should be white, with no "D" or "B" letters. What test can still check the hard drive for serviceability?

One of the difficult options is MHDD
Working with this utility is very similar to the previous version. As in other cases, you must first prepare bootable media in order to run it without starting the operating system.
After starting, you will have to select the desired hard drive, if you have more than one. The choice is made by entering the desired number from the list. After that, initialize the disk using the "F2" key and enter the SCAN command. It starts scanning the surface of the hard drive. If necessary, you can scan not the entire surface, but a certain area of clusters.
The interface of the program resembles the already known Victoria. As in the case with it, as a result there should not be sectors that could not be considered a program or are read for too long.
Now you know all the common ways to check the health of a hard drive. It makes no sense to install these programs on a computer, a bootable USB flash drive is enough.

Hard drive recovery through Victoria
Of course, knowing about the malfunction alone is not enough, you need to fix it. But it is physically impossible to cure problem sectors. Programs simply block access to the hard drive to problem areas, due to which they are completely deleted from the map, and it does not access them.
In the case of the Victoria program, before starting the scan, after pressing the "F5" key, you just need to set one of the recovery options in the fourth line of the window. As a result, not only scanning will occur, but also re-partitioning of problem sectors, and you will put your disk in order if it has not completely failed. Now you know not only how to check the hard drive for health, but also how to restore it.

Recovery with HDD Regenerator
The very name of this program says that it is adapted for the treatment of problem disks, and this is actually the case. In order for sectors to be re-partitioned during scanning. When you start in the last menu, instead of Scan, but do not repair, select Scan and repair. This operation will take a little longer, but all problem areas of the surface will be overwritten.
It is worth noting that if the recovery lasts more than 5-6 hours, then, most likely, the disk has completely failed and it will not be possible to restore it. This applies to all recovery programs.

Scanning with BIOS without utilities
Some laptops and computers are able to check the hard drive and RAM without additional utilities. Therefore, in the question of how to check the hard drive for serviceability through BIOS, you can not complicate your life by preparing bootable media, but use standard tools.
However, they may not always be designed to be recovered. In fairness, it should be noted that all the same, they will allow you to make an initial diagnosis without unnecessary problems, which means that you should definitely not neglect them.
What about removable hard drives?
Drives of this kind are also mostly mechanical devices packed in a special pocket. So how to check the external hard drive for health? All the same methods work for them, except for the Victoria program, since it will not be able to detect it. The main thing is to connect it to the USB connector of a computer or laptop before turning it on, so that it can correctly recognize it. After that, the procedure does not change, you can just check it. Or run the script for restoring damaged clusters.
Now you know all the ways to check the hard drive for health without the help of professionals. This information will help you save a lot of money on trips to service centers, because hard drive failures are one of the most common in computer technology.
- the most unreliable component of a modern computer. As a rule, modern models work up to 3 years, after which they have to be replaced. The worst thing about this situation is that it is very difficult to predict exactly when a hard drive will fail. Because of this, inexperienced users often lose important data. In this article, we will talk about how to check the hard drive for health and correctly assess its condition.
Health check based on data from S.M.A.R.T.
If you want to check the hard drive for health, then the first thing to do is install the program. This free program collects all available information about the drive and, based on it, issues an assessment of its technical condition. If the drive is fully functional, then its "technical condition" will be indicated as "Good". If it has any problems, then you will receive an "Alarm" rating, but in cases where the HDD is on the verge of death, the program gives a "Bad" rating.
Also in the CrystalDiskInfo program you can see the initial data of the S.M.A.R.T. (their program uses to assess those states). To understand what this or that parameter means, you can use . There is a table with a detailed description of all the parameters of the S.M.A.R.T. system. In addition, in the CrystalDiskInfo program, you can see the number of inclusions, the number of hours worked, the exact model name and even the serial number of the drive.
Checking the health of the hard drive under load
If the S.M.A.R.T. does not show any problems, then the hard drive can be checked for serviceability by creating a large load. To do this, simply try to write a large number of small files (a couple of megabytes in size) to the drive. For example, you can try to copy a large folder of photos to it.
- If the disk is good, then the copying process should pass without any incidents. At the same time, the copying speed should be more or less stable throughout the copying (except for a slight drop in speed immediately after the start of copying).
- If the hard drive is faulty, the copy speed will fluctuate greatly (from normal to very slow). In some cases, the copying process may hang or be interrupted. Some files may not be copied, the system will report errors. In especially advanced cases, a crack or rattle may be heard, the drive may turn off ().
If the test with writing files went well, then try testing how reading data works. To do this, try copying the data from the disk under test.
Checking for errors in HD Tune
The next step is to check the health of the hard drive using specialized programs. Such programs allow you to check the hard drive for errors and identify existing problems, even if they do not appear in normal use. Let's start checking with a free program (or its paid version HD Tune Pro).
In order to check your hard drive for errors, run the HD Tune program, go to the tab and click on the "Start" button.

After that, HD Tune will start checking the hard drive for health. During the check, you will be able to observe this process. Normal parts of the hard drive will be marked in green, and damaged in red.

On a fully functional hard disk, there should be no damaged (red) blocks at all, the entire surface should be marked in green.
Error checking with Victoria 3.5
To get the most accurate check, you need to use the program, you can download it as an iso file, for example, (here is version 3.5, which is best for checking outside the operating system). The downloaded iso file must be written to a CD (or USB flash drive) and booted from it to a computer. After booting the computer from this CD, you will need to select one of the versions of the Victoria program. For desktop computers, you need to choose the version "Victoria for Desktop", and for laptops, respectively, "Victoria for Notebook". Other options in this menu launch the DOS operating system and Volkov Commander.

To start scanning the entire surface of the hard disk, press the F4 key. After that, a menu with settings should appear. Here you need to select "Ignore Bad Blocks" and "Line Reading". It should be noted that you need to use the Victoria program very carefully, since using some of its functions can delete data on the drive. For example, this can happen when the options "Record (erase)", "Record from file", and "BB = Erase 256 sect" are enabled.

To start scanning, you need to press the F4 key again. After that, it remains only to wait until the verification is completed. At the end, if the hard drive is fully functional, you should see a screen like this.
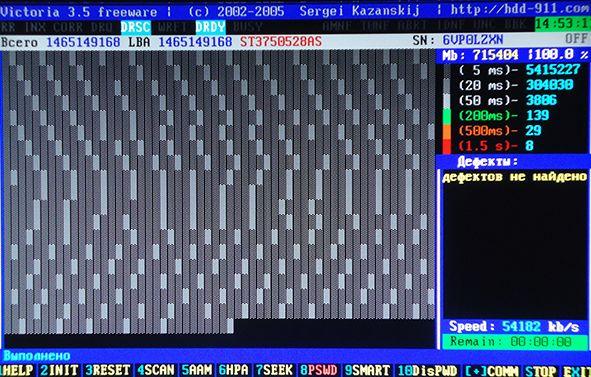
If the hard drive has some problem areas, then orange and red blocks will appear on the scanning screen. The more such blocks, the worse the condition of the HDD surface. If the number of red blocks is large, then this means that the hard drive is faulty and it is time to replace it. Detailed information about the problems found can be viewed on the right side of the screen, in the "Defects" window.
Checking for errors in Victoria 4.46
If you do not want to burn an iso image and boot from a computer from a disk, then you can use the Victoria 4.46 program, which runs from the Windows operating system. You can download this version of the program, for example,.
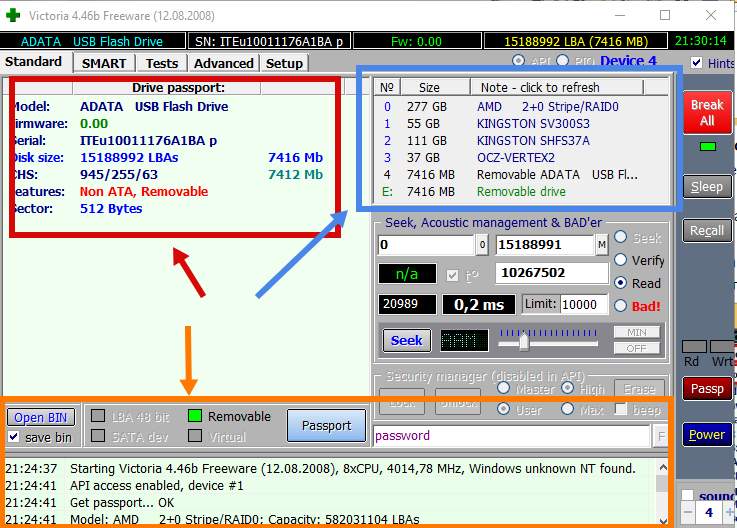
After downloading, you will receive an archive that will need to be unpacked to any folder. To run the Victoria 4.46 program, open the folder with the contents of the archive and run the vcr446f.exe program. After starting, you will see the main Victoria window, it will look something like the picture below.
You should start studying the program from the Standard tab. Here, on the right side of the screen, there is a list of hard drives that Victoria was able to determine, information about the currently selected drive is displayed at the top left (if you wish, you can select another one), and at the bottom there is a log of events, errors and other information.
To check the hard drive for errors, you need to open the "Tests" tab. Here you must first click on the button " Pass"(To get information about the drive), and then on the button" Start»(To start the check).

After that, you just need to wait until the program finishes checking the hard drive.
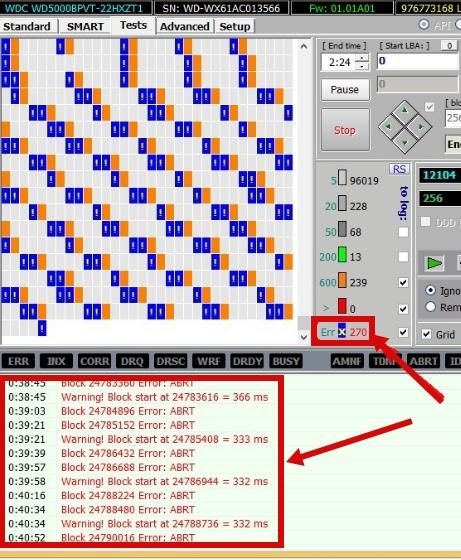
During the verification process, Victoria will find bad and problematic drive blocks, the number of which will be displayed in the column on the right, as well as at the bottom of the screen.
Results of checking the health of the hard drive
A fully functional hard drive should pass all of the above tests without any problems. CrystalDiskInfo should be rated Good, manual write and read tests should run smoothly, and HD Tune and Victoria should show no problems. If this is the case for you, then most likely your hard drive is fully functional and will work for a long time.
But, of course, there are no guarantees here and cannot be. Therefore, the only way to reliably protect your data is backup. The most important data (personal photos, videos, documents) should always be stored on multiple drives.
Experienced users are well aware that even minor influences can affect the health of a hard drive, for example, power surges, mechanical shocks and shocks, static voltage, etc. The hard drive mechanism itself can disrupt the surface of the drive where information is stored. Below is a guide on how to properly check a computer's hard drive for serviceability.
The main symptoms of a damaged hard drive
Already during the startup of the PC, it may buzz loudly or make crackling sounds. Such noise should immediately alert the owner of the computer and make you think about diagnosing the hard drive. It is recommended to copy all important and personal files to external media or to another computer before testing this important element of the PC, since the test itself will put a significant load on the hard drive.
It is imperative that you take care, before starting the program to check, to ensure good cooling of the hard drive, for example, open the cover of the system unit case and clean the internal equipment from accumulated dust. The source of rattles during the operation of a hard disk is the hit of its read head on bad sectors (bad-sectors). If no action is taken, their number will gradually increase and may lead to loss of HDD performance.
Verification procedure
Specialists have developed many different special utilities to test the performance of this important PC element. Also, the procedure can be carried out using the built-in tools of Windows.
Using Windows tools
The operating system allows you to analyze the hard drive. This method is not very reliable, but it is useful for the user to be able to use it. In addition to analyzing the surface of the hard disk, OS tools, if possible, can correct some errors.
The sequence of actions algorithm consists of the following steps:

Using Seagate SeaTools
A significant number of PC owners have already been helped to solve the problem by this handy application. It is free, fully Russified and effectively copes with the diagnosis of hard drives from most manufacturers. It is available for download at seagate.com.
 The application is equipped with an intuitive interface. Having opened the utility, you will immediately see the displayed list of hard drives with which you can perform all the necessary tests. As a result, a report will be displayed to the user, and most importantly, the program can restore bad sectors.
The application is also distributed freely, but it works only for the equipment of one particular manufacturer "Western Digital". However, since they are widespread in the Russian Federation, this program can help a significant number of users.
 The functionality is similar to the above program. You can install it from the official resource "support.wd.com".
It allows not only to make a free check of a broken HDD, but also to get detailed S.M.A.R.T. information, as well as to carry out a large number of different equipment tests.
 In addition, the utility works effectively with flash drives, RAID, SSD.
We should dwell on this program in more detail, since it currently provides high accuracy of test results. The utility is available for installation on the softportal.com page.
You need to do the following steps:

Note: It is not recommended to check the "Erase" box, as this will erase all files. 
Conclusion
Winchester is one of the weakest points of a modern computer. Its usual service life does not exceed five years, but it is impossible to unambiguously indicate the exact time.
Therefore, the only way out is to regularly check and diagnose its condition.
Good mood to you all! Friends, in this publication we will consider one very simple and primitive way of how check hard drive for performance and errors using Windows 7, 8 and 10.
This method is very well suited for beginners, as well as for identifying bad sectors of a hard drive at the stage of their early occurrence. Moreover, in this scenario, you only need to press a couple of buttons.

And in the window that opens, right-click on the hard drive. Then, in the context menu, select the "Properties" section:

And after that go along the path "Service-Check":

Sometimes the operating system may display a message stating that, they say, no verification is required. We do not pay any attention to this and confidently click on the "Check disk" item:

In the case of using Windows 10, the process of scanning the disk will automatically start, after which the verdict will be displayed: there are errors or they are not:

If you click on the "Show details" item, the system event log will open, in which you can familiarize yourself with all the details of this process:

When using Windows 7 or 8 in your work, the "Check" service section will be slightly different from that shown in the article. But this does not change the essence, you just need to check the two existing items and that's it.
Also, in these versions of the operating system, when checking with the letter C, you will need to reboot the system, since a message will be displayed that the disk is currently busy and diagnostics will not start.
That's all, friends, now you know exactly how to check the hard drive for health and errors using Windows 7, 8 and 10. And already in we will consider a more advanced method. And in the end, as always, you can watch a scary video.
- 1. How to check the hard drive?
- 2. Utilities to check the system hard drive
- 3. Other ways to check the hard drive for damage
- 4. Disk analysis using the command line
The hard disk of a computer is the main block of its memory, a part responsible for storing, distributing and moving information. Like any physical medium, a hard drive tends to fail and be damaged, which is critically unacceptable in cases where vital information is stored on it. Checking the hard drive for performance is the first thing you need to be able to do when buying a computer. We will help you understand the intricacies of this process.
How to check a hard drive?
The first thing we need to do is copy the existing important files to another physical medium, be it a Flash card or a third-party HDD. If your SDD or HDD makes strange noises, clicks, or simply raises doubts about its performance, you can resort to various methods of checking it before taking it to a specialized service. There are a great many different applications for checking a disk for bad sectors, software compatibility, hardware, etc. Where to start checking? 
Utilities for checking the system hard drive
Microsoft is famous for its large toolkit for working with various system components, and one of them is the standard CHKDSK built-in program for checking and fixing bad sectors. In this case, we can check the disk without installing third-party applications. If the disk file system has errors, chkdsk is our assistant in finding and eliminating them.
The main functions of the built-in utility:
- Finding and fixing errors in NTFS/FAT file systems
- Detection of physically damaged bad sectors
- Checking third-party media (USB flash drives, SD cards, etc.) for malfunctions

The system scan is launched very simply: open the standard “Run” window in the “Start” menu on “Windows”, or, if you do not have basic command line interaction skills, we find the menu we need through “Explorer”. For this:
- We find the section "My Computer" in the explorer;
- Right-click on the media that needs to be checked
- Open the section "Properties-> Service";
- Click the top button "Perform verification". This command only works if you have administrator rights;

- We restart the computer, during the check of the disk, Windows automatically searches for problems and fixes the problems found;
- If there are no problems, the disk will be checked without correction, but if there are any, be prepared for the fact that the disk check will take quite a long time;
- The system checks third-party physical media immediately, without rebooting.
Note that the built-in Windows tool performs only a superficial check, and detects media problems with far from perfect accuracy. To conduct a more thorough and in-depth analysis, you will need to download and install third-party utilities, the most popular of which we will discuss below.
Other ways to check the hard drive for damage
Useful utility utilities for checking disk status and troubleshooting:

Seagate Seatools is an equally useful utility, which, however, does not have the universality of the previous one, and is compatible only with Seagate hard drives, for other models the analysis will be fragmentary or even erroneous. Using Stools is quite simple - select items for diagnostics, and the program performs automatic testing. If the analysis is completed successfully, PASS will be displayed, otherwise you will see FAIL. Issues such as:
- HDD file system errors;
- Problems in the Windows MBR disk loader;
- Hardware conflict and Windows driver incompatibility;
- The presence of Bad Sectors;
- The presence of trojans, viruses and other applications that disrupt the disk.

In many cases, Seagate Tools automatically fixes the problems found, in rare cases it requires user intervention. It is worth noting that before checking and correcting errors, you will need to be patient. The painstaking analysis of a hard drive is not a momentary matter, and the duration of the process increases in proportion to the amount of recorded memory.
Disk analysis using the command line

This is how, through simple combinations, you can make sure that the hard drive is working. The disk should be checked when you first bought a new computer, and also after errors in installing programs or moving a large number of files. If you rarely use your computer, you should sometimes turn it on to overclock the physical media - each hard drive has a certain write-rewrite resource, and the method of writing data to a bulk media does not provide for static.
Even if the hard drive is fully operational and the manufacturer is reliable, it is recommended to always keep copies of the most important files on third-party media. Although it is possible to recover lost or damaged files using some programs, this method is not absolute, and even a computer service will not always help you recover erased data from physically damaged media.


