How to choose page size in word. Page layout tab in word
By default, when creating a document Word, an A4 sheet opens. In most cases, users do not even think about it and start typing. The only thing they change in the future is to rotate the sheet and change the margins.
But there are also situations when you need to make more complex settings, for example, select a different sheet format.
And, finally, it is worth mentioning the A5 format, which is most common in typography.

Setting the type of paper you are using
So, working in Word, you have the opportunity to choose what size paper you will print this or that document on. Setting these parameters is quite simple and requires only a couple of mouse clicks from you. The following description applies to program versions starting from 2007.
Method #1: Page Layout Menu
In order to change the size and type of paper, go to the "Page Layout" tab and there click on the small arrow in the "Page Setup" field. Once in this menu, you will see three more tabs, among which is the one we need. It's called Paper Size. In addition to the fact that the main formats used today are provided for your choice, you can also specify the specific parameters of the sheet you use in centimeters, if it is unique.
By the way, going to "Page Options" is just one of the settings. Directly in this area itself there is also a "Size" item and a drop-down menu with all popular sheet sizes.
In Word for Mac, you can choose from a list of predefined papers and change the paper size for all pages in a document, for specific pages, or for a specific section. You can also change the default paper size for new documents.
When you create a new document, Word applies the default paper size and margins stored in the normal.dotm template. If you frequently use non-standard paper sizes (for example, when working with US legal documents), you can set new defaults that Word uses when you create a new document. If the current document has the desired margin size, you can use that document to set new default margins.
In Word 2016 for Mac, you can also create a custom paper size and select Different paper sources for pages in your document. Selecting a different paper allows you to use different papers for the first page, which may be a different color or heavier than the other pages.
Choose paper size and create your own options
Selecting the Paper Size for Specific Pages
Select the text on the pages you want to change.
On the menu Format click document > Page settings.
Select a paper size from the list Paper size and press the button OK.
On the document page in the list Apply to select selected text and press the button OK.
If necessary, Word inserts section breaks before and after the selected text, and resizes the paper for that section.
Selecting a Paper Size for a Section
Change the default paper size for new documents
On the menu Format select item Document.
Click the button Default and then the button Yes.
Note: If you change the preferred paper size or margins for the template that Word creates new documents from (normal.dotm), all subsequent documents that use the normal.dotm template will use the new settings. If you change the preferred size or margins for a document based on a different template, only new documents created from that template will use the new settings.
You can select the paper source for the first page as well as all subsequent pages of the document. The list of available sources is determined by the printer driver installed on your computer and may differ from the one shown here.
If page is set as source Select automatically, Word will automatically select the paper source based on the page size and paper size information provided by the printer driver.

Changing the paper size for all pages
On the menu Format select item Document.
Click Page settings.
Popup menu Paper size select paper size.
Click the button OK.
Popup menu Apply: select To the whole document and press the button OK.
The need to change the page format in Microsoft Word does not appear so often. However, when such a task arises, not all users of the program understand how to make the page larger or smaller than the standard one. In our article today, we will talk about this.
Changing the page size in Word
By default, Word, like most text editors, provides the ability to work on a standard A4 sheet, but if necessary, you can always change it to a larger or smaller one, and this is done in just a few clicks.
- Open the document whose page format you want to change. On the Quick Access Toolbar, go to the tab "Layout".

Note: In older versions of the text editor, the tools needed to change the format are located in the tab "Page layout".
- Click on the button "Size" located in the group "Page settings".
- Select the appropriate format from the list in the dropdown menu.

In some cases, the list of formats supported by the text editor may not appear in this menu. You should not exclude the fact that none of the options presented will simply suit you. When faced with a similar problem, use the paragraph "Other Paper Sizes" and then do the following:

In the tab "Paper Size" window "Page settings" in the section of the same name, select the appropriate format (here, their list may also be absent) or set the dimensions manually, specifying the width and height of the sheet (in centimeters).

Note: In section "Sample" you can see a scaled example of the page you are resizing.
Here are the standard values for current sheet formats (values are in centimeters, width in relation to height):
- A10- 2.6x3.7
- A9- 3.7x5.2
- A8- 5.2x7.4
- A7- 7.4x10.5
- A6- 10.5x14.8
- A5- 14.8x21
- A4- 21x29.7
- A3- 29.7x42
- A2- 42x59.4
- A1- 59.4x84.1
- A0- 84.1x118.9
An important drawback for some users of the text editor we are considering today is that it does not allow you to set too small and large sizes for pages. To be more precise, the minimum and maximum value of the sides rests at 0.26 and 55.87 cm, respectively, which falls short of the relatively common A2 format. It turns out that from the standard ones in Word, you can only set values corresponding to formats from A10 to A3, as well as arbitrary ones that fit into the interval shown in the screenshot below.

After specifying the required values supported by the program, click the button "OK" to close the dialog.

By default, when creating a document Word, an A4 sheet opens. In most cases, users do not even think about it and start typing. The only thing they change in the future is to rotate the sheet and change the margins.
But there are also situations when you need to make more complex settings, for example, select a different sheet format.
We will considerMicrosoft Word 2010. The interface of the program changes periodically. In theory, it becomes more functional, but, as practice shows, it becomes more mysterious for users.
We will assume that everyone can turn on the program and create a new sheet. Now let's look at howchange word format. All necessary sheet settings can be found on the menu tab"Page layout".

First, let's look at howchange sheet size in word. For convenience, everything on the panel is done in pictures, when you hover over them, a hint pops up. Let's click on the picture indicating the size of the sheet and see what formats we can apply to our sheet.

The current paper size is highlighted in a different color and there is a list of other available paper sizes. To change the current sheet format, it is enough to select any format present in the list, which will immediately be applied to your sheet. But we are now interested in the bottom entry in this menu"Other page sizes...", when clicked, the settings window appears"Page settings".

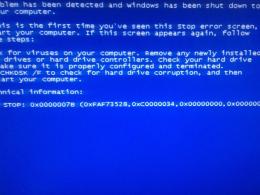
Field for manual input became availablecustom sheet sizein centimeters. Existslimitation in Word sheet formatand if you exceeded it, an error appears with the messagemaximum allowable sheet size in Word. Unfortunately, it is not possible to set the size of either side of the sheet to be greater than 55.87 cm, and this limitation is not related to the selected printer.

For example, let's createcustom format sheet in Word size 21 cm by 55 cm.

You may receive a warning message and a suggestion to correct the error. The essence of the error lies in the fact that some areas of the sheet go beyond the boundaries of the printer or print driver.
So, open the Page Layout tab itself.
First of all, let's look at one of the most important and used buttons here - Fields.
Here are the settings for indenting text around the edges of the document. So why and how to make fields in word? By reducing them, you can fit more text on the page. This saves paper, but of course, sometimes a lot of text on a page is less readable. Therefore, the margins can be adjusted depending on how it is more convenient for you and for what purpose you print the document. So, in abstracts or reports it is desirable to establish standard fields in word.

Here you can choose ready-made blanks for fields: narrow, wide, medium and others. Or you can set them up differently. The first way is to manually drag out the borders of the fields, setting the distance you need. To do this, hold the border with the left mouse button and drag it.

It's pretty easy and you can see at a glance how much text will fit on the page. But it happens that they set the exact parameters for the fields when processing some documents. It's very difficult to set it up manually. To do this, select Custom fields.

In the window that appears, enter the given numbers for the fields.

In the same window, you can expand page- we will consider this button next.
Other features.
Go to the Orientation button.

So let's consider how to rotate page in word 2007.
Let's choose Landscape orientation.
Sometimes you need to print a picture or text, for example, an ad, in this form. To do this, you need to know where and how turn the page.

In most cases, we will still use portrait orientation.
Let's move on to the Columns button. We select the number of columns, and then the existing text is divided into columns within the page.

If you have selected several columns, but have not yet entered the text, then when you enter, reaching the bottom of the page, the cursor will move up to the next column, and typing will continue there. You can adjust the width of the columns yourself by moving their borders.

Using the Breaks button, you can move the text in front of which you place the cursor to a new page, that is, make a page break. In addition, here you will find other options for breaking the text.

Enable Line Numbers button number lines in word if for any reason you need to do so.

Next, consider how to put hyphens in word. If you want words to hyphenate from line to line, like in books, then press Hyphenation and select Auto. Otherwise, the words will be wrapped on a new line entirely.

Next, consider the Background button, which will come in handy if you need to add a watermark to word. We select one of the samples, and an inscription appears on the entire page behind the text. This inscription can be customized, enlarged, changed color and brightness. To do this, select the Custom background item from the list.

In the window that appears, put a dot next to the Text item and configure the necessary parameters.

Now let's look at how to change the page color in Word. Just click the appropriate button and choose a color.

For paperwork, it does not hurt to know how to make borders in word. Click the Borders button. With its help, you can make it so that the page margins are displayed, and in the window that appears, you can configure what type of line will be, what thickness, which fields we want to display. Here, for example, just select the Frame option.

Now the fields are visible, in their place there is a frame with thin lines.

Let's take a quick look at the themes. There are already ready-made blanks for the design of the text and document, when selected, the type and size of the font, as well as the background of the page, change. True, there is one curious moment: in order to change the background color, you must first select the color of the page.

With the help of Indents, consider, how to make paragraphs in word. Here we have an indent on the right and an indent on the left, by changing the value of which you can adjust the distance by which the selected paragraph will be shifted.

You can also adjust the spacing between paragraphs. So, put the cursor on a certain paragraph and adjust the distance before and after the selected paragraph.

We will not consider the remaining buttons, they are needed when working with pictures or other objects added to the document. Instead, open the Links tab.

Here we learn how to make table of contents in word 2007 or word 2010. Put the cursor at the end of the text and press the table of contents button. Here we will select a manual table of contents if you do not have ready-made table of contents items yet.

So let's consider how to make content in word 2007. To do this, simply write your items in the table of contents that appears. If you do not need sublevels and subparagraphs, simply delete them. To make content in word 2010, you need to do the same.

And one more useful button that will help you arrange a document, as they do in books, will tell us how to make a footnote in word 2007. First, we put the cursor after the word we want to give an interpretation, and now we press the Insert Footnote button.

In exactly the same way, you can insert footnote in word 2010. So, we have a footnote at the bottom of the page, where we write our explanation. To better see, at the same time consider how to increase or zoom out page in word. To do this, drag the slider in the lower right corner of the Word.

Here we found out how to insert footnote in word.
The remaining buttons on this tab are unlikely to be useful to you, we will not consider them. And in general, it’s better not to touch them so as not to knock anything down.
This lesson is over, and now you can design the appearance of the text no worse than the book editor. Moreover, you can create your own books or brochures neatly and in a very attractive way. I am sure that the knowledge gained will be useful to you. Good luck, and don't forget to further expand your knowledge about this useful program!
In this article
Page settings tab Page layout Seal Seal see Printing.
Change the page size
Note:
Page size selection
Open a tab Page layout.
In a group Page settings click Size and choose
Advice: Post Formatting select Change page size. In the dialog box Page settings posters, click
Changing the paper size
Print setup.
Advice: Print setup.
On the menu File select Print setup.
In the dialog box Print setup in a group Paper Size.
Advice: File select Print setup. In the dialog box Print setup in a group Paper Size.
Changing page orientation
Advice: Post Formatting select Change page size. In the dialog box Page settings
On the menu File Parameters, Additionally Display. Find an item unit of measurement

Advice: Service > Parameters > General. Find a section Units and select the desired value.
Page size refers to the size of the area occupied by the publication. Paper or sheet size is the size of the paper used in printing.
Page orientation refers to the portrait (vertical) or landscape (horizontal) position of the publication. For more information about changing page orientation, see.
In this article
Page Size, Paper Size, and Orientation
Any publication layout you select in Publisher includes commonly used page sizes and orientations for that type of publication. You can change them and view the result in a group Page settings tab Page layout. You can also set these options and view the result of the change, as well as the relationship between page size and paper size, on the Seal in the backstage view. More information about the tab Seal see Printing.
By adjusting the page and paper size and orientation, you can control the position of the page on the paper and ensure print alignment. You can also go off the edge of the page by printing on paper that is larger than the publication size and cutting it to the finished size, or by printing multiple pages on one sheet.
Page size, paper size and orientation for individual pages
In a multi-page publication, you cannot change the page size, paper size, or orientation for specific pages only. This will require you to create a separate publication for each preset and then manually collect the printed documents.
Change the page size
This procedure allows you to set the publication size. For example, this method can be used to select the size of a printed publication if you want to print a 55.88 x 86.36 cm poster, whether it is printed on a single large sheet or on several overlapping sheets (fragments).
Note: You can create publications up to 6 x 6 m.
Page size selection
Create a custom page size
Open a tab Page layout.
In a group Page settings click Size and choose Create new page size. In the section, enter the desired width and height values.
Advice: Post Formatting select Change page size. In the dialog box Page settings in the group, enter the desired page width and height. You can also choose the post type you want, for example posters, click Create custom page size, and then in the group specify the desired page width and height. In the dialog box Custom Page Size you can specify a custom page size name, layout type, and required margin sizes.
Changing the paper size
The sizes of sheets of paper that you can print on depend on the capabilities of the printer. You can find out the paper sizes supported by the printer in its manual. You can also find the paper sizes specified for the printer in the dialog box Print setup.
Advice: Are you using Publisher 2007? You can find the paper sizes specified for the printer in the dialog box Print setup.
When printing your publication on sheets that match its page size, you need to make sure that the page size and paper size match. If you want to print your publication on a different paper size (for example, to run off the page or print multiple pages on one sheet), you only need to change the paper size.
On the menu File select Print setup.
In the dialog box Print setup in a group Paper Size.
Advice: Are you using Publisher 2007? On the menu File select Print setup. In the dialog box Print setup in a group Paper select the desired value in the list Size.
Changing page orientation
You can change the page orientation from portrait to landscape or vice versa.
Advice: Are you using Publisher 2007? In the task pane Post Formatting select Change page size. In the dialog box Page settings select the page size with the desired orientation.
Change ruler units
Do you need to measure in inches instead of centimeters? You can change the ruler units to inches, millimeters, picas, points, or pixels.
On the menu File select items in sequence Parameters, Additionally and scroll the contents of the window to the options section Display. Find an item unit of measurement and change the units.
Advice: Are you using Publisher 2007? Select Service > Parameters > General. Find a section Units and select the desired value.
By default, when creating a document Word, an A4 sheet opens. In most cases, users do not even think about it and start typing. The only thing they change in the future is to rotate the sheet and change the margins.
But there are also situations when you need to make more complex settings, for example, select a different sheet format.
We will consider Microsoft Word 2010. The interface of the program changes periodically. In theory, it becomes more functional, but, as practice shows, it becomes more mysterious for users.
We will assume that everyone can turn on the program and create a new sheet. Now let's look at how change word format. All necessary sheet settings can be found on the menu tab"Page layout".

First, let's look at how change sheet size in word. For convenience, everything on the panel is done in pictures, when you hover over them, a hint pops up. Let's click on the picture indicating the size of the sheet and see what formats we can apply to our sheet.

The current paper size is highlighted in a different color and there is a list of other available paper sizes. To change the current sheet format, it is enough to select any format present in the list, which will immediately be applied to your sheet. But we are now interested in the bottom entry in this menu "Other page sizes...", when clicked, the settings window appears"Page settings".

Field for manual input became available custom sheet sizein centimeters. Existslimitation in Word sheet formatand if you exceeded it, an error appears with the messagemaximum allowable sheet size in Word. Unfortunately, it is not possible to set the size of either side of the sheet to be greater than 55.87 cm, and this limitation is not related to the selected printer.

For example, let's create custom format sheet in Word size 21 cm by 55 cm.

You may receive a warning message and a suggestion to correct the error. The essence of the error lies in the fact that some areas of the sheet go beyond the boundaries of the printer or print driver.