Creating a boot image of windows 7 ultraiso. Create a bootable USB flash drive in UltraISO
The era of optical discs is slowly dying out and they are being replaced by external storage media, flash drives. In this regard, users have learned how to create bootable windows flash drives, and as it turned out, it is much more convenient. This article is devoted to the topic of creating a bootable windows 7 flash drive using the UltraISO program.
In general, there are not so few programs for creating bootable flash drives, but not everyone can burn an image in a way that follows the rules of bootable media. The UltraISO utility does this very well, which is why I am reviewing it in my article. For example, you can read the article How to create a bootable Windows 7 flash drive using the Rufus program, by the way, it is also a very handy utility.
The program is paid, but it has a trial period, which is enough for us to create a bootable flash drive. You can download it on the website http://ultraiso-ezb.ru/.
After we launch the program, it is advisable to run it as an administrator, because the program may not work correctly.
In the window that opens, click on the tab file, where we choose the item open.


In the window on the right, our image files should appear.

Now go to the tab where we click the item burn hard disk image.

A window will open, where in the disk drive drop-down list, select the flash drive on which the windows 7 installation files will be written , leave the recording method as USB-HDD + and press the burn button. To create this kind of drives, it is recommended to use a flash drive with a capacity of at least 4 GB.

A warning window will appear, which says that all information stored on the disk will be deleted, we agree and click the button Yes. Before creating a bootable flash drive, do not forget to check if the necessary files are there.

The process of creating a bootable windows 7 flash drive begins. We are waiting for a few minutes.

At the end of the process, an inscription about completion will appear, press the button back and close the program.


ABOUTleave your opinion about this article, and of course, ask your questions if something suddenly went wrong for you.
Thanks for attention!
Now it is difficult to imagine a person who would not have a computer at home. Unfortunately, unforeseen circumstances may occur that can only be resolved by reinstalling the operating system. This article will discuss how to install an operating system on a USB flash drive using the UltraISO program, and how to install Windows 7 from a USB flash drive.
Preparing a flash drive to install a Windows 7 image on it
Depending on the size of the image with the operating system, you need to choose a USB flash drive that is suitable in size. After that, if you have any files on it, you need to save them on another medium, since (Important!) All data will be deleted when formatting and installing the system image.
After all the necessary files from the flash drive have been saved, it must be formatted. To do this, go to My Computer, select the USB flash drive and, by right-clicking on it, select Format in the context menu. 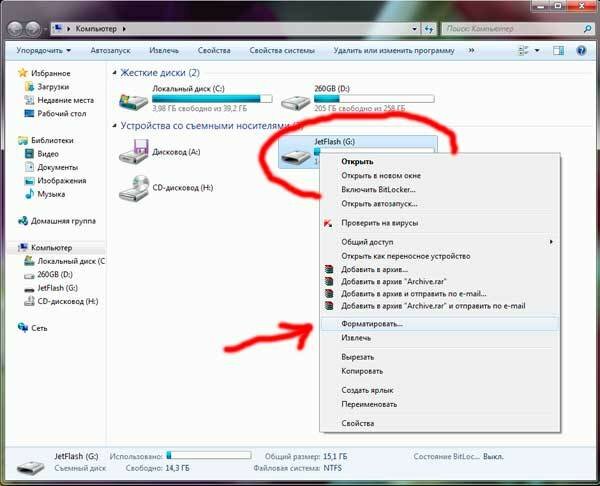
In the window that appears, in the "Capacity" section, you need to check the size of your flash drive. In the "File system" section, leave the NTFS format. In the "Cluster size" section, leave the default. Be sure to check the box next to "Quick Format". After the done procedures, you must click the "Format" button and confirm the start of the procedure. When finished, a window will appear with a completion message. The flash drive is ready to write the image.
Installing UltraISO
First of all, you need to download the distribution kit of the program. It is recommended to do this from the official website of the developer. When the UltraISO program is downloaded, run the file.
In the window that appears, you must accept the license agreement and click Next.
After that, select the path where the program will be installed or you can leave it by default.
Don't forget to label the UltraISO as it should show up in the Start Menu. After that, specify the necessary parameters:
- shortcut on the desktop (as a rule, it is necessary for quick access to the program);
- associate an .iso file with UltraISO (it is necessary to check this box in front of this item so that .iso files can be opened using this program);
- install an ISOCD / DVD emulator (allows you to install a virtual drive with which you can open .iso files).
 When all the settings are made, click the "Install" button. After the installation of UltraISO is completed, in the window that appears, click the "Finish" button. The installation is complete and the program is ready to use.
Burning an operating system image to a USB flash drive using UltraISO
Before burning Windows 7 to a USB flash drive, you need to make sure that you have an image file with the .iso extension. If there is none, you need to create it from a disk or download it from the Internet. In order to create an image from an existing disk, you can use any image creation program or make it in the UltraISO program. To make it in this program you need:
- Insert the disk with the operating system and run UltraISO in the trial period.
- In the program, find the icon with creating an image, or Tools / Create a CD image, or press the F8 button on the keyboard.
- In the window that appears, you need to select the drive on which the system is installed, the place where to save the image file, select the .iso format and click the create button.
 After the process of forming the Windows 7 distribution kit is completed, you need to write it to a USB flash drive. To do this, without leaving the UltraISO program, click File / Open, find our downloaded system image and click "Open".
After that, go to the menu Boot / Burn Hard Disk Image. 
In the window that opens, you need to select your flash drive in the Disk Drive field and re-format it, and only then click the "Burn" button. 
In the next window, you need to confirm the continuation of the process. We are waiting for the completion of the installation of the system image on the USB flash drive, after which we press the "Back" button and close the UltraISO program. The Windows 7 operating system image is installed.
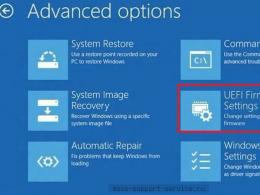
Installing flash drive boot in BIOS
When you turn on the computer, you must enter the BIOS using the Delete (Del), Esc or F2 buttons on the keyboard to set boot priorities. Be sure to insert the USB flash drive before turning it on, as there are times when some equipment does not detect this type of media and may simply not see it if it is inserted after turning it on.
After you have entered the BIOS, go to the Boot tab and set the USB-HDD startup priority first. As a rule, everything changes using the F5 and F6 buttons, but it can be different (on the right it will be indicated how you can change it). 
Installing Windows 7
We proceed directly to installing the operating system on the computer. When you exit the BIOS, the computer should restart and you should be prompted to press any key to continue booting. If this does not happen, then either the information on the flash drive is written incorrectly, or the drive cannot read it, or the settings in the BIOS have not been saved.
After pressing any key, the necessary Windows 7 files should be downloaded. After this procedure, a window will appear with a choice of language, keyboard layout. 
Select the required options and click next. In the next window, click the "Install" button. Then the operating system selection will appear. Having selected the Windows 7 we need, click the next button. 
Be sure to agree with the license agreement and continue by selecting the full installation.
A window that appears will present a list of disks on which you can install your system. Before installation, be sure to configure the desired disk. To do this, click on the "Drive settings" button below (in the English version "Drive options"). 
On the selected one, click the "Format" button to delete all data. Be sure to format in NTFS format. After formatting is complete, select the drive and click next. The installation of Windows 7 will begin.
During installation, the computer may be restarted and the process will continue after that. When the installation is completed, the system will boot the latest installed system and configure the first start of Windows 7, check the performance of the video adapter.
After that, a window will appear in which you must specify the Username and the Name of your computer. 
In the next window, you must enter the product key, or uncheck the automatic registration on the Internet. Click next. Then the system will prompt you to automatically protect your computer and Windows 7 using update installations. As a rule, it is recommended to select "Use recommended settings". 
Next, set the time and date on the computer. After that, the desktop will be prepared and the final boot of Windows 7. Now you just need to install the necessary drivers and programs. The installation is complete and the computer is ready to use.
Recently, more and more questions have arisen about installing Windows from a USB flash drive. This is partly due to the rise of netbooks and ultrabooks that do not come equipped with DVD drives. Almost all the difficulty lies in creating a bootable USB flash drive. Therefore, this article will only discuss how to create a bootable USB flash drive. The image for a bootable flash drive can be anything: Windows XP, Windows 7, Ubuntu and any other image that you can create yourself.
Create a bootable windows 7 flash drive
I will show how to make a bootable USB flash drive using the Windows7 distribution as an example.
This will require:
-UltraISO program (you need to download and install - use Yandex / google search)
- an empty flash drive with a capacity of at least 4GB
- the necessary disk image (for example, a file with *.iso extension).
First, prepare your flash drive if it is not empty. Transfer the necessary data and format (it will also be possible to format later - in the program itself).
Run the program (as administrator) UltraISO and open the required image file “ File -> Open”.

Insert the USB flash drive into the USB port if it has not already been connected. Select from the menu “ Boot -> Burn Hard Disk Image”.

Now select your USB flash drive in the Disk Drive line in this window. The image file line already contains the path to the image you selected/opened. The flash drive can be formatted by clicking on the "Format" button if it has not been done before. Press the "Record" button.

An information message will appear stating that the data on your flash drive will be lost. Click "Yes". If the message " You need to have administrator rights to perform the operation”, then you will need to run the application as an administrator (Right-click on the shortcut or UltraISO application -> Run as administrator).
In case of a successful launch, the process of recording a bootable Windows 7 flash drive should begin. Wait for the recording to finish. The creation of a bootable flash drive is completed. Now you can install Windows from a USB flash drive, similar to installing from a DVD.
Modern laptops are less and less equipped with a CD-ROM drive. And such devices as netbooks and disk drives do not occur at all. Removing a disk drive makes the mobile device lighter and thinner. But, at the same time, users face some difficulties in their work. For example, in order to install Windows 7 on a device without a drive, you have to create bootable USB flash drives. In this article, we will talk about how to write a Windows 7 image to a USB flash drive via UltraISO.
Step #1. Open the Windows 7 image in the UltraISO program.
In order to write a Windows 7 image to a USB flash drive through a program, you must first open this image. To do this, launch UltraISO, open the "File" menu and select "Open" from there.
As a result, you will see a standard window for selecting a file. Here you need to select the ISO file with the Windows 7 image that you want to burn to a USB flash drive.

After that, files from the selected disk image will appear in the UltraISO interface. It is better not to touch these files, otherwise the bootable USB flash drive may not work.

Step number 2. We connect the USB flash drive to the computer and start recording the Windows 7 image.
Next, you need to connect a USB flash drive to your computer, on which you plan to burn the Windows 7 image via UltraISO. To do this, simply connect the USB flash drive to any port and wait until the system detects it. After connecting the flash drive, return to the UltraISO program. Now you need to open the "Boot" menu and select "Burn Hard Disk Image".

After that, a window for burning a disk image will open. Here you need to select the flash drive on which you want to burn the Windows 7 image. Select the desired flash drive, and click on the "Burn" button.

After that, the UltraISO program will warn you about deleting all data from the USB flash drive and, if the user agrees, will start writing the Windows 7 image to the USB flash drive.
Step #2: Wait for UltraISO to finish burning the image.
Now you just have to wait until UltraISO writes the Windows 7 image to a USB flash drive. This usually only takes a few minutes.

In our time, the use of disks is no longer popular, since many PCs and laptops are produced even without a disk drive. For this reason, the question of how to make a bootable Windows 7 flash drive (UltraISO or another program will be used is up to you) is more relevant than ever. Let's see what you need to have to create it and what you might need such a bootable flash drive for.
Possible and problems
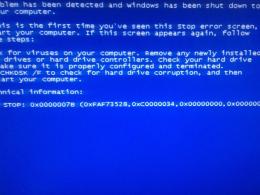
Using an operating system such as Windows can be accompanied by various unforeseen problems and malfunctions. The operating system often starts to work with serious failures, and sometimes even stops loading. It is impossible to insure yourself against such a situation, as well as to predict such a state of affairs.
It happens that problems with the operating system are eliminated by the usual system restore function. To do this, simply run it, unless, of course, you made save checkpoints, and this system was running for you. If there is no way to start recovery, then Windows 7 will be able to save the situation. Of course, you can also run from a Windows disk, but a flash drive is more convenient and mobile. Moreover, in netbooks, for example, there is no disk drive.
Reinstalling the system - solving the problem
It is not uncommon for a serious problem to be fixed only by reinstalling your OS (a Windows 7 bootable flash drive image is also suitable for this), if you did not have the Windows and data backup function enabled. A disk or flash drive with an image can be used for recovery, and for reinstallation, and for installing the system again.
Benefits of a flash drive

Most often, of course, the distribution kit with the operating system is recorded on a regular DVD. But, you see, now it is no longer relevant. Yes, and storing an OS image on such a disk is quite difficult due to the fact that it can easily be damaged by any mechanical impact. Just one small scratch can render a drive unrepairable, and so can your system. A bootable Windows 7 flash drive (ISO image on it) will be the way out of this situation. Installing the Windows system from a USB flash drive is no different from the usual process for installing an operating system from a disk.
A USB drive with an OS image is better protected from various kinds of damage than a DVD disc. In addition, the flash drive is smaller, easily moved without any problems and damage.
Main question
And, of course, the main question is how to make a bootable Windows 7 flash drive. UltraISO is one of the programs that will help you quickly and easily create an image of any disk. In addition to it, there are also other applications for these purposes. But we will talk, as you already understood, about the UltraISO program.
Tricks of the program
This program is paid, but nevertheless has some trial free period of application. You will be able to use the free version of UltraISO, but with one limitation - the file size of your image must not exceed 300 MB. Yes, this is such a tricky program. A bootable Windows 7 flash drive, no doubt, will not fit into these megabytes. So the portable (portable) versions of the UltraISO program will be the solution.
Rules for creating an image for a flash drive in UltraISO
So, we come to the main issue of this article. How to create a bootable Windows 7 USB flash drive using UltraISO. By the way, in a similar way, you can write to it the image of the now popular Windows 8.
To create a bootable flash drive in this program, you first need to run it with administrator rights. After that, click "Open" at the top of the UltraISO program window panel. Next, in the explorer window that opens, you need to select the image of the Windows operating system for its further recording on a flash drive.

In the window called "Open ISO file" you must select the image of your operating system and click on the "Open" button. If you are interested in how to make a bootable USB flash drive for Windows 7, UltraISO will give you the opportunity to choose an image of the Windows 7 OS, as well as any other: Vista, XP, Eight. Further in the program window, on the right side, an image of the necessary operating system appears. Now connect your flash drive to the PC via USB, if you haven't already done so.
Features of a flash drive and its formatting
It is important to note that a flash drive for recording an image of the popular Windows 7 or G8 operating system must have a memory capacity of at least 4 GB, and must also be formatted in the FAT32 file system. In order to also use the UtraISO program right before starting to burn the image.
note
Remember that if there is any data on the flash drive that you need, and you do not want to lose it forever, then copy it somewhere before formatting. After all, this procedure will delete all data from it.

Next steps of creation
After that, in the program window, click on the "Boot" button, and then in the context menu, select the item offering to record the hard image. Then, after the window with the name "Burn disk image" appears, you must make sure that the disk is correctly selected to form a bootable flash card with the operating system. You must be sure that the flash drive is located on the correct letter of the alphabet.
Next, in the "Write method" item, click "USB-HDD +", and then proceed to format the drive or directly record the image of the Windows 7 operating system. If the flash drive was formatted in advance, before recording the image, then you simply click "Burn". If in advance you then first click on "Format".
Formatting process in UltraISO
So, let's look at the steps for in this program. In the "Formatting" window, you need to select the FAT32 file system, and then click "Start". Then click OK in the warning window. Formatting, as already mentioned, destroys all data on the flash drive.
After completing this process, a window will appear in which you will be informed about the successful completion of the operation. Click OK again and close the formatting window.

The next step is to go to the Write Disk Image tab and click "Write" to start creating a flash drive with the image. You will see a "Hint" window, which will warn you that all data from the card will be deleted. Click "Yes". Now the recording process has begun. The write speed of a USB flash drive with an image directly depends on the capabilities of your PC. After a while, the image will be written, which you will learn from the Write Disk Image tab, where a notification will appear that the recording has been completed. Well, here you have learned how to make a bootable Windows 7 flash drive. UltraISO can be closed, it has already done its job.
Finishing touches
After all of the above and done, you need to open the "Explorer" and make sure that the image of the Windows operating system is actually written to the drive. If you open the flash drive, you will see the system image there. As mentioned earlier, the process of creating an image of another version of the OS is no different from this. In order to install the operating system, in the BIOS you will need to enable the priority of loading the OS from a USB drive.

Now you are not afraid of any failures and malfunctions, because you will always have a working bootable USB flash drive with a system for restoring or reinstalling Windows, which will allow you not to waste time looking for a new image if any problems arise. The last fact is very important in our dynamic time, when every second counts. In addition, such a solution will be relevant for those who make money on installations and reinstallations of operating systems. Agree, because it is much more convenient to carry a flash drive with you, and every PC has USB outputs.