The ultimate remake of Radiotehnika S30. Amplifier class d Correcting the deformation of the protective grids
Characteristics, I must say, not very. Or is it me from above S -90 so it seems? Moreover, I still remember how I brought them (this is not for you S -90, on the column in hand and go!) and zafanovat. To my then ears, the sound was just right! So thoughts like - S -30 ha..but reject immediately! There are no bad speakers, but there are jammed ears :).
Therefore, all owners S -30 is dedicated. If you are already fed up with their sound, and finances do not have to buy more, read the following:
So, in the presence of S -30 2 pieces, soldering iron, straight arms, improvised material: cotton wool, felt (batting, linoleum), copper wires (though from wiring, single-core ones are recommended, with a cross section of 2.5 mm2), plasticine, rubber, speaker circuits, free time and the desire to improve without limit.
We remove the front panel (8 bolts) and both speakers (in the 30s, oh horror, they were not even soldered to the wires, but on the connectors! ...) We remove the back cover (nameplate) with the filter.
Let's start editing:
1) We seal the body (we coat all the seams with plasticine or sealant), during this time the soldering iron heats up.
2) Let's take care of the filter: Turn off the overload indication unit (if the amplifier is not more powerful than 25-30 W - otherwise then we listen with caution) - according to the scheme, we cut the track from the input (red wire +) to VD KA 522B (see diagram) and solder capacitor C2 10 uF and transistor VT 2 KT315b.
Unplug the plug XP and solder the wires going to the speakers (we throw out the old ones! We put in their place audio wires with a cross section of at least 2.5 mm2, in extreme cases, copper wires from the electrical wiring) directly to the board, with reverse side connector. From the bass player (LF) “+” to connector No. 2 and “-” to No. 3. The tweeter (HF), respectively, “+” to No. 5 and “-” to No. 2 (as it should be - it is in antiphase).
Finished with the filter.
3) Corps. We dampen - we upholster with batting, felt, an old blanket, fiberglass, felt-based linoleum (choose a sound absorber to taste among the material at hand), preferably in several layers and alternating them. This is the most dreary, because of the small volume. The main thing is not to stifle the volume!
4) We put in place the back cover with the filter (on plasticine / sealant).
5) We fasten the tweeter (previously soldered (soldered! In no case on the connectors) wires to it, observing the polarity and taking into account the antiphase!) Through the rubber gasket and sealing with plasticine.
6) We sew a bag for cotton wool (although you can also use what was - like from a synthetic mesh) We fill it with cotton (how much it was. About 1/3 of the volume of the case, do not forget to fluff) and place it in upper part, preferably to one of the walls for asymmetry.
7) We solder the bass player (again, observe the polarity!) And put it into the case through the rubber gasket. We fasten it with screws (we also pass the screw heads through the rubber gaskets) and seal it around the perimeter with plasticine.
8) Remove the protective gratings from the front panel from the tweeter and, if desired, from the woofer.
9) We put the front panel in place (it is advisable to put foam rubber under it where necessary so that it does not resonate).
With the finalization of the column everything!
Now we finish the second column and enjoy the sound. Already the first minute of listening will show a clear improvement in sound. The characteristic 30th buzz on the bottoms will almost disappear. An order of magnitude to improve high. The sound will become softer or something. The middle will appear and the bass will soften. Okay, listen to yourself. The sound is hard to describe in words :).
ATTENTION!!! It is necessary to pay attention during assembly so that the phase inverter is not closed by anything and has direct access to the woofer cone! Also, special attention to the observance of phasing!
If, despite the refinement, you will soon want more, then we continue the budget tuning:
A) We put copper wires to the speakers (at least the same wiring). Watch out for polarity!
B) We grind the spikes (an article about them will be here soon) and put speakers on them (with a very budgetary refinement, we drill the bottom of the case and put on 3 M10 bolts, pointed from below)
B) Modifying the amplifier
D) We put a normal interconnect cable from the sound to the amplifier.
D) shield sound card(If the speakers are playing as part of the computer's speakers).
P. S . As always, there are some downsides. After the above, you will obviously have to buy another one HDD to the music ... Since MP 3 at 128 Kbps it will become impossible to listen - only 256-320 (but that's a completely different story ...).
Thoughts visited me different,Whether to buy an empetrish column
Whether the scheme to come up with a complex
And then collect it like a book
But in my finances I'm too miserly
And I was ready to spend at a minimum
Suddenly I look on ebay lies, it's definitely mine
On this board, assemble an amplifier according to my mind
Well, I assembled an amplifier for Radio Engineering S30 speakers, which do not have a filter in their composition, a surprise was waiting for me, however. I certainly did not think that without a built-in filter low frequencies will not be heard at all. I tested the speakers on the Pioner receiver, but actually we will not talk about the speakers.
Amplifier chip TDA7492.
I ordered a ready-made board and I just had to shove it into the case, this is how it began to look after stuffing it. 
And so, if you open the lid 
At first I was afraid that my friend would warm up and decided to fill the wires with sealant instead of hot glue, but if we take into account that the power of my speakers is about 20W in total, and the efficiency of the class D amplifier, we get that the power released by the radiator will be a maximum of 2 watts.
Such power can be dissipated even in a closed case. So it was safe to fill the wires with hot glue.
Here's exactly what it looks like to me. 


When working with an amplifier, you should only take into account the small subtlety of the supply voltage:
When the speaker impedance is 4 ohms, the operating voltage must be less than 18V;
When the speaker impedance is 6 ohms, the operating voltage can not exceed 24V;
When the speaker impedance is 8 ohms, the working voltage can not exceed 26V.
Actually, as stated in the description on the amplifier)
when working on a 4-ohm load, I powered the amplifier from a 12V power source, well, actually what was at hand)
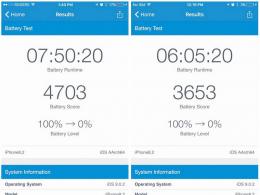
Unfortunately, I do not have expensive equipment to measure the distortion introduced by the amplifier, noise levels, take logarithmic characteristics, I will just say that the amplifier is definitely worth the money.
It was tested on Radio Engineering S30B speakers, which already have bandpass filters on the speakers and the results are more than impressive.
For those who are interested in the scheme by which I assembled the amplifier in a box or some other aspects, I made a video. You can view)
Thank you)
Have a nice day, everyone)
And for those who read the review in the evening, good evening and the next day)
In this article I will try to describe the basic principles for refining this acoustic model. After buying an Audigy 1 and Microlab X2/5.1 speakers, my life has changed. Music has gradually come to the fore and replaced computer games. For almost a year I sat on Microlabs and thought that better sound no, but then they ceased to suit me, because a person always strives for the best, so I began to strive. For myself, I figured out the following thing: not everything that sounds good is expensive and you can turn to Soviet audio engineering. For a long time, 6AC-222 was gathering dust on my closet, one fine morning I paid attention to them and decided to use them for the good of the cause. After simple actions with a soldering iron, the speakers were connected instead of the front in Microlab X2 and it started ........
I immediately warn you that you make all changes to your acoustics at your own peril and risk. The author is not responsible for your actions.
So I finally bought the legendary Soviet S30 shelf speakers with round bass reflex. (S30b are also present in the photographs. I received the camera by the end of the assembly, so what was filmed was what was already redone by a friend (S30b))

They were bought on Friday for a symbolic 400 rubles. After half an hour of listening to them as they are, I decided that I would immediately refine them. I left one column connected, the second began to disassemble. More about disassembly of columns.
The workers of the plant did not skimp on the “sealant”, if it can be called that, and missed almost all the holes with it (for speakers), naturally, no one remembered about the cracks. A good 1.5 hours were spent cleaning the front and back panels.

I must say right away that it is better not to remove the seal on the rear panel (plastic cover with connectors), because it helps to cope with vibrations. I ripped it clean, for which I later paid the price. The lid rattles under certain conditions, and even the rubber gasket does not change the state of affairs. So the back is better to leave everything as it is.
As I “deepened” into the column, I was more and more surprised. First of all, I was struck by the connecting wires of monstrously small thickness. In the S30b modification, the wires are not soldered to the speaker contacts, but are attached to the clamps, which is really bad! The joints of the panels are smeared, apparently, with PVA glue, which has already cracked from time to time, because. speakers were born back in 1986 (I'm only a year older ;-)). This was followed by a filter, consisting of a handkerchief the size of a palm, four paper capacitors, two electrolytic type K50-6, an inductor and several resistors.

The entire board is attached to a plastic plug on the back wall, which I wrote about above. The phase inverter is made of foam rubber, which has lost its shape over time and has become hard as a stone. That's all the insides. Let's try to extract practical benefits from all this goodness.
The wires in the filter turned out to be the same negligible thickness as those going to the speakers. The first thing I did was to replace them. For replacement, copper wires from a burned-out computer PSU were used. They are not acoustic, but still better than the ones that came before. All soldering operations took no more than half an hour.
The next day I went to Chip and Dip and bought an acoustic cable for 15 rubles per meter.

I laid it from the filter to the speakers themselves. This replacement is one of the most significant, because it gives the most noticeable change in sound. The speakers acquire a voice, clear and fairly transparent. The difference between what was and what was immediately heard. The laziest can limit themselves to just replacing the wires, while the rest read on.
I took out the cotton wool from the speakers completely. Someone will judge me, but I liked the way they play without cotton wool. If before that there was bass, but it was somehow screaming and hit somewhere in the back, then after I removed the cotton wool, the mumbling disappeared, the clarity increased, and now the bass began to hit the floor and became pleasant and juicy.
Now begins the most interesting, the most difficult in technical terms, if you can call it that. Lubrication of panel joints and crevices with sealant (I used a car sealant) and gluing the walls of the speakers with sound-absorbing material.

In my case, linoleum with a synthetic winterizer or something similar on the other side (“Warm” linoleum) acted as such material. The whole difficulty lies in the fact that the speaker housing is non-separable and lubrication takes a lot of time and effort. It took about 2 hours before I finished lubricating one column. Everything needs to be smeared! Internal joints, external and all the cracks that we meet on the way. Because if this is not done, then air will flow through them, which will introduce distortions into the sound, various wheezing and whistling. Why do we need this? Right! We don’t need anything, so let’s miss it on our conscience. We finished with the lubrication, we go directly to the sizing with linoleum itself. This activity is not for the faint of heart. Someone may not stand it, someone will not start at all, I decided to go to the end and do everything that is possible.
We take the dimensions from the columns and proceed to the cutting of linoleum. You can simply attach the column to the surface of the linoleum and circle it with a marker (I personally did this), and then subtract about 1.5 cm from each side and start cutting along the contour. 1.5 cm eats up the wall thickness. After cutting out the workpiece,

we put it inside the column and circle the connecting corners with a marker, because they will interfere with gluing exactly linoleum. Circled, now cut with scissors or a knife. Ready? We put it back into the column, check, if everything matches, then we smear the surface of the column with glue. I used a glue that is similar to Moment, but it is transparent and dries fairly quickly. Gently, with a thin layer, smear over the surface and apply the pattern. Do not forget to straighten everything with your hands, because. waves are inevitable.
Now we ventilate the column, because it smells of glue and other nonsense.
While the speaker was drying, I cut out the spacers from the car's speaker chamber. We apply the speaker

With the front side to the rubber, circle with a marker or pen. We cut and screw the resulting blank in place of the speaker. Next, we circle a piece of rubber from the inside of the column so that the speaker itself freely enters the resulting hole. Similar operations are done for all speakers. We carefully try on the gaskets, if somewhere the rubber does not fit snugly, then we expand the hole so that the linoleum sheet lies flat. In addition to the gaskets for the speakers, cut out the gaskets for the heads of the screws so that they do not come into direct contact with the speaker. They cut it out, checked it, and the column was already dry. You can try to put. Do not forget to make holes for the screws in the attachment points in the rubber. It is possible to smear the hole in the front speaker under the woofer with sealant, although this action is unnecessary. Everything is set, now we are listening. The difference should be audible immediately, although it all depends on the training of the ear. Happy, now let's move on. I redid the phase inverters. Everyone may have a different situation. Personally, they looked very depressing to me. Made of foam rubber about 20 years ago, they lost their shape and became hard and brittle. crumbled at the slightest movement.

For the new phase inverters, I bought plastic sewer pipes of a suitable diameter (35 mm) and length (the original FI is 8 cm long).

In order for the FI to keep normally in the hole for it, I had to wrap it with a narrow piece of linoleum, the length of which was about 1.5 meters. The resulting structure is screwed into a hole in the wooden front panel so that the outer part of the FI protrudes by about 0.5-1 cm.

In order to properly place the FI, it was necessary to modify the front front panel.

I used a dremel to cut off the plastic circle that went inside the old FI and slightly widened the hole so that the new FI would butt up with the panel. It turned out pretty badass. The new phasic performs its duties better and separates the bass guitar from the general sound, which is now heard very clearly at any volume. The most important thing is that it does not mumble, but works very correctly, it is important not to confuse anything when choosing the length and diameter of the FI.
Well, now the finale. We assemble the entire structure into a single whole, screw everything together as expected and connect it to the amplifier.

Turn on the music and start having fun
P.S. A little about the connecting wires.
A couple of days later, after finishing the speakers to mind, I decided to buy an audio cable from the amplifier to the speakers. I opted for a cable from Luxmann with a cross section of 1.2 mm2 oxygen-free copper. The sound has improved even further. The drum sounds like it's playing behind your back. The speakers began to play cleaner at higher volumes and more accurately convey the smallest details and shades. So it's not worth saving on such a thing as a connecting cable. Personally, I bought 18 meters at 25r / meter. All pleasure rose to 450r.
The whole alteration as a whole, excluding the audio cable from the amplifier to the speakers, required about 250 rubles. This price includes:
1. Insulated linoleum - 1.5m2 112r
2. Audio cable for internal laying - 12r / meter (2 meters was enough) 24r
3. Glue - I don’t know how much it costs, I got it for free (one tube for two columns)
4. Sealant - I also don’t know how much it costs, because his father gave it (one tube for 2.5 columns)