Mastering in reverse: is it possible to increase the dynamic range of compressed recordings? Using dynamic compression.
Compression is one of the most mythical topics in sound production. They say that Beethoven even scared her neighbor's children:(
Okay, in fact, applying compression is no more difficult than using distortion, the main thing is to understand how it works and have good control. What we are now together and make sure.
What is audio compression
The first thing to understand before preparation is that compression is work with the dynamic range of sound. And , in turn, is nothing more than the difference between the loudest and quietest signal level:
So here it is compression is the compression of the dynamic range. Yes, simply dynamic range compression, or in other words lower the volume of the loud parts of the signal and increase the volume of the quiet ones. No more.
You can quite reasonably wonder what is the reason for such a hype? Why is everyone talking about recipes for proper compressor tuning, but no one shares them? Why, despite the huge number of cool plug-ins, many studios still use expensive rare models of compressors? Why do some producers use compressors at extreme settings, while others do not use them at all? And which one is right in the end?
Problems that compression solves
Answers to such questions lie in the plane of understanding the role of compression in working with sound. And it allows:
- Emphasize attack sound, make it more pronounced;
- "Seat" individual parts of instruments into the mix, adding power and "weight" to them;
- Make groups of instruments or the whole mix more cohesive, such a single monolith;
- Resolve conflicts between tools using sidechain ;
- Correct the flaws of the vocalist or musicians, leveling their dynamics;
- With a certain setting act as an artistic effect.
As you can see, this is no less significant creative process than, say, inventing melodies or playing interesting timbres. In this case, any of the above tasks can be solved using 4 main parameters.
Main parameters of the compressor
Despite the huge number of software and hardware models of compressors, all the "magic" of compression occurs when correct setting main parameters: Threshold, Ratio, Attack and Release. Let's consider them in more detail:
Threshold or threshold, dB
This parameter allows you to set the value at which the compressor will operate (i.e. compress the audio signal). So, if we set the threshold to -12dB, the compressor will only kick in at those places in the dynamic range that exceed this value. If all our sound is quieter than -12db, the compressor will simply pass it through itself without affecting it in any way.
Ratio or aspect ratio
The ratio parameter determines how much the signal will be compressed if it exceeds the threshold. A bit of math to complete the picture: let's say we set up a compressor with a threshold of -12dB, a ratio of 2:1 and fed it a drum loop with a kick volume of -4dB. What will be the result of the compressor operation in this case?
In our case, the kick level exceeds the threshold by 8dB. This difference will be compressed to 4dB (8dB / 2) according to the ratio. Together with the unprocessed part of the signal, this will lead to the fact that after processing by the compressor the volume of the kick will be -8db (threshold -12dB + 4dB compressed signal).
Attack, ms
This is the time after which the compressor will react to exceeding the threshold. That is, if the attack time is above 0ms − compressor starts compressing exceeding the threshold signal is not instantaneous, but after the specified time.
Release or recovery, ms
The opposite of an attack - the value of this parameter allows you to specify how long after the signal level returns below the threshold the compressor will stop compressing.
Before we move on, I strongly recommend taking a well-known sample, attaching any compressor to its channel and experimenting with the above parameters for 5-10 minutes to securely fix the material.
Everything other parameters are optional. They can differ between different compressor models, which is partly why producers use different models for any specific purpose (for example, one compressor for vocals, another for a drum group, a third for a master channel). I will not dwell on these parameters in detail, but will only give general information to understand what it is all about:
- Knee or kink (Hard/Soft Knee). This parameter determines how quickly the compression ratio (ratio) will be applied: hard on a curve or smooth. I note that in the Soft Knee mode, the compressor does not work in a straight line, but starts smoothly (as far as it may be appropriate when we are talking about milliseconds) to tighten the sound already before the value of threshold. To process groups of channels and the overall mix, soft knee is more often used (since it works imperceptibly), and hard knee is used to emphasize attack and other features of individual instruments;
- Response Mode: Peak/RMS. The Peak mode is justified when you need to severely limit bursts of amplitude, as well as on signals with a complex shape, the dynamics and readability of which must be fully conveyed. RMS mode is very gentle on the sound, allowing you to condense it, while maintaining the attack;
- Forethought (Lookahead). This is the time for which the compressor will know what to expect. A kind of preliminary analysis of incoming signals;
- Makeup or Gain. A parameter that allows you to compensate for the decrease in volume as a result of compression.
First and the most important advice, which removes all further questions about compression: if you a) understand the principle of compression, b) you firmly know how this or that parameter affects the sound, and c) managed to try several different models — you don't need any advice.
I am absolutely serious. If you carefully read this entry, experimented with the standard compressor of your DAW and one or two plug-ins, but did not understand in what cases you need to set large attack values, which ratio to use and in which mode to process the original signal, then you will then search the Internet for ready-made recipes, applying them thoughtlessly anywhere.
Compressor Fine Tuning Recipes it's kind of like recipes for fine-tuning a reverb or chorus - it doesn't make any sense and has nothing to do with creativity. Therefore, I persistently repeat the only true recipe: arm yourself with this article, good monitor headphones, a plug-in for visual control of the waveform and spend the evening in the company of a couple of compressors.
Take action!
The sound level is the same throughout the composition, there are several pauses.
Narrowing the dynamic range
Narrowing the dynamic range, or more simply compression, is necessary for different purposes, the most common of them:
1) Achieving a single volume level throughout the entire composition (or part of the instrument).
2) Achieving a single volume level of compositions throughout the album / radio broadcast.
2) Increasing intelligibility, mainly when compressing a certain part (vocal, bass drum).
How does the narrowing of the dynamic range happen?
The compressor analyzes the input audio level by comparing it to a user-defined Threshold value.
If the signal level is below the value Threshold– then the compressor continues to analyze the sound without changing it. If the sound level exceeds the Threshold value, then the compressor starts its action. Since the role of the compressor is to narrow the dynamic range, it is logical to assume that it limits the largest and smallest amplitude values (signal level). At the first stage, the largest values are limited, which decrease with a certain force, which is called ratio(Attitude). Let's look at an example:
The green curves show the sound level, the greater the amplitude of their oscillations from the X axis, the greater the signal level.
The yellow line is the threshold (Threshold) for the compressor to operate. By making the Threshold value higher, the user moves it away from the X axis. By making the Threshold value lower, the user brings it closer to the Y axis. It is clear that the lower the threshold value, the more often the compressor will operate and vice versa, the higher, the less often. If the Ratio value is very high, then after reaching the Threshold signal level, the entire subsequent signal will be suppressed by the compressor to silence. If the Ratio value is very small, then nothing will happen. The choice of Threshold and Ratio values will be discussed later. Now we should ask ourselves the following question: What is the point of suppressing all subsequent sound? Indeed, this makes no sense, we only need to get rid of the amplitude values (peaks) that exceed the Threshold value (marked in red on the graph). It is to solve this problem that there is a parameter Release(Fade out), which sets the duration of the compression.
The example shows that the first and second Threshold exceedances last less than the third Threshold exceedance. So, if the Release parameter is set to the first two peaks, then when processing the third peak, an unprocessed part may remain (since the threshold exceeding the Threshold lasts longer). If the Release parameter is set to the third peak, then when processing the first and second peaks, an undesirable decrease in the signal level is formed behind them.
The same goes for the Ratio parameter. If the Ratio parameter is set to the first two peaks, then the third one will not be sufficiently suppressed. If the Ratio parameter is set to process the third peak, then the processing of the first two peaks will be too high.
These problems can be solved in two ways:
1) By setting the attack parameter (Attack) - a partial solution.
2) Dynamic compression is a complete solution.
Parameter butstill (Attack) is designed to set the time after which the compressor will start its work after exceeding the Threshold threshold. If the parameter is close to zero (it is equal to zero in case of parallel compression, see the corresponding article) - then the compressor will start to suppress the signal immediately, and the amount of time set by the Release parameter will work. If the attack speed is high, then the compressor will start its action after a certain period of time (this is necessary to give clarity). In our case, you can set the threshold (Threshold), attenuation (Release) and compression level (Ratio) parameters to process the first two peaks, and set the Attack value (Attack) close to zero. Then the compressor will suppress the first two peaks, and when processing the third one, it will suppress it until the threshold is exceeded (Threshold). However, this does not guarantee high-quality sound processing and is close to limiting (a rough cut of all amplitude values, in this case the compressor is called a limiter).
Let's look at the result of sound processing by the compressor: 
The peaks disappeared, I note that the processing settings were quite gentle and we suppressed only the most protruding amplitude values. In practice, the dynamic range narrows much more and this trend is only progressing. In the minds of many composers, they make music louder, but in practice they completely deprive it of dynamics for those listeners who will probably listen to it at home and not on the radio.
It remains for us to consider the last compression parameter, this Gain(Gain). Amplification is intended to increase the amplitude of the entire composition and, in fact, is equivalent to another tool of sound editors - normalize. Let's look at the end result:
In our case, the compression was justified and improved the sound quality, since the prominent peak is more an accident than an intentional result. In addition, you can see that the music is rhythmic, therefore it has a narrow dynamic range. In cases where high amplitude values were made on purpose, compression can become a mistake.
Dynamic compression
The difference between dynamic compression and non-dynamic compression is that the first level of signal suppression (Ratio) depends on the level of the incoming signal. Dynamic compressors are in all modern programs, the Ratio and Threshold parameters are controlled using the window (each parameter has its own axis):
There is no single standard for displaying the graph, somewhere along the Y axis the level of the incoming signal is displayed, somewhere on the contrary, the level of the signal after compression. Somewhere the point (0,0) is in the upper right corner, somewhere in the lower left. In any case, moving the mouse cursor over this field changes the values of the numbers that correspond to the Ratio and Threshold parameters. Those. You set the compression level for each Threshold value, so you can set the compression very flexibly.
Side Chain
The side chain compressor analyzes the signal of one channel, and when the sound level exceeds the threshold (threshold), it applies compression to the other channel. The side chain has its advantages of working with instruments that are located in the same frequency region (bass-bass drum is actively used), but sometimes instruments located in different frequency regions are used, which leads to an interesting side-chain effect.
Part Two - Compression Steps
There are three stages of compression:
1) The first stage is the compression of individual sounds (singleshoots).
The timbre of any instrument has the following characteristics: Attack, Hold, Decay, Delay, Sustain, Release.
The stage of compression of individual sounds is divided into two parts:
1.1) Compression of individual sounds of rhythmic instruments
Often the components of a beat require separate compression to give them clarity. Many people process the bass drum separately from other rhythmic instruments, both at the stage of compressing individual sounds, and at the stage of compressing individual parts. This is due to the fact that it is located in the low-frequency region, where, in addition to it, only bass is usually present. The clarity of the bass drum is understood as the presence of a characteristic click (the bass drum has a very short attack and hold time). If there is no click, then you need to process it with a compressor, setting the threshold to zero and the attack time from 10 to 50 ms. The Compressor's Realese must end before the kick kick kicks in again. The last problem can be solved using the formula: 60,000 / BPM , where BPM is the tempo of the song. So, for example) 60,000/137=437.96 (time in milliseconds until a new downbeat of a 4-meter composition).
All of the above applies to other rhythmic instruments with a short attack time - they should have an accentuated click that should not be suppressed by the compressor at any of the stages of compression levels.
1.2) Compressionindividual soundsharmonic instruments
Unlike rhythmic instruments, parts of harmonic instruments are rarely composed of individual sounds. However, this does not mean that they should not be processed at the sound compression level. If you use a sample with a recorded part, then this is the second level of compression. This level of compression applies only to synthesized harmonic instruments. These can be samplers, synthesizers using various sound synthesis methods (physical modeling, FM, additive, subtractive, etc.). As you probably already guessed, we are talking about programming synthesizer settings. Yes! It's compression too! Almost all synthesizers have a programmable envelope parameter (ADSR), which means envelope. With the help of the envelope, the time of the Attack (Attack), Decay (Decay), Holding Level (Sustain), Decay (Release) is set. And if you tell me that this is not the compression of each individual sound - you are my enemy for life!
2) The second stage - Compression of individual parts.
By compression of individual parts, I mean the narrowing of the dynamic range of a number of combined individual sounds. This stage also includes recordings of parties, including vocals, which require compression processing to give it clarity and intelligibility. When processing batches by compression, it is necessary to take into account the fact that when adding individual sounds, unwanted peaks may appear, which you need to get rid of at this stage, since if this is not done now, then the picture may worsen at the stage of mixing the entire composition. At the stage of compression of individual parts, the compression of the processing stage of individual sounds must be taken into account. If you have achieved the clarity of the bass drum, then incorrect re-processing at the second stage can ruin everything. It is not necessary to have all parts processed by the compressor, nor is it necessary to process all individual sounds. I advise you to put an amplitude analyzer just in case to determine the presence of unwanted side effects of combining individual sounds. In addition to compression, at this stage it is necessary to ensure that the parties are, if possible, in different frequency ranges so that quantization is performed. It is also useful to remember that sound has such a characteristic as masking (psychoacoustics):
1) A quieter sound is masked by a louder sound in front of it.
2) Quieter sound at low frequency is masked by louder sound at high frequency.
So, for example, if you have a synth part, often the notes start playing before the previous notes finish playing. Sometimes this is necessary (creating harmony, playing style, polyphony), but sometimes not at all - you can cut their end (Delay - Release) in case it is heard in solo mode, but not heard in all-part play mode. The same applies to effects, such as reverb - it should not last until the sound source starts again. By cutting and removing the unwanted signal, you make the sound cleaner, and this can also be considered as compression - because you remove unwanted waves.
3) The third stage - Compression of the composition.
When compressing the entire composition, you need to take into account the fact that all parts are a combination of many individual sounds. Therefore, when combining them and then compressing them, care must be taken that the final compression does not spoil what we achieved in the first two stages. You also need to separate compositions in which a wide or narrow range is important. when compressing compositions with a wide dynamic range, it is enough to put a compressor that will crush short-term peaks that were formed as a result of adding parts together. When compressing a composition in which a narrow dynamic range is important, everything is much more complicated. Here compressors have recently been called maximizers. Maximizer is a plugin that combines a compressor, limiter, graphic equalizer, enhancer and other sound transformation tools. At the same time, he must necessarily have sound analysis tools. Maximizing, the final processing by the compressor, is largely needed to combat the mistakes made in the previous stages. Mistakes - not so much compression (however, if you do at the last stage what you could have done at the first stage, this is already a mistake), but in the initial choice of good samples and instruments that would not interfere with each other (we are talking about frequency ranges) . This is what the frequency response is corrected for. It often happens that with strong compression on the master, you need to change the compression and mixing parameters at earlier stages, since with a strong narrowing of the dynamic range, quiet sounds that were previously masked come out, the sound of individual components of the composition changes.
In these parts, I deliberately did not talk about specific compression parameters. I considered it necessary to write about the fact that during compression it is necessary to pay attention to all sounds and all parts at all stages of creating a composition. Only in this way, in the end, you will get a harmonious result, not only from the point of view of music theory, but also from the point of view of sound engineering.
Further in the table are given practical advice processing individual batches. However, in compression, numbers and presets can only suggest the desired area in which to search. The ideal compression settings depend on each individual case. The Gain and Threshold parameters assume a normal sound level (logical use of the entire range).
Part Three - Compression Options
Quick reference:
Threshold - determines the sound level of the incoming signal, upon reaching which the compressor starts to work.
Attack (Attack) - determines the time after which the compressor will start to work.
Level (ratio) - determines the degree of reduction of amplitude values (in relation to the original amplitude value).
Release (release) - determines the time after which the compressor will stop working.
Gain - Determines how much the input signal will be boosted after it has been processed by the compressor.
Compression table:
| Tool | Threshold | attack | ratio | Release | Gain | Description |
| vocals | 0 dB | 1-2ms 2-5ms 10 ms 0.1 ms 0.1 ms |
less than 4:1 2,5: 1 4:1 – 12:1 2:1 -8:1 |
150ms 50-100ms 150 ms 150ms 0.5s |
Compression during recording should be minimal, it requires mandatory processing at the mixing stage to give clarity and intelligibility. | |
| wind instruments | 1-5ms | 6:1 – 15:1 | 0.3s | |||
| Barrel | 10 to 50 ms 10-100ms |
4:1 and up 10:1 |
50-100ms 1ms |
The lower the Thrshold and the larger the Ratio and the longer the Attack , the more pronounced the click at the beginning of the kick. | ||
| Synthesizers | Depends on wave type (ADSR envelopes). | |||||
| Working drum: | 10-40ms 1-5ms |
5:1
5:1 – 10:1 |
50ms 0.2s |
|||
| Hi-hat | 20ms | 10:1 | 1ms | |||
| Overhead microphones | 2-5ms | 5:1 | 1-50ms | |||
| Drums | 5ms | 5:1 – 8:1 | 10ms | |||
| Bas-guitar | 100-200ms 4ms to 10ms |
5:1 | 1ms 10ms |
|||
| Strings | 0-40ms | 3:1 | 500ms | |||
| Synth. bass | 4ms-10ms | 4:1 | 10ms | Depends on envelopes. | ||
| Percussion | 0-20ms | 10:1 | 50ms | |||
| Acoustic guitar, Piano | 10-30ms 5 - 10ms |
4:1
5:1 -10:1 |
50-100ms 0.5s |
|||
| Electro-nitara | 2-5ms | 8:1 | 0.5s | |||
| Final compression | 0.1 ms 0.1 ms |
2:1
2:1 to 3:1 |
50ms 0.1 ms |
0 dB output | The attack time depends on the goal - whether to remove peaks or make the track smoother. | |
| Limiter after final compression | 0 mS | 10:1 | 10-50ms | 0 dB output | If you need a narrow dynamic range and a rough "cut" of the waves. |
The information was taken from various sources, which are referred to by popular resources on the Internet. The difference in compression parameters is explained by the difference in sound preferences and working with different material.
People fascinated by home sound exhibit an interesting paradox. They are ready to shovel the listening room, build speakers with exotic radiators, but embarrassedly step back in front of the musical can, like a wolf in front of a red flag. But in fact, why can’t you stand up for the flag, and try to cook something more edible from canned food?
From time to time, plaintive questions arise on the forum: "Recommend well-recorded albums." It is understandable. Special audiophile editions, although they will please the ear for the first minute, but no one listens to them to the end, the repertoire is painfully dull. As for the rest of the music library, the problem seems to be obvious. You can save, or you can not save and swell a lot of money into components. Still, few people like to listen to their favorite music on high volume and the capabilities of the amplifier have nothing to do with it.
Today, even in Hi-Res albums, the peaks of the phonogram are cut off and the volume is driven into clipping. It is believed that the majority listens to music on any kind of junk, and therefore it is necessary to “turn on the gas”, make a kind of thin compensation.

Of course, this is not done on purpose to upset audiophiles. Few people remember them at all. They only guessed to give them the master files from which the main circulation is copied - CDs, MP3s, and so on. Of course, the master has long been flattened by the compressor, no one will deliberately prepare special versions for HD Tracks. Unless a certain procedure is followed for the vinyl carrier, which for this reason sounds more humane. And for the digital path, everything ends the same way - with a big fat compressor.
So, at present, all 100% of the released phonograms, with the exception of classical music, are subjected to compression during mastering. Someone performs this procedure more or less skillfully, while someone is completely stupid. As a result, we have pilgrims on the forums with the DR plugin line in their bosoms, painful comparisons of publications, flight to vinyl, where you also need to mine first presses.
The most frostbitten at the sight of all these outrages have literally turned into audio Satanists. No kidding, they're reading the sound engineer's holy scripture backwards! Modern sound editing programs have some tool to restore the clipped sound wave.
Initially, this functionality was intended for studios. When mixing, there are situations when clipping got on the record, but it is no longer possible to remake the session for a number of reasons, and here the arsenal of an audio editor comes to the rescue - declipper, decompressor, etc.
And now ordinary listeners, who are bleeding from their ears after another novelty, are more and more boldly pulling their hands to such software. Someone prefers iZotope, someone prefers Adobe Audition, someone shares operations between several programs. The point of restoring the previous dynamics is to programmatically correct the clipped signal peaks, which, resting at 0 dB, resemble a gear.
Yes, there is no question of a 100% revival of the source code, since there are interpolation processes using rather speculative algorithms. But still, some results of processing seemed interesting and worthy of study to me.
For example, Lana Del Rey's album "Lust For Life", steadily filthy swearing, ugh, mastering! The original song "When the World Was at War We Kept Dancing" was like this.

And after a series of declippers and decompressors, it became like this. The DR coefficient has changed from 5 to 9. You can download and listen to the sample before and after processing.

I can’t say that the method is universal and suitable for all ruined albums, but in this case I preferred to keep in the collection this particular version, processed by the rutracker activist, instead of the official 24-bit edition.
Even if artificially extracting the peaks from the stuffing does not bring back the true dynamics of the musical performance, your DAC will still thank you. After all, it was so hard for him to work without errors at the limiting levels, where the likelihood of the so-called inter-sample peaks (ISP) is high. And now only rare flashes of the signal will jump to 0 dB. In addition, a muted soundtrack when compressed to FLAC or another lossless codec will now be smaller in size. More "air" in the signal saves hard drive space.
Try to revive your most hated albums killed in the "volume war". For headroom, you first need to lower the track level by -6 dB, and then start the declipper. Those who do not believe in computers can simply stick a studio expander between the CD player and the amplifier. This device essentially does the same - restores and stretches the peaks of a compressed audio signal as much as possible. Such devices from the 80-90s are not very expensive, and as an experiment it will be very interesting to try them.
 The DBX 3BX dynamic range controller processes the signal separately in three bands - bass, midrange and treble
 Once upon a time, equalizers were a matter of course in the audio system, and no one was afraid of them. Today it is not required to level the blockage high frequencies magnetic tape, but with the ugly dynamics something needs to be solved, brothers.
At a time when researchers were just starting to solve the problem of creating a speech interface for computers, they often had to make their own equipment that allows you to enter sound information into a computer, as well as output it from a computer. Today, such devices may only be of historical interest, as modern computers can be easily equipped with sound input and output devices such as sound adapters, microphones, headphones, and speakers.
We will not go into the details of the internal structure of these devices, but we will talk about how they work, and give some recommendations for choosing sound computer devices for working with speech recognition and synthesis systems.
As we said in the previous chapter, sound is nothing more than air vibrations, the frequency of which lies in the frequency range perceived by a person. In different people, the exact limits of the range of audible frequencies may vary, but it is believed that sound vibrations lie in the range of 16-20,000 Hz.
The task of a microphone is to convert sound vibrations into electrical vibrations, which can then be amplified, filtered to remove interference, and digitized for input. sound information into the computer.
According to the principle of operation, the most common microphones are divided into carbon, electrodynamic, condenser and electret. Some of these microphones require an external current source for their operation (for example, carbon and capacitor ones), while others, under the influence of sound vibrations, are able to independently generate an alternating current. electrical voltage(these are electrodynamic and electret microphones).
You can also separate microphones by purpose. There are studio microphones that can be held in the hand or mounted on a stand, there are radio microphones that can be clipped to clothing, and so on.
There are also microphones designed specifically for computers. These microphones are usually mounted on a stand placed on the table surface. Computer microphones can be combined with headphones, as shown in fig. 2-1.
Rice. 2-1. Head phones with microphone
How to choose from the whole variety of microphones the one that is best suited for speech recognition systems?
In principle, you can experiment with any microphone you have, as long as it can be connected to your computer's audio adapter. However, developers of speech recognition systems recommend purchasing a microphone that will be at a constant distance from the speaker's mouth during operation.
If the distance between the microphone and the mouth does not change, then the average level electrical signal coming from the microphone will also not change too much. This will have a positive impact on the quality of modern speech recognition systems.
What is the problem here?
A person is able to successfully recognize speech, the volume of which varies over a very wide range. The human brain is able to filter out quiet speech from noise such as the noise of cars driving down the street, extraneous conversations and music.
As for modern speech recognition systems, their abilities in this area leave much to be desired. If the microphone is on a table, then when you turn your head or change the position of your body, the distance between your mouth and the microphone will change. This will change the microphone output level, which in turn will degrade the reliability of speech recognition.
Therefore, when working with speech recognition systems, the best results will be achieved if you use a microphone attached to headphones, as shown in Fig. 2-1. When using such a microphone, the distance between the mouth and the microphone will be constant.
We also draw your attention to the fact that all experiments with speech recognition systems are best done in seclusion in a quiet room. In this case, the influence of interference will be minimal. Of course, if you need to choose a speech recognition system that can work in conditions of strong interference, then the tests need to be done differently. However, as far as the authors of the book know, the noise immunity of speech recognition systems is still very, very low.
The microphone performs for us the transformation of sound vibrations into vibrations. electric current. These fluctuations can be seen on the oscilloscope screen, but do not rush to the store to purchase this expensive device. We can carry out all oscillographic studies using a conventional computer equipped with a sound adapter, for example, a Sound Blaster adapter. Later we will tell you how to do it.
On fig. 2-2 we have shown the waveform sound signal, resulting from the pronunciation of a long sound a. This waveform was acquired using the GoldWave program, which we will discuss later in this chapter of the book, as well as using a Sound Blaster audio adapter and a microphone similar to that shown in fig. 2-1.

Rice. 2-2. Oscillogram of the audio signal
The GoldWave program allows you to stretch the waveform along the time axis, which allows you to see the smallest details. On fig. 2-3 we have shown a stretched fragment of the oscillogram of the sound a mentioned above.

Rice. 2-3. Fragment of an oscillogram of an audio signal
Note that the magnitude of the input signal from the microphone changes periodically and takes on both positive and negative values.
If only one frequency were present in the input signal (that is, if the sound were "clean"), the waveform received from the microphone would be sinusoidal. However, as we have already said, the spectrum of human speech sounds consists of a set of frequencies, as a result of which the shape of the speech signal oscillogram is far from sinusoidal.
A signal whose magnitude changes continuously with time, we will call analog signal. This is the signal coming from the microphone. Unlike an analog signal, a digital signal is a set of numerical values that change discretely over time.
In order for a computer to process an audio signal, it must be converted from analog to digital form, that is, presented as a set of numerical values. This process is called analog digitization.
The digitization of an audio (and any analog) signal is performed using a special device called analog to digital converter ADC (Analog to Digital Converter, ADC). This device is located on the sound adapter board and is an ordinary-looking microcircuit.
How does an analog-to-digital converter work?
It periodically measures the level of the input signal, and outputs a numerical value of the measurement result at the output. This process is illustrated in Fig. 2-4. Here with rectangles gray color the values of the input signal measured with some constant time interval are marked. The set of such values is the digitized representation of the input analog signal.

Rice. 2-4. Measurements of the dependence of the signal amplitude on time
On fig. In Figure 2-5, we've shown connecting an analog-to-digital converter to a microphone. In this case, an analog signal is applied to the input x 1, and a digital signal is removed from the outputs u 1 -u n.

Rice. 2-5. Analog to digital converter
Analog-to-digital converters are characterized by two important parameters - the conversion frequency and the number of quantization levels of the input signal. Proper selection of these parameters is critical to achieving an adequate digitization of an analog signal.
How often do you need to measure the amplitude value of the input analog signal so that information about changes in the input analog signal is not lost as a result of digitization?
It would seem that the answer is simple - the input signal should be measured as often as possible. Indeed, the more often an analog-to-digital converter makes such measurements, the better it will track the slightest changes in the amplitude of the analog input signal.
However, excessively frequent measurements can lead to an unjustified increase in the digital data flow and a waste of computer resources in signal processing.
Fortunately, choosing the right conversion rate (sampling rate) is easy enough. To do this, it suffices to refer to the Kotelnikov theorem, known to specialists in the field of digital signal processing. The theorem states that the conversion frequency must be twice the maximum frequency of the spectrum of the converted signal. Therefore, in order to digitize without losing the quality of the audio signal, the frequency of which lies in the range of 16-20,000 Hz, you need to select a conversion frequency that is not less than 40,000 Hz.
Note, however, that in professional audio equipment, the conversion frequency is selected several times greater than the specified value. This is done to achieve very high quality digitized audio. For speech recognition systems, this quality is not relevant, so we will not draw your attention to this choice.
And what conversion frequency is needed to digitize the sound of human speech?
Since the sounds of human speech lie in the frequency range of 300-4000 Hz, the minimum required conversion frequency is 8000 Hz. However, many computer programs speech recognition uses the standard 44,000 Hz conversion rate for conventional audio adapters. On the one hand, such a conversion rate does not lead to an excessive increase in the digital data stream, and on the other hand, it ensures speech digitization with sufficient quality.
Back in school, we were taught that with any measurements, errors arise that cannot be completely eliminated. Such errors arise due to the limited resolution of measuring instruments, and also due to the fact that the measurement process itself can introduce some changes in the measured value.
The analog-to-digital converter represents the input analog signal as a stream of numbers of limited capacity. Conventional audio adapters contain 16-bit ADC blocks capable of representing the amplitude of the input signal as 216 = 65536 different values. ADC devices in audio equipment high class can be 20-bit, providing a more accurate representation of the amplitude of the audio signal.
Modern speech recognition systems and programs were created for ordinary computers equipped with ordinary sound adapters. Therefore, to conduct experiments with speech recognition, you do not need to purchase a professional audio adapter. An adapter such as Sound Blaster is quite suitable for digitizing speech for further recognition.
Along with the useful signal, various noises usually enter the microphone - noise from the street, wind noise, extraneous conversations, etc. Noise has a negative impact on the quality of speech recognition systems, so it has to be dealt with. One of the ways we have already mentioned is that today's speech recognition systems are best used in a quiet room, remaining alone with the computer.
However, it is not always possible to create ideal conditions, so you have to use special methods to get rid of interference. To reduce the noise level, special tricks are used in the design of microphones and special filters that remove frequencies from the analog signal spectrum that do not carry useful information. In addition, such a technique as compression of the dynamic range of input signal levels is used.
Let's talk about all this in order.
frequency filter A device that converts the frequency spectrum of an analog signal is called. In this case, in the process of transformation, the selection (or absorption) of oscillations of certain frequencies occurs.
You can think of this device as a kind of black box with one input and one output. In relation to our situation, a microphone will be connected to the input of the frequency filter, and an analog-to-digital converter will be connected to the output.
Frequency filters are different:
low-pass filters;
High pass filters
Passing bandpass filters
blocking bandpass filters.
Low Pass Filters(low -pass filter ) remove from the spectrum of the input signal all frequencies whose values are below a certain threshold frequency, depending on the filter setting.
Since audio signals lie in the range of 16-20,000 Hz, all frequencies below 16 Hz can be cut off without degrading the sound quality. For speech recognition, the frequency range of 300-4000 Hz is important, so frequencies below 300 Hz can be cut out. In this case, all noises, the frequency spectrum of which lies below 300 Hz, will be cut out of the input signal, and they will not interfere with the speech recognition process.
Likewise, high pass filters(high -pass filter ) cut out from the spectrum of the input signal all frequencies above a certain threshold frequency.
Humans cannot hear sounds at frequencies of 20,000 Hz or higher, so they can be cut out of the spectrum without noticeable deterioration in sound quality. As for speech recognition, all frequencies above 4000 Hz can be cut out, which will lead to a significant reduction in the level of high-frequency interference.
Band pass filter(band -pass filter ) can be thought of as a combination of a low pass filter and a high pass filter. Such a filter stops all frequencies below the so-called lower pass frequency, as well as above upper pass frequency.
Thus, for a speech recognition system, a pass-through bandpass filter is convenient, which delays all frequencies, except for frequencies in the range of 300-4000 Hz.
As for the band-stop filters (band-stop filter), they allow you to cut out from the spectrum of the input signal all frequencies that lie in a given range. Such a filter is convenient, for example, to suppress noise that occupies a certain continuous part of the signal spectrum.
On fig. 2-6 we have shown the connection of a pass-through filter.

Rice. 2-6. Filtering the audio signal before digitizing
I must say that the usual sound adapters installed in the computer have a band-pass filter through which the analog signal passes before digitization. The bandwidth of such a filter usually corresponds to the range of audio signals, namely 16-20,000 Hz (in different audio adapters, the values of the upper and lower frequencies may vary slightly).
But how to achieve a narrower bandwidth of 300-4000 Hz, corresponding to the most informative part of the spectrum of human speech?
Of course, if you have a penchant for designing electronic equipment, you can make your own filter from an operational amplifier chip, resistors and capacitors. This is exactly what the first creators of speech recognition systems did.
However, industrial speech recognition systems must be able to work on standard computer equipment, so the way of manufacturing a special band-pass filter is not suitable here.
Instead, in modern systems speech processing uses the so-called digital frequency filters implemented in software. This became possible after CPU computer has become powerful enough.
A digital frequency filter implemented in software converts an input digital signal into an output digital signal. During the conversion process, the program processes in a special way the stream of numerical values of the signal amplitude coming from the analog-to-digital converter. The result of the conversion will also be a stream of numbers, but this stream will correspond to the already filtered signal.
Talking about the analog-to-digital converter, we noted such important characteristic, as the number of quantization levels. If a 16-bit analog-to-digital converter is installed in the audio adapter, then after digitization, the audio signal levels can be represented as 216 = 65536 different values.
If there are few quantization levels, then the so-called quantization noise. To reduce this noise, high-quality audio digitization systems should use analog-to-digital converters with the maximum number of quantization levels available.
However, there is another trick to reduce the effect of quantization noise on the quality of the audio signal, which is used in digital sound recording systems. Using this technique, the signal is passed through a non-linear amplifier before digitization, which emphasizes signals with a small signal amplitude. Such a device amplifies weak signals more than strong ones.
This is illustrated by the plot of output signal amplitude versus input signal amplitude shown in Fig. 2-7.

Rice. 2-7. Nonlinear amplification before digitization
In the step of converting digitized audio back to analog (which we will discuss later in this chapter), the analog signal is again passed through a non-linear amplifier before being output to the speakers. This time, a different amplifier is used that emphasizes large amplitude signals and has a transfer characteristic (dependence of the output signal amplitude on the input signal amplitude) that is the opposite of that used during digitization.
How can all this help the creators of speech recognition systems?
A person, as you know, is quite good at recognizing speech uttered in a low whisper or in a fairly loud voice. It can be said that the dynamic range of volume levels of successfully recognized speech for a person is quite wide.
Today's computer systems Speech recognition, unfortunately, cannot yet boast of this. However, in order to slightly expand the specified dynamic range before digitization, it is possible to pass the signal from the microphone through a nonlinear amplifier, the transfer characteristic of which is shown in Fig. 2-7. This will reduce the level of quantization noise when digitizing weak signals.
Developers of speech recognition systems, again, are forced to focus primarily on commercially available sound adapters. They do not provide for the non-linear signal conversion described above.
However, it is possible to create the software equivalent of a non-linear amplifier that converts the digitized signal before passing it to the speech recognition module. And although such a software amplifier will not be able to reduce quantization noise, it can be used to emphasize those signal levels that carry the most speech information. For example, you can reduce the amplitude of weak signals, thus ridding the signal of noise.
Dynamic compression(Dynamic range compression, DRC) - narrowing (or expanding in the case of an expander) the dynamic range of a phonogram. Dynamic Range, is the difference between the quietest and loudest sound. Sometimes the quietest sound in the phonogram will be a little louder than the noise level, and sometimes a little quieter than the loudest. Hardware devices and programs that perform dynamic compression are called compressors, distinguishing four main groups among them: compressors themselves, limiters, expanders and gates.
Tube analog compressor DBX 566
Down and up compression
downcompression(Downward compression) reduces the volume of a sound when it exceeds a certain threshold, leaving quieter sounds unchanged. An extreme version of downcompression is limiter. Up Compression(Upward compression), on the contrary, increases the volume of the sound if it is below the threshold value, without affecting louder sounds. At the same time, both types of compression narrow the dynamic range of the audio signal.

downcompression

Up Compression
Expander and Gate
If the compressor reduces the dynamic range, the expander increases it. When the signal level gets above the threshold level, the expander increases it even more, thus increasing the difference between loud and soft sounds. Such devices are often used when recording a drum set to separate the sounds of one drum from another.
A type of expander that is used not to amplify loud, but to muffle quiet sounds not exceeding the threshold level (for example, background noise) is called noise gate. In such a device, as soon as the sound level becomes less than the threshold, the signal stops passing. Typically, a gate is used to suppress noise in pauses. On some models, you can make sure that the sound does not stop abruptly when the threshold level is reached, but gradually fades out. In this case, the decay rate is set by the Decay control.
Gate, like other types of compressors, can be frequency dependent(i.e. treat certain frequency bands differently) and can operate in side chain(see below).
The principle of operation of the compressor
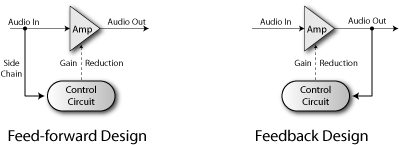
The signal entering the compressor is split into two copies. One copy is sent to an amplifier in which the gain is controlled by an external signal, the second copy forms this signal. It enters a device called a side-chain, where the signal is measured, and based on this data, an envelope is created that describes the change in its volume.
This is how most modern compressors are arranged, this is the so-called feed-forward type. In older devices (feedback type), the signal level is measured after the amplifier.
There are various analog technologies for controlled amplification (variable-gain amplification), each with its own advantages and disadvantages: tube, optical using photoresistors and transistors. When working with digital audio (in a sound editor or DAW), proprietary mathematical algorithms can be used or analog technologies can be emulated.
Main parameters of compressors
Threshold
The compressor reduces the level of the audio signal if its amplitude exceeds a certain threshold value (threshold). It is usually specified in decibels, with a lower threshold (eg -60 dB) meaning more sound will be processed than a higher threshold (eg -5 dB).
ratio
The amount of level reduction is determined by the ratio parameter: a ratio of 4:1 means that if the input level is 4 dB above the threshold, the output level will be 1 dB above the threshold.
For example:
Threshold = -10dB
Input signal = -6 dB (4 dB above threshold)
Output signal = -9 dB (1 dB above threshold)
It is important to keep in mind that the suppression of the signal level continues for some time after it falls below the threshold level, and this time is determined by the value of the parameter release.
Compression with a maximum ratio of ∞:1 is called limiting. This means that any signal above the threshold level is attenuated to the threshold level (except for a short period after a sudden increase in the input volume). See "Limiter" below for details.

Examples of different Ratio values
Attack and Release
The compressor provides some control over how quickly it responds to changing signal dynamics. The Attack parameter determines the time it takes for the compressor to reduce the gain to the level specified by the Ratio parameter. Release determines the amount of time it takes for the compressor to either ramp up the gain, or return to normal if the input level drops below the threshold.

Attack and Release phases
These parameters indicate the time (usually in milliseconds) it takes for the gain to change by a certain number of decibels, usually 10 dB. For example, in this case, if Attack is set to 1ms, it will take 1ms to decrease the gain by 10dB, and 2ms by 20dB.
In many compressors, the Attack and Release parameters can be adjusted, but in some they are preset and are not adjustable. Sometimes they are referred to as "automatic" or "program dependent", i.e. change depending on the input signal.
Knee
Another compressor option: hard/soft Knee. It determines whether the start of applying compression will be abrupt (hard) or gradual (soft). Soft knee reduces the visibility of the dry-to-compressed signal transition, especially at high Ratios and sudden volume increases.

Hard Knee and Soft Knee Compression
Peak and RMS
The compressor can respond to peak (short-term maximum) values or to the average level of the input signal. The use of peak values can lead to large fluctuations in the degree of compression, and even distortion. Therefore, compressors apply an averaging function (usually RMS) of the input signal when comparing it to a threshold value. This gives a more comfortable compression that is closer to the human perception of loudness.
RMS is a parameter that reflects the average loudness of a phonogram. From a mathematical point of view, RMS (Root Mean Square) is the root mean square value of the amplitude of a certain number of samples:

stereo linking
A compressor in stereo linking mode applies the same gain to both stereo channels. This avoids shifting the stereo pan that can result from processing the left and right channels individually. Such an offset occurs if, for example, any loud element is panned off-center.
makeup gain
As the compressor reduces general level signal, the possibility of a fixed gain at the output is usually added, which allows you to get the optimal level.
Look-ahead
The look-ahead function is intended to solve the problems associated with both too large and too small Attack and Release values. Too long an attack time does not allow effective interception of transients, and too short an attack time may not be comfortable for the listener. When using the look-ahead function, the main signal is delayed relative to the control one, this allows compression to begin in advance, even before the signal reaches the threshold value.
The only drawback of this method is the time delay of the signal, which is undesirable in some cases.
Using Dynamic Compression
Compression is used everywhere, not only in musical phonograms, but also wherever it is necessary to increase the overall volume without increasing peak levels, where inexpensive sound reproducing equipment or a limited transmission channel is used (public address and communication systems, amateur radio, etc.) .
Compression is applied when playing background music (in shops, restaurants, etc.) where any noticeable volume changes are undesirable.
But the most important application of dynamic compression is music production and broadcasting. Compression is used to give the sound "thickness" and "drive", for better combination of instruments with each other, and especially when processing vocals.
Vocals in rock and pop music are usually compressed to make them stand out from the accompaniment and add clarity. A special kind of compressor, tuned only to certain frequencies - a de-esser, is used to suppress hissing phonemes.
In instrumental parts, compression is also used for effects that are not directly related to volume, for example, quickly fading drum sounds can become longer.
Electronic dance music (EDM) often uses side-chaining (see below) - for example, the bass line can be driven by a kick or similar to prevent bass/drum conflict and create dynamic pulsation.
Compression is widely used in broadcast (radio, TV, internet) to increase the perceived loudness while reducing the dynamic range of the original audio (usually a CD). Most countries have legal limits on the instantaneous maximum volume that can be broadcast. Usually these limitations are implemented by permanent hardware compressors in the on-air circuit. In addition, increasing the perceived loudness improves the "quality" of the sound from the point of view of most listeners.
see also Loudness war.

Sequential increase in the volume of the same song, remastered for CD from 1983 to 2000.
side chaining
Another common compressor switch is the "side chain". In this mode, sound is compressed not depending on its own level, but depending on the level of the signal coming to the connector, which is usually called side chain.

There are several uses for this. For example, the vocalist is lisping and all the letters "s" stand out from the overall picture. You pass his voice through the compressor, and the same sound is fed into the side chain jack, but passed through the equalizer. On the equalizer, you remove all frequencies except those used by the vocalist when pronouncing the letter "c". Usually about 5 kHz, but can be from 3 kHz to 8 kHz. If you then put the compressor in side chain mode, then the compression of the voice will occur at those moments when the letter “s” is pronounced. Thus, the device known as the "de-esser" (de-esser) was obtained. This way of working is called frequency dependent.
Another application of this function is called "ducker". For example, at a radio station, the music goes through the compressor, and the words of the DJ go through the side chain. When the DJ starts chatting, the volume of the music will automatically decrease. This effect can also be successfully applied in recording, for example, to reduce the volume of keyboard parts while singing.
brick wall limiting
The compressor and limiter work in much the same way, we can say that the limiter is a compressor with a high Ratio (from 10:1) and usually a low attack time.
There is the concept of Brick wall limiting - limiting with a very high Ratio (from 20:1 and above) and a very fast attack. Ideally, it does not allow the signal to exceed the threshold level at all. The result will be unpleasant to the ear, but it will prevent damage to sound-reproducing equipment or exceeding the bandwidth of the channel. Many manufacturers integrate limiters into their devices for this very purpose.

Clipper vs. Limiter, soft and hard clipping


