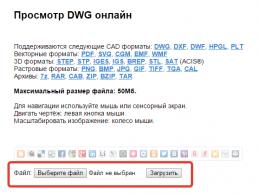
On-board computer Cyclone - description and installation. The on-board computer for Lanos is a practical device for the central panel! Bq cyclone default settings
On-board computer- This is a luxury for budget cars. These cars also include the Chevrolet Lanos model, popular in Russia and the CIS countries, with a 1.5 engine. The on-board computer is a convenient and practical device with which you can control various parameters of the engine, etc. In this article, we will consider the process of installing a BC on this model and help you make the right choice.
1 Variants of on-board devices for Chevrolet Lanos
This model was produced until 2008, the engine class complies with Euro-2 standards and is equipped with a simple ECU of three modifications (IEFI-6 and ITMS6F), both of which are able to work in sync with some models of on-board computers. The most popular versions of such devices for Lanos are the Zyklon BC models and some modifications manufactured by Multitronics. These devices are installed on the windshield, on the panel or DIN-place.
The on-board computer "Cyclone" is installed in a regular place where the car's clock is located. It has a simple structure and features and is a complete trip computer with features such as:
- current mileage indicator;
- indicator of average and instantaneous fuel consumption;
- notification of exceeding the permissible speed and the degree of battery charge;
- engine speed indicator;
- clock, date, alarm and timer;
- the ability to read ECU error codes;
- measurement of average speed and calculation of fuel based on cost;
- temperature measurement in the cabin and outside the car.
In addition to the features shown, this model on-board computer has the ability to adjust the brightness and contrast, as well as display colors, and powerful sound signal alerts. It belongs to the type of budget trip computers - the price of the device from different dealers does not exceed 3000-3500 thousand rubles. The kit contains the necessary parts and installation instructions instead of the standard clock on the central panel under the air intakes. In the case of the Chevrolet Lanos model, the connection is made to the diagnostic socket on the instrument panel, and the size of the device fully corresponds to the clock hole.

Another popular and well-established computer model for the Chevrolet Lanos in "on-board" conditions is the modification of the Multitronics SL-50V or RC-700. These models are installed on the panel under the radio and have more features in comparison with the Cyclone version. They support most diagnostic protocols and are universal. Among the advantages are the following:
- the ability to display a graph of instantaneous parameters;
- the ability to connect up to two parking radars;
- notification of unused dimensions or low beam;
- control of injection duration and fuel quality;
- reading and troubleshooting the engine ECU.

In addition, when an optional cable is connected, this on-board computer can also work as an oscilloscope, which allows you to additionally and in more detail diagnose malfunctions of various components of a Chevrolet Lanos car. Price similar computer about 5 thousand rubles.
2 Do-it-yourself installation of the on-board computer Multitroniks SL-50V
Before starting the installation of the on-board computer, be sure to remove the negative terminal from the battery, turn off the ignition of your car.

Next, you need to remove the radio panel or the entire radio tape recorder - this will make the installation process more convenient. Now that nothing interferes with installation, use a flathead screwdriver to pry off the center console trim housing and remove it. It is held on by four clips (two at the top and two at the bottom). When removing, be careful, as the plastic latches are very fragile, and it is not very easy to find such parts in a new form.
Next, unscrew the "pocket" of the panel, which is mounted on two screws, and coasters (also 2 screws that should be unscrewed). As a result, everything that is below the air conditioner and temperature adjustment keys should be removed on the panel.

There are two types of diagnostic pads on Chevrolet Lanos - OBD2 for 16 pins and OBD1 or GM12 for 12 pins. If your car has the first type of pad, then you are in luck, and just connect the contacts according to the diagram from the instructions. In the second case, you need to look under the panel on the right side of the driver's feet - there is a GM12 block. It will supply power to the on-board computer.
3 Nuances when connecting electrical wiring
To get to the electrical wiring blocks, it is necessary to remove the plastic lining (unscrew the plastic fastening screw on the left side at the driver's feet). For greater convenience, you can also remove the side cover on the left of the panel - it is fastened with latches. Next, you will need an adapter block, which can be found with the on-board unit. The positive power wire of the BC is connected to the plus on the diagnostic block, the common wire in common contact pads, "K-Line" to the standard wire white color. Further, the wires are insulated and laid under the casing to the exit to the electrical wiring pads on the left side.

Now you need to remove the headlight electric corrector panel - it is mounted on one latch. Next, connect the electrical wiring:
- the brown wire of the BC into the block of the electric headlight corrector to the white wire (there are two of them, for convenience you can ring with a tester);
- the fuel level sensor (brown wire) is connected to the standard connector C206 (the largest in the block, white), which is located next to the fuse box behind the trim on the left side of the driver's feet. The wire is connected to the 19th pin (white-black), while you can use the connection through the connector, but not necessarily;
- yellow wire (ignition lock and clock backlight to 8th place in the block);
- if necessary, remove the temperature sensor overboard and connect it to the minus on the on-board computer;
- all wires should be additionally insulated.

To fit the on-board computer on the panel, cut upper part the frame that holds the radio - without this, it will not work to place both the radio and the BC on the panel. In addition, you can swap devices for better readings. After starting the engine, the computer should turn on. If this happens, then the connections are made correctly. According to the instructions, configure the device operation parameters, select backlights, fuel level, consumption, etc.
It is worth noting that the installation of a BC in a car service will cost about 1000-2000 rubles, depending on the region. Do it yourself and save your money.
Among the budget cars of one of the most popular models is the Chevrolet Lanos. Many people prefer this car, because in terms of price / quality ratio, the model does not have many competitors. The car is really good for our conditions, but in terms of equipment it is “poor”. There is not even such a device as an on-board computer. But it is very useful and provides the driver with all the necessary information. But you can install an on-board computer on Lanos. And how to do this, we will consider further.
Suitable models of on-board computers
Chevrolet Lanos is equipped with power plants that comply with the Euro-2 standard. The car systems are controlled by the ECU, which is installed on this car in several types. But all of them can be synchronized with some models of on-board computers.
The most popular on-board computer on a Chevrolet Lanos is the Cyclone, but several models of devices manufactured by Multitronics are also suitable for this car. Depending on the selected device, it can be placed at the top of the panel, on the windshield or in a DIN niche (provided that a 2DIN radio is not installed in the car).
On-board computer "Cyclone" is designed to be installed instead of the standard clock on the front panel. Is comparatively simple device, but at the same time provides the driver with all the most required information:
- current mileage;
- Fuel consumption (average, instantaneous);
- The degree of battery charge;
- Turnover of the power plant;
- Temperature (in the cabin, outside);
- Average speed;
In addition, it reads system error codes, can signal speeding, it has a built-in clock, alarm clock and timer. There is a whole list of settings (brightness and color of the display, signal volume, etc.). In general, the on-board computer is a really useful device.
With all this, "Cyclone" refers to budget devices and you can buy it on the market for 3-3.5 thousand rubles. Along with the computer itself, the set also includes all the necessary tools for connecting and detailed instructions, how it's done. The connection is made to the Lanos diagnostic connector on the panel.

Also great option for use on Lanos are some models of Multitronics on-board computers (RC-700 or SL-50V). These devices for the Lanos car are designed to be installed in a DIN niche (we place the device under the radio). Multitronics on-board computers are universal and suitable for many vehicles. In functional terms, they are more "advanced" compared to the "Cyclone" and in addition to the above functions, these on-board computers also allow:
- Display a graph of the parameters of the motor;
- Connect parking sensors (front, rear);
- Notify about forgotten lights turned on;
- Control the operation of injectors (duration, injection quality);
- Read and reset ECU errors;
Also, after connecting a special cable, the on-board computer can operate in oscilloscope mode, which allows you to carry out detailed diagnostics of the power plant. But the cost of Multitronics computers is higher - about 5 thousand rubles.
Self installation Multitronics SL-50V
The installation process begins with the de-energization of the on-board network. To do this, just throw off the "negative" terminal from the battery. Before starting work, you also need to learn how to remove the panel on a Chevrolet Lanos, as this will be needed for installation work.

The installed radio will interfere, so it must be dismantled. By the way, for the convenience of reading the readings from the on-board computer display, it can be interchanged with the radio tape recorder (install the radio lower in the DIN niche, under the on-board computer).
The main idea that comes to mind after the first minutes of acquaintance with the Cyclone on-board computer is the most budgetary and simple option. Among the many competitors that have dozens of modes and functions in their arsenal, such an on-board computer looks at least modest.
But simplicity, as they say, is a sign of perfection. How convenient and practical is Cyclone in work? There is little information from the manufacturer, but stable work with controllers has been confirmed in practice:
- Mikas 7.6 and 10.3;
- Gionix, OBD-2 compatible;
- January and its analogues.
The device is equipped with a two-line screen. The color of the backlight is determined at the time of purchase and is not subject to change in the future. You can choose from black, blue or green in the backlight color scheme. Among the claimed benefits - minimal, even miniature dimensions and only two control buttons.
Functionality and main modes
The set of basic functions of the Cyclone practically does not differ from a similar list of branded "heavy" products with a large graphic screen. The screen displays information about the data on the movement of the car: calculation of the driving range on the available amount of fuel, gasoline costs per hour, per trip or per 100 km of travel, average consumption per hundred km, time and mileage to refueling, measurement of average speed
The second group of data displays the temperature of the air, engine coolant, controller errors, error reset, on-board network voltage, engine speed, fuel, throttle position.
Attention! The on-board computer is equipped with a remote temperature sensor.
Additional modes of the Cyclone on-board computer are minimal, but provide the full functionality of the device:
- full engine testing with display of error codes issued by the machine controller with the ability to reset them;
- the backlight and contrast of the LCD display of the Cyclone is adjusted in accordance with the illumination, when the dipped beam or side lights are turned on, the backlight automatically decreases;
- the sound warning system provides options for voicing critical parameters of vehicle operation.
Undeniable advantages
It is possible that Cyclone is a case where appearances are a bit deceiving. Most branded models of on-board computers use a bright and stylish design, a large screen with a lot of digital data and icons. But their degree beneficial use in such models, it is not much more than on a two-line screen with 16 characters per line of the Cyclone on-board computer.
The specifics of the computer connection scheme, namely mileage and fuel consumption data are taken directly from the speed sensor and the injector system. This makes it possible to obtain the most accurate information in comparison with the diagnostic line.
Main selection criterion
The on-board computer has long been essential tool to manage vehicle systems and resources. And no matter how strange it sounds, but the choice of model is always "tied" to the dimensions of its case. Especially if the interior of the car and its dashboard do not allow for a large space. In this case, you have to sacrifice the external side of the on-board computer in favor of functionality. The most common option is to replace the regular numerical clock.

For simultaneous indication of three numerical values of the monitor, two lines are more than enough. This is more practical than microcomputers with a miniature screen of three digital LEDs.
For your information! In addition to the light indication on the screen, the computer uses an audible alarm to draw the driver's attention to vehicle speeding, engine overheating, and a critical battery discharge.
In the vast majority of cases, the Cyclone on-board computer is installed as a standard device on class A and B cars.
Installation
On-board computer connection system two pads are used, the first - for 3 contacts, used to switch the temperature sensor wiring under the bumper. The control circuit is connected by an 8-pin block:

Setup and use
The on-board computer uses five consecutive screens to display information. Each screen contains information about a particular mode. For example, the first screen displays information about the date and time, driving speed, engine speed and current fuel consumption. The fifth screen is diagnostic. It displays information about:
- motor operating mode;
- overload on the engine;
- motor antifreeze temperature;
- oxygen sensor data;
- battery voltage.
There are two control buttons on the Cyclone on-board assistant panel. The upper one is used to switch screens, the lower one is used to enter the menu settings.
Information about the mode requires additional decoding in accordance with the instructions for the operation of the Cyclone on-board computer. Resetting ECU errors on the screen is done manually.
Data correction
The calculation formulas use average data for speed, fuel consumption, and odometer. To testify to real numbers it is necessary to calculate and enter the calculated coefficients for each of the parameters.
Video review of the settings and operation of the Cyclone on-board computer: