Managing kvm qemu via web. Russian-language documentation for Ubuntu
With ordinary KVM switches, I believe, many have come across. The abbreviation "KVM" stands for "Keyboard Video Mouse". A KVM device allows, having only one set of keyboard + monitor + mouse (K.M.M.), to control several computers ( system blocks). In other words, we take N system blocks, connect their outputs from K.M.M. to the KVM device, and already to the device itself we connect a real monitor, keyboard and mouse. Switching between computers using KVM, we can see what is happening on the screen of the selected computer, as well as control it as if we were connected to it directly.
This is convenient if we need several machines for work, but access to them at the same time is not required. In addition, space is greatly saved - monitors, even liquid crystal ones, take up a fairly large amount of space on the table. Yes, and they don't cost much. And in a bunch of keyboards and mice on the table, you can quickly get confused ...
Advanced readers will object - why such difficulties if computers are most likely connected to one local network and you can use the built-in operating system (or external) programs remote access, such as Terminal Services or Radmin under Windows, VNC, ssh under *nix-like operating systems. Everything is correct, but what to do if, for example, you need to enter the computer's BIOS or the operating system has stopped loading because we installed some wrong driver or program? Or do we have several operating systems installed on the computer and we needed to choose the wrong one that starts by default? In general, all these programs are really good, but up to certain limits - as long as the computer's OS is operational and we only need access to the computer after this OS boots up.
For example, let's look at a few typical KVM switches using the example of devices manufactured by the company.
Device Specifications
CN-6000 supports the separation of powers between users and allows you to create up to 64 administrative or user accounts, of which up to 16 accounts can work with the device at the same time. The device has a built-in WEB-interface for administration, and its small size allows it to be placed on a table or mounted (using a special bracket included in the kit) on a side truss of a rack (0U rack mountable). CN-6000 supports firmware upgrade via Ethernet connection (web interface or native utility). The maximum video resolution supported by the device is 1600x1200 pixels.
Summary table of specifications:
| Hardware requirement (remote client) | Pentium III 1Ghz | ||
| Interfaces | local console | Keyboard | 1 × Mini-DIN-6 F(Purple) |
| Video | 1 × HDB-15 F(Blue) | ||
| Mouse | 1 × HDB-15 F(green) | ||
| System (KVM) | 1 × SPHD-15F(Yellow) | ||
| LAN port | 1 x RJ-45(F) | ||
| Power on the net (reserved) | 1 × DB9(M) | ||
| Power interface | 1 | ||
| Buttons/switches | KVM Reset | 1 × semi-concealed, front | |
| Indicators | food | 1 × orange | |
| remote user connection | 1 x green | ||
| LAN 10/100 Mbps | 1 × green/orange | ||
| Supported protocols | 10baseT Ethernet and 100baseTX Fast Ethernet. TCP/IP | ||
| Video permissions | Up to 1600×1200 60Hz | ||
| Frame | metal | ||
| Dimensions (length × width × height) | 200×80×25mm | ||
Let's move on to the tests.
There are four utilities on the CD that comes with the kit:
- CN6000 Client is a Windows client program that allows you to connect to remote computer
- a similar client program written in Java (in jar format)
- CN6000 Admin Tool - device configuration manager (under Windows)
- log server - a program that can be configured to receive and store log files from the CN-6000
In addition, a WEB server is built into the KVM switch, so the device can be accessed through a WEB browser. But we will return to the web interface a little later, first we will consider individual utilities.
Configuring the CN-6000 through the Admin Tool.
The program is designed to configure the device, set access passwords, security, etc.
When it was launched, it was not without curiosity:

The first time you run all the utilities from the supplied disc, you need to enter serial number. In the documentation (even latest version, which lies on the manufacturer's website) it is said that the serial number is printed on the bottom of the CN-6000 case. And some kind of serial number is indeed printed there, only it is much shorter than the programs require. In general, having suffered a little, entering the serial number found this way and that, adding zeros or spaces to it and not reaching anything more than the "Invalid Serial Number" window, I already wanted to finish testing the device that day. Taking the CD out of the CD-ROM (I inserted it into the CD-drive in the first place - I had to install the software), I found a strange sticker on the disk - this turned out to be the coveted serial number.
Of course, theoretically, a person can pay attention to what is written or pasted on the CD when he inserts it into the drive. But how many immediately pay attention to this? :) And, one wonders, why was it necessary to write deliberately false information in the documentation? I repeat - the site contains more a new version Documentation and there this "typo" is not corrected. I note that this is not the last inaccuracy that slips through the documentation, so sometimes you have to act according to the saying "do not believe your eyes."

The CN-6000 administration utility is useful in that it allows you to find a device on the network, even if its IP address does not belong to the subnet we are in, it is enough that we (the computer from which we are trying to access the CN-6000 ) were on the same LAN segment as the KVM switch.
After entering the username and password, we get to the device configuration menu:

ATEN has taken a good approach to the issue of device security. When you first enter the device configuration, we are warned that it would be nice to change the standard login and password ...

In chapter network IP addressing of the device is configured, ports for remote access to computers controlled by CN-6000 are set. And here you can also specify the MAC address of the machine on which the "Log Server" program is located, which stores log files (events) sent from the KVM switch (if it is not set, the logs will be stored on the KVM itself and you can see them from the web interface). This machine (for the Log-server) can be any computer on which Windows is installed and the program under discussion is running. The only problem is that the computer must be in the same network segment (roughly speaking, connected to the same switch) as the KVM CN-6000 itself, so the usefulness of this "feature" is questionable.

Bookmarked Security filters (by MAC and/or IP addresses) for access to the remote screen of administered computers are configured, as well as a filter for administration of the CN-6000 itself.

In the next tab, user names and passwords are set, as well as their rights. Remarkably, you can restrict logins for configuring the CN-6000 and using the JAVA client. The minimum password length that the configuration utility accepts is eight characters. It is a pity, of course, that the password is not checked for "simplicity", but even checking the length of the password indicates that ATEN pays attention to security.

The last tab allows you to update the firmware of the device, enable the possibility of simultaneous connection to a remote computer by several people (although the mouse and keyboard are still the same, from the point of view of the controlled computer, so one controls, the rest look ... or interfere with each other by dragging the mouse in different directions) . The reaction to an incorrect authentication process is immediately configured, as well as the inclusion of various "hidden" modes of the CN-6000 (no response to ping and a ban on showing itself when automatic search devices on the local network via the client utility or administration utility).
In the same tab there is another item - Reset on Exit. I would assume that this is a factory reset, but in this case it means rebooting the device when exiting the configuration utility. AT otherwise(if it is not rebooted), although the new settings will be remembered, they will not be applied (until the reboot).
At this point, consideration of the configuration utility can be considered complete (another aspect will be discussed in the section on the Java client).
Let's go to the web interface.
Configuration via WEB-interface

In order to get into the web interface of the device, it is enough to type the IP address that is set on the CN-6000 in any browser.
It is noteworthy that the browser immediately redirects the client to a connection via HTTPS://, i.e. all further work takes place through a secure SSL connection.

After entering the login and password, the icons on the left and at the top of the web interface become active (you can click on them).

The top icons open sections related to configuring the CN-6000. For the most part, all the options there repeat the options of the Windows utility interface. AdminTool, but there are some differences. For example, in this window (configuring network addresses), we can only set the IP address of the device, but we cannot specify the subnet mask and gateway. In addition, setting the IP address works somehow crookedly - I was not able to change the device's IP address from the web interface (using the Admin Tools utility, it changed without problems).

Here is what you can see in the Admin Tool utility when you try to change the address through the web interface from 10.0.0.9 to 192.168.0.1. For some reason, the subnet mask changed from the standard 255.255.255.0 to 10.0.0.9, and the device (after a reboot) replies at 192.168.0.1 for 5 seconds, and then starts responding at 10.0.0.9 (it completely forgets about 192.168.0.1). This may be a bug in the current firmware version (1.5.141), but this version, at the time of testing, was the latest one that could be found on the company's website.
No more bugs related to the web interface were found during testing.

Chapter Security repeats the same section in the Admin Tool.

A similar situation with the section User Manager…

... and section customization.

Icon Log, located on the left side of the web interface, allows you to view the events that occurred during the operation of the device. In this case, the screenshot reflects the logs that appeared at the time the device was tested by Nessus.
As mentioned above, logs can be dumped to an external log server (but with certain restrictions on its location).
KVM or Kernel Virtual Module is a virtualization module for the Linux kernel that allows you to turn your computer into a hypervisor for managing virtual machines. This module operates at the kernel level and supports hardware acceleration technologies such as Intel VT and AMD SVM.
By itself, KVM software does not virtualize anything in user space. Instead, it uses the /dev/kvm file to set up virtual address spaces for the guest machine in the kernel. Each guest machine will have its own video card, network and sound card, HDD and other equipment.
Also, the guest system will not have access to the components of the real operating system. The virtual machine runs in a completely isolated space. You can use kvm both on a GUI system and on servers. In this article, we'll walk you through installing kvm Ubuntu 16.04.
Before proceeding to the KVM installation itself, you need to check whether your processor supports hardware acceleration virtualization from Intel-VT or AMD-V. To do this, run the following command:
egrep -c "(vmx|svm)" /proc/cpuinfo
If the result is 0, then your processor does not support hardware virtualization, if 1 or more, then you can use KVM on your machine.
Now we can move on to installing KVM, a set of programs can be obtained directly from the official repositories:
sudo apt install qemu-kvm libvirt-bin bridge-utils virt-manager cpu-checker
We installed not only the kvm utility, but also the libvirt library, as well as the virtual machine manager. After the installation is complete, you need to add your user to the libvirtd group, because only root and users of this group can use KVM virtual machines:
sudo gpasswd -a USER libvirtd
After executing this command, log out and log in again. Next, let's check if everything was installed correctly. To do this, use the kvm-ok command:
INFO: /dev/kvm exists
KVM acceleration can be used
If everything was done correctly, then you will see the same message.
Using KVM on Ubuntu 16.04
You have completed the task of installing kvm on Ubuntu, but you cannot use this virtualization environment yet, but it still needs to be configured. Next, we'll look at how Ubuntu's kvm setup is done. First you need to set up the network. We need to create a bridge with which the virtual machine will connect to the computer's network.
Bridge configuration in NetworkManager
This can be done in several ways, for example, you can use the NetworkManager network configuration program.
Click the NetworkManager icon in the panel, then select change connections, then click the button Add:

Then select connection type Bridge and press Create:

In the window that opens, click the button Add, to link our bridge to the internet connection:

Select from the list ethernet and press Create:

In the next window, select in the field device, network interface to which our bridge should be connected:

Now on the list network connections you will see your bridge. It remains to restart the network in order to fully apply the changes, to do this, run:
Manual bridge setting
First you need to install the bridge-utils set of utilities if you haven't already:
sudo apt install bridge-utils
Then, using the brctl program, we can create the bridge we need. To do this, use the following commands:
sudo brctl addbr bridge0
$ sudo ip addr show
$ sudo addif bridge0 eth0
The first command adds the br0 bridge device, with the second you need to determine which network interface is the main connection to the external network, in my case it is eth0. And with the last command, we bind bridge br0 to eth0.
Now you need to add a few lines to the network settings so that everything rises automatically after the system starts. To do this, open the /etc/network/interfaces file and add the following lines there:
sudo gedit /etc/network/interfaces
loopback
auto lo bridge0
iface lo inet loopback
iface bridge0 inet dhcp
bridge_ports eth0
When the settings are added, restart the network:
sudo systemctl restart networking
Now the installation and configuration of KVM is complete and you can create your first virtual machine. After that, you can view the available bridges with the command:

Creating KVM virtual machines
The Ubuntu KVM setup is complete and now we can move on to using it. First, let's look at the list of already existing virtual machines:
virsh -c qemu:///system list

It's empty. You can create a virtual machine through the terminal or in the graphical interface. To build from the terminal, use the virt-install command. First, let's go to the libvirt folder:
cd /var/lib/libvirt/boot/
To install CentOS, the command will look like this:
sudo virt-install \
--virt-type=kvm \
--name centos7\
--ram 2048\
--vcpus=2 \
--os-variant=rhel7 \
--hvm\
--cdrom=/var/lib/libvirt/boot/CentOS-7-x86_64-DVD-1511.iso \
--network=bridge=br0,model=virtio \
--graphics vnc\
--disk path=/var/lib/libvirt/images/centos7.qcow2,size=40,bus=virtio,format=qcow2
Let's take a closer look at what the parameters of this command mean:
- virt-type- type of virtualization, in our case kvm;
- name- the name of the new machine;
- ram- amount of memory in megabytes;
- vcpus- number of processor cores;
- os-variant- type of operating system;
- cdrom- installation image of the system;
- network-bridge- the network bridge that we set up earlier;
- graphics- how to get access to the graphical interface;
- diskpath- address new hard disk for this virtual machine;
After the installation of the virtual machine is completed, you can find out the connection settings via VNC using the command:
sudo virsh vncdisplay centos7
Now you can enter the received data in your VNC client and connect to the virtual machine even remotely. For Debian, the command will be slightly different, but everything looks similar:
Go to the folder for images:
cd /var/lib/libvirt/boot/
You can download the installation image from the Internet if necessary:
sudo wget https://mirrors.kernel.org/debian-cd/current/amd64/iso-dvd/debian-8.5.0-amd64-DVD-1.iso
Then let's create a virtual machine:
sudo virt-install \
--virt-type=kvm \
--name=debina8 \
--ram=2048 \
--vcpus=2 \
--os-variant=debian8 \
--hvm\
--cdrom=/var/lib/libvirt/boot/debian-8.5.0-amd64-DVD-1.iso \
--network=bridge=bridge0,model=virtio \
--graphics vnc\
--disk path=/var/lib/libvirt/images/debian8.qcow2,size=40,bus=virtio,format=qcow2
Now let's see the list of available machines again:
virsh -c qemu:///system list
To start the virtual machine, you can use the command:
sudo virsh start hostname
To stop:
sudo virsh shutdown hostname
To put into sleep mode:
sudo virsh suspend hostname
To reboot:
sudo virsh reboot hostname
sudo virsh reset hostname
For complete removal virtual machine:
sudo virsh destroy hostname
Creating Virtual Machines in the GUI\
If you have access to a graphical interface then there is no need to use the terminal, you can use the full graphical interface of the virtual manager. Machines Virtual manager. The program can be launched from the main menu:

To create a new machine, click on the icon with the monitor icon. Next, you will need to select an ISO image of your system. You can also use a real CD/DVD drive:

On the next screen, select the amount of memory that will be available for the virtual machine, as well as the number of processor cores:

On this screen you need to select the size hard drive, which will be available in your machine:

At the last step of the wizard, you have to check the correctness of the machine settings, as well as enter its name. You also need to specify the network bridge through which the machine will connect to the network:

After that, the machine will be ready for use and will appear in the list. You can launch it using the green triangle on the manager toolbar.
conclusions
In this article, we looked at how the Ubuntu 16.04 KVM installation is done, how to fully prepare this environment for work, as well as how to create virtual machines and use them. If you have any questions, ask in the comments!
At the end, a lecture from Yandex about what virtualization is in Linux:
Kimchi is a HTML5 based web interface for KVM. It is provides easy and flexible interface to create and manage a guest virtual machine s. Kimchi is installed and runs as a daemon on the KVM host. It manages KVM guests with the help of libvirt. Kimchi interface supports all latest version of the browsers with -1 version, it also supports mobile browsers.
Kimchi can be installed on latest version of RHEL, Fedora, openSUSE and Ubuntu. In this guide, i used Ubuntu 14.10 as a KVM host.
Before configuring kimchi, you must install the following dependent packages.
$ sudo apt-get install gcc make autoconf automake gettext git python-cherrypy3 python-cheetah python-libvirt libvirt-bin python-imaging python-pam python-m2crypto python-jsonschema qemu-kvm libtool python-psutil python-ethtool sosreport python-ipaddr python-ldap python-lxml nfs-common open-iscsi lvm2 xsltproc python-parted nginx firewalld python-guestfs libguestfs-tools python-requests websockify novnc spice-html5 wget
System would ask you the following details during the installation of packages.
1. OK on Postfix configuration.
2. Select Internet Site on general type of mail configuration.
3. Type your FQDN and then select OK.
Once installed, download the latest version of kimchi from github.
$ wget https://github.com/kimchi-project/kimchi/archive/master.zip
Unzip the downloaded file.
$ unzip master.zip $ cd kimchi-master/
Build kimchi using the following command.
$ ./autogen.sh --system
$ make $ sudo make install # Optional if running from the source tree
$ sudo kimchid --host=0.0.0.0
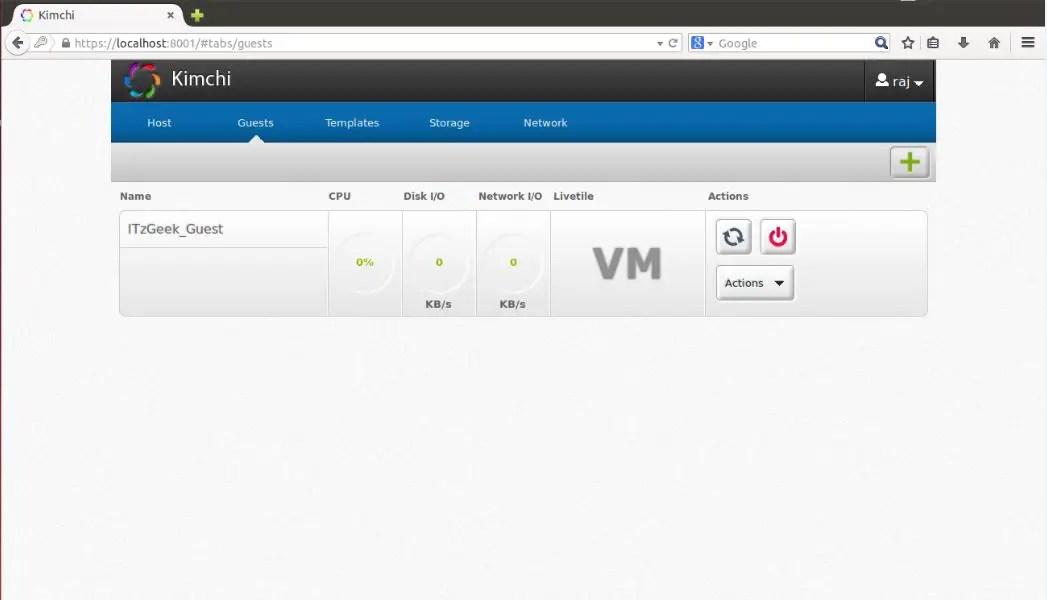
Access kimchi using web browser, https://localhost:8001. You would be asked to login, use your system credential which you normally use for login to system.

Once you logged in, you will get a page like below. This show the list of running guest virtual machines on current host, you have buttons to perform shutdown, restart and connect to console by clicking on action.
To create a new guest machine, click on the + sign in the right corner. If you use this option to create a machine, it will be done through templates.

You can manage templates by visiting templates menu. To create a new template, click on the + sign in the right corner. You can create a template using ISO images, you can place iso images on /var/lib/kimchi/isos or use remote one.

You can manage storage pool by going to storage menu, there you can add a new storage by clicking on + sign. It supports adding NFS, iSCSI and SCSI fiber channel storage.

Network can be managed by going to network menu, you can create a new network with isolated, NAT and bridged networking.

I am writing this note to demonstrate step by step installation and setting up a Linux virtual machine based on KVM. Earlier, I already wrote about virtualization, where I used the wonderful .
Now I'm faced with the question of rent good server with large volume random access memory and large hard drive. But I don’t want to run projects directly on the host machine, so I will separate them into separate small virtual servers with Linux OS or docker containers (I’ll talk about them in another article).
All modern cloud hostings work on the same principle, i. a hoster on good hardware raises a bunch virtual servers, which we used to call VPS / VDS, and distributes them to users, or automates this process (hello, DigitalOcean).
KVM (kernel-based virtual machine) is software for Linux, using the hardware of x86-compatible processors to work with Intel VT/AMD SVM virtualization technology.
KVM Installation
I will carry out all the machinations for creating a virtual machine on Ubuntu 16.04.1 LTS OS. To check if your processes support hardware virtualization based on Intel VT/AMD SVM, run:
Grep -E "(vmx|svm)" /proc/cpuinfo
If the terminal is not empty, then everything is in order and KVM can be installed. Ubuntu only officially supports the KVM hypervisor (part of the Linux kernel) and advises using the libvirt library as a tool to manage it, which we will do next.
You can also check hardware virtualization support in Ubuntu through the command:
If successful, you will see something like this:
INFO: /dev/kvm exists KVM acceleration can be used
Install packages for working with KVM:
sudo apt-get install qemu-kvm libvirt-bin ubuntu-vm-builder bridge-utils
If you have access to the graphical shell of the system, then you can install the libvirt GUI manager:
sudo apt-get install virt-manager
Using virt-manager is quite simple (no more difficult than VirtualBox), so this article will focus on the console version of installing and configuring a virtual server.
Installing and configuring a virtual server
In the console version of installation, configuration and system management, the virsh utility (an add-on for the libvirt library) is an indispensable tool. She has a large number of options and parameters, detailed description can be obtained like this:
man virsh
or call the standard "help":
Virsh help
I always adhere to the following rules when working with virtual servers:
- I store iso images OS in /var/lib/libvirt/boot directory
- I store virtual machine images in the /var/lib/libvirt/images directory
- I explicitly set each new virtual machine its own static IP address via DHCP server hypervisor.
Let's start installing the first virtual machine (64-bit server ubunt 16.04 LTS):
Cd /var/lib/libvirt/boot sudo wget http://releases.ubuntu.com/16.04/ubuntu-16.04.1-desktop-amd64.iso
After downloading the image, run the installation:
sudo virt-install \ --virt-type=kvm \ --name ubuntu1604\ --ram 1024 \ --vcpus=1 \ --os-variant=ubuntu16.04 \ --hvm \ --cdrom=/var/ lib/libvirt/boot/ubuntu-16.04.1-server-amd64.iso \ --network network=default,model=virtio \ --graphics vnc \ --disk path=/var/lib/libvirt/images/ubuntu1604. img,size=20,bus=virtio
Translating all these parameters into "human language", it turns out that we are creating a virtual machine with Ubuntu 16.04 OS, 1024 MB of RAM, 1 processor, a standard network card (the virtual machine will go to the Internet as if due to NAT), 20 GB HDD.
It is worth paying attention to the parameter --os-variant, it tells the hypervisor under which operating system the settings should be adapted.
A list of available OS options can be obtained by running the command:
osinfo query os
If there is no such utility on your system, then install:
sudo apt-get install libosinfo-bin
After starting the installation, the following message will appear in the console:
Domain installation still in progress. You can reconnect to the console to complete the installation process.
This is a normal situation, we will continue the installation through VNC.
We look at which port it was raised from our virtual machine (in a nearby terminal, for example):
Virsh dumpxml ubuntu1604 ...
Port 5900, at local address 127.0.0.1. To connect to VNC, you need to use Port Forwarding over ssh. Before doing this, make sure tcp forwarding is enabled on the ssh daemon. To do this, go to the sshd settings:
Cat /etc/ssh/sshd_config | grep AllowTcpForwarding
If nothing was found or you see:
AllowTcpForwarding no
Then we edit the config for
AllowTcpForwarding yes
and reboot sshd.
Configuring port forwarding
Run the command on the local machine:
Ssh -fN -l login -L 127.0.0.1:5900:localhost:5900 server_ip
Here we have configured ssh port forwarding from local port 5900 to server port 5900. Now you can connect to VNC using any VNC client. I prefer UltraVNC because of its simplicity and convenience.
After a successful connection, the standard Ubuntu installation welcome window will be displayed on the screen:
After the installation is complete and the usual reboot, a login window will appear. After logging in, we determine the IP address of the newly minted virtual machine in order to later make it static:
ifconfig
We remember and go to the host machine. We pull out the mac-address of the "network" card of the virtual machine:
Virsh dumpxml ubuntu1604 | grep "mac address"
Remember our mac address:
Editing network settings hypervisor:
sudo virsh net-edit default
We are looking for DHCP, and add this:
You should get something like this:
In order for the settings to take effect, you must restart the DHCP server of the hypervisor:
sudo virsh net-destroy default sudo virsh net-start default sudo service libvirt-bin restart
After that, we reboot the virtual machine, now it will always have the IP address assigned to it - 192.168.122.131.
There are other ways to set a static IP for a virtual machine, for example, by directly editing the network settings inside the guest system, but here it’s up to your heart’s content. I just showed the option that I myself prefer to use.
To connect to the terminal of the virtual machine, run:
ssh 192.168.122.131
The car is ready for battle.
Virsh: command list
To see running virtual hosts (all available can be obtained by adding --all):
sudo virsh list
You can restart the host:
Sudo virsh reboot $VM_NAME
Stop the virtual machine:
sudo virsh stop $VM_NAME
Execute halt:
sudo virsh destroy $VM_NAME
sudo virsh start $VM_NAME
Shutdown:
sudo virsh shutdown $VM_NAME
Add to autorun:
sudo virsh autostart $VM_NAME
Very often it is required to clone the system in order to use it as a framework for other virtual operating systems in the future; for this, the virt-clone utility is used.
Virt-clone --help
It clones an existing virtual machine and changes host-sensitive data, such as mac address. Passwords, files and other user-specific information in the clone remains the same. If on the cloned virtual machine the IP address was manually entered, then there may be problems with SSH access to the clone due to a conflict (2 hosts with the same IP).
In addition to installing a virtual machine via VNC, it is also possible to use X11Forwarding via the virt-manager utility. On Windows, for example, Xming and PuTTY can be used for this.
I tried many web based management interface and none of them was good enough like virt-manager.
You know, I'm one of those guys who used to have VMware where 90% of the controls are clicked.
My questions:
1) Is there any "interactive" CLI utility like mc (midnight commander) or something how to control KVM? (ON/OFF VM, increase memmory, restart VMs, add virtual hardware, add new disks, etc.)
2) Could you recommend me some web based management interface for KVM on debian squeeze? Have you seen VMware Server 2? There is a web control. I know it was slow, but it's normal when you're somewhere without a terminal. (e.g. on Android with a web browser) I tried a lot of them but nothing I tried worked.
5) How to improve the security of KVM? Can some web interface solve this problem? (e.g. accounting, user management?)
I know there is google, wiki, there is a long list of user interface for kvm, but I need opinions, experience from experts or users who use KVM. I hope this isn't some stupid question. Thanks everyone for the answers to my questions.
5 Solutions collect form web for “KVM – Which web based management should I use?”
For a KVM web manager, you can try Proxmox. Instructions for Debian Squeeze are here.
He has tools command line, but not the text base menu.
You should set up a small environment and try it out. Then state the goal and implement it.
There is no exact answer/tutorial for this. How reconfigurable a KVM server/client really depends on how much resources (cpu/ram/storage) are available.
Again, this depends on your environment, and these are multi-layer/devices, for example. routers, firewall, ip tables, password policy, access policy, etc. I don't know of any gui, webbase or not, that can handle all of these, including KVM. (OK, there is a cloud, but I have no experience with it at all)
You tried kimchi? is the most user-friendly open source code on KVM and sponsored by IBM.


Disclaimer: I am not affiliated with Kimchi at all. I just love his friendliness.
Experts use CLI. Not GUI. This is even true for experienced Windows administrators.
Not, graphical interfaces still improving, but self-writing scripts are faster and do what you want.
Improve performance in KVM? Throw it away.
This is just a hint from the XEN-PV expert. Only LXC (or other containers) or chroot-based solutions are faster.
The KVM installation guide may not be very detailed, but at least give or provide ideas on the installation and configuration process.
There is a new enterprise-level KVM and AV/IT system management called Boxilla which has a comprehensive and centralized command center that ensures maximum performance, ease of use and security.
It provides the ability to manage high performance KVM, KVM over IP, virtualized endpoints and various AV/IT devices in one centralized command center, allows administrators to manage multi-tier KVM and AV/IT deployments using a powerful web and common user interface. You can find more about it here: https://www.blackbox.co.uk/gb-gb/page/37929/Solutions-Industries/Technology-Products/KVM-Switching-and-Extension/Centralised-KVM-AV-Manager -boxilla