Installing windows on a flash drive using virtualbox. Booting a virtual machine from a USB flash drive with Virtual Machine USB Boot
All popular hypervisors for Windows - Hyper-V
, virtual box
, VMware- provide for the launch of virtual machines (VM) from boot ISO-images and flash drives. launch VM from the latter, in every case it will not be a process without problems: without dancing with a tambourine from flash drives UEFI only run VM on the base ON EFI in programs virtual box and VMware. How to simplify the launch of a VM from flash drives in other cases?
To do this, you can create a so-called virtual flash drive - all contents of the real USB- transfer the media to a virtual hard disk and, accordingly, run VM from him. But the content must be transferred along with the structure of the physical flash drive - in order to virtual disk inherited all partitions if there is more than one (for example, in the case of Mac OS or Chrome OS) , as well as boot device attributes (unless it's a UEFI media) . This can be done in at least two ways, described below.
All actions in our case will be carried out with . In other programs for virtualization, it is necessary to proceed by analogy.
1. R-Drive Image program
The first way to create a virtual flash drive is to transfer the structure and contents of a real USB-carrier to virtual disk using the program- backer. Opening the parameters of an existing VM and we click.
Adding another disk

Leave the controller type as default.

Let's create a new disk. We indicate its size: let it be approximately the same as the size of a flash drive, but still let it differ a little. This is necessary so as not to confuse devices when cloning. Save as one file.

Specify the placement path. We press.

We launch VM, connect a real flash drive to it. In the guest OS, install trial- program version . In its window, select "Copy Disk to Disk".

In the graph "A source" choose a real flash drive. In the graph "Receiver"- the newly created virtual disk.


AND - "To begin".

After cloning is completed, exit the program.

Now in the guest explorer OS we have two identical devices.

We can disconnect the real flash drive from VM. As well as we can disconnect the virtual disk from the current VM and use it to launch others VM.
2. Rufus program
The second way to create a virtual flash drive is to use the program's capabilities Rufus 3.1. In updated version 3.x this program, in addition to the existing functions for creating bootable USB-devices, learned how to clone real flash drives into files vhd. A vhd compatible with Hyper-V, and with virtual box, and VMware. We launch Rufus 3.1 on the host system. Choose the right USB-carrier, if several of them are connected, in the column "Device". Next, press the button in the form of a diskette.

Specify the file storage path vhd .

We are waiting for the completion of the operation and close Rufus.

3. Connecting a virtual flash drive and starting from it
So, the virtual flash drive has been created, how to connect it to the VM and, accordingly, launch it?
In parameters VM click HDD.


Select an existing one.

In the explorer window, specify the path to the file storage folder vhd. In the file display column, put . And we click our virtual vhd- flash drive.


On the EFI-cars enter BIOS- either use the button on the hypervisor toolbar, or at startup VM press F2.

In the bootloader window select hard drive with the number under which it is listed in the general list of connected virtual disks, but calculated from zero. In our case, the virtual flash drive is the second drive. VM, so in EFI-firmware it is listed as Hard Drive 1.0.

On regular VM created on the basis of emulation BIOS Legacy to boot from a virtual flash drive, you need to VM specify it as the first hard drive. You need to delete all existing disks of the machine and add them again, specifying the virtual flash drive first.

The article addresses the question of how to check if a bootable USB flash drive is working in VirtualBox. I will pre-install and check the performance of several flash drives with different operating systems at once: Android, Kali Linux and Windows. After that, let's check how the bootable USB flash drive in VirtualBox is operable.
I won’t get inflamed for a long time about how convenient a mobile operating flash drive is, always carried with you. Fortunately, in order for any of the OS to always be with you, you need only one device - a USB drive. And a computer on which we will be allowed to run a flash drive. The rest is details.
But immediately after creating a flash drive with a wearable OS, it must be tested. The VirtualBox virtual machine is quite suitable for this. However, for some, it is the process of creating a bootable USB flash drive in VB that makes it a little difficult. No wonder - the function has not yet been released by developers in GUI, although it has been fully operational for a long time.
What will we need?
- flash drive with installed OS
- VirtualBox virtual platform
We will work from the master's Windows.
ATTENTION. Everything open windows VirtualBox CLOSE
Flash drive - to the port. diskmgmt.msc from string Run We get into the Disk Management console in Windows. We look where your flash drive is in the list of disks. It will be easy to detect it: the corresponding size and a different serial number (physical Windows drives numbers, I remind you, starting with 0 ). I have one HDD Disk 0) and flash drive ( Disc 1):
Actually, we only need a number, the serial number of the disk. 1 - remember it; it will appear a little later at the end of the command to create a VMDK virtual machine disk file for the flash drive being checked.
We launch. In it, go to the directory with the installed virtual platform:
cd %programfiles%\Oracle\VirtualBox
and give the command to create a disk file of the VMDK virtual machine for our flash drive in the root of drive C (the file name and location path can be anything):
VBoxManage internalcommands createrawvmdk -filename C:\flash drive.vmdk-rawdisk \\.\PhysicalDrive 1

Let's use Windows Explorer and see if the file is in place:

where does he go...
It's time for the virtual machine. Let's run it as admin. And create a new machine like this, pointing to the created file flash drive.vmdk:

We launch. A bootable USB flash drive in VirtualBox with Android on board works:

I immediately draw your attention to the fact that in the settings of the virtual machine in the section carriers The first boot device must be the VMDK virtual machine disk file you created. This required condition, if you want to not only test the flash drive as a LiveCD media, but also want to install the system on a virtual machine to fully test its performance as installation flash drive. But for this, no matter what OS you try to install, you you need a virtual hard disk for it. It is easy to create it in the same menu carriers by clicking on the icon Add hard drive. And during the installation of the OS on the virtual HDD in VirtualBox, point to it. For Android, I chose this:

What to pay attention to?
- If you have any questions about installing Android on a computer, refer to the link of the same name in the paragraph above.
- The dimensions of the virtual disk during the installation of the OS are different, but we are testing the flash drive, which means we take minimal requirements. But I advise you not to skimp on the performance characteristics (take more video and RAM volumes) in order to avoid problems during installation and not sin on the performance of your bootable flash drive.
- After installing the OS on a virtual disk in VirtualBox from a USB flash drive, the file flash drive.vmdk must be REMOVED FROM the LIST of virtual media (otherwise, booting from a USB flash drive will follow you in a circle).
I have a computer with which I constantly work and have fun, Windows 7 is running on it as an operating system. I also have a portable USB hard drive, which I faked as a boot OS ubuntu linux. I use it as a "rescue" operating system, like Live CD, and sometimes I work in it. In general, I thought that it would not be bad to be able to load this OS in VirtualBox. After scraping various instructions from manuals and the Internet, I made my own recipe for how to do this.
And so, we start in VirtualBox Ubuntu Linux installed to a USB HDD like a normal virtual machine. By the way, this recipe is also suitable for flash drives.
###Given: * Computer with Windows 7 x64 * Bootable USB HDD with Ubuntu 12.04TLS
###Task:
Run Ubuntu installed on USB hard drive Drive inside VirtualBox and use the two systems in parallel.
###Solution:
To get started you need run command line(console, cmd.exe) on behalf of the administrator (!!! MANDATORY !!!) if you are using Windows 7 or Vista.

And execute the following three commands in it. C: cd "%PROGRAMFILES%\..\Program Files\Oracle\VirtualBox\" VBoxManage internalcommands createrawvmdk -filename "%USERPROFILE%\USB-HDD-connector.vmdk" -rawdisk \\.\PhysicalDrive1
###Now let's take a closer look at these commands:
You will need the first line if the current path in the console starts with a partition different from the one in which your VirtualBox is installed.
The second line defines the directory in which the following commands will be executed. In my case, this is C:\Program Files\Oracle\VirtualBox\ ”, since my virtualization program is installed in the folder that its developers offer for installation.
The third command creates a file USB-HDD-connector.vmdk, which will link our external HDD with operating system and VirtualBox. It is this file that will need to be added as primary disk to boot your virtual machine. BUT! Before executing this command, you need to clarify the number under which your external HDD known to the system.
###How to find out the disk number from which you want to boot?
And very simple! To do this, open the "Computer Management" panel, "Disk Management" section. The panel can be called in two ways:
click right click mouse on the shortcut "my computer" and select the line "management" in the menu; - Run the command `%windir%\system32\compmgmt.msc /s`. To do this, click Win+R, type this command and press enter.
Personally, I prefer the second option, although for this you need to remember this command. Fortunately, I once added a button to the toolbar of my TotalCommander that opens the “computer management” window. What, then I digress ...
In the "disk management" section, look for your disk. Disk 0, Disk 1, Disk 2… The numbers are the disk numbers.

In my case it was Disc 1. So, in the above command there is such a substring \\.\PhysicalDrive1 . The last digit here should match the disk number that you found out in the computer control panel.
Another point that I would like to describe is the place where the file we need will be created. In my version - %USERPROFILE%\USB-HDD-connector.vmdk - this means that in the %USERPROFILE% folder (this is a Windows system variable that will be replaced by the interpreter command line to the path to the folder of the user under which you are authorized in the system) a USB-HDD-connector.vmdk file will be created. Of course, you can use any file name and path you like here, but if there are spaces in this line, then it must be enclosed in quotes. Otherwise, the interpreter will interpret this gap as a jump to the next instruction.
###As a result, your console should look something like this:
If the command is successful and the link file is created, you will see the response: RAW host disk access VMDK file %userpofile%\USB-HDD-connector.vmdk created successfully ”. Vooot. The only thing left is to create a virtual machine and select the file that we just created as a hard disk. Oh yeah… And include it as “primary master”.

I would like to warn you right away that VirtualBox may swear that such a disk does not exist and the virtual machine will not start. This is due to the fact that the user under which you are authorized in the system does not have enough rights. To get around this problem, run your VirtualBox as an administrator.
The goal of the development is to make VirtualBox work without installation and run from anywhere, such as from a USB stick. Interestingly, the utility is written entirely in AutoIt scripts(all sources are open, but because of this, however, it doesn’t look very elegant. But the main thing is the result. So, download the application (I have Portable-VirtualBox_v4.1.6-Starter_v6.4.8-Win_all.exe) and run it - the program will prompt you to choose the path for unpacking. After that, you can run Portable-VirtualBox.exe. All settings are set automatically, you do not need to fix something manually (for example, paths). The window that appears is the so-called launcher. It appears once and is designed to download the latest distribution of VirtualBox and extract from there desired files. Interestingly, at this stage, the files can also be packaged in a special way so that they take up less space on the USB flash drive (although this is hardly relevant with the current sizes of flash drives). Click on the “Download installation files of VirtualBox” button, select the bitness of the system (for example, “Extract the files for 32-Bit system”) and wait for the launcher to do its job. In order for the installer to adapt the paths to the system (correct the necessary parameters in the VirtualBox.xml config), the Portable-VirtualBox.exe binary must be run again. Voila - we have a full-fledged VirtualBox at our disposal. Without any installation in the system.
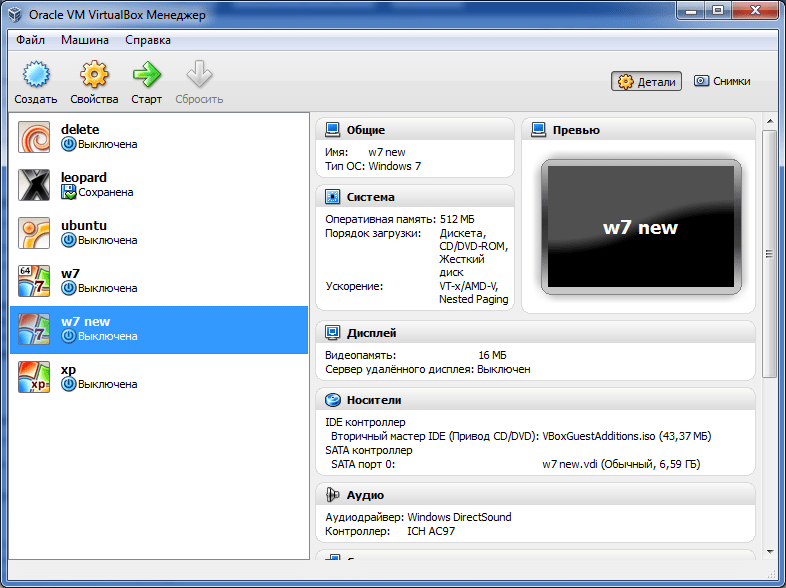
The VirtualBox icon will appear in the tray, with which you can manage the virtual machine and further configure it. In guest OSes, both USB and networking work by default. But in order to release the guest OS to the external network (Internet), you will have to carry out some additional manipulations. In the tray, select "Settings -> Network" and enable the option "Start VirtualBox with network support". Next, you need to restart Portable-VirtualBox and agree to install the driver. The process is organized in such a way that when you finish working with the virtual machine, everything that was installed in the system is deleted. It is reasonable to place the guest OS files directly on the flash drive along with VirtualBox. I have this system alone, so it can be launched immediately, without additional manipulations, by specifying its name in the parameters:
Portable-VirtualBox.exe "leopard"
Considering that the virtual machine is always not in the off state, but in the “Save the state” mode, its startup is very fast. Therefore, she is always ready to work without unnecessary hemorrhoids. And anywhere.
Everyone is good for testing operating systems and software, but for some reason none of these hypervisor programs provides the option to boot from a USB flash drive in a normal usable format. Having the ability to boot from bootable CD/DVD images may solve the problem of viewing the contents of the latter, but this will in no way satisfy the need to test a finished bootable flash drive. Check the performance of the bootable flash drive on the virtual machine, test the software contained in the resuscitation Live disk in conjunction with the virtual hardware, take screenshots of this action, install operating system, the distribution of which is available only in the recording on a USB flash drive - but you never know for what needs you may need the ability to boot from a USB drive.
How to set up booting from a USB flash drive to virtual VirtualBox machines and VMware Workstation– we will deal with this below. And for these purposes we will use the loader Plop Boot Manager.
1. Prepare the Plop Boot Manager Disk Image
Details about the appointment of demons paid program-loader Plop Boot Manager was discussed in the site article. Designed to solve the problem of the lack of an option to boot from USB devices in the BIOS of older computers, Plop Boot Manager will also help in solving the problem of booting from a USB flash drive on virtual machines. Download the distribution of the latter from the official website of the developer.
After unpacking the Plop Boot Manager archive, we can delete the contents of the folder, leaving only the desired ISO disk image - the file "plpbt.iso".

It is better to move this file immediately to a secluded place, say, to a folder with the same virtual machines, because in the process of using this ISO image, its location path will be registered in the hypervisor settings. The latter, in fact, we will carry out further - we will configure the “plpbt” ISO image as a boot source for VirtualBox and VMware Workstation virtual machines.
2. Booting from a flash drive in VirtualBox
Virtual machine VirtualBox at the time of its configuration to boot from a USB flash drive must be turned off. We press the settings button. In the window that appears, first look at the section " System” to ensure that the boot order is for the original drive. The checkbox must be placed on the item " CD/DVD».

Now let's go to the section carriers". Click " Controller: IDE' and select the button labeled ' empty” (if no other disk image is attached to the virtual machine). Next, we need the parameter " Attributes". At the end of the column Drive unit"Press the button in the form of a disk, then - the browse button with the inscription" Select optical disc image».

In the explorer window, open the same file " plpbt.iso».

That's it: the Plop Boot Manager disk image will now be mounted into the VirtualBox virtual drive. Click " OK».

Insert the USB flash drive into the computer's USB port. We start the virtual machine. The latter will boot from the Plop Boot Manager disk image and in its window we will see a minimalistic boot menu, among the options of which are USB devices. But first you need to connect the USB flash drive to the virtual machine. We click at the bottom of the window a small button with the image of a USB input and put a checkmark on the desired USB device. In our case, the flash drive is the only one of those.


We will see the Plop Boot Manager interface again and now we can already select the boot option - USB. To interact with the bootloader interface, you need to enter the virtual machine with mouse capture - that is, double-click inside its window. Recall that by default, the release of the mouse pointer from being captured by the virtual machine in the VirtualBox program is carried out by pressing the right Ctrl key. To navigate through the boot options in the Plop Boot Manager menu, use the navigation keys "" "↓", the very choice of the boot device is confirmed with the Enter key.

To get the VirtualBox VM to boot again with hard drive, you can either set the boot order from the last in the settings section " System” - which we actually checked above, or extract the disk image from the virtual machine drive. This is easiest done by clicking the disk-shaped button at the bottom of the virtual machine window. One of the available functions would be " Remove disc from drive».

However, if bootable flash drives are often tested, you can simply select the boot option from the desired disk partition in the Plop Boot Manager bootloader window.
3. Booting from a flash drive to VMware Workstation
Okay, still free VirtualBox, but for the paid VMware Workstation program, the lack of a simple and understandable option to be able to boot a virtual machine from a USB flash drive is an unacceptable thing. Nevertheless, even having paid, we will solve this problem with our own efforts.
As with VirtualBox, the VMware Workstation virtual machine must also be shut down. In the details window, click the option to change settings.

Let's get into the parameters of the virtual machine, here we need the tab " Equipment". Move to the tab " CD/DVD", set the active option" File ISO image ", then use the browse button to specify the path to the file" plpbt.iso". Click " OK».

Returning to the virtual machine details window, click the drop-down list of its states and select " Enable with firmware". In our case, we are dealing with latest version VMware Workstation 11. But more early versions program or in different editions of the translation of VMware Workstation, this option may be called differently, for example, " Enable in BIOS”, the English version is “ Power On to BIOS».

Unlike VirtualBox, VMware Workstation does not provide for setting the boot order of a virtual machine in its settings. Everything happens like on a real computer: the priority of boot devices is assigned in the virtual BIOS - an analogue of a real one basic system data input/output.
After starting the virtual machine in BIOS mode we enter it (by double-clicking inside the window or by pressing the ctrl+g). For reference: by default, the release of the mouse pointer in the VMware Workstation program is carried out with the Ctrl + Alt keys. Using the navigation keys "→" we move to the section " Boot”, then using the “↓” key we go down to the parameter “ CD-ROM drive". Use the "+" key to push it to the top of the list and press " F10».

We confirm the decision by pressing Enter in the box with a preset answer option " Yes» when prompted to save the configuration.

The virtual machine will restart and we will see the Plop Boot Manager interface. Also, as in the case of VirtualBox, at the bottom of the virtual machine window, click the USB devices button and connect the USB flash drive.

We restart the virtual machine.

Now we can go inside it and select the option to boot from USB devices in the Plop Boot Manager menu.

Returning the VMware Workstation virtual machine to boot from the hard disk is the reverse process. You need to enter the BIOS and set the boot priority with " hard drive' just as it was before. You can do otherwise and remove the Plop Boot Manager disk image itself. At the bottom of the virtual machine window there is a button in the form of a disk, it provides fast access to drive settings. Click " Parameters».

In the virtual machine drive settings window, we can either uncheck the device status " To plug”, or make the option to detect a physical CD/DVD drive active.

Did this article help you?