How to quickly and efficiently create an online store without basic knowledge in just a few days? Creating an online store on OpenCart: a guide for beginners Opencart training.
I officially declare that in Russia there is no competition in the field of sales and services!
Remember how many times managers were rude to you, how many times you received low-quality/defective goods, how many times the same couriers caused you inconvenience?
When I was doing the interior design for my apartment, they promised me and told me that everything would be done in 1 month. In reality, they did it for 4 months. Plus, they promised that such a repair would cost me one amount, but when they made the design, it turned out that they were ready to implement it for an amount twice as much. Of course, they were sent to hell. I had to look for another construction organization. And after going around a whole bunch of companies, I found only one normal one. In the rest, some gopniks came to inspect the apartment, they couldn’t put two words together without swearing, or “let’s do it without a contract, 30% prepayment.” Even if there was an agreement, it was without deadlines. If there were deadlines, then there were no fines for delaying them, or there were such fines that if they did nothing at all, then they would pay me 30 rubles a month every month. In this case, 50% prepayment. They’ll charge such a price, as if I didn’t have a two-room apartment, but a whole mansion of 1000 square meters. This is the service industry.
Let's return to online stores. If you often order from online stores, then you have probably encountered a terribly unpleasant situation when the website says “the product is in stock”, and then they say “you have to wait a week for the product.” Also, some of you have probably encountered outright rudeness from couriers. I remember the courier arrived an hour earlier to the meeting place, and was very offended that he had to wait for me for an entire hour. And he very persistently asked for a tip for waiting. I have no further dealings with this store and do not plan to.
There are some stores where getting into is a whole story. Either write out some kind of pass, then walk through some warehouses, then past some garages, then you can barely find it at all.
Over the course of my life, I have become a client of several dozen online stores. And only 1 remains in my memory as good. And that’s only because there is a pickup point in Obninsk, where I live, and they don’t call with confirmation, but simply limit themselves to SMS that the goods have arrived at the pickup point, which I personally really like. All others with one quirk or another. There are small ones, and there are also large ones. That is, only 1 store for the entire time has now received my priority of choice. But, alas, not everything is sold there, and not everything is sold at normal prices. Therefore, every time I look for a new and new online store.
And there are 99% of people like me. They don’t buy from the stores they like – there are very few of them, and not everything is sold there and not always. And in those where the conditions are better: lower price, higher rating (if the traffic is from Yandex.Market), faster delivery and faster dialing. The latter is also important, because knowing the quirks that “in stock” does not mean “in stock,” people often order from several stores at once, and whoever calls first gets the slippers.
Thus, every client who wants to place an order in the online store is potentially your client. Moreover, if you put low price, then many will not be embarrassed by your lack of reviews (payment is still only upon receipt). And, having received a little fame, you can already increase your margin.
You don't need all this to get started. You will be able to call clients and make courier deliveries yourself. And you can send orders to other cities by Russian Post. You don't need a warehouse because you won't be buying a whole bunch of goods. There is absolutely no investment required here. You can also involve your friend and divide the responsibilities in half.
But yes, you are right, if you have pickup points, this will increase sales. For this there are logistics companies, of which there are at least 50 in Moscow alone. Such a company will provide you with a warehouse, dozens of pick-up points throughout the country, will work with suppliers itself, will call customers, pack orders, organize delivery by courier and delivery by transport companies, including Russian Post. Will issue checks to customers and accept cash on delivery. Will receive calls from your clients on a landline number using IP telephony. But all this costs money. Prices vary, but, as a rule, not counting the delivery price (customers usually pay for it), 1 order will cost you about 150 rubles at low turnover and 50 rubles at high turnover + 1-1.5% of the order value for cash management services .
If it's all so profitable,
Why don’t you do this yourself?

Who said I don't do this? On this moment I am developing my own online store selling goods from China. Plus, in a few months I am planning to launch another online store, where I will sell something else.
I'm not afraid of competition at all. And in the next 5-7 years there will be no competition. Business in Russia is just beginning to develop. And those who manage to create it today will no longer be afraid of competitors in 5-7 years.
Dmitry Dementiy
![]()
In this article you will learn how to create an online store using the OpenCart CMS.
Why you should work with OpenCart
Buyers don't care what engine you use. They want to quickly find a suitable product, make sure the price is acceptable and the seller is reliable, place an order, pay for it in a convenient way and receive it quickly. With the help of CMS OpenCart, these audience needs can be met.
You don't care which engine you use. Online store CMS must meet the following characteristics:
Free distribution. Why pay for an engine if there are quality free products?
Simple and intuitive administrative panel. The admin of the online store should be sorted out within half an hour by your brother, who will help with the development of the site during school holidays.
Built-in sales monitoring system. Of course, you will track the main performance metrics using Yandex.Metrica or Google Analytics. But it is useful to receive some data every time you log into the admin panel.
Possibility of customization and expansion of functionality using ready-made free templates, modules and plugins. A new online merchant cannot afford to spend money on paying designers and web developers.
SEO-friendly. The Russian assembly of CMS OpenCart supports the CNC function. And with the help of additional extensions and settings, the engine can be brought into line with the requirements of search engines for website promotion.
Safety. With the help of payment and security modules, you can protect your customers.
The listed characteristics correspond to CMS OpenCart. Below you will find instructions for creating an online store using this engine.
Step 1: install OpenCart
You can install OpenCart after registering a domain and paying for the services of a hosting provider. If you have chosen hosting that supports auto-installation of engines, proceed as follows.
In the control panel, in the list of available installations, select the current version of OpenCart. For example, you can install a CMS in cPanel using Softaculos. Run automatic installation.


Launch the autoinstaller.
If you have chosen hosting without support for CMS auto-installation, proceed as follows:
Create a database in your hosting control room. Enter your name, login and password.
Unpack the archive and upload the files to the server using an FTP client, such as SmartFTP or FileZilla. You will receive data for accessing the server via FTP from your hosting provider.
Enter the site URL in address bar browser. Accept license agreement, specify database access data and install the CMS.
Install free module security, for example, OpenCart Total Security. The add-on protects the site from intruders.
How to connect a website to analytics and monitoring systems
To connect Google Analytics, activate the built-in module. To do this, go to the admin menu “Modules – Extensions”, use the drop-down menu to select the “Analytics” option and click the “Add” button next to the Google Analytics option.

In the module edit menu, add the analytics code and change the status to “Enabled”.

Wait a few minutes and check if the data is being received by Google Analytics.

To connect the Yandex.Metrica analytics system, add the tracking code to the Google Analytics module field.

REVIEWS
online store owners
Hi all! After the New Year holidays, we launched an online store where you can order or purchase children's products such as strollers, sleds, snow scooters, tubing, car seats, and many others. In this regard, I want to talk about one very interesting service - ShopConstructor.ru. It is with the help of this service that we have the opportunity to make a beautiful, high-quality and fully functional IM very quickly and inexpensively. Managers and support service always quickly answer questions and help resolve issues. By the way, there are a lot of free bonuses. Thanks guys for the quality service. Well, we are waiting for everyone in our online store.
There was a huge choice of where to turn, but according to the reviews, only one came up, and it was a good idea, in case anyone urgently needs an online store at an affordable price, you can contact the company Shopconstructor.ru. I urgently needed an online store, as soon as possible, I contacted the assistant managers, who clarified all the questions, and the programmers immediately got to work, and within 5 days, everything was ready. Thank you for the work you have done. If you need sites of this type again, I will contact you again).
I’ll share my story of meeting shopconstructor.ru. In the fall of last 2017, I came to the conclusion that having a store “in contact” is not enough, since online sales are more familiar to me, I decided to focus on creating a full-fledged online store. The budget was limited, the search criteria were simple: not expensive, beautiful, easy to select and order, the ability to edit yourself, cheap to maintain, the ability to expand the functionality of the store (as the company grows).
There are enough offers on the Internet for creating IM, but it was extremely difficult to choose one based on my criteria; I searched for more than a month. Paying attention to the shopconstructor service, I studied almost the entire connection on the site, by the way, they have useful articles in
Greetings, site readers! 🙂
Today we continue our acquaintance with various CMS. And in this article we will consider creating an online store on OpenCart.
First, let's refresh our knowledge about the CMS (engine). In short, this is a ready-made website that each owner customizes to suit himself, adding new functionality and interface elements, as well as modifying the existing one or completely removing elements that, in his opinion, are redundant.
So, let's return to the topic of the article :) We are considering the development of an online store on OpenCart, because... This engine is one of the free products. Moreover, this is not my subjective opinion. In all Runet ratings, he does not fall below 5th position.
Let me remind you that its advantages include ease of installation and store management, as well as powerful functionality for free products. All the necessary features are available in it: a product card with its description, a user account, a shopping cart, customer and sales analytics, and much more. Read more about its advantages and disadvantages in the mentioned article. And, most importantly, this free product! 🙂
Of course, this is not an entirely correct statement, because, as is known, free cheese only happens in a mousetrap :)
But compared to commercial engines, the costs of launching stores based on it will be limited to paying for hosting, registering a domain name and paying for modules and programmer labor if you need to do something individual.
To summarize the above, I will say that OpenCart is ideal solution for those who want to launch a small trading resource without special expenses. In addition, I have especially tender feelings for this engine, because... this is my first CMS with which I started my work as a web programmer. That is why she opens this series of articles dedicated to creating websites on various engines :)
So, let's talk about creating an online store on OpenCart in more detail.
As I promised earlier, I will include the installation of templates, modules, as well as their development in separate articles.
Selecting the version of CMS OpenCart to create an online store
At the moment the most current version is 2.1.0.1. Its release took place on October 6, 2015.
Due to the fact that this was quite recently, it was only Russified previous version OpenCart 2.0.3.1, which we will use.
It must be said that this state of affairs, unfortunately, does not indicate the highest quality official support for the product, because since the release of version 2.0.3.1. Half a year has already passed (release May 29, 2015). On the Internet, I have already come across Russified versions of the latest version of OpenCart, but they are assemblies, i.e. partially redesigned versions of the engine.
- Their advantages compared to a “pure” engine are their addition of very necessary and interesting features(built-in Russian payment systems, delivery methods, filters with various criteria, etc.).
- The disadvantages are that they are not always free, and if you have questions about the store, you can’t count on official support, but be patient and search for an answer on the assembly forum :)
We will not consider them in this article, but we will definitely devote material to them, because they definitely deserve attention.
Preparatory stage for creating an online store on OpenCart
So, let's proceed directly to creating a site on OpenCart. I recommend, first, installing it on your computer. And then, if you like it, transfer the finished store to hosting.
Before you install something, you need to download it.
OpenCart has a website with an official Russian-language representative office. From there we will take the engine installer - http://opencart.ws/download.html. To do this, download the latest available file - version 2.0.3.1 (redirects to the official English-language website).
Now you have the engine itself in your hands. What to do next?
The next step in creating an online store on CMS OpenCart will be installing it on a local web server. For those who don’t know what this is, I recommend reading the article “”.
As it says, I personally use the OpenServer web server, which I recommend to you. After you install it, go to the ..\OpenServer\domains folder (this is the folder where the files of sites hosted on the web server are stored).
Copy the archive with the engine into it and unpack it. As a result, you should have something like this:

Now you need to make the site itself on OpenCart.
To do this, create a folder with the name of your resource. In my case it is “opencart2”.
Next, we transfer the engine files to the site. To do this, go to the folder ..\OpenServer\domains\opencart-2.0.3.1\opencart-2.0.3.1\upload and copy all the files that are in it. If someone has forgotten, the key combination Ctrl+A is used for this.

We return to the directory with the list of sites and paste the copied files into the folder of your store.
If you did everything correctly, the result should be the following:

Great! By the way, do not forget to delete the folder with the engine files and the archive, so as not to leave unnecessary files and not get confused in the future.
The next stage of website development on OpenCart will be launching the installer. But first we need to do some more preliminary steps. You would have learned about the need to carry them out during the installation process thanks to the installation wizard’s comments, but we won’t wait for this and will do everything at once.
First, rename the config-dist.php file to config.php. The same needs to be done with the file in the “opencart2\admin” folder. These are files where, when installing the engine, its settings will be written, without which it will not work. In addition, if you leave the files unrenamed, the engine simply will not install and will display a message about the impossibility of writing settings.
Secondly, we will need to create a . If you don’t know what it is and why it is needed, I suggest you read the article of the same name. To do this, we will use the phpMyAdmin program, which is built into OpenServer. You can launch it as follows:

When you click on this menu item, a tab with authorization in this program will open in your Internet browser:

We log in to phpMyAdmin by entering the username and password of the user that you specified when installing OpenServer. If you have entered the data successfully, a program window will appear in front of you:

The next step in creating an online store on OpenCart is to add a site database. To do this, click on the “Databases” tab in the main window.
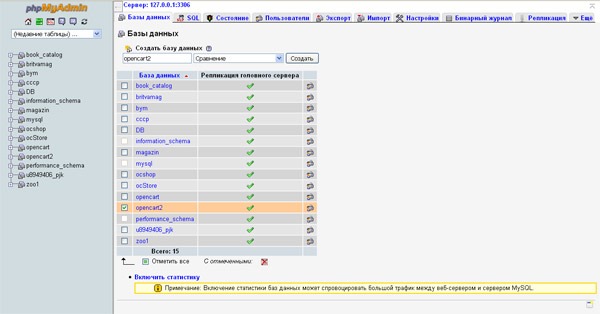
Here you need to enter the name of the database and click on “Create”. In my case, the database is called the same as my website - “opencart2”.
Since we downloaded the official English version, to fully create a store on OpenCart we will also need to download the localization language. It is available on the page http://opencart.ws/download.html via the link “Russian language for Opencart 2.0.0.0 - 2.0.3.1”. Next, we follow the same scheme - copy the archive with the crack into the folder ..\OpenServer\domains and unpack it:

We open the RussianOC2\upload folder and see that there are files there, sorted into directories that replicate the structure of the engine:

Therefore, to install the crack, we need to copy them and paste them into the site folder, overwriting existing files if they match.
But, looking ahead, I hasten to disappoint you that the Russian interface language can be added only after installation. The installation will have to be done in English. But there’s nothing wrong with that, especially since I’ll show you all the necessary information to enter and where to enter it :)
On this preparatory stage The creation of an online store on OpenCart is coming to an end. Next we move on to installing the engine itself.
How to create an online store on OpenCart: installing the engine
After you have copied the engine files to the site folder, you need to restart the web server itself so that it accepts the accepted changes. The restart occurs in the main menu of the server, which opens by clicking on the program icon in the start line (in the form of a checkbox).
Click on the “Restart” menu item in the form of a yellow flag.
After completing the steps, open any Internet browser (Chrome, Mozilla, Safari, etc.) and enter the name of your store in the address bar.
If you do not get to the engine installation screen and the browser searches for the specified word in search engine by default, a window should have appeared with the question “Did you mean switching to “Name of your site”?”
Click “Yes” and if you completed all the previous steps correctly, the following screen will appear in front of you:
 Here is the first step of installing the engine, without which you cannot create an online store on OpenCart of any type - a traditional license agreement. Which traditionally no one reads :)
Therefore, click “Continue” and move on.
 The second step is to check the system: how prepared it is for creating an online store on OpenCart. As a rule, there is no problem with server software requirements. If there is a red flag somewhere, you need to read on the Internet how to update the version of an unsuitable program on OpenServer, or simply use the latest version of the product when installing the web server itself. Then there will definitely be no problems :)
P.S. The version of my OpenServer is far from the latest, but it meets the requirements.
In the third block (which for some reason has a serial number of 4 on the installation screen 🙂) a warning would have appeared if we had not renamed the config-dist.php files.
The last block (it didn’t fit in the picture) displays access rights to various engine directories. Here, too, as a rule, everything is in order. If there are any restrictions, they depend on the rights of the site’s root folder or ..\OpenServer\domains. In this case, you need to open public access for them.
If everything is in order, we continue creating the online store on OpenCart by clicking on “Continue”.
 On the third CMS installation screen, we enter data to access the database (which we have successfully previously created). And the site administrator account settings: his login and password (which will be used to log in to the administrative part), as well as an e-mail that can be indicated on the site for complaints and customer technical support :)
In the database connection settings, enter the blank fields: login and password for your phpMyAdmin account and the name of the database itself. All other fields can be left unchanged.
 If everything went well, you will see the final engine installation screen with buttons to go to the administrative part and the storefront. Links to some modules from the store on the official engine portal are also available here. If black rectangles suddenly appear, like in my illustration, don’t worry - this is just a small flaw of the programmers. The links themselves are working.
From my own experience I will say that it is better to do this right away. Otherwise, this warning will appear every time you want to enter the administrative part.
To remove the installer, go to the site folder and delete the “install” directory. We won't need it anymore.
This completes the main part of the first stage of creating an online store on OpenCart. As a result, you can go to the store window and make sure that the site is working :)
 Everything is great! 🙂
With one small drawback, that everything is English language 🙂
To correct this situation, we enter the administrative part and enable Russification, the files of which we copied to the site at the very beginning.
 Enter the login and password of the administrator account that you specified when installing the engine. Click “Login”.
 If all the data is entered correctly, a nice OpenCart admin panel will appear in front of you, which I personally really like (on versions 1.5.x.x, which I started working with, the admin panel was more modest).
So, the next goal when creating an online store on OpenCart is to add a Russian interface language. To do this, select the side menu item in the form of a gear:
 In the menu that opens, select “Localisation”. And in the submenu that opens, select “Languages”.
On the screen that opens, click on the button in the upper right corner in the form of a plus sign on a blue background to add a new language. After clicking, a screen with its parameters will open:
 Here we enter the following information:
- Language Name: Russian
- Code: ru
- Locale (“Localization”): ru_RU.UTF-8,ru_RU,russian
- Image: ru.png
- Directory (“Folder”): russian
We leave the remaining fields unchanged. Click the button in the upper right corner in the form of a floppy disk on a blue background to save the language. After these steps, the list of languages will look like this:
 The next step towards creating an online store on OpenCart is to enable the language on the site. To do this, in the side menu of the admin panel, select the gear again and click on the “Settings” item.
 On the screen that appears with a list of sites (OpenCart allows you to create several stores based on the engine and manage them from one admin panel), open the settings of our site.
This is done by clicking on a button in the form of a pencil on a blue background, located on the same line with the address of your site and the inscription “Your Store”.
On the settings screen that opens, select the “Local” tab:
 Here we select the country and region where the store is located (will be taken into account when calculating delivery costs), the language of the storefront and administrative part.
Currencies are also available (in the future you can easily edit this list) and units of measurement (used when specifying product attributes).
After entering the values, do not forget to save the changes by clicking on the floppy disk button.
 And here we have the Russified admin panel of the store! 🙂 Checking the showcase (client part):
 But here it’s somehow not very good :) But at the very top left, a drop-down menu appeared with a choice of languages, which was not there by default. Select Russian language.
But during Russification, the language changed only on the controls. The names of categories, products and their descriptions remained in native English (I specifically included the store cart screen, where a large number of controls, and you are convinced that our changes work).
But there’s nothing to worry about here either, because... when creating an online store on OpenCart, you will still change the default (set by default) categories, products and descriptions to your own, which you will trade.
This marks the end of the first stage of creating a website on OpenCart - installing the engine on your computer. Ahead of us is the installation of graphic templates, modules and filling the store with goods.
I will also say a few words about transference ready-made store for hosting.
Let me remind you that we deployed the store on a local web server.
When installing the engine directly on a remote server, the procedure is exactly the same: copy the installer to the server, create a project folder, copy the files and start the installation process. In this case, the stage of transferring the store to hosting will naturally be skipped :)
That's it for an introductory article describing creating an online store on OpenCart, is coming to its logical conclusion :) Ahead awaits you detailed description the next stages of store deployment, and I will also talk in more detail about OpenCart assemblies, which, as already mentioned, have a number of advantages compared to the “pure” product.
Subscribe to updates to be aware of the release of new articles, share the post on in social networks with your friends, involve them in discussion.
I also look forward to your feedback and suggestions in the comments.
If something doesn’t work out for anyone or has questions about installing OpenCart, don’t hesitate to ask! I will be happy to help and answer everyone!
Good luck to all! 🙂
P.S.: if you need a website or need to make changes to an existing one, but there is no time or desire for this, I can offer my services.
What You'll Be Creating
If you want to try a simple and fully featured popular web store, OpenCart is a great option.
For those who are not familiar with the platform, we have created this series of lessons for beginners. In this series of articles you will learn how to install and open Online store OpenCart in 10 minutes.
Let's start!
As mentioned in the introduction, we only have 10 minutes to become friends with OpenCart. What we know so far:
- OpenCart is popular and easy to use.
- Do you want to open an online store right now?
OpenCart will work on a fairly well-known hosting, with a minimum of PHP 5.2, database MySQL data, cURL (server extension), 100-300 MB free space(depending on the number of products and images) and mod_rewrite (module Apache servers). Always ask your hosting company if they support OpenCart hosting. In many cases, hosting companies provide one-click installation, but we decided to do the installation manually.
Before you begin installation, prepare your database and information about account FTP user.
Prepare the OpenCart installation package
Download latest version OpenCart with official OpenCart download page and move it to your local project folder. Unpack the zip archive in your working folder. Rename config-dist.php to config.php and admin/config-dist.php to admin/config.php. Upload all files and folders to the server from the folder "Downloads".
In this tutorial, I will install OpenCart on my local machine, which is configured as shared hosting.
Make sure the folders on the server are writable (chmod 0755 or 0777):
- image/
- image/cache/
- cache/
- download/
- config.php
- admin/config.php
Go to your store's home page and follow these installation steps:
Step 1: Read the user license and click Continue.
Step 2: This screen helps you check if your hosting company's terms and conditions meet OpenCart's requirements. If all indicators turn green (which means everything is ok), press e Continue.
If the indicators turn red, this means that there are problems and they need an urgent solution. Fix problems and go back by pressing a button Back and press the button Continue.In my case, I have a small error and I need to rename two files config_dist.php to config.php as You see.
Step 3: Provide database credentials when prompted. For Database Driver Most hosting companies use MySQL, choose something unique for the database prefix - this will make your configuration more secure. The remaining data will be provided by your hosting company. If you have filled out this form with your details, click Continue.
Step 4: We are already at the finish line! From the warning we learned that we need to delete the install directory and continue in the external part of the store or administration. Let's move on to the admin area, where exciting things happen for new OpenCart friends.
OpenCart Administration Panel
Go to www.yournewwebshop.com/admin and log in to your admin panel. First of all, you will see a reporting panel showing sales data, the order and graph of customer statistics, as well as a list of recent orders. Now we need to make basic changes before starting work in the administrative area.
General settings
To change the default information, go to System > Settings > Edit Store > General. You can change the store name, address, owner name and contact information. If you want to change the template or update the meta data, go to Shop on the menu Settings.
In the tab Local You will find the default store location options, you can select the front end and backend language, change the currency and sections.
In the tab Options You will see settings related to the type of products and lists, vouchers, taxes, customer account, cash register, warehouse and branches. For the first time I will not change anything in the tab Options.
If you want to change the logo and favicon and change product sizes in the future, go to the tab Image.
Tabs FTP,Mail And Fraud are used for advanced settings, this is not necessary at this stage. If you want to use SEO URL's in OpenCart, go to the Server and activate the function Use SEO URL's(don't forget to rename htaccess.txt to htaccess in the root folder). You can also paste the code Google Analytics code.
Managing your categories and products
You can add or change categories in the menu Catalog > Categories. Click Insert to add a category. Under the tab Are common Type the category name, meta data and description.
Under the tab Data, the main parameters that you need to edit are to select the parent category, add an SEO url, select a photo of the category and determine whether this category should be displayed in the main menu on home page. Other parameters are for advanced users.
Key product features may be changed or added to the menu Catalog> Products. To add a characteristic, click Insert. For novice users, only the first three tabs are of particular importance.
Tab Are common covers input fields, product name, meta data (meta Description and keywords meta), product description and keywords.
On the tab Data You can add Model ID, SKU, other kinds of product codes (eg EAN, ISBN), Product Location, Price, Tax Class, Quantity, Stock Status, SEO URL, Product Image, Access Date, Status and Dimensions.
On the tab Links contains options to choose from manufacturer, category and related products. The rest of the product parameters are intended for advanced store owners, which will be discussed in the following parts.
And what will happen next?
I hope you've seen how easy it is to download OpenCart and adjust the basic settings to get started quickly. Now you are ready to move on.
In the next part of this series we will cover:
- advanced administrative settings with localization
- advanced product and category properties (e.g. product alternative)
- Additional marketing tools promotion
Stay tuned and let me know if you have any thoughts or questions in the comments!