How to install Russian language on a Samsung phone. We Russify devices on Android
android- popular system, it stands not only on smartphones, but also on tablets, netbooks, e-books; it is used in digital players and game consoles, there are even Wrist Watch and points on this system. In the near future, TVs and cars will work on it.
Of course, it is much more convenient to use all these gadgets if the interface is Russified.
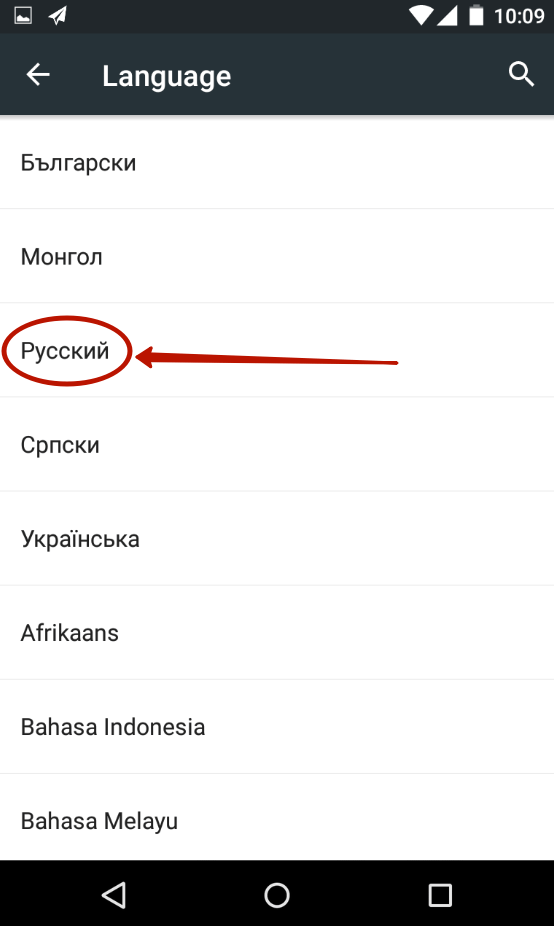
Changing the language on Android is simple, you just need to select the "Languages and keyboards" item in the settings and click on the top "Languages" item. In the list that appears, select "Russian (Russia)".
In the case when there is no Russian in the list of available languages, Russification of the android system is needed. So you can get both the Russian layout for the keyboard and the interface operating system in Russian.
The procedure will depend on which version of Android is installed on your smartphone or tablet. The video at the end of the article shows how easy it can be done. Let's take a look in detail, if 4.1.x (or lower), then the Russification of android goes as follows:
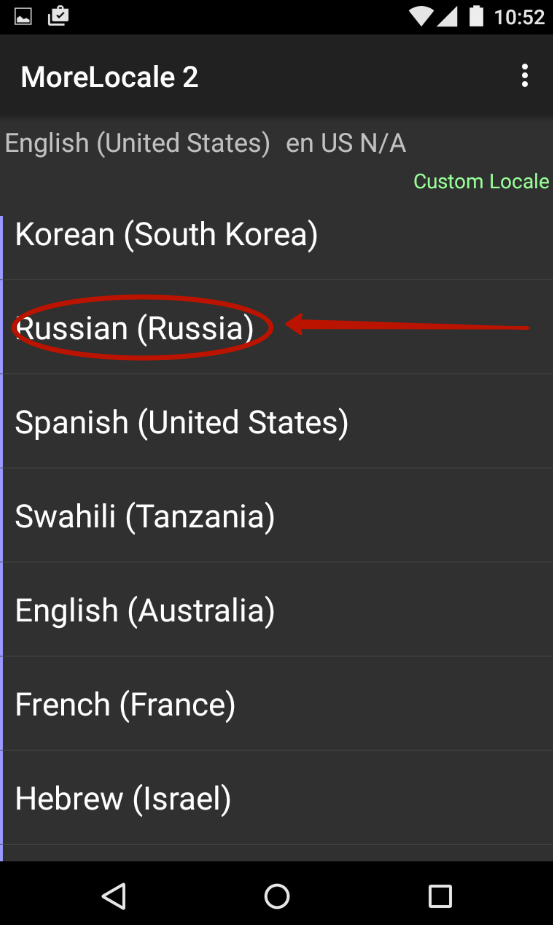
- Download from Google play crack "MoreLocale 2" https://play.google.com/store/apps/details?id=jp.co.c_lis.ccl.morelocale.
- A window will appear, in it click on "Custom Locale".
- In the next window, select "ISO".
- In the list that opens, select "Russian".
- In the field opposite "Country" select "Russian Federation"
- As confirmation, press "Set".
This is enough for the system to be completely Russified.
For new versions (4.2 and higher), this is not enough, a ban on editing the configuration has been added to it. Just installing a special crack will not be enough, you need to work with the console.
How to install Russian language on android using the "ADB" application? It can be downloaded from the Internet and installed on your computer. Then it will be possible to connect a smartphone or tablet to it and arrange their work.
For Russification of android versions 4.2 and higher, you need:
- Install the same crack "MoreLocale 2" on your Android device.
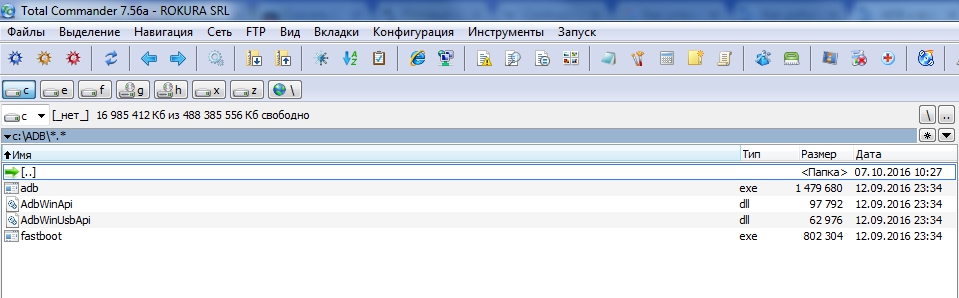
- Download the ADB program, put it on your home PC as follows: you need to connect your phone as an SD card, copy the ADB.rar archive to your computer, unpack and run adb_install.bat or an exe application that will install ADB on your computer (for Windows) . Then in the ADB Master select the ADB Location path, for example, C:\adb\adb_win_v1.0.26
- It should have . If not, you need to download and install.
- On an Android device, go to "Settings", "For Developers", "Debugging via USB". Tick.
- Connect the device to the computer. Enable command line and write:
- cd c:\adb - this command will open the folder with the "ADB" program
- adb devices - a command to search for connected devices. When the gadget is found, one line should appear below the inscription "List of devices attached". This android string devices.
- adb shell pm grant jp.co.c_lis.ccl.morelocale android.permission.CHANGE_CONFIGURATION - the command gives the MoreLocale2 cracker permission to edit the Android device configuration.
- Disconnect the device from the computer.
- Run "MoreLocale 2" and do the same thing you would do for more early version Android.
To use the Russian layout, you can download any Russian-language keyboard from Google Play and install it.
If you have smartphone samsung and the steps above did not help, then try the Locale app https://play.google.com/store/apps/details?id=com.whenair.language
The convenience of using a phone or tablet largely depends on the availability of Russian localization. The phone may have a different language, and then it is very difficult to use it. You can change the language using default settings, and if there is no Russian, try adding it using a special application.
The Russian language is preinstalled in most certified devices. Here you simply need to activate it. However, how to find the items you need if it is, for example, Chinese or Korean. Trying to translate the inscriptions in this case is useless. Fortunately, most modern gadgets have graphic hints for menu items that will help you find the settings you need.
Let's find out how to change the language on an Android phone or tablet. You need to follow these steps:

In most cases, these settings allow you to change the language to Russian.
In many Chinese phones, even in the language settings you will not find Russian. It is simply not there, and then changing the language will not work. Installing the Russian language on an Android phone is not a big problem. Add Russian will help MoreLocale 2.

This special application, capable of Russifying almost any device. You can download it at official store Google applications Play or on another site. You must first install the program on your phone. After that, follow these steps:

This application can add a language to virtually any device under Android up to version 4.2. Changing the language takes a few seconds, but on some devices Russification will be only partial.
We put the Russian language on Android version 4.2.X and higher
If you have a smartphone with a modern version of the OS, then you should use another application. Set Locale & Language will help you change, or to be more precise, completely add the required language to the firmware, even if it was not originally there. Despite such opportunities, users note the unstable operation of the application, so its actions do not give a full guarantee.
To change the language, you need to follow the steps below:

The main advantages of this software are that it is completely free and also has more than 200 languages in its database.
We put Russian using a computer
If none of these methods helped, try setting up using a computer and the ADB program. It serves as an addition to MoreLocale 2. If only with the help of MoreLocale 2 it was not possible to change the language, then this option is for you. You must first install the drivers for your tablet or phone, and then enable USB debugging mode.
To install Russian when ADB help, follow the instructions below.
Ordering a smartphone from abroad nowadays is very simple. Therefore, buyers often prefer cheap devices from China. However, when the smartphone arrives by mail, the owners are faced with a problem - their device does not have the Russian language. Installing "great and mighty" in your smartphone can be a daunting task for regular user. Therefore, we decided to make simple instruction how to get Android in Russian.
On most modern smartphones with more or less new versions Android Russian the language is already out of the box. It just needs to be activated. To do this, you need to follow simple steps.
How to set the Russian language in Android from the menu
- Open "Settings" or "Settings". Look for "Language & Input" or "Language & Input" (globe icon). In the menu that opens, select "Language" or "Language" (the first item).


An alternative way to Russify Android
This method relevant for smartphones running Android 4.2 Jelly Bean and newer. The method involves connecting the device to a computer and downloading a localization file to it.Instructions - how to get Russian on Android, if it is not originally available:
- Download the app. You may not even open it.
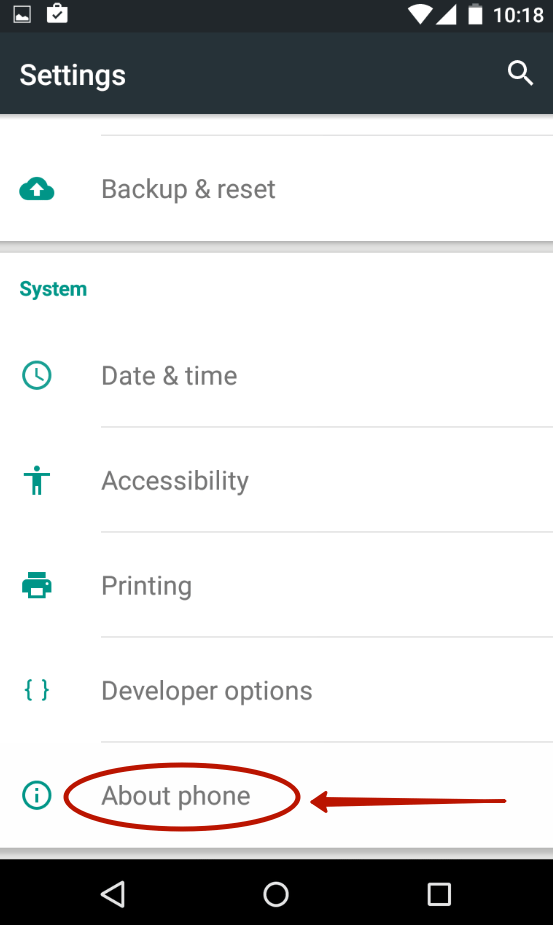
- Now you need to get developer rights in Android. To do this, go to "Settings" or "Settings" → "About phone" or "About" ( last paragraph).
- Here you need to find the item “Build Number” or “Build Number” (last or penultimate item). On this line with the build number, you need to click several times until an inscription appears that you are now a developer (“You are developer now”).


Now make sure your device's screen is not locked. Enter the command adb devices
If a code name appears and the inscription “devices” is opposite it, then everything is fine.
After that, another command: pm list packages more locale
And the final command: pm grant jp.co.c_lis.ccl.morelocale android.permission.CHANGE_CONFIGURATION
As a result, the console should display the following text:

It is also advisable to reboot after all these operations.
Instructions for old devices
If your device is running Android 4.1 Jelly Bean or older and it's still listed system languages there is no Russian, then you need to use a slightly different instruction:- We download the application.
- We launch it and on the first screen we press the “CustomLocale” button.


After that, the Russian language will appear in the main system menus of the system, but not everywhere. To achieve the full effect, a flashing of the device is required.
Keyboard with Russian language in Android
The last step in achieving Russian Android is installing a keyboard with the appropriate language. Several high-quality keyboards have been created for Android that support Russian input. One of the most popular and high quality is the Google Keyboard. It is her installation that we will consider.Instructions for installing Russian keyboard in Android:
- Downloading the application
The Android operating system has become very widespread. Its actual free of charge untied the hands of the Chinese. Even the smallest companies from this country have started producing smartphones. They often focus on low cost their creations. Of course, these manufacturers try to sell their goods not only in their native China, but also outside the country, using certain online stores for this. And sometimes the buyer is faced with one problem - the device he received has an interface made in English or Chinese. In this article we will show that Russification Chinese Android is nothing complicated.
It should be noted that by default, Google introduces support for several dozen languages into its operating system. There is also Russian among them. A smartphone manufacturer can get rid of certain languages - for example, in order to reduce the amount of memory that the operating system will occupy. But practice shows that recently large and not very companies have stopped touching language packs.
It is also impossible not to note the fact that at the first start, the smartphone should offer to select a language. This applies to almost all Android versions. If he does not offer you to do this, then someone has already launched the device before you. But this is not scary, since you can almost blindly install the Russian language on Android. To do this, do the following:
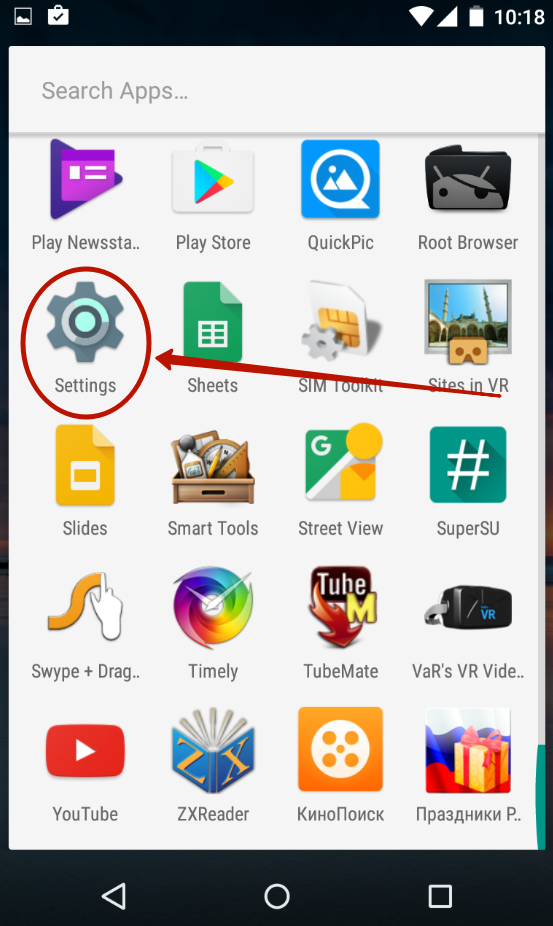
Step 1. Go to " Settings". If you instead in English- hieroglyphs, then focus on appearance an icon that should look like a gear. V latest versions OSes it can be found not only in the menu, but also in the notification panel, if it is fully extended.

Step 2 Proceed to the section " Language & Input". Usually next to its name is the simplest image of the globe.

Step 3. Click on " Language". It is at the very top.

Step 4. You will be offered a list of languages that are hardwired into the operating system. Choose from the options " Russian».
For more modern smartphones the procedure will be slightly different. As a rule, the desired parameter is hidden in the advanced settings, in other submenus, or simply does not have any identification marks. It is especially problematic in such a situation to change the system language not from English, but from Chinese (relevant if you ordered a smartphone from Aliexpress). If this is your case, then try the following steps:
Step 1. Go to settings (usually it's a gear icon) and type in the search bar "yuyan" or copy hieroglyphs «语言» .

Step 2. Now find the hieroglyphs in the list «语言» . Note that different submenus are displayed during the search. Therefore, select the line that also ends with hieroglyphs «语言» (or just switch between each line in turn). If you did everything correctly, the language selection menu will open. Here it remains to find the right one. In our case, this "Russian". After that, the system language will be changed.

If the smartphone is in English, then you can change the language in a similar way. Just type in the search instead of hieroglyphs language”, and then set the desired parameter.
That's all! However, as we said above, the list may not include the Russian language if the manufacturer decided to ignore it. Then you need special program for Russification.
Using the crack MoreLocale 2
Google Play does not have as many crackers as we would like. One of them is More Locale 2. The application is free and compatible with a huge number of devices. In fact, it contains all those language packs that are available in the operating Android system by default, before the influence of the Chinese manufacturer on it.
To get started, you need to install this program. After that, do the following:
Step 1. Activate section. In our recent article, we already wrote about how to do this. In the case of the English version of the operating system, you first need to proceed to " Settings».
Step 3. Here, tap about 7-10 times on the item " Build Number". This will activate the permissions for developers, which will be notified by a pop-up notification “ You are now a developer».

Step 4. Press the " Back". Proceed to the newly appeared section " developer options».

Step 5 Here you need to activate the checkbox next to the item " USB Debugging”, thereby enabling USB debugging mode.

Step 6 Now you need an archive with an ADB executable file. Download and extract it to the root of the C drive of your computer.
Please note that the versions for Windows XP and subsequent versions of this operating system are different!
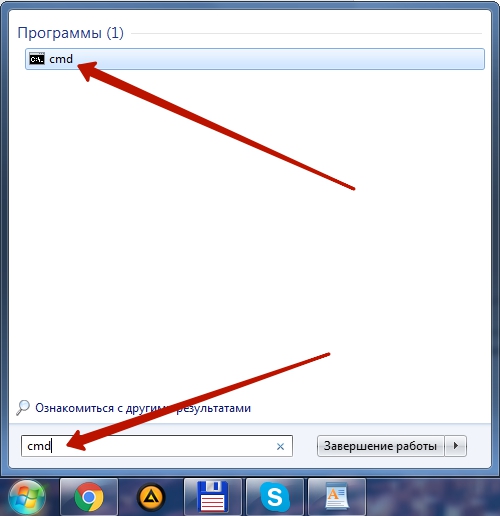
Step 7. Connect your device to your computer using a USB cable. Next, launch a command prompt. To do this, open the menu Start” and enter in the search field “ adb” (without quotes) by clicking the left mouse button on the displayed result.
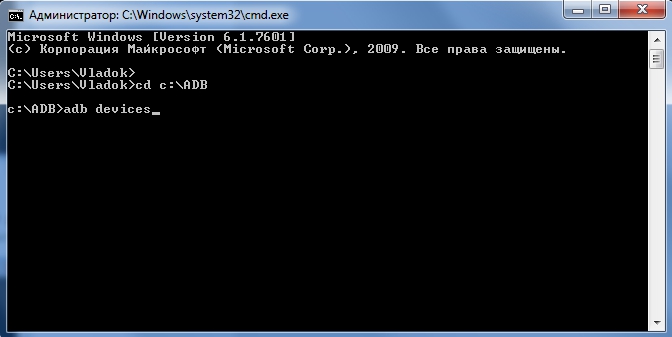
Step 8 Enter the following on the command line: cd c:ADB. Click on Enter.
Step 9. Enter the command " adb devices”, then press Enter. So you will see the code name of the device connected to the computer. If the system cannot detect the smartphone, then something has gone wrong - it is quite possible that you are using a low-quality cable.
Step 10. Enter the following commands in order:
- pm list packages more locale
- pm grant jp.c.c_lis.ccl.morelocale android.permission.CHANGE_CONFIGURATION
Note: command line does not support the copy function. In this regard, you will have to enter all the text manually.
Step 11 Disconnect your smartphone from the computer and open the program More Locale 2.

Step 12. Find in the list of languages " Russian". Click on this item.
The system will automatically be localized. This completes your steps!
Russification of the keyboard
Interestingly, after changing the system language, absolutely nothing will change in virtual keyboard. If English and Chinese, then they will remain after the localization of Android. Fortunately, setting the Russian language for the keyboard is much easier than for the system itself. Especially after Google made its keyboard a separate application, allowing it to be downloaded from the online store.
Step 1. Download the program Google Keyboard .

Step 2 Now follow to Settings» and visit the item « Language and input».

Step 3. Here click on " Google Keyboard».

Step 4. Click on " Languages».

Step 5 Check the languages you need. Or activate the item " System language", if Android is already Russified.

That's all, this Russification of the keyboard is completed! Of course, in the same way, you can turn on the Russian language on any other virtual keyboard, if it supports it (some of them only have a Latin layout).
By typing on android smartphone e or tablet, Russian-speaking users inevitably face the need to switch the input language from Russian to English and vice versa. And residents of countries such as Ukraine or Belarus, as a rule, use three input languages at once. So android users devices often encounter the fact that their virtual keyboard does not have the languages \u200b\u200bthat they need for typing. Now we will tell you what to do in such cases and how to add an input language to an Android smartphone or tablet.
In order to add an input language on Android, you need to enter the Device Settings. To do this, open the menu with a list of all programs and find the "Settings" program, in addition, the settings window can be opened using the top curtain or desktop icon.
In the "Settings" menu, you need to go to the "Language and input" tab. This section is located in the "Personal data" section and is marked with an icon with a large letter "A".
In the "Language and input" tab, you will see a list of keyboards and input methods. Here you need to click on the "settings" icon next to the keyboard you are using (the keyboard you are using will be marked with a checkmark). After clicking on the "Settings" button, the "Keyboard Settings" window will open in front of you.

Here you need to open the "Input Languages" section, which is located at the very top of the window. After that, the "Input Languages" window will open in front of you.

Here you need to check the box next to the language you need, so we will add the input language to Android device. After the checkbox is set, the settings window can be closed.
After you have added a new input language to your Android device, you may need to change the input language. In order to change the default input language, return to the "Settings - Language and input" window and open the "Default" section.

After that, a window will open in front of you, in which you can select a standard input language.

Check the box next to the input language you want to use as the default.