Instructions for using android 5.1 1. Instructions for Android (Android) - description of the user interface
Suppose you are lucky and Santa Claus put a newfangled gadget under the Christmas tree. Smartphones, e-book readers and tablets have been very popular lately. To unleash the potential of such a gift, the Vestey.Hi-Tech guide will help novice owners of "smart" devices.
What's this? Android is a program with which you control your device. Its history began in 2005, when Google bought the developer company of the same name and began to develop the platform. In September 2008, the first stable version was released. android version- 1.0 (codenamed Apple Pie). Over the next four years, 14 "editions" of the OS came out. The release of the latest version to date - 4.1 / 4.2 (Jelly Bean) - took place in June 2012.
Android, backed by the world's largest search engine, has quickly become the world's most popular mobile OS. Its success was greatly facilitated by the openness source code and Google's policy that allows manufacturers to install Android on their products for free. "Robot" is preferred by such large companies as HTC, Samsung, Sony and Motorola.
- If you urgently need to top up your phone or Internet balance, pay utility bills, buy a ticket or just transfer money. Dozens of applications from major payment systems and banks are at your service. V Google Play, for example, there is Yandex.Money, Webmoney, QIWI, Alfa-Bank, Russian Standard, TCS Bank or Home Credit Bank.
- Help you navigate the terrain or build a route for a car trip
Yesterday, Google announced the release of a new update for Android 5, which they dubbed Android 5.1 Lollipop. Android 5.1 Lollipop becomes the next update after , the update promises some key features straight from Google, for Nexus smartphones and tablets. With that in mind, here's what you need to know about Android 5.1 Lollipop.
In November, Google finally began rolling out its big update to Nexus smartphones and tablets. The update brought improvements, bug fixes and new features for owners of devices such as and others. Along with the new OS came new problems that led to complaints from Nexus users.
Slowly but surely, Google has fixed some of the first android problems 5.0 Lollipop. First of all, the developer launched the update, followed by the Android 5.0.2 Lollipop update. Both updates remain the most current versions Android on Nexus tablets and smartphones, but it looks like a new update is on the way.
It looks like the new Android 5.0 is going to be a major overhaul, it's no longer just a fix update, hence the growing interest among users of Nexus and other Android devices.
Android 5.1 Lollipop hit the scene yesterday and wowed everyone with a flurry of information. Android 5.1 Lollipop has been officially confirmed and brings at least one new feature. The manufacturer reported that a new version The OS is about to launch on the first Nexus. There are also a few gaps in the Nexus model line left untouched. We are not sure when the developer will roll out the updates, so now users will have to be patient.
Today we want to review everything we know so far about the new Android 5.1 Lollipop. This guide includes all the latest data and will help you prepare for the next Google update.
Confirmation
The first thing you should know is that this is not some stupid joke or prank. Android 5.1 Lollipop is a very real update. The way Google chose to announce the release of the new update was, of course, extremely unusual, but it is clear that the update remains very real and will be released on at least one of the Nexus'ov in the very near future.
Android 5.1 Lollipop was confirmed yesterday via Google's Indonesian site. Oddly enough, the site didn't call the update "Android 5.1," but it's clear that an update is on the way. How did we know about it? Android Police managed to get hold of a snapshot of Android One, a device running Android control 5.1. Obviously, Android One will be the device that will be introduced with the new software.
Limited release
Yes, Android 5.1 Lollipop is currently only limited to Android One, a device from Indonesia, after which it is likely that the update will be released for the latest Nexus devices running. It is by no means certain that new android 5.1 will be updated for Indonesia or another region where Android One is sold.
Indonesian site Google has removed all references and specifications of Android 5.1 for these Android Ones, now the description of the smartphone reads: " Android Lollipop(and future updates as soon as it's released)." Of course, everything indicates that the Android 5.1 Lollipop update is already imminent, at least for Android One in Indonesia.
UpdateAndroid 5.1Lollipop forNexus
Finally, we got to an interesting place. Android Police claims they were able to find several links in the code of the site that hint at the upcoming release of the update for Nexus series devices, tablets and smartphones. And although the links can certainly be information stuffing from the manufacturer, this is probably not an accident. Oddly enough, they are all marked Android 5.1.
- Android 5.1; Nexus 5 - Build LMY29C
- Android 5.1; Nexus 6 - Build LMY29C
- Android 5.1; Nexus 6 - Build LMY29D
- Android 5.1; Nexus 9 - Build LMY22E
- Android 5.1; Nexus 6 - Build LMY22E
If Google is allowed to disclose the Android 5.1 update and it can resolve the bugs, we doubt the manufacturer will limit it to three devices. Unfortunately, with two patches left with system-wide bugs that need to be fixed, we sincerely doubt that Google will leave things as they are with, for example, the Google Nexus 7 (2013).

Unfortunately, it is too early to say when Android 5.1 Lollipop will be released, although we are certainly close to it. If Android One gets Android 5.1 Lollipop with release, the Nexus series devices won't be too far behind.
If and when Google decides to roll out Android 5.1 Lollipop to its Nexus, the update will come factory-open-source Android from Google. And when the factory update files arrive, OTA won't be long in coming. Follow.
Peculiarities
Most of the features of Android 5.1 remain hidden, although we have already heard about the new solution. This is the ability to toggle Wi-Fi and Bluetooth connections from the quick settings menu.
This solution may not sound like much, but this addition to the Lollipop changelog will allow Android users to quickly change settings without leaving the app. In other words, you won't have to switch between active screens. This is much more convenient, especially for Android users who are constantly switching between smartphone or tablet connections.
So far, this is the only confirmed change to Android 5.1 Lollipop, which suggests that Android 5.0's bug fixes remain the main focus of the update.
ChangelogAndroid 5.1Lollipop (rumored)
There is also a changelog based on rumors. This data comes from AndroidPIT and came back a few weeks ago, detailing a number of fixes that are expected to follow with the new update. Here full list changes. It is not yet clear if all of them are waiting for us on board the final version of Android 5.1:
- Silent mode returns, which disappeared with Android 5.0
- General improvement in system stability
- Improved RAM management
- Fixed sudden application crash
- Battery consumption improvement
- Fixed overload of network devices when using Wi-Fi
- Fixed wireless connection issues
- Resolved issues with Google Now features
- Fixed issues with notifications
- Fixed issues with detecting audio devices
- Other improvements and changes
What else you need to know, Nexus users have been complaining about apps crashing after updating to Android 5.0 Lollipop. Google is monitoring the issues and believes the crash is caused by a memory leak in the operating system. The bug seems to be preventing the operating system from cleaning up memory as intended.

Unfortunately, the consequences of these issues are app bugs on Android 5.0, Android 5.0.1, and Android 5.0.2 Lollipop. Most often, Nexus 5 and Nexus 7 users complained about these problems, although we personally did not encounter this problem in the operation of these devices. On the other hand, we had a chance to get acquainted with the problem personally on the Nexus 6. And finally, the most interesting part.
Google said a fix will come in the future Android updates, although the company does not name a specific update. Perhaps it will be Android 5.1 Lollipop. We hope.
transcript
1 Android 5.1, Lollipop Manual Android user Lollipop 0
2 Setting up your device When you turn on your phone for the first time, a welcome screen will appear. Choose your preferred interface language and click the arrow to continue. When prompted on the screen, connect to your Google account or create one if you don't already have one. Signing up with Google gives you immediate access to all the services associated with your Google account, such as Gmail email. You can optionally skip this step and create a Google account later. When the device setup is complete, the main screen will open. Here you can add app icons and widgets (for a quick view of the most important information of selected apps) so that you always have easy access to the data you need. To switch between the main screens, swipe left or right. To view notifications, swipe down from the top of the screen. To access frequently used settings in the Quick Settings menu, swipe down from the top of the screen twice with one finger or once with two fingers. To open the Settings menu, swipe down from the top of the screen once with two fingers or twice with one finger, and then tap the icon in the upper right corner. Touch the Google logo on the home screen or say Ok Google to search for information or instruct Google accordingly. Sending SMS (text messages) 1. Tap the Messenger icon on the Home screen. 2. Click the icon to create a new message. 3. At the top of the screen, enter a phone number or select a contact, and then press 4. Enter your message and press. To change the default SMS application, go to Settings > Wireless & networks ( Wireless connection and networks) > More > Default SMS app. Making phone calls Android Lollipop 1
3 1. Tap the icon on the home screen or all apps screen. 2. To find the number you want to call, scroll through your contact list or use the search. If the on-screen keyboard is obstructing, press the Back key to minimize it. 3. Tap the contact's name to start a call. To view the recent call log, select the Recents tab. Touch the keyboard if you want to use it. Making video calls The Hangouts app allows you to make and receive video calls. To open it, tap the Hangouts icon on the Home screen or All Apps screen. Start a video call: 1. Tap Add at the top of the Hangouts app home screen and start entering your name, address Email or phone number of the contact. As you type, the screen will display matching names and phone numbers from your contact list. 2. Select a contact name and click the Video icon at the top of the screen. To configure notifications and other settings, tap the (Settings) menu. > Settings Sending Email Messages Use the Gmail app to read and send messages via Gmail email or another email service. 1. Tap the Gmail icon on the home screen or all apps screen. 2. If you have already signed in to your Gmail account during the phone setup process, your device will be synced with your email. Otherwise, enter your email address. Status bar The status bar is located at the very top of the screen. On the right, icons for connecting to a Wi-Fi network, mobile signal strength, Android Lollipop 2 battery level are displayed
4 batteries and time. On the left, you can see notifications sent by apps. Quick settings Use the Quick Settings menu to quickly access the settings you use most often, such as putting your phone in airplane mode. To open quick settings, swipe down from the top of the screen once with two fingers or twice with one finger. To change a setting, simply touch the appropriate icon: Wi-Fi Network: Connects or disconnects from a Wi-Fi network. To open the Wi-Fi settings settings, tap the network name. Bluetooth Settings: Enables or disables the Bluetooth function. To open the Bluetooth settings settings, click on the word Bluetooth. Data cellular communication: Allows you to view usage settings and turn cellular data on or off. Airplane Mode: Enables or disables Airplane Mode. In this mode, your phone is not connected to Wi-Fi or cellular networks, even if they are available. Flashlight: Turns the flashlight on or off. Brightness: Move the slider to decrease or increase the brightness of the screen. Auto-Rotate: Fixes the device's screen orientation to portrait or landscape. Android Lollipop 3
5 Open the main Settings application by tapping the icon in the upper right corner. c You can also enable or disable the auto-rotate screen feature through the Quick Settings menu to lock or unlock the device's screen auto-rotation based on its position. Managing battery life On the status bar, the battery icon shows how much battery power is left, but you can also see the exact percentage and estimated battery life left by swiping down from the top of the screen and tapping the Battery icon. Your Android phone's battery is designed to last all day. When your battery is low, Android's power saver reserves battery life so you can still make calls and send SMS messages from your phone. To turn it on, go to Settings > Battery > Battery saver. Accessing your favorite apps At the bottom of the Home screen is the Favorites bar: another fast way open your favorite apps. Android Lollipop 4
6 Just touch the application icon to launch it. To place an application on the Favorites panel or remove it from there and move it to any other place, press and, without releasing, drag the icon to the desired point on the screen. Navigation buttons At the bottom of the screen of most smartphones and tablets, regardless of the application used, there is always a navigation bar with three buttons. Back Opens the previous screen you were on, even if you were using another application. It is not possible to go back from the main screen. Home Opens the home screen. To open the Google Now app, swipe up. Overview Opens a sequence of thumbnails of recent applications you have used. To open one of them, touch it with your finger. To remove a screen from the list, slide it left or right, or press X. Customizing the home screen To change the screen wallpaper, add a widget, change search settings, or rearrange screens, press and hold an arbitrary point background image on the main screen. You can add any number of home screens that will be on the right. To create a new screen, swipe all the way to the right and drag an app or widget icon to the right edge of the screen. The screen to the left of the home screen is reserved for the Google Now app and is only available when that service is active. Android Lollipop 5
7 To create a folder, quickly drag one icon onto another. To set or change the name of a folder, open the folder and tap its name. Changing the screen wallpaper: 1. Tap and hold on an arbitrary point on the background image, then tap on the Wallpapers icon. 2. Select a wallpaper by swiping from right to left, or set an image from your photo collection, downloads, or Google Drive. Adding an Application Icon to the Home Screen: 1. Switch to the Home screen page where you want to place the application icon. 2. Click the All Apps icon. 3. Find desired application, scrolling from right to left if necessary. 4. Tap and hold an app icon until the home screen opens. Drag the icon to the desired location and release your finger. Adding a Widget: 1. Tap and hold on an arbitrary point on the background image, then tap on Widgets. 2. Swipe right to select a widget that provides a quick view or access to information on the home screen, such as a larger clock or the Google Play library. To move an app icon or widget: 1. Tap and hold the icon. 2. Move it to a new position. To switch to another home screen, slide your finger to the edge of the current one. To move another icon along the path, slowly move your finger over it. 3. Remove your finger. Tapping and typing To select or activate a screen element, tap its icon. To enter text, such as a name and password, or search for a word, simply touch the point on the screen where you want to type it. A keyboard will appear with which you can type text. The following gestures are also most commonly used: Android Lollipop 6
8 Press and hold. To select an item, press and hold it until an action occurs. This way you can open letters with diacritics and other special characters on your keyboard. Move your finger to the desired letter with the diacritic. Tap, hold and drag. Touch and hold an item, and then, without lifting your finger, move it to the desired location on the screen. This way you can move app icons around the entire home screen. Scrolling or scrolling. Swipe quickly across the entire screen without stopping (otherwise you will accidentally move some object). Scroll left or right on the current home screen to view other home screens. double tap. Quickly double-tap a map or image to zoom in or out. Scale change. In some applications (such as Maps, Google browser Chrome or Photos), you can zoom in or out by pinching or spreading two fingers. Screen rotation. Most screens change orientation when you rotate your device. To lock the screen in a vertical position, swipe down with two fingers from the top of the screen and tap the Portrait/Auto-Rotate icon in the Quick Settings menu. Android OS versions and updates To check the version or download updates for the Android operating system, go to Settings (Settings) > System (System) > About phone (About phone). Click System updates to check for the latest operating system updates. Under the Android version heading, you can see the current operating system version number. Display Follow the steps below to change the display settings. Open the menu Settings (Settings) > Device (Device) > Display (Screen). Brightness level: Drag the slider to adjust the brightness of your device's display. Adaptive brightness: turn on this function to have the device automatically optimize the brightness level according to the ambient light level. By default, the adaptive brightness function is enabled, but you can change the screen brightness yourself if necessary. Android Lollipop 7
9 Sleep: Set the interval after which the display backlight turns off when the phone is not in use. Daydream: Select a screen saver from photos, backgrounds, or other images to display on the screen while charging or when your phone is docked. Sounds and Notifications You can change the sound and notification settings on your device via Settings > Device > Prompt & notification. Notifications let you know when you receive new messages, calendar events, and current processes such as downloads. In addition, they include alarm calls. Interruptions (Alerts). Enables or disables the call or message notification feature. If the message alert is active, tap Calls/messages from to select the contacts you want to receive notifications from (Anyone, Starred contacts, or Contacts Only). From the Downtime menu, select the days and times you want to receive audio notifications. When device is locked (In screen lock mode). Here you can set the types of notifications that will appear on the phone screen in lock mode, as well as the visibility of private information in the notification. Private information includes, for example, the title of the song being downloaded, the name of the sender of the e-mail message, or the details of a calendar event. App Notifications. You can change settings on a per-application basis, such as Gmail email. The When device is locked setting will always take precedence over individual application settings. Notification access (Access for applications). Select apps that can send you notifications. When you receive a notification, an icon appears at the very top of your phone screen. Icons for pending notifications are located on the left, while system information such as power wifi signal or cellular signal and battery level are displayed on the right. Android Lollipop 8
10 Some types of alerts, such as an incoming email or calendar event, can be expanded to provide additional information. Whenever possible, the top notification is always expanded. To expand a notification, place one finger on it and swipe down slowly. Click the notification icon on the left to open the associated app. Certain types of alerts also allow you to perform some actions by clicking the icons contained in that notification. For example, when a calendar event occurs, you can postpone it (remind about the event later) or send an email message to its participants. After reviewing the notification, remove it with your finger from the screen. To hide all notifications, click the notification icon. Dismiss at the very bottom of the list Managing accounts on your phone Adding an account 1. Go to Settings > Personal > Accounts. Click Add account. 2. Select the type of account you want to create: Google, Personal (IMAP) (Personal (IMAP)) or Personal (POP3) (Personal (POP3)). If you are in doubt about choosing between IMAP and POP3, try IMAP first, as many mail services use the IMAP protocol. i. Select Google to add Google account. When you connect to a Google service, all email addresses, contact names, calendar events, and other data associated with that account are automatically synced to your device. ii. Follow the on-screen instructions to add an account. Change account settings Android Lollipop 9
11 1. Go to Settings > Personal > Accounts. 2. Select an account. If you're using a Google account, tap Google followed by your account name. Removing an Account To remove an account from your device, follow these steps: 1. Check if you have used Account you want to delete to set up your phone. If not, go to step 2 and follow the instructions. If yes, you need to factory reset your phone. This will delete all data from the device and you will need to set up your phone again using your Google account. 2. Open the Settings menu. 3. In the Accounts section, select the account you want to delete. If you're using a Google account, tap Google followed by your account name. When signing out of a Google account automatic synchronization all email addresses, contact names, calendar events, and other data associated with that account is terminated. 4. Click on the menu icon in the upper right corner of the screen. 5. Click Remove account. Security 1. Go to Settings > Personal > Security > Screen lock. 2. Choose the type of lock that suits you. Even when the screen is locked, you can perform certain actions with your phone: Quick settings: Swipe down from the top of the screen to open the settings menu without entering a password. Camera: Swipe the screen from right to left to turn on the camera. Dialer: Swipe the screen from left to right to open the dialer (password required first). Emergency Calls: Swipe your finger across the screen from left to right to call an emergency number without entering a password. Seal Operating system Android 5.0 allows you to view and print the contents of some apps over the Wi-Fi network your device is connected to. Android Lollipop 10
13 The Google Play service distributes products over the Internet by streaming data, so they are not always stored on the device. While you can download content to the Google Play apps for offline access, it never appears in downloads. Screenshots 1. Make sure the desired image is displayed on the screen. 2. Press the power and mute buttons at the same time. The screenshot is automatically saved in the Photos app. Using the keyboard If you want to change the keyboard language, go to Settings > Personal > Language & input. Entering and editing text Use the on-screen keyboard to type text. Basic editing functions Highlighting text Press and hold or double-tap anywhere in the text. The nearest word will be highlighted in a contrasting color, and marks will appear around the edges of the selection. Move these handles to change the selection range. Deleting text Press the text key to erase the characters before the cursor or the selected part Entering capital letters Android Lollipop 12
14 To enter a single capital letter, press the shift key once. You can also first press a key and, while holding it down, press a letter at the same time. When you release the key, the case will change back to lower case. Caps Lock Press or press and hold the key twice to switch to upper case mode. Press again to return to lowercase writing. Converting letter case If you want to quickly change all the letters in a previously written word to uppercase, highlight the word and press a key. Then you can convert the word written in capital letters back. Entering a character or letter To enter a single character, press the key once. You can also press and hold the character input key while entering text, or touch it and, without releasing it, press another character. When you release the key, the phone will return to letter entry mode. Insert special characters and letters Press and hold a character or letter to open a list of letters with accents or special characters. Cutting, copying, and pasting text Select the text you want to cut or copy. Press the Cut or Copy key. To paste text, tap on the screen where you want to paste it, and then tap Paste. To replace part of the text with the copied text, select the text and press the (Paste) key. Paste Sending emojis With Google Keyboard, you can select from a variety of thumbnail color images called emojis to express your mood or emotions in a message. Android Lollipop 13
15 Word suggestion 1. Touch the location on the screen where you want to insert text. 2. Start typing the word. When the word you are looking for appears in the list above the keyboard, tap it. 3. Continue scrolling through the list of clues until the correct word appears on the screen. If it doesn't, print it in full. Android OS will continue to list matching words as letters are typed. To change your keyboard settings and text input method, go to Settings > Personal > Language & input. You can enable or disable word suggestion in Settings > Personal > Language & input > Keyboard & Input methods > Google Keyboard > Text correction ( Text correction) > Next-word suggestions (Suggest words). Continuous word entry This feature allows you to enter a word by sliding your finger over the letters without leaving the screen: 1. Touch the place on the screen where you want to insert text to open the keyboard. 2. Slowly slide your finger over the letters that make up the search word. 3. Release your finger when the desired word appears in the floating window or in the center of the suggestion bar. To select a different word from the suggested ones, touch it. If you don't find the right word, type it in manually. You can change the word entered using gestures by touching it to see other suggestions. If the word contains consecutive letters, such as the e in sleep, hold your finger slightly over the e before moving on to the next letter. Android Lollipop 14
16 Enter words continuously without using a space When you enter text continuously, you don't need to press the spacebar, just keep dragging your finger over the letters you want, and then lift your finger to start a new word. You can change the settings for continuous input of words in the menu Settings (Settings)\u003e Language & input (Language and input)\u003e Keyboard & Input methods (Keyboard and input methods)\u003e Google Keyboard (Google Keyboard)\u003e Gesture Typing (Continuous input). Built-in Dictionaries To manage the dictionaries associated with your keyboard input languages, go to Settings > Personal > Language & input. Custom Dictionaries You can add words to your own dictionary to save them on your device. To add a word or phrase, including keyboard shortcuts, switch to Settings > Personal > Language & input > Google Keyboard > Text Correction > Personal dictionary, then go to the dictionary of your language, click Add, and type in the word. When using the word suggestion feature, your word or phrase will be included in a list of suggestions. Additional Dictionaries 1. Go to Settings > Personal > Language & input > Google Keyboard > Text correction > Add-on dictionaries. 2. A list of additional dictionaries of other languages that can be downloaded to your device will open. 3. Touch the name of the desired dictionary and click Install. Entering words by voice In most cases, instead of typing text using the on-screen keyboard, you can use the voice input feature. 1. Touch the text input field or the place in the already typed text where you want to add a word. Android Lollipop 15
17 2. Click the microphone icon on the on-screen keyboard. 3. Say the desired word when the microphone image appears on the screen. Some languages (English, French, Italian, German, Spanish and Russian) also support voice input of punctuation marks such as comma, period, question mark, exclamation mark. Change settings voice input You can go to Settings > Personal > Language & input. Working with Applications All Applications This screen displays icons for all installed applications, both built-in and downloaded from the Google Play service. You can move these icons to any of the main screens. The All Apps screen lets you do the following: Move between home screens: Swipe left or right with your finger. Open apps: Click on the icon for the respective app. Move app icons to the home screen: Touch an app icon and, without lifting your finger, drag it to the desired location on the screen. View widgets: Press the Widgets key at the top of the All Apps screen. Install more apps: Click the Google Play icon in the app list. To remove an app icon from the Home screen without removing the app from your device, touch and hold the app icon, drag it up the screen, and then release your finger over the Remove key. To view information about an app on the home screen, touch the app icon, and without lifting your finger, drag it to the top of the screen, and then release your finger over the App Info key. Email Gmail Android Lollipop 16
18 Use the Gmail app to read and send email from any mobile device. To open it, tap the icon on the home screen or on the all apps screen. Gmail to a Gmail account can be used when connected to all Google applications and services, including the following: Google Now search service Calendar Contacts Google Drive for working with documents Reading messages: Use the buttons at the top of the screen to archive the email, delete or mark it as read. Click the icon to mark the message as unread. The menu allows you to move to another folder, check boxes, mute, print, and perform other actions on email messages. Swipe right or left to open the previous or next message chat. Manage message chats: In your inbox, press and hold a chat to highlight related messages. Use the buttons and menus at the top of the screen to manage your highlighted messages. To change your mail settings, add an account, or access help, click the appropriate menu icon or button. You can always return to your inbox from anywhere in Gmail by clicking the Back button at the top of the screen. In your inbox, tap the menu to open a list of available accounts, add a tag, or more. Connecting the accounts of others mail services to Gmail: 1. Go to Settings > Personal > Accounts > Add account. 2. Select the type of account you want to create, such as Google, Personal, or Work. 3. Select Google to add a Google account. When connected to a Google service, all email addresses, contact names, calendar events and Android Lollipop 17
19 other data associated with this account is automatically synced to your device. 4. Follow the on-screen instructions to add an account. To change the settings for added accounts, do the following: 1. Open the Settings menu on your phone. 2. In the Personal section, click Accounts and select the desired account. If you're using a Google account, tap Google first and then your account name. Google Play 1. Open the Google Play app. 2. Click on the menu icon in the top left corner. Here you can open your account or switch to another account, view the list of purchased applications or wish list, etc. To set your preferred settings, clear your search history, and enable user controls, go to Menu > Settings. For example, if you want to filter apps by age or enable PIN entry for purchases, click Content filtering or Require authentication for purchases. Start searching for content by opening any Google Play app from the All Apps screen and tapping the menu icon. Camera There are several ways to open the camera: on the lock screen, swipe from right to left on the home screen, tap the Camera icon When you open the camera for the first time, your device will prompt you to remember your location when taking pictures. This feature will allow, for example, to show your location on Google service Cards. Android Lollipop 18
21 You can open the photo folder in two ways: from the Camera app, swipe from right to left on the screen; On the All Apps screen, tap the Photos icon. If you use a Google account on your phone, the Photos app lets you automatically back up your photos and videos, organize them, and share them with friends. In addition, you can view, search, crop, edit, and tag photos, and create albums and videos. By clicking on the menu icon, you can do the following: switch to and from a Google+ account; organize and edit photos and videos; create and view photo albums; automatically create Auto Awesome animations, panorama shots or merge group shots; View photos you've been tagged in. Contacts When you turn on your phone for the first time and sign in to your Google account, all contacts from that account are synced to the Contacts app. After that, in case of any changes, the contact information will be automatically updated on all your devices or in the Internet browser. You can also sync contact information with Microsoft service Exchange. All information in the Contacts app is also available in Gmail, Google Talk, and other services. You can add contacts from various sources, and they will be automatically synchronized everywhere. The Contacts app allows you to do the following: View a list of all or favorite contacts: Select this option at the top of the screen. Add contacts: Click the add button. View Details: Tap the name of a contact or group to view detailed information about them. Share contact information or move a frequently used contact to the home screen: tap the menu icon. Edit contact information: Tap the edit icon at the top of the screen to edit contact details. Android Lollipop 20
22 Change app settings: Tap menu to import or export contact information, change display settings, add or edit accounts. Messages To read and reply to incoming messages: 1. When there is an incoming message, the device will be alerted and a new received message icon will appear on the notification bar. 2. To read the message, tap the received message icon in the notification bar. 3. To reply to a message, touch the Send message field and enter your message text. 4. Click the Send button to send the message. Creating and sending text messages: 1. Go to the All Apps screen and tap the Messenger icon. 2. On the main screen of the Messenger app, press the button. 3. Enter a name from your contact list or a mobile phone number in the To field. For sending text message group of recipients, click the icon in the To field and select additional contacts or enter additional phone numbers. Below the To field, you can select a recipient from the list of frequently used contacts by clicking Frequents (Frequent) or from the list of all contacts by clicking All contacts (All contacts). When sending a group message, make sure that the group message feature is enabled in the app settings. As you enter a name or phone number contact in the To field, the phone will display a list of matching contacts, if there are any on your phone. If a suitable recipient is found, tap their name, or continue entering their phone number. 4. To write a message, touch the Send field and enter your message using the Google keyboard and, if desired, insert emoticons. 5. If you press the Back button while composing a message, it will be saved as a draft. To continue writing a message, tap the desired chat. 6. Click Send to send the message. Android Lollipop 21
23 From the main screen of the Messenger app (Messages), you can manage separate messages, message chats, notifications and contacts, as well as change the settings for sound and screen alerts and other settings. Deleting messages 1. Open a chat in the Messenger app (Messages). 2. Touch and hold the message you want to delete. 3. When the Message options menu opens, click Delete. Deleting a chat Touch and hold a chat in the list to highlight it. To delete a chat, click on the trash icon in the upper right corner of the screen. Archive: Click to archive a chat. Delete: Click to delete a chat from your phone. Enable or disable notifications: Click the notifications icon to enable or disable the notification of new events for this chat. Add contact: Tap to add a contact from the chat to your contact list. Hangouts The Hangouts app lets you make video calls with any of your Google account contacts, and share photos with your friends and tell them where you are. Calendar Any changes to calendar events are automatically displayed on all synchronized devices. To change the calendar view, click the menu icon and select Schedule, Day, or Week at the top of the screen. Android Lollipop 22
24 The Calendar application allows you to do the following: Read or edit the details of an event: Click on an event to view detailed information about him. Manage events and calendar settings: Tap the corresponding icon at the top of the screen or in the menu to search for or create an event, return to the current day, or change application settings. You can send an email message to any contact participating in the event in one of the following ways: Open the event in the Calendar app and tap guests (Notify guests by email). You can choose one of the ready-made quick answers or write your own text. When your device notifies you of an event just before it starts, swipe down on the notification icon, then expand it if necessary and tap guests (Notify guests by email). Special abilities To make it easier for people with disabilities to use your phone, go to Settings > System > Accessibility. Subtitles: You can enable support for text prompts on your device by setting the language, text size, and text style. Some apps require you to turn on subtitles directly in the app's settings. Talkback is a Google screen reader that comes with your Android device. It allows you to speak for events such as receiving notifications or the results of your actions on your phone, such as opening an app. When the Talkback function is activated, to select an item on the screen, you must double-tap it. Talkback settings allow you to control the volume of audio prompts, feedback and touch navigation options. Copyright reserved. GIGABYTE COMMUNICATIONS Ltd Android Lollipop 23
26 Copyright GIGA-BYTE COMMUNICATIONS INC. is the owner of all GIGA-BYTE COMMUNICATIONS INC. mobile products mentioned in this document, including the device itself, accessories, software, text, music and images, or has permission to use them from the original manufacturers. You may not reproduce, transmit, distribute or store the content this manual in whole or in part by any means without the prior written permission of GIGA-BYTE COMMUNICATIONS INC. Classic 1 GIGA-BYTE COMMUNICATIONS INC.
27 general information This section contains important information about the safe and correct use phone. Please read the following information before using your device. Ignoring the recommendations listed below can be dangerous or illegal. Fully charge the battery before using the device for the first time. Do not remove the battery from the device while charging. Make sure your device is turned off before inserting a SIM card. Leaving the battery for a long time at a low level of charge can lead to complete discharge or even shorten its life. To ensure normal battery life, it is recommended to charge the battery as soon as the low battery indicator appears on the device. To prevent the battery from draining completely, fully charge it if you do not plan to use your phone for a long time. Do not attempt to disassemble the device yourself. This work may only be carried out by qualified personnel. When in public places, follow the rules for using the device. In some countries, recording telephone conversations is illegal. Before Recording telephone conversation always ask permission from a third party. To protect your hearing, turn down the volume before connecting stereo headphones or other audio headset to the device. To avoid damage to the touch screen or the entire device, do not press it too hard with your fingers or leave your phone in your pants pocket when you sit down. It is also recommended to operate the touch screen only with the stylus or fingers. The warranty does not cover damage to the touch screen resulting from misuse. The device may become warm when used for a long time, such as when talking for a long time, using the Internet, or while charging the battery. As a rule, this is normal. In the following cases, contact your phone supplier or service center for getting Maintenance A: 1.The device is damaged. 2.Problems occur in the operation of the device when the instructions for its use are fully observed. 3.The device has been exposed to moisture. 4. Liquid has been spilled or an object has fallen on the device. Do not insert inappropriate objects into the connectors and openings of the device. Do not place the device near heat sources such as stoves, radiators, space heaters, or other objects that generate heat. Condensation may form on or inside the phone when it is moved between environments with different temperatures or humidity levels. To prevent damage to the device, remove moisture from the device before use. To prevent damage to the device, do not place it on an unstable table, stand, holder, or other unstable surface. Unplug the device from the power outlet before cleaning it. Use a damp cloth for cleaning. DO NOT use water or liquid or aerosol cleaners to clean the touch screen. Classic 2
28 Contents Copyright 1 General information 2 Getting started Understanding your phone Installing and removing the SIM card, battery, and memory card Charging the battery Turning the phone on and off Lock/Unlock Contacts Home screen 9 Specifications 12 Classic 3
29 1. Getting Started 1.1 Phone Structure This section introduces the hardware components of the device. Component Component 1 Micro-USB connector 9 Browse key 2 Headset jack 10 Home key 3 Volume key 11 Back key 4 Front camera 12 Microphone 5 Internal speaker 13 LED Flash 6 Proximity/light sensor 14 Camera 7 Power button 15 Battery cover 8 Display and touch screen 16 External speaker 1.2 Inserting and removing the SIM card, battery or memory card Inserting the SIM card Your phone has two SIM card slots. The right slot is designed to install a SIM1 card (for Mini SIM cards), the left slot supports SIM2 cards (for SIM cards). Micro SIM). Installing SIM1: Make sure the gold-plated contacts are facing down and the bevelled corner is facing out. Insert the SIM card into the slot and push it in until it stops. Classic 4
30 Installing SIM2: Make sure the gold contacts are facing down and the bevelled corner is facing out. Insert the SIM card into the slot and push it in until it stops. Inserting the SIM1 card Inserting the SIM2 card Removing the SIM card Turn off the phone, and then use your fingers to slide the SIM card out of the slot. NOTE: Switching SIM settings 3G networks (GSM+WCDMA standards) use SIM1 by default, but they can be manually reconfigured to SIM2. SIM1 SIM2 Default setting GSM+WCDMA GSM Custom setting GSM GSM+WCDMA Click the Applications icon > More > Mobile networks ( Mobile networks) > 3G service (3G network) > Enable 3G (Enable 3G). Select one SIM card for WCDMA + GSM standards, while the second SIM card will be automatically configured for GSM standard. When installing one SIM card, the GSM + WCDMA standard will be selected by default. SIM1 SIM2 SIM1 installed GSM+WCDMA X SIM2 installed X GSM+WCDMA Enable/disable data transmission Classic 5
31 Click the Applications icon > > SIM management > Data connection. Select the same SIM card as for 3G networks (GSM+WCDMA). Battery Your phone comes with a rechargeable battery. Battery life may vary depending on network standard, applications, and connection types to your device. Installing the battery Make sure that the battery contacts fit snugly into the contacts on the battery compartment. Removing the battery Use your fingertips to lift the battery up and out of the device. Replacing the back cover (1) Insert the cover into the slot starting from the bottom. (2) Then press the back cover on the sides and top until it clicks into place. Memory card Use a Micro SD memory card to store photos, music files, videos, and other types of data. Inserting a memory card (1) Insert the memory card with the gold contacts facing down. (2) Push the memory card into the slot until it clicks into place. Classic 6
32 Removing the memory card (1) To safely remove it, click the Applications icon > Settings > Storage > Unmount SD card > OK. (2) Push the memory card in until it pops out of the slot. Charging the Battery The battery must be fully charged when using the device for the first time. (1) Plug one end of the USB cable into network adapter, and connect the other end to the phone. (2) Connect the AC adapter to the power supply to start charging the battery. (3) For safety reasons, use only the original Charger that comes with your phone. GIGABYTE COMMUNICATION Inc. is not responsible for any possible damage caused by the use of a non-original charger or any other equipment. NOTE: Classic 7
33 For your safety, do not remove the battery from your phone while the AC adapter is connected or the device is charging. 1.4 Turning your phone on and off Turning on your phone Press and hold the power button until the GSmart logo appears on the display. Turn off your phone (1) Press and hold the power button for a few seconds. (2) In the window that pops up, click the Power off button. (3) Press OK to confirm. Entering sleep mode To put the device into sleep mode, briefly press the power button. The display will turn off. To turn the display back on, briefly press the power button again. 1.5 Locking and unlocking your phone Unlock Swipe your finger in a circle on the screen to open the device's unlock button. 1.6 Contacts The Contacts application is a phone book where you can store the names, phone numbers, email addresses of your friends and other information. You can import contact information from your Google account or corporate accounts into your contact list on your phone. Adding contacts (1) Click the Applications icon > (2) Click to add new contact. (3) You can sync new contact with your account Google entry, phone, SIM card SIM1 or SIM2. (4) A window for creating a new entry will appear. (5) Enter contact information by toggling between the relevant fields. (6) Click DONE to save the entry. Classic 8
34 NOTE: When saving contacts to the SIM card, uploading images to contact information is not supported. Searching for contacts To quickly search for a contact, do one of the following on the Contacts screen: Tap the icon and enter the first letters of the contact's name to start searching for it. As you enter letters, the list will be filtered. After completing the search, press to return to the application menu. 1.7 Home Screen The Home Screen allows you to access fast access to the main applications, as well as view notifications of missed calls and received messages, check the battery level and connection status. Default home screen view: basic functions. Icons Description You can save your most important links and folders in the Favorites panel. Tap to launch the Apps screen. On the home screen, swipe left to right or right to left to switch between screens. The icons at the bottom of the home screen have different functions. Home screen customization: add links or widgets as you like. Icon Function Enable tethering or hotspot mode Enable or disable network connection Connecting or disconnecting from the network WiFi Enable or turn off the Bluetooth function Turn on or turn off the location service Google Classic 9
MOBILE INTERNET DEVICE idx9 3G 3G QUICK START GUIDE Thank you for choosing Digma products. Before you start using this device please read the manual carefully
Introduction. For successful work On your device, make sure it has the latest Android system update. To do this, open Settings > About phone and find System update. Customize
HTC Desire 310 dual sim Advanced user guide 2 Contents Contents Unpacking HTC Desire 310 dual sim 7 Back cover 8 Dual SIM cards 9 Memory card 10 Battery 11 Turn on/off
18 1. Getting Started 1.1. Installing a SIM card 1.2. Phone charging 2. Buttons 3. Introduction 3.1. Standby mode 3.2. Dialing Contents 4. Menu 4.1. Connected smartphone player control
TM Quick Guide English android language 5.0 Lollipop Google Inc, 2014. All rights reserved. Edition 1.5c Google, Android, Gmail, Google Maps, Chrome, Chromecast, Android Wear, Nexus, Google Play,
User manual Dear user, Thank you for choosing this smartphone with dual SIM support. For correct operation of the device, please read the manual
Bluetooth Remote with Handset Function BRH10 User Manual Table of Contents Introduction...3 Function Overview...3 Hardware Overview...3 Basic Information...5 Charging the Bluetooth Remote...5 Turning On
HTC Desire 210 dual sim Advanced User Guide 2 Contents Contents Unboxing HTC Desire 210 dual sim 7 Back cover 8 Dual SIM cards 10 Memory card 11 Battery 12 Turn on/off
Children's watch smart baby Watch Classic 1. Item Type: watch with system GPS navigation 2. Features: Type SIM cards: microsim Display 0.96" OLED 320x240 black and white Battery: Li-Ion, 420 mAh Communication:
Table of Contents General information for users... 2 Warning... 2 1.0 Turning on and off... 2 2.0 Introduction to Google Android 4.2... 3 2.1 Desktop... 3 2.2 Applications menu at the bottom center of the desktop
HTC Desire 526G dual sim Advanced User Guide 2 Contents Contents Unboxing HTC Desire 526G dual sim 8 Back cover 9 Two micro-sim cards 11 Memory card 12 Battery 13 Power on
All original accessories for your equipment on one page
Tracker Phone GS-503 User Manual 1. Appearance LED Flashlight Headphone Jack Volume Control Dial and Confirm Button Navigation Down Button and Phone Book Button
Point of View Mobii 3515- Android 4.0 Mobile phone English Contents General information... 2 Warning... 2 Package contents... 2 1.0 Basic information... 3 1.1 Buttons and connectors... 3 1.2 SIM card.. .
Huawei M835 Quick Start Guide Overview of the terminal Description of the main buttons of the terminal Touch to return to the previous screen, exit any application, or hide the keyboard.
Instruction for GPS navigators Altina based on Android 4.x OS Table of contents 1. System settings... 2 1.1. Menu "Settings".... 2 1.2. Interface language... 3 1.2.1. Set the system interface language (if
HTC Desire 816G dual sim Advanced User Guide 2 Contents Contents Unpacking HTC Desire 816G dual sim 8 Two nano SIM cards 9 Memory card 10 Battery 12 Turning the power on and off
Xperia M C1904/C1905 User Guide Table of contents Xperia M User Guide...6 Getting started...7 What is Android?...7 Overview...7 Device details...8 Turning the phone on and off... 10
Xperia V LT25i Owner's Manual Contents Xperia V Owner's Manual...6 Getting Started...7 About the Owner's Manual...7 Android What and Why?...7 Basic Elements
HTC Desire 620G dual sim Advanced User Guide 2 Contents Contents Unpacking HTC Desire 620G dual sim 8 Back cover 9 Two micro-sim cards 11 Memory card 12 Battery 13 Power on
A complete user guide for RoverPad devices running the Android operating system. 1 User Manual Table of contents Welcome to Android!... 6 Adding and changing
Xperia E dual C1605/C1604 User Guide Contents Xperia E dual User Guide...6 Getting started...7 What is Android?...7 Phone main parts...7 Device details...9
Your HTC Desire C User Guide 2 Contents Contents Unpacking HTC Desire C 8 Back cover 9 Removing the battery 10 SIM card 11 Memory card 12 Charging the battery 13 Turning the battery on and off
SM-G361H SM-G361H/DS SM-G361HU/DS User's Manual English. 06/2015. Rev.1.0 www.samsung.com Contents Read Before Use Getting Started 6 Package Contents 7 Product Overview
Xperia E C1505/C1504 User Guide Table of contents Xperia E User Guide...6 Getting started...7 What is Android?...7 Phone basics...7 Parts of the device...9 Turning on
Ww w REGISTER YOUR DEVICE Online at http://arnovatech.com/register Thank you for choosing this ARNOVA product. We hope that for many years it will give you
HTC 7 Mozart User Guide 2 Contents Contents Getting started Contents of the box 7 Your phone 7 Bottom cover 9 SIM card 11 Battery 12 Turning the power on and off 14 Entering a PIN code
Android 2.3 User Manual December 13, 2010 Technology platform for mobile Android devices 2.3 2 Legal Regulations 2010 Google Inc. All rights reserved. Google, stylized
Lenovo MIIX 3-830 User's Guide Before using your computer, read the safety instructions and important tips in the included manuals. Notes Before use
Contents Quickme Business Mail Instructions for use 1. Authorization 2. Main screen 3. Working with mail 4. Sending a message 5. Contacts 6. Calendar 7. Working with calendar events 8. Settings
Samsung SCH-R210 Spex User Manual Software Version “R210.BD07” 1. History 1. Outgoing 2. Incoming 3. Missed 4. All Calls 5. Timers Last Outgoing Incoming Roaming Calls All Calls
Lenovo TAB A7-40/ Lenovo TAB A7-50 User Manual v1.0 Please read the safety instructions and important notes in the attached manual. Chapter 01 Overview
1.1 What's in the box? 1.2 Equiso 1. HDMI port 4. USB port 2. Reset button 5. MicroSD card slot 3. Micro USB port 1.3 Remote control 1. Battery charge status light (Blue light fully charged
Contents 1. About the device... 1 1.1. Appearance of Smarty Mini 7L... 1 2. Turning the device on and off... 2 2.1. Basic buttons and their characteristics... 2 2.2. Operating screen... 2 2.3. Working with applications...
SM-G530H/DS SM-G530H/DV User's Manual English. 11/2014. Rev.1.2 www.samsung.com Contents Read Before Use Getting Started 7 Package Contents 8 Product Layout 10 Usage
SM-T555 User Manual English. 05/2015. Rev.1.0 www.samsung.com Contents Read Before Use Getting Started 6 Package Contents 7 Product Overview 9 Using a SIM or USIM Card
LG LS665 User Manual Appearance Phone battery charging. Plug the charger into your phone and a power outlet. Using the keyboard and entering text. Touch key one
User Manual 1 Introduction 1 2 Getting Started 2 Getting to Know HUAWEI MediaPad T1 8.0 2 Getting Started 2 Charging the Battery 3 Important information battery information 4 Home screen 5 Notifications and icons
Xperia E1 dual D2104/D2105 User Guide Contents Getting started...6 Overview...6 Assembly...7 Using the device for the first time...8 Why do I need a Google account?...9 Charging the device...9
Liquid Z530 User Guide 2-2015 All Rights Reserved Acer Liquid Z530 User Guide Duo Model: T02 Revision: 10/2015 Register for an Acer ID and use
EPAM Systems PSB-MOB PSB On-Line Mobile User Manual Terms, definitions and abbreviations RBSS PSB On-Line Mobile application, Application, PSB On-Line Mobile User IP Bank, Promsvyazbank
HTC Desire 626G dual sim user guide 2 Contents Contents Unpacking HTC Desire 626G dual sim 8 Two nano SIM cards 9 Memory card 11 Battery 12 Power on/off 13 Setup
ANDROID Quick Start Guide Android Mobile Technology Platform 4.4, KitKat Copyright 2013 Google Inc. All rights reserved. Edition 1.05. Google Android, Gmail, Google Maps, Chrome, Google
Microsoft Apps User Guide Issue 1 2 About Microsoft Apps About Microsoft Apps The Microsoft Apps suite includes Microsoft business apps for Nokia phone
Xperia SP C5302/C5303/C5306 User Guide Contents Xperia SP User Guide...6 Getting started...7 About the user guide...7 Android what and why?...7 Overview
Script E-book Quick Start Guide Contents Precautions.. 3 Device layout.. 6 Basic operation e-book.. 9 Troubleshooting and Troubleshooting
Contents Precautions. 2-3 Basic information about the tablet. 4-7 Basic operations. 7-11 Turn on and off. Standby mode. 8 Connect to PC and TV. 8-10 Installing a memory card. 10
Your HTC Desire S User Guide 2 Contents Contents Getting started What's in the box 8 Your phone 8 Base cover 10 Battery cover 12 SIM card 13 Memory card 14 Battery
SM-J700F SM-J700F/DD SM-J700H/DD SM-J700F/DS SM-J700H/DS User Manual English. 07/2015. Rev.1.0 www.samsung.com Contents Product Basics 4 Read Before Use 5
Ihome3 Smart Door Eye & Wireless Video Call System User Manual Version 1.0 Precautions lithium-ion batteries(two go
UPDATE THE ARCHOS FIRMWARE ENGLISH ÄÄ ÄÄ directly on your ARCHOS at: www.archos.com/firmware Operating system ARCHOS (the system that allows the ARCHOS device to function) at all times
User Guide 2-2015 All Rights Reserved Acer Liquid Jade Z User Guide Model: S57 This Revision: 03/2015 Register for an Acer ID and enjoy great
HUAWEI P2 Quick Start Guide Getting to know your phone Thank you for choosing HUAWEI Ascend P2! The illustrations below show the appearance of your P2 smartphone. Headphone jack
Phone with GPS User Manual Please read this manual carefully before use. The color, appearance of the product and the contents are subject to change without prior notice.
SM-G318H/DS SM-G318H User's Manual English. 05/2015. Rev.1.0 www.samsung.com Contents Read Before Use Getting Started 6 Package Contents 7 Product Overview 9 Usage
Laboratory work 02 in the discipline "Informatics"
Laboratory work 02 in the discipline "Informatics" Laboratory work consists of 2 parts. Report the completion of each part to the teacher for operational control, since the final assessment of the work includes
Many users of smartphones or tablets are intimately familiar with the operating system that is in their device. For the most part, this is the operating system from Google - Android. The iOS system is no less common and much less common is Windows. Even though each system is good in its own way, different versions of the same OS can be very different from each other and turn out to be very successful or extremely bad. More recently, Android 7.0 has appeared, but a large number of devices are still sold on Android 5.1Lollipop and it is its pluses and minuses that will be discussed in the article.
System advantages
During the release of the fifth version of Android, many innovations were announced, which in one way or another turned out to be not quite working or not working at all. Version 5.1 was supposed to fix these bugs and some of them are indeed gone.

In OS 5.1 appeared smart phone protection feature. Smartphones with this system can be locked remotely and the lock cannot be removed unless you log into your Google account. Function Device Protection works even when an attacker resets the device to factory settings. Previously, this action allowed you to bypass the protection of the smartphone and made it very vulnerable.
Version Android 5.1, unlike the 5th, got the ability to manage two SIM cards. Previously, for this, device manufacturers had to modify the operating system on their own, now the function works immediately. In theory, a smartphone with a “bare” OS can immediately work with two SIM cards, which is quite difficult to check, because all manufacturers install their own firmware and shells, which, in fact, provide users with the opportunity to use two SIM cards. Only the Nexus line is known to come with a clean system, but those phones aren't dual-card capable per se.

Improved HDVoice. Previously, the developers said that now the function will allow better speech transmission, it began to distinguish between voiceless and voiced sounds, however, there is one point. Both phones must be running Android version 5.1.
In addition to functional changes, the system received a number of design changes.
- The contacts menu, or rather their editing, has undergone major changes.
- Many icons and pictograms have received animation
- When an application is blocked, a hint immediately appears on how to remove the blocking later. Previously reverse action caused some problems.
- Quick settings can now also be quickly deleted.
- Easier access to WiFi networks, as well as Bluetooth-enabled devices.
- The unlocking process has become more convenient, and pop-up notifications can be hidden with a swipe up.
- When playing sound, users can adjust the volume of system sounds, which was previously impossible and often caused some inconvenience.
- Flashlight has been fixed. V previous version after a few minutes, the flash turned off and an error appeared on the screen.
- The downside was the lack of functionality. silent mode. Many users asked to add it, but the promise remained unfulfilled.
System performance
In general, according to users, version 5.1 works an order of magnitude faster than 5.0. even with a lot running applications the phone does not slow down, and the applications themselves do not close, as happened before. The RAM became clogged much more slowly. Version 5.0 already after two or three days showed that the RAM was completely occupied, the phone required cleaning and worked much less. More tests new system showed that there is no such problem. An improvement in performance was also noticed in the applications for evaluating AnTuTu and 3DMark, so in the first program new android received a score of 39890 against 35720, and in the second these figures were -16193 against 14481.
It is worth noting that these figures were obtained on a top-end smartphone at the time the OS was released and, accordingly, these pluses may not be noticeable on weak devices, and this will be discussed below.

Minuses
Despite the large number of advantages, the system also has a number of disadvantages.
Performance. Android 5.1 version works quite fast under certain conditions, namely 3 GB RAM. The minimum value is 2 GB, and even now, more than a year after the release of the system, such numbers are far from small, because devices with such memory are in the middle price segment, or rather closer to the high one, which means that for many users they remain inaccessible and it turns out that a budget smartphone with a small amount of RAM is obviously slow and weak.
Minus the second - interface. It was previously said that a lot of changes have been introduced and in general they are useful, but the main disadvantages are a large number of settings in the pubescent curtain. Previously, there were fewer of them, and additional ones could be opened in a special submenu, but now everything opens at once and sometimes it’s not easy to navigate.

The second downside is color design. But by default, the panels turn out to be pale blue, which is not at all pleasing to the eye and sometimes even annoying. Of course, launchers allow you to quickly fix the situation, but in the original version it could have been more beautiful.
The tendency to simplify is also not a plus. For more than a year now, all developers have been trying to make their systems more adaptive and simple for users, but in the race for this simplicity, they make everything too primitive. Many icons are knocked down in one place, and as a result, a void remains on the screen. The gallery was replaced with the Photos folder, which is designed to work in the cloud and without an Internet connection, the user has all the pictures piled up in one heap.
Another important disadvantage was the simplification of notifications. Previously, it was clear in the tray that a system message or notification of a letter had arrived, now it's just an application icon, and what it wants to tell the user is unclear.
Conclusion
In general, the Android 5.1 system is quite successful under a number of conditions - powerful smartphone and user settings. Owners of powerful devices after a series of improvements will receive an excellent workable OS, but the owners weak phones and supporters of leaving “everything as it is” will most likely receive only negative emotions from version 5.1.
Introduction
The Android operating system (Android) today is hardly inferior to Windows in terms of prevalence. It is used in more than 90% of smartphones and tablets. A distinctive feature of its user (graphical) interface is that it is designed to be used without a keyboard and mouse - only with a screen that responds to finger touches (touchscreen).
In general, managing Android is not difficult.
This instruction in some details may not match the Android interface on specific device. The fact is that some device manufacturers change the standard Android interface. Samsung is making big changes.
However, general principles interface organizations are preserved.
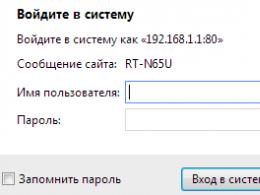
Screen unlock and Android desktop
The first thing you will see when you turn on your device is the unlock screen:
You need to touch the image of the castle with your finger and, without releasing your finger, drag it to the right, to the border of the circle and release it there:

Note. On some devices, instead of the image of the lock, it may be different. But the principle remains the same - you need to swipe your finger across the screen.
After unlocking the screen, the desktop will open on which all controls are concentrated:

At the very bottom of the screen is the status bar and the system tray - they are black. The status bar contains the main control buttons, from left to right:
- Back button. Return to the previous window of the active program. If the program has one window, this button closes the program.
- Home button. Return to desktop. Minimizes the active program and opens the desktop.
- Swap button. Opens a preview of all running programs. Thanks to this, you can conveniently switch between running programs.
- Window button. Menu active program. Opens a menu with commands for the program that is currently active.
- Speaker volume adjustment.
- Take a screenshot of the screen.
Note. On some devices, the status bar may not have volume and screenshot buttons.
At the right end of the status bar is the system tray. It displays program messages, program icons. If you touch the tray, a menu will open with quick settings:

Note. Not on all devices, when you touch the tray, the quick settings menu opens. Some manufacturers may not have such a menu. Or it can be opened in a different way, such as by swiping your finger from the top of the screen.
Just above the status bar is a launcher with shortcuts to selected programs.
Touchscreen Android
All management of programs and Android itself is carried out through touching the screen. Android shares touches (also called gestures) by their nature:
- Quick touch (touch and immediately remove your finger) - similar to a computer mouse double-click or press enter. Performs a default operation, such as launching a program or opening a file.
- "Long" touch (touch and hold your finger) - similar to a computer click right button mouse - offers additional operations. Or selects text, file, element.
- "Zoom" - touch with two fingers at the same time and then move them towards each other or vice versa. Increases or reduces the font in the document or the size of the picture.
- "Scrolling" - sliding movement of the finger across or along the screen. Displays elements that are hidden outside the screen borders. For example, a list of files, the next picture in the gallery, the next page of the document.
Working with files in Android
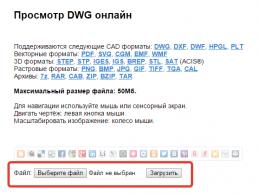
Opening, copying and deleting files in Android is performed in the same way as in any other OS - through a special file manager program. There are many such programs for Android. File manager, which comes with Android, is easy to use:

V top panel buttons that show the folder you are currently in. And buttons for available operations. A quick touch on a folder opens that folder. A quick touch on a file opens that file.
If you need to select files (folders) for copying or deleting, you need to make a long touch on one file and when it is selected, select the rest:

Selected files can be deleted, copied, cut or sent via Bluetooth or WiFi. If you need to copy or transfer files, then after selecting and copying (cutting) them, you need to go to another folder and click the "Paste" button there.
If you want to select all the files in a folder, you can do it like this:

First, select the first file (with a long tap), then touch the "Selected" button. An additional "Select All" button will open.
Programs can be launched through shortcuts in the launcher or on the desktop, as well as through the Android main menu.
If you tap on the program menu icon in the launcher, the program menu will open:

One screen may not fit all installed programs. To scroll through the menu, you need to make a sliding movement with your finger from right to left.
If you make a short touch on the shortcut of the program, it will be launched. If you touch and hold your finger, after a while the desktop will become visible and you can move the shortcut to the desktop with a flick of your finger.
Switching between programs in Android
If you touch the button for switching between programs - .
A screen will open in which there will be previews of all running programs:

On this screen, you need to touch the desired program.
If the program window is quickly moved down, the program will be closed.
How to close a program in android
First way. Press the "Back" button - in the Android taskbar. But if it is a program with multiple windows, such as a browser, this button is inconvenient to use. In addition, the program does not actually close, it becomes invisible, but it continues to remain in RAM.
The second way. Press the "Window" button - .
If the program has a main menu, it may contain an exit or close command:

Or this program menu:

The third way. Press the "Swap" button - in the Android taskbar. Then find the window preview and move it down:
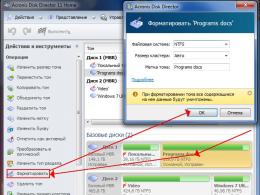
Fourth way. Open system settings, go to the applications tab, then open the "Running" programs tab and touch the desired program:

and in the new screen, click the "Stop" button

Note
Programs on Android do not actually close in the first three ways! That is, they continue to hang in the background and can work in the background. Eating up the battery and even Internet traffic.
Moreover, even after closing the program, in the fourth way, after some time it can start again. When an event occurs. For example, when connecting to the Internet.
Therefore, periodically you need to view the list of running programs and stop unnecessary ones.
Installing programs on Android
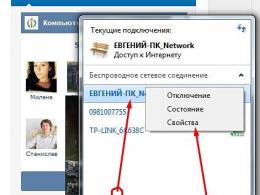
Connecting to the Internet on Android
On most Android devices, you can connect to the Internet through networks mobile operators or WiFi. Both of these methods are available through the device settings - Wireless networks section.
If you need to switch from WiFi to 3G or vice versa, you must first turn off the current Internet source and only then turn on another one.

The keyboard in Android appears on the screen automatically when you touch the data entry field:

The keyboard that comes with Android is not very convenient. On it, the number keys and special character keys have been moved to another set that you need to switch to. In addition, it does not have arrow keys to move the cursor and there are no Alt, Ctrl keys. Second character set:

And the third character set:

As you can see, if you need braces, you will have to change two sets of keys in order to get to them.
However, in Android, the keyboard is a program and this means that it can be replaced with another one. For example on Hacker's Keyboard:

It is almost like a real keyboard. Most importantly, it has arrow keys to move the cursor. This is very handy because moving the cursor several characters with your finger or the graphical slider is hell. But since there are more keys on it, their size is smaller and you need to work with it more carefully.
To switch languages, on the Hacker's Keyboard, you need to swipe the spacebar.
Switching between keyboards is done in Android settings:

Select and copy text in Android
When actively working with texts on a computer device, sooner or later there will be a need to copy the text and transfer it to another program (document). In conventional OS, this is done easily - the context menu or Ctrl + C. In Android it is more difficult. First you need to quickly, double-tap the screen on some word from the fragment that you want to copy. The word will be highlighted and two sliders will appear:

By holding the slider with your finger, you can move it and thus select as much text as you need. After that, you need to touch the selected text and do not release your finger until the menu appears:

In which you need to select "Copy". This menu may look different in different programs. For example, instead of text, there may be icons.
Then go to the program (document) where you want to insert the text and touch the screen in the right place and hold your finger until a similar menu appears, but select "Paste" accordingly.
Of course, copying text in Android is inconvenient. But on bezrybe and cancer fish.
Summary
Of course, a device running Android cannot fully replace a full-fledged computer, nevertheless, more or less, but common types of work can be performed on it. Up to editing simple files MS Word, Excel.
If your Android device supports USB-Host (OTG) mode, then you can connect a USB mouse and keyboard to it and it will be much easier to work with text.
If you found this article useful or just liked it, then don't be shy - support the author financially. This is easy to do by throwing money on Yandex Wallet № 410011416229354. Or on the phone +7 918-16-26-331 .
Even a small amount can help writing new articles :)