I changed the motherboard and the processor won’t start 7. Replacing the motherboard without reinstalling Windows
If the system has been replaced motherboard, most likely your operating system will not boot in normal mode. You will see a critical error in the form of a “blue screen of death” (BSoD) on your monitor screen. The usual practice for solving this problem is to reinstall Windows. Many may be surprised, but replacing motherboard without re Windows installations - the problem is solvable and detailed instructions we will offer further in this article.
The appearance of such a screen means incompatibility of the equipment (controller driver), because the old equipment had a different kind of controller. In this case, you can solve the problem as follows: change the controller driver to the built-in one in Windows. After such a replacement, the system will boot and you can install the driver that comes with the new board.
Instructions for replacing the board for Windows XP
First way
If the board being replaced is intact and it is possible to boot from Windows XP, then in this case it is necessary to install standard drivers for motherboard controllers. Select the required controller, in the properties go to the tab “ Driver"and click on the Update button….

We refuse to search for a driver on the Internet, click Next >, select “Install from a specified location”, check the radio button next to “Do not search. I'll choose myself required driver" and click Next > . According to the list of drivers, you must select “ Standard Dual Channel PCI IDE Controller» and click Next > .

After the installation of the standard driver is complete, you need to turn off the computer and make a replacement outdated equipment to new. After complete Windows boot We install the necessary driver from the supplied disk drive for the new equipment.
Second way
If your motherboard for some reason has stopped functioning and there is no way to log into the system from it, then you need to perform more complex operations. For this method you need installation disk Windows XP.
In order for Windows XP to boot after installing a new motherboard, you need to do some steps:
- install new hardware (motherboard);
- do bootstrap from the Windows XP installation disk drive, press Enter to begin the XP installation process.


To restore an installed OS, you need to select it and press R. The recovery process is very similar to the Windows XP installation process.
After the recovery process it is necessary install the required drivers For new board, the rest of the software and personal data of the user will be untouched.
How to change the motherboard for Windows 7
There are several factors that influence a smooth change of the main board in a Windows 7 computer. Important factors are:
- motherboard model (differences between motherboards);
- the need to change the platform (Intel to AMD).
Preparation stage
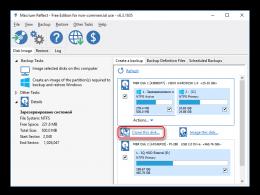
Before starting any manipulations with the computer, it is advisable to do old OS image. This operation is simple and can save a lot of time and nerves in the future. The image is created by the following programs:
- Paragon Backup & Recovery Free;
- Norton Ghost;
- DriveImage XML;
- Acronis True Image.
Why does changing the board entail reinstallation? operating system? The most common reason is that the motherboard drivers are not suitable. The most capricious ATA/SATA controller drivers, they do not work with new equipment. To avoid these problems, you simply need to get rid of old drivers that may cause a conflict by removing them from the system.
Removing old drivers
Using the program sysprep, we remove information from Windows along with drivers. It is for this reason that it was necessary to make an image of the system. This utility will not affect user settings and other programs. The program starts before connecting to the new motherboard hard drive with the system.
To run the program, press the Win + R key combination to open the Run window and enter: C:\windows\system32\sysprep\sysprep.exe. Then click OK.

A utility window will appear on the screen, as shown in the picture, which also shows necessary settings.

Then click OK and system cleaning will begin. After the program finishes, the computer will shut down.
Board replacement process
After the computer has completely turned off, you need to completely disconnect it from the power supply and change the motherboard or connect HDD with Windows 7 OS processed by the utility sysprep.
The first time you boot the system, you will need to install drivers, so prepare a disk with the software in advance. You will also need to reconfigure regional settings, as they are deleted by the utility.
When Windows starts, it will ask for a username. It is better to enter a new name and then delete it - this will prevent unnecessary entries in the profile. After the first launch, you will be able to log in with the same settings.
The system will also ask you to make some more settings, which are usually done after reinstalling the OS. After entering them, the new user’s desktop will load, after which you can delete it and log in under the old name the next time you boot.
Program sysprep helps replace system board without reinstalling Windows. The only inconvenience is that the activation of the seven will need to be done again. The reason is that the OS binds to the hardware.
Using the registry (video)
Operating system users personal computers have their own preferences and work habits. Some use standard Windows applications with default settings. Other users are extremely interested in personalizing the operating system interface, using large quantity applications and programs with personal settings.
When you reinstall Windows, the customized interface is removed. Therefore, users are not eager to “demolish” the old operating system. However, progress is constantly moving forward, hardware quickly becomes outdated and the time comes to replace some components.
And if replacing RAM, graphics adapter, power supply or processor can be produced without installation new system preserving all information and integrity Windows settings, then, in the event of a failure or upgrade of the motherboard and hard drive, you cannot avoid installing a new OS.
Preliminary steps to save Windows settings
To protect yourself from possible failure during the motherboard replacement procedure, you must have a copy installed system. Today there is a huge variety of software with which you can create a rescue disk with an old operating system.
In order to deceive the system when replacing the motherboard, you need to remove all drivers. After all, the main problem when replacing a motherboard is driver incompatibility, and the most capricious is the ATA/SATA controller.
Windows has special program(sysprep) to clear unique data from the system, using which you can painlessly replace the motherboard. Particular attention should be paid to the fact that this program should be run before replacing old components.
So, we can start deleting data using the sysprep utility. To launch the program, you must simultaneously press the “Win + R” keys, enter the address in the window that appears: “C:\windows\system32\sysprep\sysprep.exe” and press the “ok” button.
After a dialog box with program settings appears on the monitor, you must perform the following manipulations:
- in the “Actions to clean up the system” menu, select “Go to the system welcome window (OOBE)”;
- check the box “Preparation for use”;
- in the “Shutdown Options” menu, select “Shutdown”;
- press the “OK” button.
The computer will automatically turn off as soon as the utility has completed all the necessary operations. The next stage is the process of replacing the motherboard and starting the computer with the new hardware.
Restoring Windows 7 if the motherboard fails
However, it is not always possible to prepare for a “painless” motherboard replacement. Sometimes sudden hardware failures occur and download working system It doesn't work anymore.
In this situation, the special ERD-Commander program will help, which can be easily downloaded on the Internet and then burned to a CD. Having installed a new motherboard, we follow step by step instructions:
- Boot from a pre-recorded disk.
- Select “ERD Commander 6.5 for Windows 7” from the menu.
- In the pop-up window asking about connecting to the network, click “No”.
- We answer “Yes” to the program’s request to reassign drive letters.
- We indicate our Windows7, click next.
- We are waiting for automatic troubleshooting.
- In the “System Recovery Options” window, select the lowest item “Run various MSDaRT recovery tools.”
- Next, call the registry editor.
- We find the “MountedDevices” branch and delete it.
- Go to the branch “HKLM\SYSTEM\CurrentControlSet\services” and change the values in the Start parameter to “0”.
Board replacement process
When you first boot, Windows will ask you for your username. You should start a new one account, which you can then easily delete and use your old data. Then the system installs itself necessary drivers or will ask the user for those that are not in the database.
The only drawback this method is repeated Windows activation, since the operating system is sometimes tied to previously installed hardware.
The question of replacing the motherboard without reinstalling Windows 7 is not an easy one. Pitfalls will stand in the way of ordinary users. Therefore, do not cut from the shoulder. It’s unpleasant to download everything yourself, and then sit in front of the “screen of death” and think about what to do next. It is better to study this issue carefully. It is necessary to understand what steps need to be taken, what problems may arise and what ways to solve them.
Prerequisites
The matter is important and serious. Perhaps you are not satisfied with one of the components. Technology moves forward, but your processor can no longer cope with the tasks. Naturally, you need to buy a new chip. But it is often incompatible with specific model motherboard. Then you will have to change the motherboard along with it.
Or maybe you decided to buy new modules random access memory. Your old ones, based on DDR2, have long ceased to cope and are outdated. Even if you only want to expand the amount of RAM, finding modules of this type will be extremely difficult and even impractical. Therefore, it is better to take a closer look at DDR4. This is newer and higher-speed memory. But it requires special slots on the motherboard. Why not buy a new motherboard?
The same problems can arise with other components. New video card models require advanced slots - faster and higher quality. The hard drive is improving and has long since moved to the third revision of Serial ATA. To upgrade your system, you need to study the aspects carefully because replacing the motherboard without reinstalling Windows 7 will be your main problem.
Demolish or keep?
Why is it necessary to save the operating system? After all, it’s much easier to just tear it down and install another one after assembling the PC. Of course, for many users this will be the most profitable option. But there are also users who customize the system for themselves down to the smallest detail. All personal parameters and necessary applications are important to them.
When you reinstall the OS, everything will naturally be deleted. And if for some this will be the beginning of something new, then for others it can turn into a great tragedy. It is necessary to eliminate all problems and preserve personal data.
Tools
In order not to lose the operating system and information, it is better to use a couple of tools. To replace the motherboard without reinstalling Windows 7, two utilities will be useful to us.

Sysprep is a built-in OS tool. It is used to clean hardware parts, reset OS activation, etc. In general, the software will allow you to create an image of an operating system that does not require hardware.
ERD Commander is a tool that you will have to download in advance. It helps even if it is damaged and loading is impossible. This is his main task. There are also additional features. In general, ERD Commander is useful software for programmers. It helps restore the system if it is blocked by ransomware viruses, selectively resume the operation of files from the registry, etc.
the main problem
Why is it even desirable to have a copy? The fact is that replacing a motherboard usually leads to a huge amount of driver incompatibility. And if this problem can still be corrected with some devices, then the main errors come from the ATA/SATA interface - ports for the hard drive. That’s why the “screen of death” appears so often, which brings an endless reboot.
Preparation
Start the whole process by working with Sysprep. To replace the motherboard without reinstalling Windows 7, you need this tool. It cleans all unique files and drivers. Therefore, this must be done before the new component takes up space on the motherboard.
To start working with the utility, you need to find it through command line Win+R. A small window will open in which we enter the path to Sysprep: “C:\windows\system32\sysprep\sysprep.exe”. In the new window you should configure the software parameters.

First, go to the “Actions to clean the system” section and here you should select the line that goes to the system welcome window. Here you need to check the box next to “Preparation for use”. Now look for the section with “Shutdown Options” and click “Shutdown”. Don't forget to finish everything with the OK button.
After a few seconds of operation, when the tool has done everything necessary, the system will turn off. Then we move on to assembling the motherboard, installation and other similar matters.
Alternative
If you are replacing the motherboard without reinstalling Windows 7, you will also need the registry. To ensure that the installation does not lead to compatibility errors, whether it is changing the motherboard or changing the controller mode, you need to dig into the system while it is working correctly.

Open the command line Win+R and enter regedit. So you will launch that same registry and start working with it. Now you need to go through HKEY_LOCAL_MACHINE\SYSTEM\CurrentControlSet\services\msahci. Open the last folder and look for the Start line on the right. You need to change the value to zero. We return to the column on the left and look for the final pciide folder along the same path. Here again we set the value to zero. For users who use RAID arrays (multiple disks), we repeat the entire process in iaStorV.
Now you can replace the motherboard without reinstalling Windows 7 (64). Turn off the computer, install the updated motherboard in the case and turn on the computer. At correct actions the process will be correct. The operating system will load the drivers onto the controller on its own, and you will have to do all the necessary settings yourself.
Recovery
During all these operations, errors may occur. Incorrect input of values or erroneous actions cannot be ruled out. All this leads to the fact that it is impossible to launch the operating system. Let's try to download and load ERD Commander onto a flash drive. Replacing the motherboard without reinstalling Windows 7 should be easy. As we have already learned, this tool helps restore the system in difficult situations.
To use this program, you need to download it from the Internet and put it on a CD or flash drive if you don’t have a drive. Now, when you turn on the PC, the boot drive will see this software and begin downloading the necessary information from it. In the window, select ERD Commander 6.5 for the seventh OS, or for the version that you previously installed.
A notification about “renaming” the drives will now appear. We agree with this process. We don’t touch the network settings yet, don’t forget about the keyboard layout. If several operating systems were installed on the disk, you need to select the one previously used in the next window. If there is only one, then only one line will appear in the tablet. Click “Next” and watch what happens. It usually takes a few seconds until the system copes with problems, etc.

Now a window with “System Recovery Options” will open. Here you need to select last point with MSDaRT restoration. Next, click on the registry. Now we don't need commands. Replacing the motherboard without reinstalling Windows 7 takes place in the registry window that is already familiar to us.
On the path HKEY_LOCAL_MACHINE\SYSTEM you will see the MountedDevises folder - you need to delete it. Above there will be a CurrentControlSet folder, in it you need to find the atapi folder, changing the Start line there to zero, and repeat this setting in the remaining archives.
The last step is to work with the Msahci folder. Here we change the value to zero again. The system should boot correctly. If nothing works, most likely the problem is much more complex. Here, in addition to other software errors, we are talking about conflicts with the built-in video adapter.

Safe mode
Still can't replace the motherboard without reinstalling Windows 7? You can go to " Safe mode" When starting the PC, press F8. When the OS boots, go to “Device Manager” and remove the device that is failing. If you cannot identify it, then it is recommended to simply delete it PCI bus and download all the necessary drivers.
All these operations are designed for people who have at least some knowledge of PCs. Regular user He will definitely get confused somewhere and choose the wrong thing. After this, the system will become a “brick” and programmers will save it. If you are not sure what you are doing, either find friends who understand all this, or ask for help at a service center.
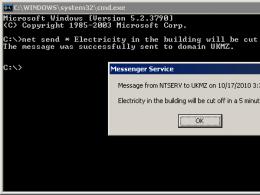
If you decide to do"upgrade"(updating) the motherboard, or replacing a non-working board with a new one, your old Operating System will no longer boot. While loadingwindows will arise blue screen(BSOD) with an error STOP 0x0000007B. This happens due to a change in the bus controllerATA/SATA.
The whole point is that Windows does not have the ability to independently change the controller driver upon boot. As a result, during boot the operating system - simply loses the hard drive and will not be able to continue running.
So the question is:
how to change the motherboard without reinstalling Windows 7? Reinstalling Windows is not difficult, but with all this All programs and settings will be lost. And this is quite often unacceptable!
Return Windows 7 by updating it with installation disk, will also fail because run this function only possible from an already loaded OS.
But don't be upset! It will help us (download the disk image here: ERDC.rar). Unpack it from the archive (just drag and drop the file ERDC.iso- for example, on the desktop) and write to "blank" using a disc burning program ISO-Burner. Thanks to him, we we will make the necessary changes to,
required to boot on a fresh controller.
Let's begin!
1. Boot from the burned disc. Select the version in the download menu ERD Commander 6.5 for Windows 7.

2. To the question "Initialize network connection in background?" we answer No.

3. To the question "Reassign drive letters..." we answer Yes.

4. Select the keyboard layout and press the button Further. After that, select our operating system from the list and click Further.


5.
If the previous boot of Windows 7 failed, a search for boot problems will begin.
Let's press Cancel, so as not to waste time, because this remedy Restoring startup in case of changing the motherboard cannot help. To the question "Stop troubleshooting?" we answer Yes. The next news that it was not possible to eliminate the problems, do not be afraid and press the button Ready.

6. In the window that appears, select the item Microsoft Diagnostics and Recovery Toolset.

7. Now let's launch registry editor

8. First you need to delete the registry branch HKLM\SYSTEM\MountedDevices

9. Now you need to enable the launch of services that load standard controller drivers IDE And SATA.

10. Expanding the thread HKLM\SYSTEM\CurrentControlSet\services on the left side of the Registry Editor. Now we check the following sections in this thread: amdide, amdsata, amdxata, atapi, intelide, msahci, pciide. Parameter Start everyone must have equal 0x00000000 (0). Meaning Start=0- starting the service when Windows boots. If it is equal 0x00000003 (3) double click on the parameter name (Start) and replace the value with 0 and press OK.

11. After start will be set to 0 for all the above registry keys, close the registry editor and reboot the PC in normal mode. As a rule, this is enough to successfully boot Windows 7. Now you need to install the drivers on a fresh motherboard.
In case it didn't help!
If the above did not help and Windows 7 still does not boot and displays an error STOP 0x0000007b, this means the required controller driver is not loaded. To correct the situation, we enable the loading of all drivers known to the operating system.
To achieve the desired result, set the parameter value Start equal 0
in the following services: adp94xx, adpahci, adpu320, aic78xx, amdsbs, arc, arcsas, elxstor, HpSAMD, iaStorV, iirsp, LSI_FC, LSI_SAS, LSI_SAS2, LSI_SCSI, megasas, MegaSR, nfrd960, nvraid, nvstor, ql2300, ql40xx, aid2, SiSRaid4, vhdmp, vsmraid, aliide, cmdide, nvraid, viaide.
Reboot the PC in normal mode. The OS must boot.