How to clean a laptop from dust and not damage anything: the correct algorithm of actions. What is a cooler on a computer, laptop, phone and what is it for How to find a fan in a laptop
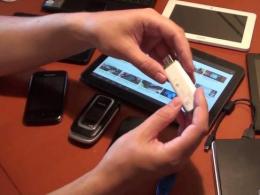
Cleaning the cooler is not such a complicated procedure as to carry a laptop to a specialized workshop. You can clean the fan from dust yourself with certain tools and little knowledge.
You will need:
- Tweezers;
- Cotton buds;
- Needle, scalpel or any other sharp object;
- Alcohol;
You should also purchase a special substance with which to lubricate the cooler - spray or silicone grease.
Disassembling a laptop

First you need to disassemble the device in order to gain access to the cooling system. Remember, if your device is under warranty, then you should not break the seals yourself, as you may lose it. Usually the warranty period is 1 year, so during this time it is not recommended to climb inside.
If the warranty period has already expired, you can safely remove the cover with a regular screwdriver at home. Don't forget the latches that hold it in place. Do not break off the cover - you will need it when you put the device back together. After you have removed the cover, you need to disconnect all the components that block access to the cooler. Each laptop is designed in its own way, so it is recommended to find on the Internet a video of parsing your personal device.
Disassembly instructions
The fan is disassembled in several stages:
How to clean and how to lubricate

The process is explained in more detail in this video.
youtube.be/feo5bLjP-jE
Lubricating a non-separable asus laptop cooler requires special knowledge and skills, so this procedure is recommended to be carried out exclusively in a specialized service. Experienced craftsmen know perfectly well how and with what and how to lubricate this type of fan.
Cooler Assembly
Assemble in reverse order from how you took it apart:
- The bladed part is put on;
- Two rings are mounted on the rod with tweezers;
- A retaining ring is put on;
- After that, the mechanism is closed with a plug and the fan turns on;
The fan cleaning is done and you can continue to use the device without any problems. In the event that this procedure did not help get rid of overheating or excessive noise, then most likely a complete one is required.
How to clean a laptop cooler without taking it apart

If you want to clean the cooling system, but you cannot disassemble the laptop and the fan, respectively, you can follow the procedure below. We are looking for ventilation holes on the laptop and using a vacuum cleaner, the power of which should be set to the minimum level, we collect the existing dust. Of course, this is not as effective as a complete disassembly and cleaning, but it also gives its result. However, in this situation, the question "How to lubricate the fan?" remains unanswered.
Tips on how to avoid frequent disassembly and cleaning of the laptop
- Using a USB cooler This device is a special stand equipped with a cooler. It does not allow the PC to overheat, providing active cooling.
- Do not use the laptop on a couch or bed, as the fabric covers the ventilation holes, thereby preventing proper cooling.
- Do not eat above the keyboard, because the crumbs get under the keys and contaminate all the systems of the device.
Now you have information on how to properly clean and what oil to lubricate, and how to avoid over-frequent cleaning. This instruction suitable for most devices different manufacturers: hp, asus, acer, lenovo, samsung, dell, msi.
Every piece of equipment needs preventive maintenance, especially laptops. And it's not just about periodically cleaning the software supply, you also need to clean and lubricate the fans (Cooler). If you do not clean the cooling system, then your equipment will probably fail soon.
There are two ways to clean a laptop fan
The first is to give the laptop to a service center . This option is suitable for those people who do not have the time or the slightest technical training to clean the laptop fan. And it is worth considering that not everywhere people treat their work responsibly. That is why you should contact the official service centers, which guarantee the quality of these works.
The second is to clean the laptop fan at home, by yourself . This option is a little more complicated, but less expensive, and also guarantees proper maintenance. But at the same time it requires care, accuracy and responsibility. If you do something wrong, you will be held responsible.
ATTENTION! Do not attempt to service your laptop while it is under warranty service, since this operation will require partial disassembly of the equipment.
Self cleaning
In order to clean a laptop fan, you must have several tools (screwdriver, tweezers, cotton pads, paper tape, brush), and lubricants (thermal paste, silicone or oil lubricant, alcohol or a mixture for degreasing surfaces).
Some laptops do not need to be completely disassembled to clean the fan and other parts, these types have a separate cover on the bottom of the equipment. Opening it up will give you full access to the entire cooling system. If you did not find such a cover, you will have to disassemble the laptop almost completely. To do this, unscrew all the screws on the bottom of the laptop. Be sure to check that you have unscrewed all the screws. Then, using a screwdriver, carefully pry off the DVD / CD drive, it should pull out without much effort. You may also need to disconnect HDD you may need tweezers for this.
Opening a laptop
The next step is to remove the back cover of the laptop. You will need to carefully pry off the seam between the main body (this is the part of the laptop with the keyboard) and the back. The easiest way to do this is from the side of the opening for the DVD / CD drive. Carefully, using a screwdriver, unfasten all the locks around the device, trying not to damage the plastic.
If you did everything right, then the laptop lid will detach without any problems.
Cleaning and lubricating the cooler (fan)
The cooling system consists of a fan, a heatsink and a copper bar. Inspect the cooler if it can be removed separately from the entire system. So, we unscrew it and we can clean the blades and the radiator from dust. If your system does not have a quick-removal fan, you will need to remove the entire  system. Pay attention to the fixings of the system. Each hole is numbered. This is done to prevent deformation of the copper conductor during dismantling and installation. Unscrew the screws in order from largest to smallest. When all screws are removed, you can lift the system by gently rocking it.
If the processor is separated along with the cooling system, do not be alarmed (do not try to peel off the processor with a screwdriver or knife, you can damage it). The processor can be separated from the system by simply heating it over an open fire (for example, from a candle or a lighter), and then simply installing the processor back. Now the cooling system is in your hands, in the places where the copper conductor contacts the computer parts, there is an old thermal paste. It should be removed with a cotton swab and alcohol, and it is also removed from the processors. Next, you should clean the radiator and cooler blades from dust with a brush, dismantling the air channel on the cooling system.
Now we can grease the fan. On the different types coolers have different lubrication options. To determine how to lubricate it, you need to tear off the sticker from the impeller. If there is a hole, put a little grease in there (on the tip of a screwdriver), and stick the sticker back. In the event that there is no hole, you need to pull the impeller and after a little effort it will come off the pulley. Next, we also put a little grease inside the impeller and put it in place.
Assembling a laptop
Now you can assemble the system. We collect the air channel, if the junction of the cooler and the radiator was glued with adhesive tape, then we remove the old one and glue it with a new one. Then we apply a little thermal paste on the processors (note that the thermal paste should be specifically for a laptop, fine-grained, usually gray or steel, check with the seller). Next, we put the cooling system in place, when all the guides are in the grooves, press the copper conductor a little and move it, for a uniform  distribution of thermal paste. Then screw all the screws (do not tighten), and check again if the system is in place. Only after you have made sure that everything is installed correctly, begin to tighten the screws. Required by numbering, from smallest to largest.
Next, you need to install the back cover of the laptop. It is better to start installing the cover from the side of the microphone and headphone jacks. Be sure to make sure before snapping all the locks between the main body and the cover that all the connectors are in the holes allocated for them. Lock all locks.
Now you can install the hard drive. Be sure to check before tightening the screws whether the cable for connecting the hard drive is pinched. Carefully place the DVD/CD drive into the installation hole, it should snap into place without much effort. If this does not happen, check if you did everything correctly.
Outcome
Please note that Maintenance(cleaning the laptop fan) should be done every one and a half to two years. Depending on the location and total time of use. You can also check the degree of contamination of the fan by bringing your palm to the radiator window. From there, warm air should blow. If this does not happen, or the air burns your hands badly and the bottom of the laptop gets very hot, it's time for you to clean the cooling system.
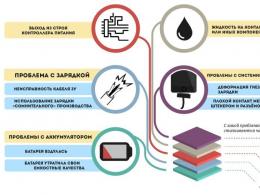
laptop overheating - common cause contacting the service center. IN best case laptop noticeably "slows down". At worst, high temperatures lead to breakage. The reasons are different: improper operation, air vents clogged with dust, wear of the thermal interface, and even initially unsuccessful design. Let's try to figure out what causes the causes of overheating, and how to deal with them.
What does it consist of
The laptop cooling system consists of a fan (or fans), heatsinks, and vents on the case. A typical design - a copper heatsink snakes through the processor and video card chips, leads to a fan that blows hot air through a hole in the laptop case. At the points of contact between the heatsink and the chip, there is a layer of thermal interface between them: thermal rubber or thermal paste.
How to determine the temperature
Modern laptops are able to diagnose themselves. Feeling that the temperature "passes" for normal, the laptop reduces performance. They say about this that "the computer began to slow down." In more complex situations, the laptop crashes and displays a warning about the problem on the next boot. But you should not rely only on the intelligence of a laptop. You can independently determine the high temperature "by eye". If you feel that the laptop heats up much more than when you bought it, then you need to take action. To whom a scientific approach is closer, we recommend installing a thermometer program. For example, HWMonitor. Please note that measurements must be taken in a "loaded" state - while watching a movie, while working with 3D graphics or while playing.

HWMonitor shows the temperature of the chipset (THRM), processor cores (Core #0 and Core #1), graphics card chip (GPU Core) and hard drive(HDD). The maximum temperatures of the equipment depend on the model, but there are indicative figures:
- processor - 75-85 °;
- video card - 70-90°;
- hard drive - 50-60 °;
- chipset - up to 90°.
If the temperature exceeds the upper limit, it makes sense to seek the help of a specialist.
Causes of overheating and necessary measures
Poor cooling system design
Alas, it happens that overheating is associated with design features laptop. Typically, such a laptop gets very hot from the first day of operation, or after a short operation, because. more susceptible to the causes discussed below.
There is no need to despair. Build a simple structure on your table, as in the photo. Just lift the back end a little. This will improve air circulation and the temperature can drop by 5-10 degrees. The method can be applied anywhere - the usual one will do book.

Greater effect can be achieved with a special cooling pad. The stand is a design with fans. With them, you can achieve a decrease in temperature by 5-15 degrees. Among the disadvantages are large dimensions and the need for external power from a wall outlet or USB.

"Craftsmen" offer more original solutions.

Misuse
The laptop can only be used on hard surfaces - on a table or on a stand. In extreme cases - on your knees (although it is difficult to sit in this position for a long time). It's all about the ventilation holes. When the laptop is on the table on small "legs", air enters under its case. When the laptop is placed on a soft surface (in a bed, on a sofa, on a thick tablecloth), the ventilation holes are closed. Hot air is not removed, cold air is not drawn in, and the temperature inside the case rises.
The recommendation is very simple: stop using the laptop incorrectly. Work at the table. And if you can't imagine life without a laptop in bed, use bedside tables and coasters. The latter, for example, can be bought at Ikea.

Holes and fan clogged with dust
This happens with almost all laptops. Dust accumulates inside the case, clogs the vents and impairs the performance of the fans. It is recommended to carry out scheduled cleaning after the end of the warranty period and every following year. Cleaning can only be done from the inside. No vacuum cleaner, special "computer" or powerful home, can pull out all the dust through clogged holes.


And disassembly-assembly requires certain knowledge. At least theoretical. It will be sad to see how the motherboard cracked due to the fact that the screws were screwed in the wrong order.
Replacing the thermal interface
As we said at the very beginning, at the points of contact between the heatsink and the chips, there is a layer of thermal rubber or thermal paste between them. When replacing a thermal interface, not only knowledge is important, but also skill. A layer that is too thick, thin, or uneven can cause the laptop to run hotter than before. As a rule, the replacement of the thermal interface is combined with cleaning from dust.
Failure of the ventilation system
The laptop ventilation system consists of two parts:

- The heat removal system is a combination of thermotubes and radiator grilles. Designed to transfer heat from processor chips to heatsinks, where this heat is dissipated by air flow.
- The fan itself. May not be available on some laptop models.
Most often, the fan itself fails, usually due to overheating, the bearing jams or becomes loose over time and begins to “crack”. In "smart" laptops, with a faulty fan, at startup, the BIOS displays an error message about the cooling system. To diagnose such a malfunction in more budget laptops, it is enough to bring your hand to the radiator outlet grille under a significant load, the lack of air flow and fan noise indicates a fan malfunction.
The second common malfunction of the cooling system is a malfunction of the thermotubes. Thermal tubes stop conducting heat from the processor to the radiator grille. In this case, the fan will run at full speed, a cold air stream will be output from the laptop, but the processor will overheat. This malfunction is dangerous for a laptop due to the failure of the processor or motherboard.

But the photo shows that the thermotube is torn off from the copper plate, there is no heat sink from the processor
There is only one way to deal with such malfunctions - replacement.
So, if your laptop gets too hot, make sure you use it properly. If problems appear when working on hard surfaces, bring it to the service. So far, it's just a rise in temperature. But if nothing is done, it can lead to serious physical damage to the equipment. Better prevention.
All models of modern compact PCs must have good system ventilation. This will ensure adequate cooling for all parts of the device, its performance. Fans work for air intake and for blowing out, and over time, debris accumulates in the case. Every user should know how to properly clean a laptop from dust.
When you need to clean your laptop from dust
A clear signal that it is time to clean the laptop from dust at home will be braking, system freezing, shutdown due to overheating. This happens due to the accumulation of dust in the cooling elements, which is not removed from there on its own. Coolers start to work worse. If a lot of dirt has penetrated inside the device, then it can get on the bearings, and the fans will start to make a creaking sound. The processor, video card will become very hot, which can lead to damage to the computer.
Different manufacturers use special cooling systems. For example, Asus, Samsung and Hewlett-Packard, if you take them apart, will look completely different. For the same reason, for some models, mandatory cleaning is needed after a year of use, while for others, the need for this may not arise for two years. If you don't want to take your PC apart because it's still under warranty, there's a way to clean your laptop of dust yourself without opening it.
How to clean a laptop from dust without disassembly
The main “dust collector” in a laptop is the cooling fans. Due to the accumulation of dirt, the cooler starts to work worse, and the computer starts to warm up. To clean them, it is not necessary to remove the cover and break the seals, there are several options for how to clean the laptop fan from dust indiscriminately:
- using a cylinder of compressed air;
- using a hair dryer;
- blowing with a vacuum cleaner.
How to vacuum a laptop
For those who doubt whether it is possible to clean a laptop from dust with a vacuum cleaner, instructions on how to do this will be given below. The main condition is that the device is powerful and has a "blow out" mode. This method will save you from having to disassemble the laptop or give it for cleaning. service center. You can do the dust removal yourself. How to vacuum a laptop:
- Disconnect the power cord from the device, remove the battery (if possible).
- Switch the vacuum cleaner to blow mode. Use only the main tube without additional attachments and extensions.
- Move the hose to the fan grille and turn on the appliance.
- Swipe the tube from side to side to blow the entire grill and fan well.
Some of the dust will surely escape from the case through the air intake holes, but keep in mind that some dirt will still settle inside the case. Using the same principle, use a hair dryer or (which is better) a compressed air bottle, use it several times to clean the cooler. You can do this procedure regularly - once or twice a month. If you have serious problems due to contamination, it is better to clean the laptop completely.

Disassembling and cleaning the laptop from dust
The surest way to reliably clean a laptop from dust yourself is to completely disassemble the device. Remove the cover, unscrew the main parts and wipe them well. Ideally, it is necessary to replace the thermal paste on the main elements (processor, video card). You need to carry out self-cleaning, provided that you have the necessary skills. It is important to remember the location of the screws, the sequence of their screwing.
Disassembling a laptop is easy, it often becomes a problem to put it back together. During the first disassembly, it is recommended to have a camera with you, and before removing one or another part of the panel, take a picture of the original appearance of the computer. Also, when cleaning, you will need a brush, a dry cloth, alcohol and a few pieces of cotton wool. If you decide to change the thermal paste, then take a fresh tube of the substance.
How to clean a laptop fan from dust
To figure out how to clean a laptop from dust yourself, you need to remove back panel. As a rule, this does not cause difficulties: it is fastened with screws that are easy to unscrew or plastic latches. The "locks" are opened by simply opening the panel. Better use for this plastic cards A: They will not damage the surface and internal parts. If the cover does not give in, then you missed a bolt somewhere - the panel should be removed easily, without a crunch or crack.
Right under top panel, as a rule, all elements of the system are visible. In most modern laptops, the cooler is directly connected to the cooling system of the processor, video card, so it is not recommended to unscrew it. Use a can of compressed air, a vacuum cleaner, to blow its blades well. Direct the air at different angles, into the system and away from the grille. For thorough cleaning, use a brush that can remove dirt deep inside the fan.
How to clean your keyboard
A less difficult stage of self-cleaning a computer is processing the keyboard. A lot of dirt and dust often accumulates under the buttons, which can affect its operation. There are two types of cleaning:

- Surface without the need to disassemble the PC. It is necessary to turn off the device, brush all the keys well with a brush, blow the surface with a vacuum cleaner. Take a cotton swab, apply alcohol and clean the buttons from dirt and grease.
- Deep cleaning of the keyboard with the need to turn it off.
In the second case, you will have to disassemble the back panel and disconnect the cable from the computer motherboard. As a rule, it is quite wide and has a blue sticker on the end. It is easy to determine if you first unscrew the screws from the keyboard panel. In some models of portable PCs, it is not fastened with bolts, but with plastic latches that can be easily detached using the old bank card if you carefully pry them off. You need:
- disconnect the power, remove the battery;
- remove the back cover of the device, carefully fold all the bolts;
- disconnect the cable: do not make great efforts, in most cases you need to bend the "antennae" that press the wire;
- take out the keyboard;
- take a picture of the location of the keys;
- remove each button when washing a flat tool;
- with a dry cloth, and then with a cotton swab with alcohol, treat the surface from dirt;
- wipe each key and put them in place;
- reconnect the keyboard to the PC.
How often should you dust your laptop?
The frequency with which you have to clean your PC from dirt on your own depends largely on the design of the cooling system, the dust content of the room, and the case ventilation system. As a rule, it is recommended to carry out preventive cleaning once a year, but some models can safely do without it for up to 2 years. You can blow out the coolers yourself with a can of air every week to avoid problems.
Video: how to clean a laptop from dust yourself
Did you find an error in the text? Select it, press Ctrl + Enter and we'll fix it!It happens when there is not enough. The radiator grill becomes clogged with dust over time, less and less air is needed to cool the laptop. One fine day from overheating may die completely. To prevent this from happening, you just need to clean the cooler. The easiest way to do this is if you have powerful vacuum cleaner blowing. In this case, you do not have to disassemble anything. It is enough just to blow the air in the direction opposite to the usual air flow. If blowing did not help, then you need to disassemble the laptop case.
Each laptop has its own disassembly system, try to find the disassembly instructions for your particular model. If there are no instructions, then you will have to understand and disassemble yourself. Unplug your laptop from the mains and remove the battery from it. Loosen the screws on the bottom of the laptop. Depending on the model, you may need to remove different laptop covers, the main thing is that you understand what you should be looking for. And you are looking for a cooler, which you can recognize by the large fan attached to it. As soon as you find it, the first thing you will be horrified by is the amount of dust that has settled on it. Take a vacuum cleaner and carry out the primary processing of the cooler to remove large rags of dust. Be careful, in this case, the vacuum cleaner should work for suction, not for blowing. Carefully remove any remaining dust with cotton swabs. If the dust covered motherboard, walk with chopsticks and on it, but be extremely careful not to damage anything.
Some experts advise cleaning the cooler in the bathroom with a hot shower on. The damp steam will tamp up flying dust and prevent it from getting back into the laptop, but never attempt to rinse the laptop or parts of it with water. After you have cleaned the cooler, assemble the laptop in the opposite direction to how you took it apart. If you did everything right, then immediately after turning it on you will be able to notice how much faster and easier the laptop has become. Laptops get clogged with dust very quickly, so you may have to repeat the cleaning after a year.
note
Often this happens due to the fact that the fan of the laptop cooling system is corny clogged with dust or something else (there have been cases when laptops were brought to the SC, where the fan was clogged with cat hair). If there is dust on the fan and radiator of the cooling system, then the cooling efficiency decreases, and the fan starts to make a lot of noise. To fix this, you need to clean the laptop from dust.