How to set up a D-Link Wi-Fi router: step by step instructions. How to set up a D-Link Wi-Fi router: step by step instructions How to open the settings of a d link dir 300 router
The D-Link DIR-320 router is considered one of the most popular ones. It is not uncommon for a person to buy a D Link router, bring it home, and then call the Internet provider and say: “Here, I bought it and I can’t set it up.” Consider briefly specifications and appearance.
Appearance and characteristics
As for the characteristics, there is little that can be said, because all routers are extremely similar. Used standard wireless network 802.1g/b. On the wifi router e, in addition to LAN ports, there are 1 USB port. The antennas on the modem are removable. To be more precise, it has only one antenna. The device itself supports PPPoE, L2TP, PPTP connection protocols.
On the front of the device there are various indicators, light bulbs that allow you to monitor the status of certain characteristics:
- First comes standard indicator power supply, indicating whether the router is turned on
- Next come the indicators showing the status of the Internet, the Wi-Fi wireless network.
- After there are 4 indicators of local ports. They show if there is any router connection through the LAN cable, and if so, through which port.
- The last USB indicator that shows if the USB port is enabled.
There are various ports and connectors on the back of the machine where you can insert cords and cables to correct installation:
- First, there is one antenna, which allows communication to reach further around the house or apartment.
- Then comes one USB connector, it has a green stroke.
- Then there are 4 blue local ports, they are required to connect using a LAN cable.
- Then one WAN or INTERNET connector for connecting the Internet to our modem.
- The penultimate connector is needed to connect the power supply.
- The last button is labeled "RESET". It is needed to reset the settings, it is used to reset the password. The button itself is located inside the hole, which protects it from accidental pressing, because after resetting the password, the router has to be reconfigured.

Router Installation
Before you configure anything, the modem needs to be unpacked and installed in a place convenient for us. It is important that there is an outlet nearby, so that the Internet cable gets there, so that there is a PC nearby.
There is nothing complicated in the installation. For proper installation, you just need to connect electricity to the router, connect the computer and the Internet through the cords. The internet cable is provided by the internet company. At this stage, the configuration and installation of D Link DNS to the required location is over.
Complete router setup
Before we start setting up the Internet and wireless network, before setting up the D Link DIR 320 router, we need to check if the computer is connected to the modem correctly.
Connection test
To check the connection of a computer that is running an operating system Windows system 7, we need to go to "Start", then to the standard computer control panel. (It's easier to do as in the instructions for the screenshots, it will help you set up the D Link DIR 320). 
Now we need to select "View network status and tasks".

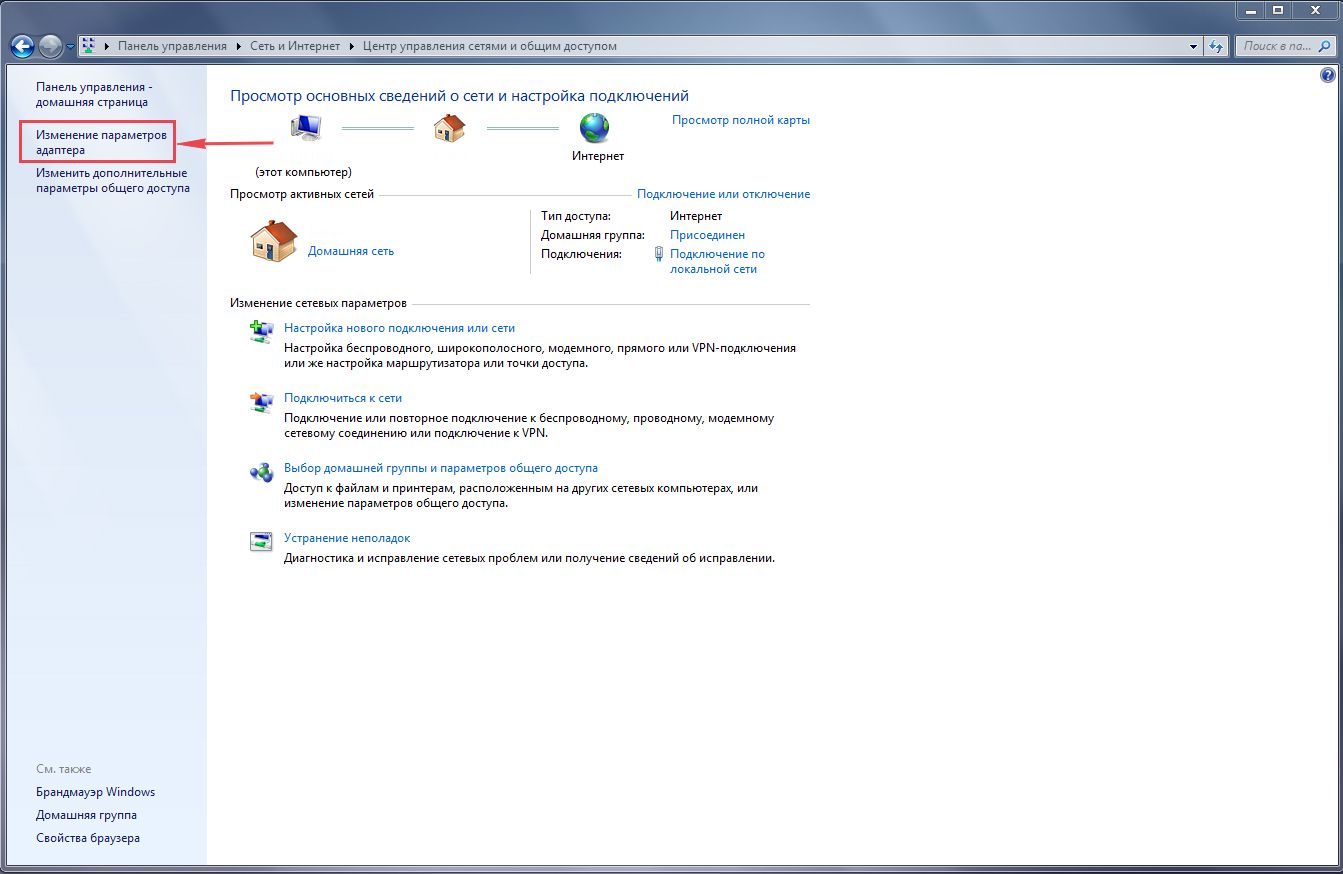
After we have selected the required item, we need to click "Change adapter settings".

Now you need to look in the properties of "Connections by local network».

We need to see if the Internet Protocol version 4 properties are correct.

Here we put ticks, if they are not there, everything is opposite auto tuning like in the screenshot. And click "OK".

In the event that you have Windows 10 on your PC, then follow a different instruction. "Start", and then you need to click on "Settings".

Click on the "Network and Internet" sub-item.

On the left in the menu, you need to click on Ethernet, then we look at setting the adapter parameters, as in the first instruction.

Now we also look at the properties of the LAN network.

We look at the properties for the fourth version.

Again, set the automatic configurations and click "OK".

Now we are sure that the connection is working properly, if not, then we update the software. And on the updated router, you can now perform some actions.
Setting up an Internet connection
To perform any further actions, we need to enter the router settings. This happens through the browser, there we go to 192.168.0.1 or 192.168.1.1 - these are sites. This must be done on a PC that does not have an internet connection.
In the window that opens, we are prompted to enter Login & Password. By default, the username and password are identical - admin.

Now we have entered the center of all configurations, we need to change the interface language to Russian, so that it is easier. In the upper right corner, where Language, select "Russian".

PPoE
Consider default setting over PPPoE. The last is the type of connection, you need to check it with the provider. All important information for setting may be in the contract. So the first thing to do is look there.
In the "Network" block, click on WAN. In the window that was just opened, you need to click "add". Here we do as shown in the screenshot.


You need to select the connection type PPPoE, or the one that is prescribed by the Internet company in your contract.
Then we indicate the username and password, they are numbered 2 and 3.4. This data is in the contract with the Internet company.

After that, click "Apply". Internet should now appear on your computer.
PPTP with dynamic address
First, to perform debugging, we need to go to the WAN link, which is located in the "Network" block. On the new page, click "Add".
1. Type of connection, as in the name of this subparagraph, PPTP with a dynamic address.
3. Next, we need to provide a username and password. This data must be provided by the provider.
4. Same with the VPN server. It must be provided by the provider.
5. Click apply.

PPTP with static address
In order to configure a static connection, you need to add a new connection. This must be done in the WAN window, it is located in the "Network" block. We select the connection type that we need - PPTP + static.
1. After you need to fill in the fields in the IP paragraph. All required fields must be completed. And we can request data from the provider, support services, or find it in paper contracts.
2. Now the settings of the VPN item. Immediately check the box next to automatic settings. After we register all the selected fields. This is the username and password twice, they must be in the contract. As well as the address of the VPN server.
3. Click apply.

Setting up a wireless network
Setting up Wi-Fi is even easier. To do this, in the Wi-Fi block, select the basic settings (if you can’t find it, then first you need to click on the advanced settings at the bottom of the page).

After you need to check the box next to "Enable wireless connection". Then we provide the required information. SSID is the name of your Wi-Fi. Here we write any, only in English letters. Click "Apply".

Now you need to set a password for Wi-Fi. To password-protect Wi-Fi, select "Security Settings".

In the "network authentication" field, select WPA2-PSK. The encryption key, which is number 2, is the WiFi password. After being introduced New password we need to save. To do this, click on "Save and reload", this is at number 3.

Now all questions about how the D Link Dir 320 nru router is configured should disappear. Sometimes, before setting up a router, we need to learn how to flash a D Link Dir 320 router. But we will talk about this, and how to create a network storage using a D-Link DIR router, in another article.
Related videos
Fast internet to you!
Resetting the router settings is done by pressing and holding the Reset button on the back of the router.
In order to get into the web interface of the router, you need to open your Internet browser and type http://192.168.0.1 in the address bar, Username admin, field password leave blank (provided that the router has factory settings, and his IP did not change).

Change the factory password.
Default: Login admin, password admin
Couriers-configurers must change the password in the settings to the Serial number indicated on the box (S/N). When reconfiguring, it is also recommended to use it as a password for the router and wi-fi S / N ( serial number).
In the router interface, you need to go to the System tab, Administrator password menu.
In field Password(New Password) Enter a new password.
In field Confirmation(Confirm Password ) repeat new password.

Then press the button Save settings.
After that, the router will prompt you to re-enter its settings.
Setting up Wi-Fi on the router.
In the interface of the router, you need to go to the tab WiFi, menu basic settings (Basic settings).
1.SSID the name of your wireless network.

2. Tab WiFi, choose Security Settings.

3. Drop down list Network authentication (Network Authentication): select
WPA-PSK/WPA2-PSK mixed is the most safe way protect your wireless network.
Encryption key field PSK .
You must enter any set of numbers, length from 8
before 63
. They also need to be remembered so that you can specify them when you connect to the network. It is recommended to use the serial number of the device as a key (indicated on the box, in the form S/N########). Click on the button "Change" to apply and save your settings.
The instructions will show basic characteristics and help you set up D-link router DIR-300, correct setting even such a budget router will help organize a full-fledged local network at home, and when buying a more powerful router, the D-Link DIR-300 will expand the infrastructure, becoming an excellent addition to the new device.
Before configuring the D-Link DIR-300, you must connect the router as follows:
- The provider cable coming from the shield in the entrance is connected to the WAN port, which may be called "INTERNET".
- The laptop is connected to one of the LAN ports of the router. By default, these 4 ports are equivalent if VLAN has not been configured on this DIR-300 before.
Reset
When connecting a used D-Link DIR-300, there are often problems with both idle ports and logging into the GUI interface. To correctly configure such a router, you need to start by resetting to factory settings: press the RESET button, which is located on the case near the power connector, and hold it for 15 - 20 seconds.
The RESET button is soldered directly to printed circuit board D-Link DIR-300, so you can not apply excessive force when pressing: this will disable the router!
Restoring the factory settings will also help if the user settings of the router are lost: the previously saved configuration of the D-Link DIR-300 should be loaded only after a rollback to the original settings.
A detailed description of how to restore the factory configuration is presented in
Computer settings
The computer from which the modem will be configured must obtain its local address when the DIR-300 is powered on. For this you need to bring network card PC mode automatic receipt configuration.
1. Through the connection icon, which is located on the taskbar, you can go to the management network settings OS.

2. Then, go to properties local connection.

3. In the properties of TCP / IPv4, you need to check the "Automatic" checkboxes.

Login to the router interface
To sign in to d-link settings DIR-300, you need to type the network address of the router in Chrome or IE.
If the PC setup is correct, it will boot main page GUI of the router and a request for authorization in the D-Link DIR-300 will appear.

If you encounter difficulties when establishing a connection between the computer and the router, you should use.
Setting up an Internet connection
D-Link DIR-300 supports all types of connections made by Russian providers. Before setting up the router, you need to prepare an agreement in order to enter the credentials correctly.
Connection setup on D-Link 300 can be done in two ways:
1. Automatically using the Click'n'Connect utility. This option is well suited for IPoE and PPPoE connection types;

2. Manual setting will be preferred over automatic for connections using VPN server: L2TP and PPTP.

If you need to configure the D-Link DIR-300 router for providers and use these instructions.
WiFi setup
D-Link DIR-300 equipped wireless module N150 with 2 dBi antenna. In a small room, the router provides stable coverage. You can configure WiFi either manually or using the built-in utility or the WPS protocol.
- Manual setting allows you to select the channel, speed mode and transmitter power, allowing you to fine-tune the router for specific operating conditions.
- The WPS protocol is supported by both TVs and mobile gadgets, connecting devices to D-Link 300 without entering a password.
- Automatic configuration of a secure WiFi network of the router is performed using the built-in "Wizard" D-Link DIR-300:

More detailed information how different ways performed WiFi setup in D-Link 300 is contained in . It also provides recommendations for improving the coverage and wireless speed of the router.
Routing
Setting up the network has ceased to be the prerogative of geeks and IT people: a huge selection of devices has appeared on the market, designed to make the life of an ordinary person better and more comfortable.

A home park of network devices can include both "PC + smartphone + iPad", as well as a media server, a game console, a TV, an IP camera and even a refrigerator, and the router is the heart home network. Setting it up means connecting these devices to the D-Link DIR-300 physically: by wires or via WiFi. And then ensure the interaction between them and the Internet by setting access and translation rules at the channel and network levels.
The DIR-300 DHCP server distributes IP addresses to all devices and can operate both in dynamic and static modes. It is necessary to configure static addresses in order to register a route, since the router must associate a permanent local IP address with the MAC address of a given device for this.
The DHCP settings in the D-Link D-300 are configured on the "Network - LAN" tab. Here the address pool is set and the MAC/IP bindings are configured.


Routing rules can be configured on the D-Link DIR-300 interface tab "Advanced - Routing".


VLAN setting
Most new revisions D-Link modem DIR-300 support VLAN - a technology for dividing a network into logical segments. Configuration is performed on the "Advanced - VLAN" tab.


VLAN is used to group devices into target groups, optimize traffic and distribute access.
For example, you can allocate a children's computer to a separate VLAN of the router and add a WiFi segment so that the child can connect a tablet or phone to the D-Link DIR-300 with his own password: no matter what device the connection is made from, such a router setting will provide viewing, protected content - filter.
The reason for using VLAN can also be the installation of an IPTV set-top box. If the provider supplies tagged traffic, then one of the interfaces of the D-Link DIR-300 router will have to be combined with the WAN port in transparent mode.
Port settings D-Link router DIR-300 according to this scenario is described in the example of Rostelecom television.
Firewall and NAT
To set up remote access as home computer, so to network storage connected to the DIR-300, you need to understand how the router implements the network security mechanisms.
Broadly speaking, under remote access refers to any traffic initiated from the outside towards the home network and router. Thus, in order to organize a game or FTP server providing connection with remote machines, some configuration of the D-Link DIR-300 must be done.

NAT is a mechanism that translates addresses so that Internet hosts do not see the real structure of the home network on the other side of the router, but process all traffic from local computers, seeing only the external WAN IP address. Thus, NAT in D-Link DIR-300 protects against network attacks, preventing direct external access to the device's internal addresses.
But at the same time, the router will interfere if you need to give friends access to FTP folders with photos or to the game space. To set up translation rules for NAT on the DIR-300, you need to perform port forwarding.
To configure the ports of the router, you need to go to the D-Link DIR-300 settings on the "Virtual Servers" tab.

 +
+
There is another problem: the router receives a gray WAN IP from the provider, which is constantly changing. Not having permanent address, connect to D-Link DIR-300 remote computer will not work, because the destination address is always different.
To solve this problem, DDNS technology is used, which allows you to assign a permanent IP to a dynamic Domain name. Real-time DDNS updates WAN IP change information and provides continuous binding to a domain name.
Firewall is a set of rules for filtering traffic based on criteria such as: address, port, protocol, direction. Filtering by the D-Link DIR-300 firewall is carried out after decapsulation, routing and NAT processing.
The router allows you to reconfigure the firewall on the "Firewall - IP Filters" tab.


Network expansion
The D-Link DIR-300 Wi-Fi router supports client mode. This means that you can connect the DIR-300 router to an upstream router either via cable or WiFi to expand your existing network.
First you need to enter the settings. In the D-Link DIR-300, this feature is located on the "WiFi - Client" tab.

The “Enable” checkbox switches the router to client mode, and the “Broadcast wireless network” option allows you to connect WiFi devices to the D-Link DIR-300 as a repeater.
From the list available networks you need to select the corresponding SSID name of the upstream router and log in, and in the network settings you set the name of the current network, password and encryption method.
If the WiFi password is changed on the upstream router, then the D-Link DIR-300 client settings will have to be reset. Therefore, in order for the router to work as a client without interruption, it is recommended to fragment the WiFi network and use one of the segments as a bridge.
Now you need to configure the modem of the D-Link DIR-300 router so that the devices connected to it as a client have access not only to local nodes, but also to the Internet.
On the DIR-300 "Network - WAN" tab, you need to specify the WAN upstream direction through the WiFi-Client interface and set the type of routing used in the local network.

DIR-300 configuration is accompanied by reboot notifications after each configuration change.

Found a typo? Select the text and press Ctrl + Enter
I plan to write a number of different articles on routers from D-Link, and in almost every article you need to write how to enter the settings of your D-Link, in order to configure some function, change the password, etc. I recently wrote, so I had to fully describe the process of logging into the control panel. Therefore, I decided to prepare a detailed article on how to enter the settings on D-Link routers. And in other articles, I will just put a link to this article :) I already wrote (for all manufacturers), and specifically . For each manufacturer of routers, I will try to prepare such instructions.
With D-Links, everything is very simple with settings. Like most manufacturers. And if you used to have Asus, or for example Tp-Link, then you should not have problems accessing the control panel on D-Link. I already wrote in some article that I just don’t like the fact that the D-Link settings seem to change with almost every firmware update. By the way, how to update it, I already. Well, okay, their routers are good, popular, you can ignore this, it's just difficult to prepare instructions. I will prepare this article using the D-Link DIR-615 router as an example. (with firmware 2.5.20).
Entering D-Link settings
As usual, we first need to connect our router to the device from which it will enter the settings. It could be desktop computer, laptop, tablet, phone, and even TV. But, if possible, it is best to configure the router according to network cable, that is, use a stationary PC or laptop for this business. But, if this is not possible, then you can also configure via Wi-Fi from the same laptop or mobile device.
Network cable connection
The cable must be included with the router. We take it, and connect the router to the computer. Like this:
On the router, we connect the cable to one of the 4 LAN connectors. On a computer or laptop, to the network connector. There shouldn't be any problems here.
Wi-Fi connection to enter settings
If you want to set up your router from a device that cannot be connected via cable (or you don't have a cable), then you can connect via Wi-Fi. If you have already used a router, then you know how to do it. If the router is new, and you want to set it up, then immediately after connecting the power to it, it will broadcast the wireless network. The name of which will be standard. And as far as I understand, it is the same as the model of your router. For example, for D-Link DIR-615, the default Wi-Fi network is called "DIR-615".
Find the network on your device and select it. For example, on a laptop (I wrote about connecting laptops to Wi-Fi):

The default network may be without a password (in this case, there will be a corresponding icon next to it, and the password request will not appear). But, even on a new router, when all the settings are on it by default, the network can be protected. The standard password is listed at the bottom of the router and signed as WPS PIN.

If you are prompted for a password when connecting, enter it. The connection to the router must be established.
We go to the control panel at 192.168.0.1
Most main point: all standard data for entering and into the settings are indicated on the sticker on the router itself.

There is an IP address for accessing the settings, D-Link has this 192.168.0.1 . Username - admin, and default password - admin.
Open any browser and address bar dial our IP - 192.168.0.1
. Let's go over it. 
You will be prompted for a username and password. The username is admin and the password is also admin. But, provided that you have not changed it yet. If changed, then indicate the one that was installed. And if you forgot it, you will have to do a factory reset. (press the RESET button on the router for 10 seconds with something sharp).
The control panel of the router will open, and a window will immediately appear in which you need to specify a new password twice, which will later be used to enter the settings (instead of admin). Specify it and click the button Ready.

Save your settings. Click on the menu item System(top) and select Save.
That's all, you can continue setting up your router. Just don't forget to save your settings, and when you're done, reboot your router. (power off and on).
Before proceeding with setting up the router, let's check the LAN connection settings. For this:
Windows 7
1. Click on " Start", "Control Panel".
2. Click on " View network status and tasks".

3. Click on " Change adapter settings".
4. LAN connectionProperty".

5. From the list select " Internet Protocol Version 4 (TCP/IPv4)"and press" Property".

6. " and "", then press the button " Ok".

Windows 10
1. Click on " Start", "Parameters".

2. Click on " Network and Internet".

3. Choose " ethernet" and click on " Configuring Adapter Options".

4. In the window that opens we see " ethernet". Click on it right click mouse, select " Property".

5. From the list select " IP version 4 (TCP/IPv4)"and press" Property".

6. In the window that opens, you need to check the boxes " Obtain an IP address automatically" and " Obtain DNS Server Address Automatically", then press the button" Ok".

Connecting a router D-Link DIR-300 to the computer
The next step is to connect the router D-Link DIR-300 to your laptop or personal computer. To do this, you need to connect the cable that your provider ran to the port of the router, where it is signed INTERNET, in older models this port is signed as WAN. The cable that came with the router, connect one end to a laptop or computer, connect the other end to one of the four ports that are marked in black on the router (the colors of the ports may vary depending on the version of the router). And yes, do not forget to connect the power cable.

Authorization of the D-Link DIR-300 router
So, we connected the router, now you need to use any browser (be it Google Chrome, Mozilla Firefox, Internet Explorer, etc.) get into its web interface. To do this, open the browser and in the address bar we drive in the address of the router: 192.168.0.1
- Username - admin
- Password - admin
So, we drive in the data and click " Enter"

Setting up a router D-Link DIR-300.
And finally, we got to the web interface of the router and now you need to configure the equipment. First of all, we will secure the wireless network by setting a password for wi-fi. Then you will need to find out what type of connection is used to access the Internet, is it PPTP, L2TP or PPPOE. You can find out by calling your provider (this is the organization with which you have entered into an agreement to provide Internet services). So, let's start setting up the router. First, let's change the language of the Web interface to Russian. To do this, go to the tab " language"and choose" Russian"

Setting a password for wi-fi on a router D-Link DIR-300.
I bring to your attention Video instructions for setting a password for wi-fi on a router D-Link DIR-300
Let's also take a written and illustrative look at setting a password for wi-fi on a router D-Link DIR-300.
1.
Select on the web interface " Advanced settings"
2.
On the menu " WiFi"choose an item" basic settings".

3.
Let's check" Enable wireless connection" should be checked.
4.
Below in the line " SSID:" come up with and specify the name of your wireless network, this name will continue to glow when you connect to the network.
5.
"The country" - "Russian Federation", "Channel" - "auto", "Wireless mode" - "802.11 B/G/N mixed".
6.
Press " Apply" and return to the previous menu by clicking on the symbol that looks like a triangle on the left.

7. On the menu " WiFi"choose" Security Settings".

8.
In line " Network Authentication:"choose" WPA2-PSK".
9.
In line " PSK Encryption Key:" you need to come up with and enter a password for the wireless network that we created above.
10.
Press " Apply", then in the upper right part of the web interface, go to the tab " System"and press" Save and Reload".

Setting up PPTP on the router D-Link DIR-300.
PPTP on the router D-Link DIR-300 using the D-Link DIR-620 router as an example.
Let's also write and illustratively PPTP on the router D-Link DIR-300.
1.
On the menu " Net"choose" WAN".

2. Add".

3.
In point " Connection type:"choose" PPTP+Dynamic IP".
4.
Check the box next to " Connect automatically".
5.
Username:"), password (on the line " Password:Password confirmation:VPN server address:").
6.
Apply".

Setting up PPTP with a static IP address on the router D-Link DIR-300.
Consider connection setup PPTP with static IP on the router D-Link DIR-300
1.
On the menu " Net"choose" WAN".
2. In the window that opens, click " Add".
3.
In point " Connection type:"choose" PPTP+Static IP".
4.
Below in the section IPIP address:", subnet mask in line " Netmask:", default gateway in line " Gateway IP address:" and DNS in line " Primary DNS Server:".
5.
Check the box next to " Connect automatically".
6.
Below we drive in the Username (in the line " Username:"), password (on the line " Password:"), confirm the password (in the line " Password confirmation:") and specify the server address (in the line " VPN server address:").
All of the above data is provided to you by the provider (the organization that provided you with the Internet).
All this data is usually prescribed in the contract with the provider. If for some reason you could not find them, you need to call hotline your provider and find out how to get them.
7.
After all the manipulations with the settings, press the button " Apply".

Setting up L2TP on the router D-Link DIR-300.
1. On the menu " Net"choose" WAN".
2. In the window that opens, click " Add".
3.
In point " Connection type:"choose" L2TP+Dynamic IP".
4.
Check the box next to " Connect automatically".
5.
Below we drive in the Username (in the line " Username:"), password (on the line " Password:"), confirm the password (in the line " Password confirmation:") and specify the server address (in the line " VPN server address:").
All of the above data is provided to you by the provider (the organization that provided you with the Internet).
All this data is usually prescribed in the contract with the provider. If for some reason you can't find them, you need to call your provider's hotline and find out how to get them.
6.
After all the manipulations with the settings, press the button " Apply".

Setting up L2TP with a static IP address on the router D-Link DIR-300.
Consider connection setup L2TP with static IP on the router D-Link DIR-300. Usually a static IP address is provided legal entities, either as additional service to the basic tariff for individuals.
1.
On the menu " Net"choose" WAN".
2. In the window that opens, click " Add".
3.
In point " Connection type:"choose" L2TP+Static IP".
4.
Below in the section IP"specify the ip-address in the line" IP address:", subnet mask in line " Netmask:", default gateway in line " Gateway IP address:" and DNS in line " Primary DNS Server:".
5.
Check the box next to " Connect automatically".
6.
Below we drive in the Username (in the line " Username:"), password (on the line " Password:"), confirm the password (in the line " Password confirmation:") and specify the server address (in the line " VPN server address:").
All of the above data is provided to you by the provider (the organization that provided you with the Internet).
All this data is usually prescribed in the contract with the provider. If for some reason you can't find them, you need to call your provider's hotline and find out how to get them.
7.
After all the manipulations with the settings, press the button " Apply".

Setting up PPPOE on the router D-Link DIR-300.
I bring to your attention Video instructions for setting up the type of connection PPTP on the router D-Link DIR-300 using the D-Link DIR-620 router as an example.
PPPOE on the router D-Link DIR-300.
1.
On the menu " Net"choose" WAN".
2. In the window that opens, click " Add".
3.
In point " Connection type:"choose" PPPOE+Dynamic IP".
4.
Below we drive in the Username (in the line " Username:"), password (on the line " Password:Password confirmation:").
All of the above data is provided to you by the provider (the organization that provided you with the Internet).
All this data is usually prescribed in the contract with the provider. If for some reason you can't find them, you need to call your provider's hotline and find out how to get them.
5.
After all the manipulations with the settings, press the button " Apply".

Setting up PPPOE with a static IP address on the router D-Link DIR-300.
Consider connection setup PPPOE with static IP address on the router D-Link DIR-300. Typically, a static IP address is provided to legal entities, or as an additional service to the basic tariff for individuals.
1.
On the menu " Net"choose" WAN".
2. In the window that opens, click " Add".
3.
In point " Connection type:"choose" PPPOE+Static IP".
4.
Below in the section IP"specify the ip-address in the line" IP address:", subnet mask in line " Netmask:", default gateway in line " Gateway IP address:" and DNS in line " Primary DNS Server:".
5.
Below we drive in the Username (in the line " Username:"), password (on the line " Password:") and confirm the password (in the line " Password confirmation:").
All of the above data is provided to you by the provider (the organization that provided you with the Internet).
All this data is usually prescribed in the contract with the provider. If for some reason you can't find them, you need to call your provider's hotline and find out how to get them.
6.
After all the manipulations with the settings, press the button " Apply".

Firmware update
I bring to your attention Video instructions for updating the firmware on the router D-Link DIR-300 using the D-Link DIR-620 router as an example.
Connecting a computer to wi-fi
After connecting and configuring the router, you need to connect the computer to a wireless network (wi-fi), consider connecting to wi-fi in two operating systems, this is Windows 7 and Windows 10:
Windows 7
Video instruction
1.

2. Sultan

3.
Connect automatically" and press
"Connection".

4. You must specify " Security KeyOK".

5.

Windows 10
Video instruction
1. In the lower right corner of the desktop we find the icon for the wireless network (wi-fi), click on it with the left mouse button.

2. A window pops up with a list of available wireless networks. We select a wireless network, in my case it is a network " Sultanova"(You choose the network whose name was given when).

3. After selecting a network, check the box next to " Connect automatically" and press " connect".

4. You must specify " Security Key"this is the wireless network password that you specified when. After you have specified the key, press " Further".

5. We wait, perhaps a couple of seconds, and you are connected to your wireless network.