Programs for playing on the Internet and local network. The simplest local network
Hello dear users. Here I have presented the material in an accessible way for those people who spend most of their time playing various computer games. But it will be useful not only for avid gamers, but also ordinary users who will also find something to draw for themselves. So, today you will all learn about how you can independently organize a network via the Internet.
Not so long ago, I caught my eye quite useful program called "Hamachi". It is with its help that our virtual one will be created via the Internet. Therefore, now I will describe in detail for you the whole principle of operation of this software. So, let's suppose that you want to play this or that game together with your friend or friend. However, the application you need does not contain a function that supports this action through world wide web, but only has the option of distribution over the local network. Dont be upset. This will be enough for us.

In order to play with this feature, we must have a local network via the Internet. The above program will provide us with such a network through which you can not only play with friends, but also transmit and receive any data. To do this, start by downloading this miracle on your computer. After that, you will be ready to have a local network over the Internet on your device. Once you have done this, you will need to install it on your HDD. There is nothing complicated in this, so I will not describe this procedure.
So, the program is installed, and now we must run it and configure it accordingly. Activate the app. In the window that appears, you should see a big blue button. It is on it that you should click in the first place. Next, you need to enter the name of the client. Here your imagination has a place to roam, because nothing fundamentally depends on what you write here.

Confirm the entered data and see the following window. There you select and click create tab new network. You will see another window in which you will need to specify the name of your connection. It must be entered in a line called "identifier". There is also a password field. It may or may not be entered. But it's still better that he was. In this case, unwanted people will not be able to join you.
When you have filled in all the necessary data, click on the button called "Create". So you will have a local network over the Internet. When this operation is done, your comrades should join you. To do this, you need to click on the button in the main menu called "Connect to already existing network". After that, you just need to enter the desired identifier, as well as the password for the connection. It's all. Now this local network will connect computers via the Internet, which will “think” that they are in a regular “local area”. Play together, transfer data - all this is possible thanks to Hamachi.
Home PC owners are often faced with the need to combine several computers into local network, however, due to a number of reasons (remoteness from each other, etc.), this is not feasible in the usual ways. And then they will come to the rescue specialized utilities who can create virtual local area networks between users connected to the Internet.
The most obvious area of application of such utilities is multiplayer games that do not support online mode, but the matter is by no means limited to them. There are all the usual things available on a local network: browsing the contents of folders with open access, work with the network printers, listen to other users' iTunes library, and even control other people's computers with built-in Remote Desktop.
Developer logmein
The size 3.1 MB
Works without account; there are ways to display real networked PCs in a virtual environment
Verdict
Hamachi has been the most popular virtual networking tool for a long time. True, after it was acquired by a large company LogMeIn, specializing in network software, there were some concerns about its future, but, fortunately, they turned out to be in vain - the program remains free for non-commercial use, with a limit of 16 clients on the network. If there is a need to connect large quantity man, you should consider purchasing a license that allows you to use the utility to connect 256 computers. This opportunity will cost $200 per year.
Unlike EasyVPN discussed below, Hamachi can be used without creating an account: by pressing just one button, the user connects to the server and receives an IP address. Further, the procedure for creating a virtual network or connecting to an existing one looks exactly the same as in Comodo.
We note some advantages of those who are not too lazy to spend a few minutes to receive free account. In this case, they will not have to re-configure the program on a new PC every time, and they will also be able to manage their account through the web interface.
In the mode of operation without authorization, which is called mesh, only the computers associated with the virtual network are visible. If there is an account, the mode appears Gateway virtual networking, allowing them to access all the resources of another user's real LAN. In mode hub-and-spoke you can only work with selected PCs on a real network.
Please note that Hamachi does not have a remote desktop management function, since LogMeIn has a separate utility for this. The program can also enable/disable encryption and traffic compression.
One of the most interesting features of Hamachi is the creation of a special utility installer using the web interface, which can automatically add other users to the required virtual network. You can get such a distribution kit after simple operations on the site, you can use the link to the program repeatedly.
Freeware (for non-commercial use)
Developer Comodo
The size 6.44 MB
Rich functionality; easy setup
Inability to use the same account on multiple PCs at the same time
Verdict
 |
Comodo EasyVPN is a relatively new development of a company known for several good and at the same time free programs for non-commercial use (Comodo Firewall, Comodo Backup, Comodo Antivirus, etc.). The utility for creating a virtual network, which is also distributed free of charge, was no exception.
The advantages of EasyVPN include a simple user-friendly interface and simple virtual network setup. The user needs to create an account - perhaps this is not very convenient, but it will allow you to forget about re-configuring the program (all the old options will be picked up again even after installing it on a new PC). Unfortunately, you will not be able to log in under one account from several computers at the same time - when it is activated on one PC, the other will be automatically disconnected from the server. This is due to the fact that one specific static IP address is associated with the account.
Comodo EasyVPN allows you not only to create virtual local networks for games, but also has a built-in chat with the function of transferring files over a secure channel (however, by default, absolutely all traffic is encrypted, not just files). Also part of EasyVPN is the ability remote control PC, and all these additional options do not need special settings - for example, to activate Remote Desktop, you need literally one click on local computer and confirmation of opening access from the user on the other end of the wire. In the settings, you can set the ratio of picture quality / transmission speed.
EasyVPN also allows you to deploy private, password-protected virtual networks and gives you the option to turn off traffic encryption.
The Comodo utility only works in Windows environment, however, it supports all the latest editions of Microsoft OS, including 64-bit versions.
Freeware
Developer AWIT Systems
Site
The size 12.2 MB
BitTorrent support for file sharing; running on multiple PCs under one account
Unusual interface
Verdict
 |
The Remobo utility is currently in beta testing, so any program features are available to everyone. In the future, however, it is planned to introduce premium accounts with specific features, but free basic accounts will still be available to any user.
In general, Remobo functionally repeats its competitors, although it looks somewhat weaker. One of the features of this program is a specific file sharing option - just add the desired set of folders and files to the list, and they become available for viewing and downloading to other users. The most interesting thing is that the exchange of information takes place via the BitTorrent protocol; for this, a client of the same name is even installed along with the program. Such a solution can increase the speed of data exchange if the same files are available on different computers multiple users at once.
Remobo also has a built-in remote desktop utility and messaging program.
Remobo works on Mac OS X and Linux, supports 64-bit versions of Windows. Unlike Comodo EasyVPN, it allows you to use one account to run the program on several computers at once - thus, the user can combine all his machines into a virtual network.
Freeware (open source)
Developer
Site
The size 1.92 MB
Support for common messaging protocols; free use for commercial purposes
Average functionality
Verdict
 |
Wippien differs from other utilities primarily in that it can also be used for commercial purposes, since the project is developed as an open source and anyone can, if necessary, download not only the program itself, but also its source codes.
Wippien is based on Jabber, so you can either use an existing JID or register as an account new account kind [email protected]
The utility supports communication between users and, unlike other programs in this review allows you to do this not only through the internal protocol, but also in such familiar networks as ICQ, MSN, AIM and Google Talk.
For those who don't need additional features, a stripped-down version of Wippien is offered - the MiniVPN utility. This distribution of the program is distributed without support for the messaging function. However, to use it, you still need to have the installed full version Wippien, which should be run at least once in order for the settings to be saved in the system.
In addition to MiniVPN, another separate application is available - WippienService, which allows you to run Wippien on the system as a service and work with the computer in this way, even if the user has logged out of his Windows account.
Wippien can also function in 64-bit versions of Windows, for this you need to download and install a 64-bit driver separately. There is also a beta console client Wippien for Linux.
Freeware
Developer
Site
The size 8.4 MB
Cross-platform; installation on routers; proxy support
Works as a server-client (you can create a "one-way" virtual network)
Verdict
 |
NeoRouter is the most cross-platform utility of the above. It is installed not only on everything latest versions Windows (since Windows 2000) and Mac OS X (since Tiger), but also works in almost all major Linux distributions(including 64-bit versions) and, most interestingly, can be installed on routers using tomato, fon and openwrt firmware, which extend the capabilities of these devices.
NeoRouter differs from other participants in that it operates on a server-client basis. You need to install server part on one of your computers and then connect to it using a separate Network Explorer program. A direct P2P connection is created between the PCs, which allows data to be exchanged faster than with an intermediate link. To connect to remote computer it is not necessary to install NeoRouter on every machine. To do this, it is enough to use the portable version of the program recorded on a flash drive.
Another feature of NeoRouter is proxy support (HTTP, SOCKS4 and SOCKS5); in addition, the functionality of the program can be extended using a small number of add-ons available on the developer's website.
Setting up a virtual local area network using Comodo EasyVPN as an example
Consider the process of creating and connecting to a virtual network using the example of two people. The procedure is almost identical in all programs, we will be based on Comodo EasyVPN.
So, both users install the utility from the manufacturer's website (while agreeing to add a new virtual adapter to the system when the installer asks about it). After launching EasyVPN, each of them needs to create an account, which can be done directly from the program by clicking on the button Register a new account.
To deploy a network, one of the users selects from the menu Networks – Create a new network. In the window that appears, specify the network name and password (option Enable VPN we recommend leaving it on). After that, the other user selects on his computer the item Networks – Join a network and enters the network name and password in the dialog that appears.
Now both are in the same virtual network and can, for example, play computer games over the LAN.
Another important point concerns the first launch of the utility and its attempt to access the Internet. The firewall installed in the system may ask if it is worth adding new program to the whitelist. You must answer in the affirmative, otherwise you will not be able to configure the virtual network.
Updated - 2017-02-14
Local network with Internet access. If you have several computers at home and all your household members are constantly working on them, and only one of them has Internet access, then you have probably wondered more than once: - How to connect all these computers to high-speed ADSL Internet via one modem?
Local area network with Internet access
That's what we'll talk about now. Moreover, not all computers are necessarily desktop. This can be done with laptops too. I will describe all the settings for Windows XP. Although the same can be done for other systems. The difference is only in access to the settings of the network card. In all operating systems, network card settings are hidden in different ways.
The only difference is in the way to them, because. different systems have different control panels. No matter how good and fancy new OS(Vista and Windows 7), but I prefer Windows XP. Its settings (especially for the local network) are the most flexible and simple.
I have three computers at home, and everyone is constantly busy. And for a long time Internet access was only on one computer, which is very inconvenient. But then the moment came when we realized that it was time to do something. We gathered a small home council, and decided to create our own small local network with public access in Internet.
What do we need to build a local network with Internet access
Bought a switch for five ports,

and three network cables: one - 3 meters and 2 x 10 meters.

network cards in all three computers built-in motherboard, so we bought only one - to connect the modem.

We already have a modem.

In general, everything cost "little blood" - a little more than 700 rubles.
Connecting equipment for a local network
WITH INTERNET ACCESS
- Installed a new network card in PCI-slot computer with direct Internet access. This computer will be our Server. The system immediately detected it and installed itself required driver(if your system could not install the driver, then install it yourself from the disk that is sold with the network card).
- We connected a modem to this network card and.
- We will connect a cable to the second network card of the same computer, which will be connected to the switch at the second end.
- Connected network cables to the network cards of each computer.

- The second ends of the cables were connected to the switch and connected to the mains. The LEDs flashed on the monitor screens, messages appeared that network cable connected.

LAN setup
WITH INTERNET ACCESS
Then we started setting up the local network.
- Started from Server settings with direct Internet access. To do this, choose - Start – Setting – Control Panel – Network connections .
- First, we renamed the network card to connect the network, so as not to get confused in the future. They named it solidly - " LAN" (local computing network).
- We now have an icon called " LAN” is the network card to which we have the LAN cable connected. Let's look at the settings of our network card for the local network. To do this, click right click mouse icon " LANProperties ».

- The window " LAN - properties ". If you named your network card differently, then you will have a different name, only the word Properties will not change. Roles, this does not play any, so you can not get hung up on this.

- In this window, on the tab " Are common» double-click on the entry « Internet protocol (TCP/ IP) "or select this entry and click the button below" Properties ».
- The following window will open TCP/ IP) ».

- In it, we make it active (set a point) opposite the entry “ Use the followingIP-the address: ».
- Assign to our computer, which will connect to the Internet directly via modem IP-address: 192.168.0.1 (if you have never set up a network, then it’s better to write the same as ours). The last digit must be 1 . The server must be the first on the network.
- Subnet mask: 255.255.255.0 (dots are not required anywhere). Nothing else needs to be written anywhere. Save everything (press the button " OK “).
- Put the checkmarks at the bottom on « When connected, display the icon in the notification area ” and “Notify me when there is limited or no connection ”, so that you can immediately see if the cable has come off or for some other reason there is no network. And once again we save everything.
- We have configured the entire network card of the first computer named "Server". Now let's move on to setting up the network itself.
- Select the icon " LAN ».
- And click on the left in Network tasks on the icon of the house " Install home network or small office network ».

- The window " Network Setup Wizard ". Click on the button " Further ».

- In the next window, press the button again Further ».

- In the next window, put a dot on the entry " Other"and press the button" Further ».

- In this window, set the point to " This computer belongs to a network that does not have an Internet connection ” (this makes it easier to set up the network).
- And again press the button Further". The next network settings window will open, where we will be asked to give a name and description.

You don't have to write a description, but the name should be clear to you. Better change it at this step. For everything to work without problems, all names must be written in English letters, and it does not matter in large or small.
At first we called the computer STELLA so it writes the current name STELLA, and now we will rename it to SERVER. And again press the button Further“. In the next window, you must specify the workgroup.

Name working group You can leave it as it is, or you can change it to whatever you like. It also doesn't affect anything. We press the button " Further “.

This page is best left as is.
On the next page, you will see all the data that you entered to set up your network. If something does not suit you, you can return by clicking the button " Back and change what you need. If everything suits, then press the button " Further ».

In this window, it is better to set the point to " Just complete the wizard… ».

Next, press the button " Ready” and the system will prompt you to reboot. Follow this advice. In the same way, we configured the network cards on the other two computers. The only difference is only in a different name, and the name of the group must be the same for everyone (i.e. the same).

On another computer, as you can see, the name of the icon has not been changed, since there are no other icons, and you can’t confuse it with anything. There is only one network card.
V " Internet protocol (TCP/ IP) »For the second computer, write:
IP -address: 192.168.0.2
Default Gateway: 198.162.0.1
PreferredDNS -server: 192.168.0.1
AlternativeDNS -server: we don't write anything

V " Internet protocol (TCP/ IP) "For the third computer, we write:
IP -address: 198.162.0.3
Subnet mask: 255.255.255.0
Default Gateway: 198.162.0.1
PreferredDNS -server: 192.168.0.1
AlternativeDNS -server: do not write anything

Everything is the same as on the second, only IP-addresses last digit 3 .
Our network is set up. Now we configure the network card to which the modem is connected (if you already have a modem connected and the Internet is configured, then you can skip this part of the article).
We go again to the first computer, which was called " Server". We go to - Start – Control Panel – Network connections . Right click on the network card icon Internet and select " Properties ».

The window " Internet properties ". In it, on the tab " Are common» select in the small window « Components used by this connection: » entry « Internet protocol (TCP/ IP) " and open it either by double-clicking or by pressing the " Properties ».

In the new window that opens Properties: Internet Protocol (TCP/ IP) » set a point on the record « Use the followingIP-the address: " and write:
IP-the address: 192.168.1.26
Subnet mask: 255.255.255.0
Default gateway: 192.168.1.1
(These figures may be different for you. You can find them by calling the technical support phone from your Internet provider).
And press the button " OK ».

We fall again into the window " Internet properties ". Go to the tab " Additionally ».

Put a check mark in it Allow other network users to use the Internet connection this computer". And uncheck "Allow other network users to manage Internet connection sharing"". We press the button " OK and restart all computers. That's all. We now have a network with all computers connected to the Internet.
- Main condition: The “server” must be turned on and connected to the Internet, even if no one is working on it yet, otherwise other computers will not be able to access the Internet.
On other computers (Clients) you only need to launch your browser (Opera or whatever you have installed).
Here is the connection diagram of our computers:

It is imperative to install an antivirus program on all computers, especially since it can be updated regularly for you. Enjoy the advantage of a local network.
Connecting two computers to the Internet
The settings are no different from the connection that we reviewed above. The only difference is the absence of a switch, because we simply connect one computer to another with a single network cable.
By the way, from my experience I can say that you can take the same cable as for the local network, and not twisted pair. For two computers it doesn't matter. But when you connect a twisted pair to the switch, your network will not work.
Here are the questions we looked at:
- XP LAN Setup,
- connecting two computers to the Internet,
- Internet Connection Sharing,
A small introduction
As already mentioned in short description, this article will focus on creating a local network over the Internet using the Hamachi utility.
If you create a local network via the Internet using this utility, you can play with friends, share files and use various utilities to work with the local network. For programs and Windows network Hamachi will be the most common local area network. All information transmitted over the Internet is encrypted with a 256-bit key using the AES algorithm (the Internet, despite the fact that the Internet is usually depicted as a white cloud, is actually a rather gloomy forest with a lot of dangers. So encryption is very useful here)
Setting up Hamachi
First of all, this utility needs to be downloaded (download / download / website) and installed. Suitable for our purposes free version with a limit of 16 computers on the network. This is more than enough.
After installation, run this utility and click the button Turn on:

To create a network via the Internet, click Create a new network:

Enter the network ID (name) and password to connect to it:

Click on the button Create:

That's all. We have created a network.
Now consider how to connect other computers to this network. To begin with, you also need to install and run this utility on them.
In the main window, click on the button Turn on:

Specify the name of the client (it must be different from the one entered earlier. The client is different):

To connect to the network, click on Join an existing network:

Enter the name and password of the previously created network:
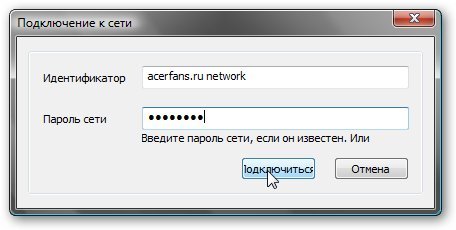
Click connect:
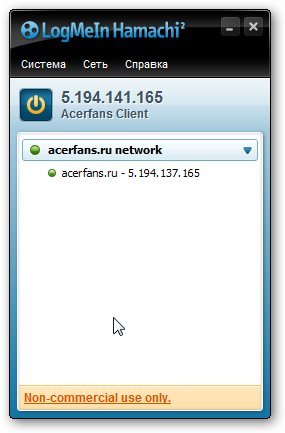
That's all. We have connected to the network. A green circle means the connection succeeded. Yellow - connection error. A flashing bezel means data is being transmitted.
In the system, on both computers that connect via the Hamachi network, an additional network connection appears:


The configuration of this network is completely similar to the local one. It is described in these materials:, and in other articles on this site
Additional features and settings
The Hamachi utility allows you to manage your network through a Web interface. To do this, you must first register, enter the account name in the program settings (link join):

and go to the Hamachi website.
Also, this utility allows you to exchange messages between network users. To do this, right-click on the user who is connected to the network and select the item Chat

In the window we write messages to others:

This utility also allows you to configure traffic compression and encryption:

That's all. All questions about computer networks please state in this forum thread:. For questions about organizing joint games on the network, please contact the topics in.
Please post all questions on the forum.
I already had one article on my blog about organizing a local network over the Internet using , but today we'll talk about another service used for similar purposes - OpenVPN.
What are we talking about? About how to link two or more computers located in completely different places into a single local area network. That is, physically they will be far from each other, but virtually - as if in the same local network. What does it give?
- Ability to share files over the network;
- The ability to run some type of program that accesses from one computer to another;
- Ability to play games together and much more.
The article itself was not written by me, it was suggested to me by one of the regular participants of our forum, NicromanseR, for which I am very grateful to him. I myself have only slightly edited the article so that it fits more into the style of this blog.
So, how to make a LAN over the Internet using OpenVPN? The task is not entirely simple and will require a certain amount of manipulation, but the proposed instruction describes them in sufficient detail.
So, download the distribution kit of the program from the official site, unpack it and install everything by default. Attention! You need to confirm the installation of the TAP-Win32 Adapter V9 network adapter driver when Windows asks for it.
openvpn server
One of the computers will act as an Openvpn server, other computers will connect to it. It is desirable that it has a dedicated (permanent) . Let's start with setting it up.
- Run the window command line Start - Run (or Win + R) - cmd.exe
- The hardest part of the setup is generating certificates and keys. Here you need to be extremely careful and follow the instructions exactly. In the console window, without quotes, enter "cd C:\Program Files\OpenVPN\easy-rsa" where C:\Program Files\OpenVPN\ folder with installed program. The console window is not closed.
- Enter again without quotes "init-config"
- Edit the vars.bat file and set the following parameters: KEY_COUNTRY, KEY_PROVINCE, KEY_CITY, KEY_ORG, KEY_EMAIL. These parameters cannot be left blank, the rest can be left as default. Example:
set KEY_COUNTRY=EN
set KEY_PROVINCE=MO
set KEY_CITY=Moscow
set KEY_ORG=GazProm
set [email protected]
set KEY_CN=changeme
set KEY_NAME=changeme
set KEY_OU=changeme
set PKCS11_MODULE_PATH=changeme
set PKCS11_PIN=1234You won't be able to edit in a standard notepad. given file, so I used the program "Notepad ++".
- We enter in turn the commands "vars" "clean-all" and "build-ca". The last build-ca command will ask for parameter values. All parameters can be left unchanged by pressing Enter, except for one - Common Name. Here you need to enter some name, I entered the name of the organization.
- Now let's generate a certificate and a key for the server by running the command: "build-key-server server" Same as in previous team, all parameters can be accepted by default, but for Common Name, enter the word "server". Answer the last two questions "Sign the certificate?" and "1 out of 1 certificate requests certified, commit?" in the affirmative by pressing "y"
- Now let's generate keys for clients by running the commands:
"build key client1"
"build key client2"
(these are commands for two branches, by analogy, you can make keys for more) - Like last time, we accept all parameters, except for the Common Name, for which we specify client1 and client2, respectively. Answer yes to the last questions. It remains to execute one more command: "build-dh"
- So, as a result of executing all the commands, we will get a number of key and certificate files in the C:\Program Files\OpenVPN\easy-rs\keys folder. Go to the C:\Program Files\OpenVPN\config folder on the server and copy the contents of the .\easy-rs\keys folder there. Copy separately the following files for client machines: ca.crt, client1.crt, client1.key, client2.crt, client2.key to a safe place, then they will need to be transferred to the computers of connected clients. That's all with the server, you can start the OpenVPN Service, you can do automatic start services if necessary (via Start - Control Panel - Services), but it remains to make a config for the server. I would like to point out right away that Windows clients and servers, the path must be written through a DOUBLE "\\". And so, let's go to the C:\Program Files\OpenVPN\config folder and create the "server.ovpn" file there, its content should be something like this:
port 5194
proto udp
dev tune
subnet topology
ca C:\\Program Files\\OpenVPN\\config\\keys\\ca.crt
cert C:\\Program Files\\OpenVPN\\config\\keys\\server.crt
key C:\\Program Files\\OpenVPN\\config\\keys \\server.key # This file should be kept secret
dh C:\\Program Files\\OpenVPN\\config\\keys\\dh1024.pem
server 10.218.77.0 255.255.255.0 # vpn subnet
ifconfig-pool-persist ipp.txt # IP addresses of clients will be stored here
push "route 192.168.78.0 255.255.255.0"
keep alive 10 120
comp lzo
persist key
persist-tun
status openvpn-status.log
log-append openvpn.log
verb 4
mute 20
client-to-client
client-config-dir C:\\Program Files\\OpenVPN\\config\\keys
The config is ready, it remains to create 1 more file with the name "ipp.txt" and the following content:
client1,10.218.77.10
client2,10.218.77.11
client3,10.218.77.12
That's it, you can still lag behind the OpenVPN server. Let's move on to setting up the client part for creating a local area via the Internet.
openvpn client
To configure the Openvpn client, Go to the folder at C:\Program Files\OpenVPN\config and create a file there "client.ovpn" with the following content:
remote my_server 5194
client
dev tune
proto udp
subnet topology
persist key
persist-tun
ca C:\\Program Files\\OpenVPN\\config\\keys\\ca.crt
cert C:\\Program Files\\OpenVPN\\config\\keys\\client1.crt
key C:\\Program Files\\OpenVPN\\config\\keys\\client1.key
comp lzo
verb 4
mute 20
Here you need to change the value of "my_server" to the IP address of your server. Copy the ca.crt, client1.crt, client1.key files to the C:\Program Files\OpenVPN\config\keys folder for the "client1" user and the ca.crt, client2.crt, client2.key files for the second client (if you are planning more than two). This completes the OpenVPN client setup. Let's try to connect.
Note (Sunder): If you configure everything correctly, then after starting the service on the server and sessions on the clients, your computers will be on the same local network. Technically, it will look like you have a new network adapter, which functions as a LAN over the Internet. And further. Open VPN is free product with open source, so you do not work through a black box, are not tied to other people's servers, in general, with this technology you get real protection from outside world. In addition, OpenVPN works great under , so you can even link computers with completely different operating systems to each other.
If you have any questions, write, we will try to help.