Is it possible to scan through a network printer. How to install the scanner and set it up for work
You will need
The local network; - scanner; - the Internet.
Instruction
Use the RemoteScan 5 application to share the scanner over the network. Download this program at the link http://www.cwer.ru/node/6585/. Next, install it on your computers. Accordingly, to the computer to which the scanner is connected, the server version, to the other PCs to which the scanner must be connected via the network, the client version.
Please note that when installing the client version of the program, a message about the absence of a scanner may appear, do not pay attention to it. After the application backend installation is complete, click right click mouse over the program icon in the tray. To access settings.
Select a scanner, configure ports to access it. Please note that it may take one to three minutes for the device to be detected. If this does not happen, then your scanner model is not supported by the application.
Wait until the strikethrough icon disappears from the icon. Open anti-virus/firewall. Allow access to the scanner port, by default it is 6077. If you have NOD32 antivirus, then go to your personal firewall, open settings, select interactive mode, create a separate rule for the RemoteScan program. Install client applications on required computers, add the special software there, and scan over the network.
Use another program to share the scanner over the network if your scanner was not detected by the previous application. To do this, download the Blindscanner program. Go to http://www.masterslabs.com/en/blindscanner/download.html, select desired version, download and install on the computers the server and client versions of the programs, respectively. The setup is done in the same way.
Set up scanner over LAN
Many users have come across a situation where there are several computers and one printer (scanner or MFP) in the office. Most often, one or two MFPs with PCs connected via a local network are enough to perform office tasks. However, configuring the scanner over a network can be tricky. This is due to the fact that Windows has a built-in print server, but there is no such scanning server. That is why we offer you instructions on how to set up scanning documents over a local network.
Read also:
We will organize the scan server using the RemoteScan program. To do this, you should perform the following steps:
Download Remote Scan for Windows (7/8/10)
Version: 5.494.Download
Run the downloaded file, select the installation language and click the "Next" button. Follow the prompts of the Installer Wizard and click "Next". We agree with the license, and in the options window, check the box "Install Server Software". The program instance will be installed in server mode, allowing other PCs to use the network scanner. At the next stage, you need to make sure that the checkbox is ticked, as in the screenshot.
IMPORTANT! The firewall may issue a permission request for the program. In this case, it is recommended to allow the application on all networks.
Launching the server version
You just need to select a scanning device so that RemoteScan can share it. Double click on the desired device.
The program will be minimized to tray and will continue to run itself when you turn on the computer.
If it becomes necessary to reconfigure the scanning device, you can always do this by right-clicking on the RemoteScan program icon and selecting "Chose a Scanner".
As you can see, using the program is quite simple.
How to make a network scanner?
Master's response:A local network that unites several computers within the same organization has some advantages in use: access to shared applications and files and the ability to sharing equipment: scanners, printers.
To make the scanner network, you can use the RemoteScan 5 application. To do this, you need to download this program at: http://www.cwer.ru/node/6585/, then install it on each computer on the network. Accordingly, on the PC to which the scanner is connected - the server version, and on other personal computers to which the scanner needs to be connected via the network - the client version.
Please note that during the installation of the client version of the program, a message may appear stating that the scanner is missing. You don't have to pay attention to it. Upon completion of the installation of the server part of the program, you need to right-click on the program icon in the tray in order to be able to use the settings.
You can then select a scanner and set up ports to connect to it. Keep in mind that it can take up to three minutes to identify any device. If this did not happen, then this model scanner is not supported by the application.
Wait until the icon is no longer crossed out. After that, you should open the anti-virus program / firewall and allow access to the scanner port. The default is 6077. If you have NOD32 antivirus installed, then you can go to your personal firewall, open settings, select interactive mode and start creating a separate rule for the RemoteScan program. You need to install the client version of the application on the appropriate computers, add special software, and perform network scanning.
Perhaps using another program to share the scanner on the local network will help if the previous application did not detect your scanner. To do this, you need to download the Blindscanner program, go to http://www.masterslabs.com/ru/blindscanner/download.html, select the required version, download and install the server and client versions of the program on your computers, respectively. Perform the setting in the same way.
Canon 1133(a) - printing and scanning over LAN and WiFi, setup
This article will describe how to set up MFP Canon 1133 and 1133A for printing and scanning through local network.
The Canon 1133 MFP is an interesting office-class device. Large cartridge (up to 6,000 pages), double-sided printing. Model 1133A has duplex scanning. Large paper tray. Two network interfaces - wired (Ethernet) and wireless (WiFi).
Model 1133A differs in that it adds an auto-feeder to the scanner and the ability to scan duplex.
Since this is an MFP for the office, accordingly, the most correct way to use it is a direct connection to the local network.
Connecting Canon 1133 (1133A) to LAN
The beginning of the setup is connecting the MFP to the local network. This is done through the settings menu on the MFP itself. To connect via WiFi, you need to specify an access point and a password for it. For a wired connection, you need to specify automatic receipt network settings via the DHCP protocol, but if you do not have a router on the network (DHCP server), then you need to manually specify the IP address of the MFP. If you are using wired connection- connect the cable to the MFP and to the router.
After saving the settings, you need to turn off and then turn on the MFP. Through the MFP menu, check whether the device has received an IP address. On the MFP panel there is a quick button for accessing information about the status of the device.
Setting up a router
If a router is used on the local network, then you need to open the admin panel of the router and check the connection of the MFP to the local network there - it should be in the list of network clients that received an IP address.
It is necessary to assign this address to the MFP on a permanent basis! So that the router assigns this IP address to the MFP every time it is turned on.
How to connect a printer scanner to a computer
Up to this point, connecting a printer or scanner to a computer was not an easy task.
It was necessary to find a special port, make sure correct setting all system drivers, and hope that everything is installed correctly and your OS (Operating System) will give you the opportunity to scan or print the treasured document. Thanks to this guide, everything has become much easier. If your goal is to print documents, connect a printer or scanner to a computer, you need to configure remote access(print documents using the Internet), and you are wondering "How to connect a scanner printer to a computer" - this instruction is for you!
Connecting the Printer to a Personal Computer
Stage number 1. Placing the printer near a PC (Personal Computer).
Make sure the printer or scanner is within easy reach of the cable or port. In other words, the cable should not be stretched, it lies freely.
Advice: Carefully roll up the excess cable and tie it with a rope, this will help you trip less on the cable and increase its durability.
Stage #2. Software.
To facilitate the process of connecting the device to a PC, install the necessary software (software, drivers) supplied with the printer/scanner.
Advice: If a disc with software you didn't have it, don't worry Windows system itself is capable of automatically detecting a printer scanner that is connected to a PC. Also, if all this did not happen, you can go to the printer manufacturer's website and download the driver you need yourself, as a rule, it is located in the "Software and Drivers" section (Almost all modern sites are able to detect your printer scanner automatically).
Stage 3. Connecting a scanner printer.
One of the next steps in resolving the question "How to connect a printer scanner to a computer" is a direct connection to the USB connector.
Advice A: At this point, make sure your printer/scanner is connected to a power outlet and to your computer.
Stage 4. Follow the instructions for your operating system.
At this stage of connecting the scanner printer to the PC, your operating system will do all the work for you, just click next. At this stage, the complete and final installation of the drivers takes place.
Advice: if the system before or after this step still does not see your printer scanner: try connecting your cable to a different USB port, or completely uninstall the drivers and return to step #2.
Stage number 5. Check that your printer or scanner has been installed correctly and correctly.
Open the Start menu, click on Control Panel. Then "Devices and Printers (View Devices and Printers)". Find the desired printer in the list of connected devices.
Ready! After these manipulations, your printer scanner is connected and fully functional.
Scanners
Using a scanner, you can digitize text, a drawing, or an image for further processing, such as preserving old photographs printed on paper for years to come. For the home, flatbed scanners are usually chosen. They are compact and easily scan thick media. For offices, they often prefer feed-through scanners that can only process paper sheets, but at high speed and in streaming mode. Xerox launches scanners various kinds for home and office, having different dimensions, speed indicators and scanning modes, resolution, color reproduction, maximum page load per day and other parameters.
Choose the right Xerox scanner for you, with user-friendly interface, a wide range of functions, high reliability and excellent value for money. Confirm your decision by reading numerous reviews and reviews of Xerox equipment.
In the catalog on this page you can find our model range scanners, go to specific product pages to evaluate specifications, read descriptions, view photos, compare several models with each other and choose the device that suits you best. You can buy a Xerox scanner from our partners in Moscow, St. Petersburg, Novosibirsk, Yekaterinburg and many other cities in all regions of Russia. To find out the addresses of stores in your region, click on the "Where to buy" button under the product image, and on the page that opens, select the city, republic, region or region you are interested in. In addition, you can find out where to buy Xerox scanners by using the following
After turning on the scanner, install the driver for this device in order to possible transfer data between the computer and the scanner. Start by connecting the scanner to Computer USB. (See the instructions for using the scanner and find out how to connect it to your computer.)
Changing Scanner Settings
After installing the scanner, you may want to review your settings or change the default settings. To do this, run the command Start>Control Panel. In the search field in the control panel window, enter the word scanner and press the key
- In the Control Panel window, click on the link that appears View Scanners and Cameras.
- In the window Scanners and cameras a list of installed scanners will be displayed. Click first on any scanner in the area Scanners and cameras and then on the button Scan profiles.
- In the dialog box Scan profiles select the scanner and click the button Change. In the dialog box Change default profile, view the settings, which may include (depending on your scanner model) color management to properly reproduce scanned colors and set resolution. (The higher the resolution, the clearer and cleaner the electronic document but it may take longer to scan).
- Click the button Save profile, and after returning to the properties dialog box, double-click the button close to close windows Scan profiles And Scanners and cameras.
Once you are ready to turn on the scanner, place the document you want to scan into it. Depending on the scanner model, this document can be placed on the scanner and covered with a lid or passed through a tray. See the instructions for the scanner for how to start the scanning procedure (for example, click on the button Scan or Start). The computer will automatically detect the beginning of the scanning process, display a dialog box showing the progress of the scan, and prompt you to view and save the scanned item.
- Fast multi-threaded open TCP port scanner!
- Scan the network and find devices.
- Determine the IP and MAC addresses.
- Remote turn on, turn off and restart the PC.
- Receiving information from a PC over the network by the administrator.
This free program allows scan the local network, detect active hosts, computers, servers and other devices, determine their MAC and IP addresses. Built into the utility multi-threaded scanner of IP addresses and TCP ports in the network, so it won't take long to search for network devices.
How to find out what IP address a device connected to the network has received? It could be a tablet or a TV home wifi network, maybe corporate network with hundreds various devices. In any case, this tool will allow you to scan the network, detect devices and display their addresses (IP, MAC, DNS, WINS).
It supports scanning of one or more ranges of IP addresses and many protocols for discovering network devices (ICMP ping, searching for open TCP ports, NetBios, SNMP, UPnP, ...). After completing the process of searching for hosts on the network, you will have the opportunity to upload the list of detected device addresses to a file or copy it to the clipboard.
Download a free port scanner now and use it whenever you need it!
OS Windows XP/Vista/7/8.1/10 supported; Server 2003/2008/2012/2016/2019.
What else can our address scanner do?
- Receipt various information from found Windows computers over the network: system information, a list of installed software, the contents of the registry (), a list of processes and services, open resources, Accounts and user groups, event log, etc. (if you have administrator rights on the remote computer);
- Obtaining various information from switches and printers via SNMP, UPnP, NetBios ();
- Determining and displaying MAC addresses of devices;
- Search for open TCP ports on a remote host ();
- Ping hosts;
- Route tracing;
- Turning computers on and off over the network ().
It often happens that in addition to a remote printer, you also need a remote scanner to work. And if setting up a printer on a local network is not difficult, then everything is much more complicated with a scanner. The fact is that Windows does not provide tools for sharing the scanner. This is done at the level of its drivers. Therefore, to open access through the local network, you need to use third-party programs.
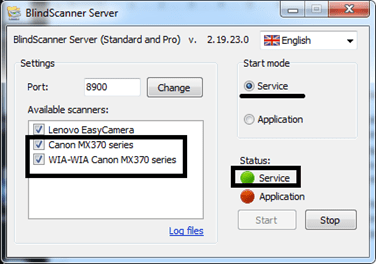
The Blind Scanner utility is great for this, which works exclusively with scanners, making them visible to all computers on the network. The program is installed on each computer in client mode, and on the computer to which the scanner is connected - in server mode.
After installation, the program will automatically start the server service and will work minimized to tray. By opening the program window, you can see the operating mode of the service, its status (active or not), as well as scanners connected to the computer.
The utility is active and available over the network. Now it needs to be installed on all computers from which the scanner will be accessed, in client mode.
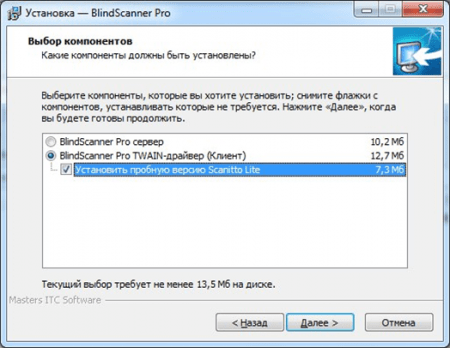
After the installation is completed, the "Scannito lite" program will start, in which you need to select BlindScanner Pro.

A scanning window will open, in which you need to search for the program server. To do this, open the settings (as in the screenshot) and enter the local address of the computer to which the scanner is connected.

The connection will then be attempted. If everything is entered correctly, then in a couple of seconds you can see the scanner itself in the field.

Select the scanner model in the drop-down menu, after which you need to set the settings: resolution, color mode, paper size, and contrast and brightness settings.
Now you can start scanning. Upon completion, the result will be displayed in the preview window, after which you can save it to any directory. As with a printer, only one computer can access the scanner, the second must wait for the first to finish.
This is the simplest yet most reliable way to share a scanner. It can be used both in the office and in home network when it is not possible to move the scanner from place to place. Also, any program that supports scanning, for example, ABBYY FineReader, can act as a client.
White. Their sizes depend on the model and brand of the manufacturer. To date, hundreds of companies produce scanners, mainly from the USA, Japan and some countries of Southeast Asia. The vast majority of them are compatible with operating system Windows.
It is worth noting that there are two ways to install it yourself. Their choice depends on whether you connect the scanner directly to personal computer or (the so-called installation of a local scanner) or to a shared network scanner through which your model will work.
How to install a scanner on a PC or laptop
To install a local scanner, you will need the most common USB cable. As a rule, it is included in the package. However, you can use any other USB cable as well. Connect one end of it to the rear panel of the scanner itself, the other to a special connector. Turn it on and wait for Windows to automatically detect it.
If Windows cannot detect the scanner, you may need to install drivers on your computer. A driver disk is also included in the package. If for some reason you cannot find it, go to the official website of the scanner manufacturer. Drivers for all models will be posted there for free download in special section. Download and install them on your computer or laptop and try connecting the scanner again.
How to install the scanner yourself through a network server
In many organizations, all scanners are connected to one specific network scanner. This makes their work much faster and helps save employees time.
In this case, you will need to spend a little more time to properly install the scanner. First, connect the scanner to your computer with a USB cable. Then click the Start button on your computer. In the menu that opens, select the Control Panel section, and then Network. Following these, you will see a special menu in which you must select the Network and Control Center item and public access. Select the View command network computers and devices.
In the list of scanners, find exactly your scanner model and right-click on it. In the menu that opens, select Install. This will automatically load the Installation Wizard. Follow its instructions exactly by clicking on the Next buttons. At the end of the installation, click the Finish button. This completes the connection of the scanner to the shared network scanner.