A program for connecting computers to each other. How to connect two computers to each other through a network cable
Hello, dear readers of the Help blog for a novice computer user. In this article, we'll look at how connect two computers between themselves to the network using twisted pair. Using twisted pair the most viable option, because given type The conductor has a relatively low price, but it provides a fairly high data transfer rate and distance between computers.
To complete this task, you must have:
- Two network cards (one per computer). If they already exist (for example, integrated into motherboard), all the better;
- Cable twisted pair — based copper cables twisted pairs (that is, two wires twisted together and form a pair) wires (twisted pair), which are divided into shielded (shielded twisted pair, STP) and unshielded (unshielded twisted pair, UTP);

Rice. 1 twisted pair cable
- Two RJ-45 plugs (jack);
- Crimping tool ("crimper").

Rice. 2 Crimper.
First of all, we need to measure the distance between computers (not directly, but along the paths along which the cable will be laid). We add a few meters to the resulting number and buy (it’s easier to choose twisted pair unshielded - UTP). It must be remembered that distance between computers should not exceed 100 meters. We also buy two RJ-45 plugs and a crimping tool (you can crimp the twisted pair cable right at the place of purchase, but we will go the other way and do everything ourselves).
When purchases are made it is necessary to crimp the cable. Since we connect two computers together without using an additional network equipment(switch, hub), we need crimp the cable according to the type of Cross-over ("null-hub"). First you need to prepare the twisted-pair conductors for crimping: cut off the sheath of the conductors by about three centimeters (at both ends), unwind the wires and distribute them by color in the same plane with each other, according to the figure.

Rice. 3 The order of the conductors when performing crimping: a) the first end of the cable; b) second.
We take the RJ-45 plug and insert the prepared twisted-pair conductors into it one by one. Do not forget about the distribution of conductors by color. When the conductors have entered to the end of the plug, we take the crimper (crimping tool) and crimp (we insert our jack at the crimper and squeeze the handles to the end). Made? We repeat the same steps with the reverse end of the twisted pair. Do not forget that here the conductors are distributed in slightly different colors.
When everything is ready, we connect the jacks to the connectors on the network cards of both computers and turn on the computer. We just need to configure the operating system. In our case, this is Windows XP.
When the computer is turned on, we set up a workgroup of our network and give a name to the computer. To do this, on the desktop, call the context menu of the “My Computer” folder (click right click click on this shortcut and select properties - see figure).

If there is no “My Computer” shortcut on the desktop, we do everything using the “START” button menu. In the window that opens, go to the "Computer Name" tab. Enter what you want in the Description field and click the Change button. We prescribe the computer name and the name of the working group (in our case, these are “AUTP” and “DOMM”, respectively) at our discretion.

Press the “Ok” button (twice). A window will appear asking you to reboot. We choose to cancel. After that, go to the “Control Panel” through the “START” button, select “Network Connections”. After going to the “Network Connections” folder, look for the “Local Area Connection” shortcut. Right-click on the shortcut and call "Properties".

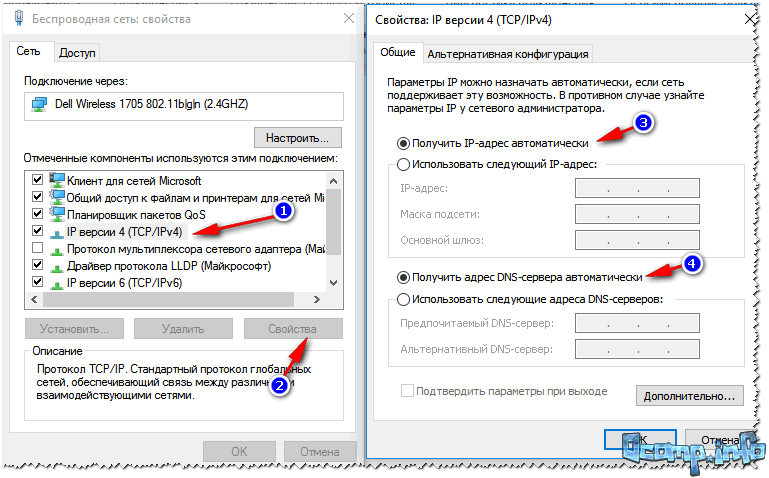
On the “General” tab, in the “Components used by this connection:” list, click on “Internet Protocol TCP / IP”.

In the window that opens, check the box next to “Use the following IP address”.
Good day!
Eh, if in the 90s of the last century a computer was a luxury, now many people have not one, but several computers / laptops at home. If you connect computers to a local network (in which there will even be only 2 devices), you can get undeniable advantages:
- the ability to open files located on another PC, work with them, etc. Now you do not need to run back and forth with a flash drive or disk;
- the ability to make a network printer (scanner, CD / DVD drive, etc.), and use it from all PCs in the local network;
- the ability to play network games (this is a separate and most interesting opportunity, which can be talked about for a long time).
In this article, I wanted to consider the issue of building a home local network (and setting it up), which will be useful to all novice users. I will follow the path of step-by-step analysis, I will start with the question of connecting one PC to another, then I will consider Windows setup, and how, in fact, to share (make available to the local network) folders, printers, etc. So...
When creating a home local network, most often, two options are used:
- connect two computers (PC to laptop, PC to PC, etc.) using a cable (it is often called twisted pair);
- get a special "box" called a Wi-Fi router. A PC is connected to the router using a network cable, and laptops, phones, tablets, etc. devices get Internet access via Wi-Fi (the most popular option today).
Option number 1 - connecting 2 PCs using twisted pair
pros: simplicity and cheapness (you need 2 things: a network card, and network cable); providing a sufficiently high speed that not every router is able to issue, a smaller number of radio waves in the room.
Cons: extra wires create confusion, get in the way; after reinstalling Windows OS - network setup is required again; for Internet access to be on the second PC (2), the first PC (1) must be enabled.
What is needed: that each PC has a network card, a network cable. If you plan to connect more than 2 PCs to a local network (or if one PC is connected to the Internet and is on the local network at the same time), one of the PCs must have 2-3 or more network cards.
In general, if both PCs have network cards, and you have a network cable (also called an Ethernet cable) - then connecting them with it is not difficult. I don't think there is much to consider here.
Note: Please note that network cards usually start to turn green (yellow) LED when you connect a cable to it.

Another important point!
Network cables for sale are different: and not only in color and length. The fact is that there are cables for connecting a computer to a computer, and there are those that are used to connect a PC to a router.
For our task needed crossed network cable (or cable pressed in a cross way- here who calls it).
In a crossover cable - on the end connectors, the yellow and green pairs are reversed; in the standard (for connecting a PC to a router) - the colors of the contacts are the same.

In general, if two PCs are turned on, working, you connected them with a cable (the LEDs on the network cards blinked), the network icon next to the clock stopped displaying a red cross, which means the PC has found the network and is waiting for it to be configured. This is what we will do in the second section of this article.
Option number 2 - connecting 2-3 or more PCs using a router
pros : most devices: phones, tablets, laptops, etc. will have access to WiFi networks; fewer wires "underfoot", after reinstalling Windows- Internet will work.
Cons: purchase of a router (after all, some models are far from cheap); "complicated" device setup; router radio waves ., lower ping and freezes (if the router can not cope with the load).
What you need: a router (it usually comes with a network cable to connect one PC to it).
With the connection of the router, as a rule, there are also no big problems: the cable coming from the Internet provider is connected to the special. router connector (it is often called "Internet"), and local PCs are connected to other connectors ("Lan-ports"). Those. the router becomes an intermediary (an example diagram is shown in the screenshot below. By the way, in this diagram there may not be a modem on the right, it all depends on your Internet connection) .

By the way, pay attention to the LEDs on the router case: when you connect the Internet cable from the provider, from the local PC, they should light up and blink. Generally, WiFi setup router is a separate big topic, besides, for each router, the instructions will be slightly different. Therefore, it is hardly possible to give universal recommendations in one single article ...
By the way, when connecting through a router, the local network is usually configured automatically (i.e., all computers connected via a network cable should already be on the local network, there will be a couple of small strokes (about them below)). The main task after that is to set up WiFi connection and internet access. But since this article is about the local network, I do not focus on this ...
LAN setup (Windows 7, 8, 10)
In this subsection of the article I will give universal instructions, regardless of how your local network is organized: connected via a network cable, or using a router. Where the settings will relate to a specific option - there will be notes.
Note: all settings are relevant for Windows 7, 8, 8.1, 10.
Computer name and workgroup
Allegory: each person has his own name, surname, patronymic, date of birth, city, etc. - No two people are the same. It is the same in the network - there should not be computers with the same name ...
The first thing to do when setting up a local network is to check and configure workgroup name and computer name. Moreover, you need to do this on each computer in the local network!
To find out the computer name, open the panel Windows controls by the address: Control Panel\System and Security\System (screen below). Next, make sure the following:
- PC name and slave. the group must be in Latin;
- each PC / laptop in the local network should have its own unique name(for example: PC1, PC2, PC3);
- Every PC/Laptop should have same working group (for example: WORKGROUP).
To change the name and working group - click the "Change settings" button.


Change workgroup and PC name
In general, when you bring all the names in accordance with the requirements above, you can proceed to the next step of the setup.
Turn on printer and folder sharing
Relevant for connecting through a router, and directly ...
This innovation appeared in Windows 7, supposedly provides greater security for the OS (in my opinion, it only creates the need for additional setting local network). The bottom line is that, by default, Windows blocks and does not allow access to open and share folders, a printer, etc., until the security policy is "softened".
To remove this lock and enable sharing, you need to:

Setting up IP addresses, DNS, masks, gateways
For a network organized using a router
In general, for PCs connected to a local network using a router, usually nothing needs to be configured (everything works by default). If something is wrong, just in case, I recommend that you go in and check the connection properties.
To do this, you first need to open "network connections" . This is done simply:
- first open the window "Run"- combination of buttons Win+R;
- then enter the command ncpa.cpl and press Enter(works in all Windows versions 7, 8, 10).

How to open network connections // ncpa.cpl

Local Area Connection Properties
To connect PC to PC via network cable
PC 1
By PC 1, I mean a computer that has two network cards: one of them is connected to the ISP's Internet cable, and the second is a local network cable that goes to PC 2.
Note: although, the Internet cable from the provider does not have to be. If it is not there, choose PC 1 and PC 2 - arbitrarily ...
And so, we open network LAN connection properties(how this is done - see a little higher in the article).
- IP address: 192.168.0.1;
- subnet mask: 255.255.255.0 (see screenshot below);
- save your settings.

V properties of IP version 4 (TCP/IPv4) second PC, you need to set the following parameters:
- IP address: 192.168.0.2,
- subnet mask: 255.255.255.0;
- default gateway: 192.168.0.1;
- preferred DNS server: 192.168.0.1 (see screenshot below);
- save your settings.

Actually, the local network setup itself is finished. Now you can proceed to the most interesting part - sharing and using the shared resources of the local network. Exactly what we were going for...
Sharing Internet access on a second PC
Relevant for PCs connected directly by LAN cable...
You need to configure PC 1 (i.e. the one to which we have the provider's Internet cable connected).
First we open network connections : press combination Win+R, enter ncpa.cpl, Further Enter .
How to open network connections //ncpa.cpl

Next, open the tab "Access", and check the box next to "Allow other network users to use your Internet connection this computer" . Save your settings.

Allow other users to access the internet
If everything is done correctly, the Internet will be on both computers.
Note: of course, for the Internet to be on PC 2 - PC 1 must be turned on! This, by the way, is one of the inconveniences of such a local network, when connected through a router - the Internet will be regardless of which PC is on / off.
Sharing folders/files for public access
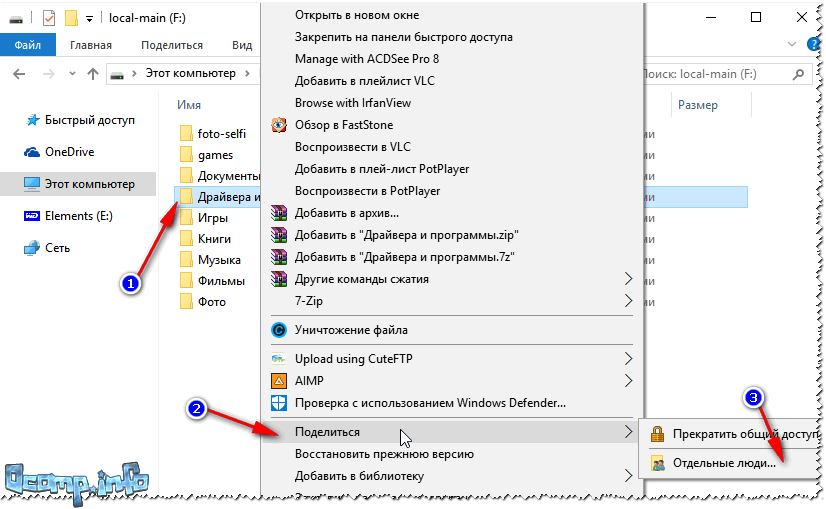

3) Set the resolution: read or read and write.
Note:
- allowed to read: users can only copy your files to themselves (neither delete nor change - they can't!);
- read and write allowed: LAN users will have full control over files in folders: they can delete all files, change any of them, etc. In general, I would not recommend providing such access to important and large folders (to transfer files, it is better to have a separate folder, to which you give full access).
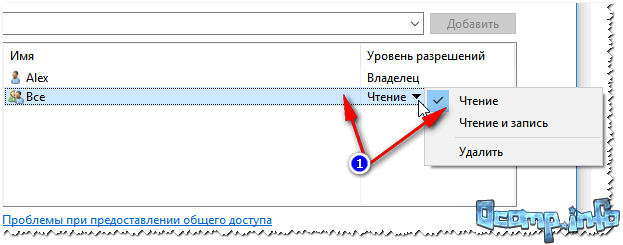

5) After a few seconds, Windows will report that the folder has been shared. So everything went well.

6) To access the folder:
- open the explorer;
- then open the "Network" tab (on the left, at the bottom of the window);
- open computer name, on which the folder was shared. As you can see in the screenshot below, it is shared, you can go into it and start copying (reading) any files.

Printer sharing (shared network printer)
1) The first thing to do is open the control panel: control panel/hardware and sound/devices and printers.
3) Then open the tab "Access" and check the box "Sharing this printer" . Save the settings (see screenshot below). Actually, now the printer is shared and it can be used by other PCs / laptops / tablets and other devices on the local network.

How to share a printer
4) To connect a network printer, open conductor, select computer name , on which the printer is shared. Next you should see it: click on it right mouse button and select the option from the menu connections .
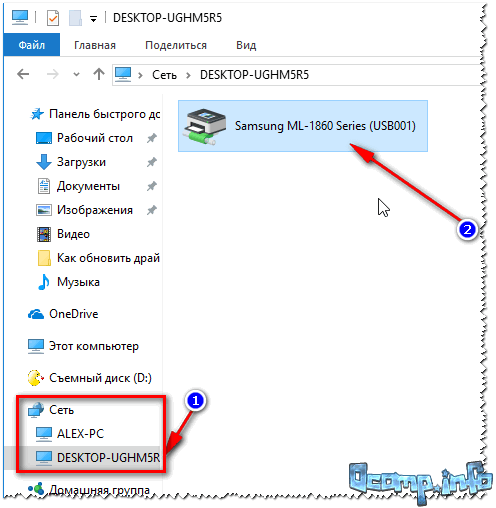
How to connect a network printer
5) Then you can open any document, press Ctrl+P (File/Print), and try to print a friend page.
Note: By default, Windows typically lists a different printer (not the one you have connected over the network). Do not forget when printing - change it.
Regarding the local network printer - I recommend that you read my detailed article on this topic. It covers some of the points in more detail. Link below.
"Creating" a network printer -
I am finishing the article on this. Good luck and fast setup.
Connecting two computers to a local network with one cable.
In some situations, when we already have a network cable laid, it becomes necessary to connect another computer to the network, but there is no way to lay another network cable, either financially or physical reasons. This article can help you in this situation.
On one network cable - a twisted pair cable with eight cores, you can connect two computers at the same time without loss of communication quality and speed!
Let's assume that the cable is already laid and 1 PC is connected.
Let's start with the fact that from the side of the network switch it is necessary to remove the external protective insulation from this network cable with a knife, see photo:


Under the insulation there will be 8 wires that are twisted together in pairs (4 pairs in total)
In the usual connector crimping scheme, 4 wires are used for data transmission: green, white-green, orange and white-orange. The rest blue, white-blue, brown and white-brown are not used. They are what we need.
A detailed video tutorial is located here:
We separate the wires by color and cut the blue, white-blue, brown and white-brown wires, see photo:


Now the resulting 4 free ends with a wire must be crimped according to scheme 1 or 2 from .
For example, according to scheme 1, the wires in the connector should be arranged as follows:
1 - white-blue
2 - blue
3 - white-brown
5 - Empty
6 - brown
7 - Empty
8 - Empty


As a result, we get a network cable crimped with two connectors from the side of the network switch. These connectors can already be inserted into it.

Now, at the other end of the cable, where computers will be connected, we cut off the outer insulation in exactly the same way and cut off the blue, white-blue, brown and white-brown wires.
You can twist or solder another network cable of the length necessary to reach the 2nd computer onto these ends. Or, for convenience, I advise you to use just such an outlet, see the photo below. And then you can insert a network patch cord of any length up to the second computer into it.

Having opened the box of the power socket, you will see two rows of contacts and their numbers are written on a piece of paper between them = these numbers correspond to the contact number on the connector that will be inserted into the socket.
In accordance with scheme No. 1, we arrange the wires in the following sequence according to the socket contacts
1 - white-blue
2 - blue
3 - white-brown
5 - Empty
6 - brown
7 - Empty
8 - Empty
Two computers can be connected as virtual network, and physically, using fiber optic cable.
This may be needed for various purposes and is especially popular in organizations to form a collaborative work network.
In this material, we will answer the question - how to connect two computers using, as well as what is needed for this and what program changes all computers on the network will have to be added.
Scope of application
In what cases might it be necessary to connect cables between two devices?
There may be several reasons for this:
- It is necessary to create in the organization a convenient common network to share files;
- At home, a small local data center is organized (the user works simultaneously on two PCs and communication between them is needed for convenience).
- Many users have more than one computer at home, but not all of them are connected to a local shared network, probably because not all users know what advantages such a network provides. And there are the following advantages:
- Possibility to share wired internet;
- Playing network games, as well as computer games that can be designed for more than one player;
- Quick exchange of any files, excluding the stage of transferring them to a memory card;
- It is possible to organize shared disk space for two computers, then it will be possible to use the resources of one computer, working after another;
- Possibility of joint work in programs;
- Possibility connected to a second computer, from the first;
- Possibility of joint editing of documents, etc.
Connecting devices to the same network is not too difficult. Technically, this is not difficult at all.
However, you will have to perform some manipulations with system resources your device.
What is required to connect?
In order to connect two devices to a common local network, you should check if your PCs meet certain requirements.
A fundamentally important requirement is the presence of a network card on both connected PCs.
Modern and most older laptops and desktop computers equipped with it - if your device successfully accessed the network, it connected to Wi-Fi, then such equipment is installed in it.
It is possible to check the presence or absence of the necessary card in other ways.
The most accurate and simple method is to run specialized utility, showing the presence and characteristics of PC components.
It is also worth looking at the number of ports on the equipment - when present, then the necessary card is definitely there, since this is the port for connecting the network cable to the card.
In addition to the actual connected devices, you will need a cable for the network, also called twisted pair. The simplest, acceptable and comfortable length will do.
If the computers are remote, the cable must be run through the wall, etc. This type may not be suitable, but in the standard case it is optimal.
Important! If a twisted pair cable needs to be pulled through a wall, then it will first need to be carefully crimped.

Connection
To combine two separate devices into one common network, follow the instructions below:
- Turn off both devices;
- Connect twisted pair- just connect a PC with it by inserting the twisted pair plugs into the ports of different computers;

- In some cases, there is a colored light indicator above the corresponding port on the PC, indicating whether there is a connection to the network, whether the cable is connected - when the indicator is lit, it means that you have connected everything correctly;

- Now it is necessary to carry out software debugging of the device components in order to give them the ability to work together in the network;
- Find the section My Computer (or This computer on newer versions of the operating system);
- In this window, right-click on any free space, and in the expanded small menu, find the Properties item and go to it;
- A small window will open, which will list all the characteristics and features of your computer or laptop;
- Here you need to view your device name and its workgroup designation − it is very important that the designations of these groups are the same for both laptops, connected to the network, but at the same time, different device names are required;
- To configure and change these indications, click on the button Change settings and set the names that satisfy the conditions;

- Save Changes;
- Necessarily restart both connected devices when you complete the procedure;
- Next, you need to debug network adapter also for device collaboration, do this by following the Windows path - Control Panel- Network and Internet - ;
- In the left part of the window that opens, find the line Change adapter settings- click on it;
- Look at the main PC adapter shown in this list - if it is connected to the second PC in a working manner, then there will be no crosses above it and similar evidence that it is not functioning;
- Almost always, of all adapters, you need the one called ;
- Double click on it with the mouse;
- A drop-down menu will open where you need to go to the section Properties;
- A window will open with a large field Components;
- Scroll down until you find the IP version 4 component;

- Double click on this component;
- Repeat all the steps on both connected devices - at this stage, you must have protocols open on both computers or laptops;
- In the component of the first linkable device write in the IP address field - 192.168.0.1;
- In the Subnet mask line on the same PC write down 255.255.255.0;
- On the second connected device, specify otherwise in the line - 192.168.0.2;
- In the Subnet Mask line, also write other values - 255.255.255.0;
- Go to the Default Gateway field and type in there 192.168.0.1 (you need to set these parameters only on the connected second device, on the first one - leave it as it is);
- In line Preferred DNS Server enter parameter 192.168.0.1 (also only on the second device, on the first PC they remain unchanged);

- After that, click OK to save the new settings, do this on two PCs.
Check the correctness of the connection.
To do this, open Explorer and on the left side of the window, with a tray of folders and partitions, find the line Network.
Click on it and when everything is connected correctly, you will be able to see an icon, a graphic representation of the current network.
At this stage of the connection work, devices cannot share the Internet, do not use the combined disk space, and cannot transfer files without using temporary media. At this stage, there is not much difference in whether the computers are connected or not.
File sharing
The main function used by many participants in a computer network is file transfer.
But this function must be configured separately.
But users will be able to use together the total combined disk space of the two hard drives different PCs, co-edit folders and documents.
To share access to file systems both devices from each of them, do the following manipulations:
- Go to Control Panel;
- Go to item Network and Internet;
- choose Network and Sharing Center;
- Find the menu on the left in the window that opens, and in it the link Change advanced sharing options, and click on it;

- Several options for user accounts and profiles will open- guest, private, public, etc. - in all of them you need to set up network sharing for files, folders and devices, set up network discovery and remove password protection:
- Check the checkbox next to the item allow Windows manage homegroup connections;
- Apply the settings shown in the picture for each profile type on each of the two PCs;
- If necessary, it is possible, on the contrary, to restrict the ability to work on the network for a certain type of profile, for example, for guests;

- Now you need to give each computer access to the disks and folders of the second;
- Go to section My computer or This computer, select the drive you want to grant access to, and right-click on it;
- Use the dropdown menu to navigate to Properties of this disk;
- a small window will open, at the top of which you will see two tabs - switch to the Access tab;
- The item will appear in the central part of the window. Advanced setup- click on it;

- In the opened window find the line Share this folder, next to the line, on the left, there is a checkbox in which you need to check the box to enable this function;
- Now on the left side of the screen at the bottom of the window, find the Permissions link and click on it;
- In the drop-down list, select all the features that you need to give participants local connection when handling materials in this folder (on disk);
- Apply all changes and test- in this case HDD the first device will become visible on the second connected computer;
- Now it is possible to move and copy files, and this will happen at normal speed;

- Repeat the process of configuring access on the second network member, and also check if whether its files became visible on the first PC.
With the right settings, all devices on the current network actually acquire one shared file space and full access to each other's memory.
How to share internet?
Making such changes is necessary in a situation where one of the home devices is connected to global network via cable, using a modem, and the second is not connected.
Then you need to make these settings. so that the second device on the network, not being directly connected, can receive the Internet from the first.
This is not a very relevant topic, since most modern users have installed at home, through which the Internet is used for all devices, however, the instruction can come in handy for someone.
To configure the ability to use the Internet from the modem for all participants home network, do the following manipulations:
- Go to My Computer or This Computer;
- Click once with the right mouse button on free space in the selected window;
- Click on the item Control Panel;
- And now follow the path of Windows - Control Panel- Network and Internet - Network and Sharing Center - View network connections;
- Find the designation of the current main connection, that is, the one through which you directly access the Internet;
- Right click on it, and when a small menu opens, click on the Properties item in it;
- At the top of the small window that opens, change the tab to Access, as in the previous instructions;
- At the top of the window you will see the inscription Allow other network users to use this connection to the internet;

- To confirm this permission, check the checkbox to the left of the inscription;
- Confirm and save all necessary changes;
Then restart both devices.
These settings need to be made only on the device that was originally connected to the Internet.
On the second device, do not touch anything at all - you can immediately start using the Internet.
Peculiarity
If you have an Internet connection via cable, there is one inconvenient detail.
By default, any device has only one network card with the appropriate connector.
If there is a wired connection to the Internet, a modem is connected to this connector, that is, the connector is busy, and, therefore, in fact, you will not be able to connect two PCs using a twisted pair cable, because there is simply no free port on the device connected to the Internet for this.
Thus, when there is a wired Internet connection, another network card must be connected to the device.
A port will appear through which you can connect the cable. You can also use an Ethernet-to-USB adapter that turns USB port in the network.
Mac OS X
The instructions above are only applicable to devices on .
But Apple devices connect to the network in a similar way.
To do this, follow the instructions:
- Connect computers with a cable using network card ports, as described in the Windows instructions;
- If your laptop does not have a network port, then use a specific Ethernet-to-USB adapter;
- On the main of the connected devices, expand the Apple menu - left click on the logo icon in the upper left corner;

<Рис. 17 Соединение с сервером>
- Find the View item and double-click the left button on the device name displayed in the section;

- The system will ask you to confirm the networking by entering the administrator password on the second device - with do this and the connection between devices will be established.

As can be seen from the above, devices with this operating system easier to set up since you don't actually have to do anything manually - All settings are carried out by the program in automatic mode.
How to connect several computers to each other and to the Internet, distributing the same speed to the Internet? Through such connections, you can not only use files located on another PC, the Internet, but also printers that are connected to any link in this network. Let's try to consider all the options for setting up a local network, from the simplest to the most complex.
We divide the sequence of actions conditionally into two stages.
To begin with, let's analyze and discard the option when you only need to share the Internet.
Internet connection of 2 or more computers in one apartment without creating a local network
You can solve this issue in several ways:
- Installing a router (router)- allows you to have access to the Internet to each of the computers without connecting the second one to the network. Since the Ip-address (the identification requisite of a computer on the network) is assigned directly to the router, you will have one tariff for the provision of Internet services, and you can use the Internet by two computers at once.
- wifi technology - wireless connection to the network. Possible when using special kit equipment and its settings.
1st stage. LAN setup
How to connect two computers in a network (Network Bridge)
One of the computers connects to the Internet, the second computer connects to the first. The main disadvantage in this case is that in order to access the network of the second computer, it is necessary that the first computer is also on the network. And also, if your Internet connection goes through a network card, then you need an additional network card to connect the second computer to the first one, because. the built-in network card is already busy (it accepts the Internet).
To connect two computers to each other and to the Internet via a Network Bridge, you will need:
1. Special cable (twisted pair) and possibly an additional network card.
Twisted pair can be obtained from radio markets or specialized stores. It is made independently, using a special tool called "crimping" and based on the required length of the cable itself. The pinout can be found on the Internet. And you can ask to compress the "vituha" directly on the radio market (tell the seller what you need to compress for the connection type "via network cards" or "comp-comp", there is also a "comp-switch") or buy a ready-made cable (if any), but it may be short. There is no factory assembly of such a cable, only a "comp-switch" is on sale, you can buy it, but then one end of it is cut and crimped.
A twisted pair is an 8-core cable (eg UTP-5) with RJ-45 connectors. The ends of the cables are crimped special. tool (special pliers) into the connectors in accordance with the colors of the ends. The order of crimping the network cable is as follows: BO-O-BZ-S-BS-Z-BK-K at both ends to connect to the hub. To connect a computer to a computer, one of the sides should be: BZ-Z-BO-S-BS-O-BK-K, where O is orange, Z is green, C is blue, K is brown, BO is white-orange, etc. etc. (do not go into too much detail, but give the cable to knowledgeable people for crimping).

Twisted pair ($2-2.5 - 3 m)

Crimp tool
So, with the help of "twisted pair" we connect computers card-to-card (connection type "comp-comp")!

Network card ($3-6)
2. After connecting 2 computers via cable, you need to configure them programmatically.
Computers need to be in the same working group, in the same address range and with different network names. The setting of these parameters is shown in the graphic diagram:

In this case, it is also desirable to set the IP addresses and the subnet mask manually (the subnet mask is generated automatically when the IP address is specified). IP addresses can be selected in the range 192.168.0.xxx. At the same time, on all computers on the local network, the IP address must necessarily begin with "192.168.0.xxx", and the last three digits (xxx) must be different (otherwise there will be a conflict, since this is tantamount to two different houses having the same same address) and be in the range 0 - 255. The IP address setting is shown in the graphical diagram:

2.2. Wizard setup
To do this, go to "Control Panel" -> "Network Setup Wizard", and follow the instructions of the wizard.
Can also be combined manual setting network and setup using the wizard, for example, after setting up the network using the wizard, specify the IP address.
After all this, you can give access (share) some folders in the folder properties, in the "Access" tab. Shared folders can be seen by going to "My Computer" and in the "List of typical tasks" select " network". Or through Total Commander go to "Network and Plugins" (disc button on the far right) -\u003e "All Network" -\u003e " Microsoft Windows network".
3. Printer setup.
3.1. Sharing a Printer on a LAN
To do this, go to Start - Control Panel - Printers and Faxes. We find the printer connected to this PC, right-click on it and in context menu select "Sharing...". After that, this printer will automatically be detected on other PCs connected to this local network.
3.2. Using a printer that is in public access, in the local network
On other PCs, go to Start - Control Panel - Printers and Faxes. Click on "Install Printer", and then follow the instructions of the printer installation wizard.

I. Choose " network printer or a printer connected to another computer"
Let's move on to the next step.
II. We put the choice on "Overview of printers"
We do an overview of printers on the local network.

III. If frequent or permanent use this printer is set in the item "Use this printer as default?" - "Yes".
This completes the setup.
We connect 3 PCs through network cards by the type of Network Bridge
It is not necessary to have a router or a switch to connect 3 PCs, it is enough to buy one more network card.
This option is cheaper than a switch, because. a switch is 3 times more expensive than a network card. To connect 3 computers, you need to select one of them and make it the master, the other two slaves. You need to put 2 network cards on the host computer. Then connect with 2 other twisted pair and create a Network Bridge. Then share the internet and local folders, while the slave computer must be constantly turned on and connected to the Internet.
We connect 3 or more computers (up to 20 PCs) through an external hub (switch or network hub)
How to connect 3 or more computers to each other and to the Internet, provided that you need to distribute the same speed to each?

The simplest solution is to buy a switch (Hab), for 5 or more ports, N cables (taking into account the distance of each from the supposed location of the switch to each computer) with a comp-switch crimp (this has already been discussed above), where N is the number computers. After acquiring the necessary, you need to connect the computers to the switch. After that, we set up computers in the same way as with a connection between two computers.
We connect 3 or more computers (up to 6 PCs) through an internal hub (Hub)
We create a local area using an internal 5-port 100 Mbit hub
This option is perfect for organizing a network for a home and a small office (up to 6 computers) using a hub (or, as they say, a hub), for example, Genius GF4050C. The advantage of this PCI hub is that it is placed inside the computer like a regular expansion card. And for very little money ($45) you will get a 100 Mbps high-speed network in your office. But it should be noted that when the server (the PC where the hub is installed) is turned off, the network will not work. However, the hub does not require an extra power outlet and does not take up space on the table.

Internal hub
We connect 5-20 or more PCs through the Central PC server
We create a network with a central server computer that serves as a switch.
This option is intended for large offices and corporate organizations. More than 20 PCs can be interconnected. The central server computer with some server OS installed on it, for example, FreeBSD + switch, serves as a hub.
After exceeding the number of computers in the local area more than 20, you need to abandon the switch (hub) and install a central server, because. with so many PCs, data transfer will slow down the computer. This is due to the extra load on the processor when transmitting / receiving data, since there is a lot of processing, for example, when a movie is downloaded (resources are spent on creating packets where data is read, and parsing packets where data is received). All this leads to a slowdown in the performance of both computers: the one who reads and most of all the one where the data is read. If there is a center. server, then it is engaged in this business, and not client computers. That is why they put the central server. The switch takes over some of the processing, but this is not enough when in large numbers networked PCs.
But it is better, of course, to use a server with a smaller number of computers, while there will be no braking, but in this case, you need to spend extra money on a server, i.e. to another PC. In addition, the server must be served by someone, for this there is such a position as " System Administrator". In general, if there is no money for additional computer, it is possible to start up to 20 computers through a switch.