Zyxel keenetic extra ii ip by default. ZyXEL Keenetic Extra: simple and advanced Wi-Fi router setup
It's time for Zyxel to change. In autumn, the company changed its logo (for the first time in 27 years!) and updated its website, and at the very end of 2016 it introduced new router models with a completely different design: Zyxel Keenetic Air and Extra II. That's just about them and will be discussed. Air and Extra II are very similar both externally and in terms of filling. In fact, we will test the Extra II model, but the differences in the younger version will be discussed separately, since there are not so many of them. Air and Extra II are already sold in Russian stores for about 2,900 and 3,500 rubles, respectively.
| router | Zyxel Keenetic Air | Zyxel Keenetic Extra II |
|---|---|---|
| Standards | IEEE 802.11 a/b/g/n/ac (2.4GHz + 5GHz) | |
| Chipset/controller | MediaTek MT7628 (1 × MIPS24KEc 580 MHz) + MT7612 | |
| Memory | RAM 64 MB/ROM 16 MB | RAM 128 MB / ROM 32 MB + swap |
| Antennas | 4 × external 5 dBi; length 73 mm | |
| WiFi encryption | WPA/WPA2, WEP; WPS (separately for each band); 2 × guest network | |
| Max speed | 802.11ac: up to 867 Mbps; 802.11n: up to 300 Mbps; 802.11g: up to 54 Mbps | |
| Interfaces | 2 × 10/100 Mbps Ethernet | 5 x 10/100Mbps Ethernet, 1 x USB 2.0 |
| Indicators | 4 × per top cover, each Ethernet port | |
| Hardware buttons | Turn off Wi-Fi / start WPS, reset settings, operation mode switch | Disable Wi-Fi/Start WPS, Factory Reset, Custom Fn |
| Dimensions (W × L×H) | 167×100×33mm | |
| Weight | 210 g | 230 g |
| Nutrition | DC 9 V, 0.85 A | DC 12 V, 1 A |
| Price | 2 900 rubles | 3 500 rubles |
| Opportunities | ||
| Internet access | Static IP, DHCP, PPPoE, PPTP, L2TP, 802.1x, WISP; CABiNET; DHCP Relay; Multi WAN; ping checker; NetFriend Setup Wizard; 3G/4G modem, Keenetic Plus DSL (only for Extra II) | |
| Services | DLNA, FTP, SMB, AFP server; print server; IPv6 (6in4); parental control/filtering/protection against Yandex.DNS/SkyDNS telemetry; BitTorrent client Transmission; VLANs VPN server (IPSec, PPTP); Entware, Keenetic Plus modules (Extra II only) | |
| Port forwarding | interface/VLAN+port+protocol+IP; UPnP, DMZ IPTV/VoIP LAN-Port, VLAN, IGMP/PPPoE Proxy, udpxy | |
| QoS/Shaping | WMM; specify interface/VLAN priority; shaper | |
| Dynamic DNS Services | DNS-master (RU-Center), DynDns, NO-IP; KeenDNS | |
| Working mode | Router, WISP; media adapter, access point, repeater | |
| Forward VPN, ALG | PPTP, L2TP, IPSec; (T)FTP, H.323, RTSP, SIP | |
| Firewall | Filtering by port/protocol/IP; packet capture; SPI DoS protection; brute force protection | |


Opportunities
All tests were carried out using stable version firmware NDMS 2.07. More information about NDMS and its capabilities was discussed in the materials about Keenetic, as well as about. Note that the number of devices with NDMS has already exceeded 4 million. Coincidentally, while getting acquainted with new routers, the developers transferred the upcoming version of NDMS 2.08 to the stage public beta. Since it will soon be available to all users, it makes sense to say a few words about some interesting innovations. First, there was support for schedules. In the web interface, you can use them to manage the time of network interfaces and Internet access, but in general, schedules will subsequently be available for other settings. In particular, through the console interface, you can set the schedule for turning on / off the front and rear indicators. However, for convenience, the function of disabling them can be assigned to one of the hardware buttons on the router case.
NDMS 2.08
Secondly, in the settings of access points, a function has appeared to automatically redefine the channel every 6/12/24 hours, which can be useful in case of a particularly “dirty” broadcast. Thirdly, the free DDNS service KeenDNS has acquired the option of forwarding web resources (HTTP and HTTPS) from the local network to the outside through the Zyxel cloud. For example, this way you can get remote access to the NAS web interface even if there is no white IP address. And in general, it is much more convenient for an unprepared user than manual port forwarding or creating tunnels. As a matter of fact, he was not conceived as another DDNS, but as an easy way to give the user the opportunity remote access to devices home network. The list of new features does not end there, but some of them are like support for EoIP / GRE / IPIP tunnels, an SNMP server, protection against brute-force attacks on common network resources(FTP, for example) or new features for third-party Entware packages - will be of interest only to specialists.Testing
Wi-Fi settings are standard: automatic channel selection and its width, WPA2 encryption, access points are not isolated, and WPS and guest networks are disabled, other parameters are left by default. You cannot force the width to only 40 MHz (for 2.4 GHz) or 80 MHz (for 5 GHz) in the web interface. The stands were in direct line of sight at a distance of four meters from each other. First booth configuration: Intel Core i7-2600K, 16 GB RAM, ASUS PCE-AC68 (marked as A in the table), Windows 7 SP1 x64. 2nd: Intel Core i7-4700HQ, 12 GB RAM, Windows 8.1 Update 1 x64, Realtek RTL8168 (in R chart), ASUS USB-AC56 (in U chart). The exchange between the wireless and wired network segments is obviously limited by the speed of the network ports.
| ZyXel Extra II/Air Router | |||||||
|---|---|---|---|---|---|---|---|
| streams | 1 | 2 | 4 | 8 | 16 | 32 | 64 |
| Medium wifi speed 802.11ac 5 GHz Mbps | |||||||
| A -> R | 94 | 95 | 94 | 94 | 93 | 91 | 87 |
| R -> A | 94 | 95 | 94 | 94 | 92 | 91 | 89 |
| A<->R | 158 | 155 | 149 | 149 | 144 | 137 | 128 |
| A -> U | 141 | 126 | 128 | 137 | 148 | 153 | 152 |
| A<>U | 164 | 174 | 177 | 178 | 169 | 159 | 146 |
| A(5)<->U(2.4) | 167 | 172 | 174 | 173 | 172 | 160 | 144 |
| Average speed Wi-Fi 802.11n 2.4 GHz, Mbps | |||||||
| A -> R | 93 | 94 | 94 | 94 | 92 | 90 | 87 |
| R -> A | 90 | 90 | 94 | 94 | 91 | 90 | 90 |
| A<->R | 134 | 130 | 131 | 152 | 157 | 148 | 137 |
| A -> U | 60 | 58 | 61 | 61 | 56 | 55 | 50 |
| A<>U | 57 | 62 | 63 | 60 | 58 | 53 | 45 |
Data exchange within the 5 GHz band and between the two bands is very, very good, but work exclusively in 2.4 GHz in places could be better. On the other hand, the novelties are just made for those who want to expand their home network by switching to 5 GHz. As for WAN connections, regardless of the type, the connection speed will be in the region of 90-95 Mbps, and in duplex 135-165 Mbps: VPN connections are still slower than direct ones. For check networking the drives used were a LanShuo INIC-3609 box and a Kingston SSDNow V+200 SSD with one NTFS volume. The access speed for FTP and SMB for reading and writing fluctuated around 9.5-11.5 MB / s. In general, everything is fine, but there is one caveat - in each of the tests, the CPU load reached the maximum.
In order to get into the web interface of the router, you need to open your Internet browser and type 192.168.1.1, User Name in the address bar admin (Username), Password (password) - 1234 (provided that the router has factory settings and its IP has not changed).
Change factory password
For security reasons, it is recommended to change the factory password. Default: Login admin, password 1234. In the interface of the router, go to the tab " System", Further password. In field "New password" enter New password. It must be repeated in the next field. Next, save the settings by pressing the button " Apply».
Setting up Wi-Fi on the router
WiFi.
- In the window that appears in the field Network name (SSID) enter the name of your network (any)
- In field Network protection select WPA2-PSK
- In field Network key enter your password to access the network (any)
- In field Channel: select Auto
- After filling in all the fields, click the button Apply.

Internet connection setup

NAT when automatically obtaining an IP address (DHCP)
- Select a section at the bottom of the page Internet
- In the window that appears, click on Broadband connection (ISP)
- In field Configuring IP Settings select Automatic
- In field MTU Size enter 1400
- After filling in these fields, click the button Apply.

Setting up PPTP (VPN) when automatically obtaining a local IP address
Select the tab at the top of the page Authorization.
- In field Type (protocol used) select PPTP
- In field Connect via select Broadband connection (ISP)
- In field Server address enter pptp.freedom
- In field Username enter your login to access the network from the Subscriber Registration Card
- In field Password enter your password to access the network from the Subscriber Registration Card
- In field Authentication Algorithm select CHAP. After filling in all the fields, click the button Apply.

Setting up a PPPoE connection (Rostelecom, Dom.ru)
InternetAuthorization»
- Type (protocol):PPPoE
- Username : Your contract login
- Password: Your contract password
- Setting IP parameters: Automatic
- Service Name, Hub Name, Description- may not be filled
- In field Authentication Method select Auto
- Save settings with the button "Apply".


Setting up an L2TP connection (Beeline)
In the router interface, select the tab on the left " Internet”, in the list that opens, select “ Authorization»
- Internet Access Protocol: L2TP
- Description: connection name
- Server address: name or address of the server (specified in the contract)
- Username : Your contract login
- Password: Your contract password
- Authentication method: Auto
- Save settings with the button "Apply".


Recently on the market network equipment a new Zyxel Keenetic Extra router has appeared. This router has good specifications, and it is suitable for small offices as well as home use. You can connect no more than 4 computers to the router using a patch cord, but the number wireless connections Zyxel Keenetic Extra has no Wi-Fi limit (although you can set the limit manually).
The router also has a number of auxiliary useful features- support for wireless broadcasting at a frequency of 5 GHz, IPTV, DLNA, support for 3G / 4G modems, an auxiliary BitTorrent client, and so on.
But how is the new Zyxel Keenetic Extra router configured? Is it possible to activate the router automatically if you are too lazy to understand manual setting? And is it possible to connect the Internet not through an Ethrenet cable, but using a 4G modem? Below we will find the answers to these questions.
Simplified automatic setup
Before configuring the router, you need to make sure that an external Internet cable is connected to the blue socket on the back side, and the router itself is connected to the network using an adapter (the corresponding indicator light is activated on the front side). To configure Keenetic Extra, you need to connect to the router using a patch cord, or via wireless network WiFi.
There are two ways to configure the router - automatic and manual. The first one allows you to activate all the main functions in a minimum number of steps, however, this technique does not allow you to configure some device functions (3G / 4G modem, complex signal transmission encryption, DLNA, and so on).
The manual method is convenient in that it allows you to configure all the functions of the router at a fine level, which will allow you to “squeeze” the maximum out of the device.
Easy setup
Let's first look at how to do a simplified automatic configuration of the Zyxel Keenetic Extra router:
- Connect the computer to the router via a patch cord or via a Wi-Fi network, and then launch any browser (Opera, Google Chrome, Internet Explorer etc).
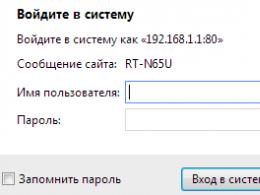
- V address bar browser, enter the address of the router - by default it is 192.168.1.1.
- An authorization window will open in front of you - both in the Login line and in the Password line, enter the value admin.

- Now the settings console will open in front of you - to configure the router in automatic mode using a simplified algorithm, click the "Quick Setup" button.

- To receive the settings automatically, you need to select the parameters of your Internet access - country of residence, name of the provider, technical settings+ connection login and password (the PPPoE method is usually used as the connection method, all important information should be in agreement with the provider). After that, the router will be configured automatically.

- You also need to accept or refuse the activation of the Yandex-DNS function (if this parameter is activated, the router will automatically filter illegal information and adult content, traffic will not be filtered without activation).

- At the end of the setup, the console will most likely prompt you to come up with a new username and password to gain access to the router - it is recommended to do this, since the standard admin / admin can be easily hacked.
A brief overview and setup of the model can be viewed in the following video:
Manual setting
You can also configure the router manually. This method is preferable because it allows you to activate a number of important features that make it easier to work with the Internet (whereas automatic tuning only basic access is activated).
Manual tuning is recommended after auto start Internet (if you want to set up even external connection, then after gaining access to the settings console, select the "Web configurator" button instead of "Quick setup").
PPPoE cable connection
The main way to connect to the router is cable connection using the PPPoE protocol. The instruction looks like this:
- In the configuration console, click the globe icon, and then select the PPPoE/VPN tab;
- Click the "Add connection" button;

- Check the boxes "Enable" and "Use";
- In the "Type (protocol)" line, select PPPoE;
- In the lines "password" and "login" indicate the relevant data (specified in the contract with the provider);
- At the end, click the "Apply" button.

If your provider uses a different type of connection, select it from the list and fill in the required lines (see contract).
Wireless Wi-Fi connection
The Wi-Fi activation guide on the Zyxel Keenetic Extra router looks like this:
- In the console, select the ladder icon;
- Activate the tab "Access Point" 2.4 GHz;
- Put a bird next to the "Activate" item;
- Come up with a name for your network and enter it in the "Name (SSID)" line;
- Select an encryption method ( the best way WPA2-PSK), and also create and enter a password in the line of the same name;
- Select the broadcast standard (recommended 802.11bgn);
- Click the "Apply" button.

Please note that you can also create a parallel guest connection - to do this, activate the " Guest network” and configure the connection using the standard algorithm indicated above.

The guest network is usually used to create secondary access points with limited rights - this network is usually given access to guests, while home users and your friends get access to the standard network).
IPTV
You can also use a router to create IPTV connections. The setup in this case will be very simple:
- press the button in the form of a window, which is divided into 4 compartments (the farthest on the right),
- open the UDPXY tab,
- check the box next to "Enable"
- click the "Apply" button.
With extra lines you can do more fine tuning IPTV connections.
DLNA
DLNA is a special technology for connecting a flash drive or USB drive to the router, which will be accessed by all devices connected to the router (computers, DLNA-compatible TVs, etc.). Before activating DLNA, write any files to the USB flash drive, and then insert it into the USB connector on the back of the router. After that, configure the DLNA function on the router:
- In the console, press the button in the form of a window, which is divided into 4 compartments (the farthest on the right);
- Select the DLNA tab;
- Check the box next to "Enable";
- Specify the name of the flash drive, or click the button in the form of three dots and specify the directory to which you want to allow access;
- Click the "Apply" button.

3G/4G internet
You can connect to the Internet not only via an Ethernet cable, but also using a 3G/4G modem. To do this, you need to insert the modem into the USB connector on the back of the router and wait a couple of seconds until automatic synchronization occurs.
None advanced settings you do not need to do it, although you can check the activity of the modem connection as follows - in the console, click the icon in the form of a graph of functions, select the 3G / 4G tab and read the technical information about the connection.
Launching and configuring the BitTorrent client
The router also allows you to run a BitTorrent client that will download files and save them to a USB drive connected to the device. Please note that BitTorrent is completely standalone, so it will work even when the computer is turned off.
The client is configured as follows:
- Make sure you have connected a USB storage device to the router and activated it using the DLNA function;
- Go to the console of the device, click the button in the form of a window (far right) and open the tab "BitTorrent Client";
- Put a bird next to the "Enable" item;
- In the "Directory" line, make sure that the path to your flash drive is indicated (or click the button in the form of three dots and specify the path to the connected USB drive). At the end, click the "Apply" button;
- Now you need to configure the BitTorrent client. To do this, open any browser and type in the value 192.168.1.1:8090 in the address bar - an auxiliary window for working with torrents will open in front of you. To add a new torrent, click the file folder button with an up arrow, click Browse, select a torrent file, click OK, and wait for the download to complete.

home group
For convenience, you can combine several of your computers into a homegroup to optimize communication with each other and the network:
- Open the console and press the button in the form of two monitors;
- Open the "Devices" tab - here you can specify the entire list of computers that you want to group. For example, to add a new device, click the corresponding button and select all devices in the list that opens;

- Using the DHCP Relay tab, you can organize some of the IP parameters that are needed to connect devices to external sites;

- If you use multiple devices to access the Internet at the same time, then you may get an IP address conflict, which will significantly slow down your Internet access. To get rid of this shortcoming, open the NAT tab and activate the function of the same name, which standardizes IP for all connected devices.

Firmware update
Firmware is a collection of programs and utilities that determine functionality router at the software level. Hardware manufacturers regularly release new firmware versions to add various support functions, improve hardware performance, and fix various bugs.
The Zyxel Keenetic Extra router needs to be updated as follows:
- Go to the management console and click the button that looks like a graph of functions. Activate the "System" tab and find the "System Information" table on the right and look at the line "NDMS Version" - it will indicate the firmware version on your device at the moment;
- On the Internet, go to the main Zyxel website, open the "Support" tab and find out the current firmware version for your Keenetic Extra device. If there is a newer version on the site, download it (in otherwise you do not need to download anything, because you have the current version);
- After downloading the update package, unpack the archive, go to the management console again, click the gear-shaped button and open the "Files" tab. Click "Browse" and select all the unzipped files that you downloaded from the official Zyxel website. After that, the router will download new files and reboot the device with the new firmware version (when loading, the device will offer to replace some files - click the "Yes" button).

Please note that when updating the firmware, the user settings are in most cases "reset" to the factory settings. In other words, you will have to reconfigure your router. So it's better to set new version firmware immediately after performing an automatic initial setup, when the device has not yet been configured.
We have covered the main points. If you have any questions or need help while reading, be sure to write in the comments! See you soon!
3 6 001
You may also be interested

Connecting the ZYXEL Keenetic Extra II router to a computer
The next step is to connect the router ZYXEL Keenetic Extra II to a laptop or personal computer(PC). To do this, you need to connect the cable that the provider has installed to the "INTERNET" port of the router (this is the cable that goes to the apartment, house, office, etc. from outside). The cable that came with the router, connect one end to the router's "HOME NETWORK" port, and connect the other end to a laptop or PC. And yes, do not forget to connect the power cable.

If you have network problems when connecting, go here to solve it:
ZYXEL Keenetic Extra II router authorization
So, we connected the router, now you need to use any browser (be it Google Chrome, Mozilla Firefox, Internet Explorer, etc.) get into its web interface. To do this, open the browser and in the address bar we drive in the address of the router: my.keenetic.net or 192.168.1.1 and press the button " Enter" on keyboard.
After, the router offers us to produce quick setup, select the interface language - "Russian" and click Web configurator.

After that, the router can display a window for setting a password on the web interface. Here, if you wish, you can set a password, you can not. If you set a password, write it down somewhere.

Also, ZYXEL routers operate in different modes, it will not be superfluous to check whether the mode is selected. Click on the shortcut in the bottom menu System"and go to the tab" Mode". If you are setting up the Internet with a login and password, leave the mode" Internet center - basic mode".

Configuring the ZYXEL Keenetic Extra II router
Now you need to configure the router. First of all, we will secure the wireless network by setting a password for wi-fi. Then you will need to find out what type of connection is used to access the Internet, is it PPTP, L2TP or PPPOE. You can find out by calling the provider (this is the organization with which you have concluded an agreement to provide Internet services). So, let's start setting up the router.
Setting a password for wi-fi
The ZYXEL Keenetic Extra II router is dual-band, which means that the router supports 2 wireless operating frequencies, these are 2.4 GHz and 5 GHz. 5 GHz allows for higher bandwidth, but has a shorter range than 2.4 GHz, 2.4 GHz is more susceptible to interference. 5 GHz is not supported by all devices. You can choose both, and depending on the circumstances, change wireless connection already on devices.
I offer Video instructions for setting a password for wi-fi on a router ZYXEL Keenetic Extra II
Let's also take a written and illustrative look at setting a password for wi-fi on a router ZYXEL Keenetic Extra II in two frequencies.
1.
Click on the Web interface in the bottom menu on the shortcut " WiFi network
", get into the network settings" 2.4 GHz hotspot".
2.
Enable hotspot", then in the field " Network name (SSID)" come up with and specify the name of the wireless network, this name will continue to glow when you connect to the network. I advise you to indicate the frequency used in the network name, for example: "imya seti 2.4".
3.
"Network protection" - WPA2-PSK.
4.
Network key
5.
"Channel Width" - "20 MHz".
6.
Press " Apply".

7.
Click the tab " 5 GHz hotspot".
8.
Check if the checkbox is checked Enable hotspot", then in the field " Network name (SSID)" come up with and specify the name of the wireless network. I advise you to indicate the frequency used in the name of the network, for example: "imya seti 5".
9.
"Network protection" - WPA2-PSK.
10.
Now you need to set a password for the wireless network. In field " Network key"Create and type in a password.
11.
"Channel Width" - "20/40/80 MHz".
12.
Press " Apply".

PPTP setup
PPTP on the router ZYXEL Keenetic Extra II on the example of the ZYXEL Keenetic Omni II router.
PPTP on the router ZYXEL Keenetic Extra II.
1.
Internet".
2.
Select the tab " PPPoE/VPN"press" Add connection".

3.
Turn on" and "".
4.
V " DescriptionType (protocol)"choose" PPTP", "Connect via"choose" Broadband connection (ISP)".
5.
Username"), password (on the line " PasswordServer address
6.
"Configuring IP Settings" - "Automatic".
7.
Apply".

Setting up PPTP with a static IP address
PPTP with static IP on the router ZYXEL Keenetic Extra II
1.
Click on the shortcut in the bottom menu Internet".
2.
Select the tab " PPPoE/VPN"press" Add connection".
3.
In the window that appears, check the checkboxes next to " Turn on" and " Use to access the Internet".
4.
V " Description" enter any word in Latin, for example "Host", " Type (protocol)"choose" PPTP", "Connect via"choose" Broadband connection (ISP)".
5.
Below you are prompted to specify the username (in the line " Username"), password (on the line " Password"). You will also need to specify the ip-address of the server (in the line " Server address").
6.
Manual" against " Configuring IP Settings".
7.
Specify ip-addresses and DNS.
All this data is usually prescribed in the contract with the provider. If for some reason you cannot find them, please call hotline provider and find out how to get them.
7.
Once you have entered all the required information, click the " Apply".

Setting L2TP
I offer Video instructions for setting up the connection type L2TP on the router ZYXEL Keenetic Extra II on the example of the ZYXEL Keenetic Omni II router.
Let's also take a written and illustrative look at the connection setup L2TP on the router ZYXEL Keenetic Extra II.
1.
Click on the shortcut in the bottom menu Internet".
2.
Select the tab " PPPoE/VPN"press" Add connection".
3.
In the window that appears, check the checkboxes next to " Turn on" and " Use to access the Internet".
4.
V " Description" enter any word in Latin, for example "Host", " Type (protocol)"choose" L2TP", "Connect via"choose" Broadband connection (ISP)".
5.
Below you are prompted to specify the username (in the line " Username"), password (on the line " Password"). You will also need to specify the ip-address of the server (in the line " Server address"). All of the above data is provided by the provider (the organization that conducted the Internet).
All this data is usually prescribed in the contract with the provider. If for some reason they could not find them, you need to call the provider's hotline and find out how you can get them.
6.
"Configuring IP Settings" - "Automatic".
7.
Once you have entered all the required information, click the " Apply".

Setting up L2TP with a static IP address
Consider connection setup L2TP with static IP on the router ZYXEL Keenetic Extra II. Usually a static IP address is provided legal entities, either as additional service to the basic tariff for individuals.
1.
Click on the shortcut in the bottom menu Internet".
2.
Select the tab " PPPoE/VPN"press" Add connection".
3.
In the window that appears, check the checkboxes next to " Turn on" and " Use to access the Internet".
4.
V " Description" enter any word in Latin, for example "Host", " Type (protocol)"choose" L2TP", "Connect via"choose" Broadband connection (ISP)".
5.
Below you are prompted to specify the username (in the line " Username"), password (on the line " Password"). You will also need to specify the ip-address of the server (in the line " Server address").
6.
Since the connection uses a static IP address, select " Manual" against " Configuring IP Settings".
7.
Specify ip-addresses and DNS.
All of the above data is provided by the provider (the organization that conducted the Internet).
All this data is usually prescribed in the contract with the provider. If for some reason they could not find them, you need to call the provider's hotline and find out how you can get them.
7.
Once you have entered all the required information, click the " Apply".

PPPOE setup
I offer Video instructions for setting up the connection type PPPOE on the router ZYXEL Keenetic Extra II on the example of the ZYXEL Keenetic Omni II router.
Let's also take a written and illustrative look at the connection setup PPPOE on the router ZYXEL Keenetic Extra II.
1.
Click on the shortcut in the bottom menu Internet".
2.
Select the tab " PPPoE/VPN"press" Add connection".
3.
In the window that appears, check the checkboxes next to " Turn on" and " Use to access the Internet".
4.
V " Description" enter any word in Latin, for example "Host", " Type (protocol)"choose" PPPOE", "Connect via"choose" Broadband connection (ISP)".
5.
Below you are prompted to specify the username (in the line " Username"), password (on the line " Password"). All of the above data is provided by the provider (the organization that conducted the Internet).
All this data is usually prescribed in the contract with the provider. If for some reason they could not find them, you need to call the provider's hotline and find out how you can get them.
6.
"Configuring IP Settings" - "Automatic".
7.
Once you have entered all the required information, click the " Apply".

Setting up PPPOE with a static IP address
Consider connection setup PPPOE with static IP address on the router ZYXEL Keenetic Extra II. Typically, a static IP address is provided to legal entities, or as an additional service to the basic tariff for individuals.
1.
Click on the shortcut in the bottom menu Internet".
2.
Select the tab " PPPoE/VPN"press" Add connection".
3.
In the window that appears, check the checkboxes next to " Turn on" and " Use to access the Internet".
4.
V " Description" enter any word in Latin, for example "Host", " Type (protocol)"choose" PPPOE", "Connect via"choose" Broadband connection (ISP)".
5.
Below you are prompted to specify the username (in the line " Username"), password (on the line " Password").
6.
Since the connection uses a static IP address, select " Manual" against " Configuring IP Settings".
7.
Specify ip-addresses and DNS.
All of the above data is provided by the provider (the organization that conducted the Internet).
All this data is usually prescribed in the contract with the provider. If for some reason they could not find them, you need to call the provider's hotline and find out how you can get them.
7.
Once you have entered all the required information, click the " Apply".

Firmware update, components
I offer Video instructions for updating the firmware on the router Keenetic Air using the Keenetic Omni II router as an example.
I hope the article was most helpful.
If you wish, you can support the project: