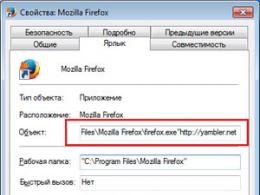
Capicom doesn't work on ie. Configuring Internet Explorer to work on the ETP
List of documents for a legal entity:
1. Extract from the Unified State Register of Legal Entities (USRLE) not older than 30 days.
2. Passport
3. Company details
4. SNILS (Insurance Certificate of State Pension Insurance)
5. TIN certificate
List of documents for an individual entrepreneur (IP):
1. Extract from the Unified State Register of Individual Entrepreneurs (EGRIP)
2. Passport
3. SNILS (Insurance certificate of state pension insurance)
4. TIN certificate
List of documents for an individual:
1. Passport
2. TIN certificate
2. SNILS (Insurance Certificate of State Pension Insurance)
2. A window pops up: "Error! The CAPICOM library cannot be loaded, possibly due to low access rights on this local machine."
If you get a window "Error! CAPICOM library cannot be loaded, possibly due to low access rights on this local machine" when you work on the roseltorg.ru website, you need to:
1. Click on the yellow bar under the site address with the text "This website is trying to install the following add-on: "CAPICOM User Download v2.1.0.2" from "Microsoft Corporation". If you trust this website and add-on and want to install it , click here...";
2. Select "Install ActiveX Control";
3. Click on the "Install" button; this procedure must be performed until the window with this message stops popping up (this is individual for each computer). This is a one time setting.
3. How to install a personal certificate?
Installing a personal certificate (your organization's certificate) can be done in the following way:
Through the menu "View certificates in the container"
1. Select Start / Control Panel / CryptoPro CSP , go to the Service tab and click on the button View certificates in a container(see fig. 1).
Rice. 1. “CryptoPro CSP Properties” window
2. In the window that opens, click the Browse button to select a container to view. After selecting the container, click on the OK button (see Fig. 2).

Rice. 2. Window for selecting a container for viewing
3. In the next window, click on the Next button.

Rice. 3. Window "Selected private key container"
4. If the version of CryptoPro CSP 3.6 R2 (product version 3.6.6497) or higher is installed, then in the window that opens, click the Install button, and then respond in the affirmative to the certificate replacement notification (if it appears).

Rice. 4. Certificate view window
5. In the window that appears about the successful installation of the certificate, click OK

Rice. 5. The window "Message about the successful installation of the certificate"
6. then press the button ready

Rice. 6. View window for the selected certificate
5. Close the CryptoPro CSP window by pressing the OK button

Detailed information on installing the certificate is available at the following link.
4. How to set up email.
Outlook Express security settings are configured as follows:
1. Select the menu item Tools / Tools -> Accounts/ Accounts and open the Mail tab.
2. In the displayed list of accounts, select the one you want to configure and click the Properties button.
3. In the displayed dialog, select the Security tab, which allows the user to specify his personal certificates that will be used when selecting the user's private keys to generate an electronic digital signature and decrypt incoming messages. The certificate selection dialog only displays certificates that have a matching address Email and allowed for email protection
5. In the displayed dialog, select the Security tab:
6. In the displayed dialog, set the following modes:
a. Enable user when sending encrypted mail / Always encrypt messages when sending encrypted mail . Setting the enable mode allows the sender to decrypt messages sent to them.
b. Include my digital ID when sending singed messages. Setting this mode will automatically add the sender's certificate to all messages. This mode allows you to exchange certificates using a signed message, and then use the received certificates for subsequent encryption of messages between recipients.
c. Send messages with an opaque signature/ Encode message before signing. When message mode is enabled, all attachments will be merged into a single attachment with a digital signature included. If the mode is disabled, the signature is generated as one separate attachment for all attachments.
d. Add senders certificates to my address book automatically. When this mode is enabled, certificates transmitted as part of a signed message will be automatically added to the address book.
e. Check for revoked Digital Ds:
i. only when online / Only when online. Setting a verification token causes each operation to generate or verify an electronic digital signature to be accompanied by a certificate revocation check. To check for revocation, a Certificate Revocation List (CRL) is used, the location of which is recorded as an appendix in each user's certificate. Default this option is not enabled, and Outlook Express does not track when user keys are compromised.
ii. Never / Never.
Revocation check is not performed.
5. How to sign a document.
There are 2 types of sending a signed document.
The first way is to sign the document itself and the second way is to sign the entire letter.
To create and send a signed message:
1. Click the Create Mail button or select the menu item File -> New -> Mail message.
3. To send a signed message, check the status of the Sign button. It should be pressed and the sign of the signed message should be visible on the right side of the screen.
4. After the message is prepared for sending, click the Send button:
The second way is when the file itself is signed. Package Microsoft Office allows you to attach digital signatures to a specific document. For this you need:
1. On the Tools menu, select Options, and then click the Security tab.
2. Click the Digital Signatures button.
3. Click the Add button.
4. Select the desired certificate, and then click the OK button.
For other data formats, you must use the CryptoArm program.
6. CryptoPro expires.
Was not entered during installation serial number product under the license you purchased.
7. Mail does not see the certificate.
When setting up e-mail, at the stage of signing a document, mail does not find the required certificate. This happens when the e-mail address, which is indicated during the production of the EDS, does not match the valid e-mail box.
8. When installing CryptoPro, at the last step, the system displays a message about the incorrect installation of the program and rolls back. How to be?
The problem occurs due to incomplete (or incorrect) removal previous version Crypto Pro from a computer. To remove the files remaining from the previous version, you must use the CryptoPro trace cleanup program clear.bat. You can download the program from here: ftp://ftp.cryptopro.ru/pub/CSP_3_6/clearing.zip
9. Where can I find the EDS signing public key?
All signatures issued by our company have the public key inside a container on a secure medium. In order to extract it from the container, you must:
When included in system unit via the CryptoPro program Start à Control Panel à CryptoPro à Tools à View certificates in the container. In the dialog box that appears, select the desired container via the browse à Next. In the data view window public key EDS select properties à “Contents” tab à Copy to file and specify the path to save the certificate.
10. CryptoPro does not see the container on the flash drive. Prompts you to select another medium.
Depending on what type of media you are using, the solutions are different. If you use smart cards such as Rutoken, MsKey, Etoken, then most likely you do not have drivers installed to work correctly with the key.
If your key is on USB flash drive 2.0, then you need to look at the version of the CryptoPro core. If you are using CryptoPro 3.0, then you have gone astray. In order to set it up you need to:
When the media is included in the system unit Via CryptoPro Start à Control Panel à CryptoPro àHardware Configure readers Add. In the reader installation wizard window that appears, select Drive on the right side of the screen (since in CryptoPro all USB media are defined as floppy disks). In the next window, select the correct name for the flash drive, that is, the name under which the flash drive was defined in "My Computer".
If you are using CryptoPro 3.6 and the container is not visible, then the medium is damaged. It should be submitted to the office to determine the status of the key.
11. We received an EDS, what to do next? How to register on the trading platform?
The entire procedure for accreditation, filing an application for participation in the auction and holding the auction itself is described in the regulations of a particular electronic trading platform, which can be found on the website of this site. There are also various auxiliary video materials, instructions for working in the system. Or you can contact us to purchase our service of assistance in accreditation on any electronic platform.
12. To check which operating system is installed on your computer
- Go to the explorer in My Computer.
- Click right click mouse on the display and select "Properties" from the menu that appears.
— The window that appears contains information about your system.
13. To find out which version of Internet Explorer is installed on your computer
- Run Internet Explorer.
- Select "Help" from the horizontal menu at the top of the browser.
— The window that appears contains information about the current version of the browser.
- Possible option
14. To install a newer version of Internet Explorer 8
— Specify in command line following address:
- In the presented window, click "Download for free".
- Click "Run" in the window that appears.
- Then click "Run" again.
- When installation is complete, you must restart your computer.
- EDS for Rosneft at the TEK-Torg site
-
EDS for public tenders
- EDS for "RTS tender"
- EDS for AGZRT zakazrf.ru
- EDS for MICEX
- EDS for Sberbank-AST: where and how to get?
- Electronic signature: key for EETP
- EDS for the site "Russian Auction House"
- EDS for ships: where to use and which ones are suitable?
- EDS for bankruptcy auctions: where else can it come in handy and how to get it?
- EDS of the customer for commercial bidding
- EDS of the supplier for commercial bidding
- EDS for GIS housing and communal services
- EDS for public services
- EDS for EFRSB
- EDS for PTS
- EDS for Rosaccreditation
- EDS for government bodies
- Electronic signature for individuals
Installation instructions
To set up your computer to work with electronic signature need to use Electronic signature installation wizard.
It offers full and custom installations. During the custom installation process, you can specify which components to install or update. A full install doesn't offer this option.
Automatic installation
Custom installation

-
Software installation user guide: Rutoken software, CryptoPro CSP, root certificates
Step 1. Installing the Rutoken software
2. If after starting setup file will be prompted to reinstall or remove the existing Rutoken software, which means that this software already installed on the computer. Re-installation is not required. Close the window by clicking on the cross in the upper right corner of the window. Skip this section of the instructions and go to step 2.

In the window that appears, click " Install".
4. The installation of drivers and the software necessary for working with Rutoken will begin. This may take several minutes.

5. After successful installation, a corresponding window will appear, where you will need to click " Close."

6. The installation of the Rutoken software is completed.
Step 2. Installing the CryptoPro software
2. If, after launching the installation file, you will be prompted to reinstall or remove the existing CryptoPro software, this means that this software is already installed on the computer. Re-installation is not required. Close the window by clicking " Not", and in the next window - " Cancel». Skip this section of the instructions and go to the next step.

3. If the software has not been installed yet, follow the instructions.
In the window that appears, click "Install (recommended)". Restart your computer after successful installation
4. If you need to change the installation settings, select " Additional options". Then click Next.

5. Familiarize yourself with license agreement CryptoPro and select "I accept the terms of the license agreement". Then click Next.


7. In the window for choosing the type of installation, select "Typical" and click "Next".

8. The program is ready to start installation, click "Install".

9. The process may take several minutes. When installation is complete, click "Finish".

10. Installation of the Crypto Pro CSP program is over.
Step 3: Install the Owner's Personal Certificate
1. Run the CryptoPro CSP application: Start –> All Programs –> CryptoPro –> CryptoPro CSP.
In the CryptoPro properties window, go to the Service tab, on this tab click the "View certificates in container" button.
2. Make sure that the personal electronic identifier is connected to the USB port of the computer, and click the "Browse ..." button.

3. In the next window, select the key container located on the Activ Rutoken lite 0 reader and click the OK button.


5. In the window that appears, click the "Install" button.

6. If necessary, enter the Rutoken PIN code. In the next window, click the "OK" button.

7. Personal certificate installation is complete.
Step 4. Installing the root certificates of the GUTs, the Ministry of Telecom and Mass Communications of Russia, the UTs of JSC EETP


Step 5Installing the Capicom Plugin
2.If, after running the installation file, you are prompted to reinstall or remove the existing Security Update for CAPICOM (KB931906), this means that this software is already installed on the computer. Re-installation is not required. Close the window by clicking Cancel. Skip this section of the instructions and go to the next step.

3. If the software has not been installed yet, follow the instructions. In the window that appears, click "Next".

4. Read the Microsoft License Agreement and select "I accept the terms in the License Agreement". Then click "Next".

5. At the next stage of the installation, click "Next".

6. Click "Install" to complete the installation.

7. The program has been successfully installed, click "Finish".

Step 6. Installing Crypto Pro EDS Browser plug-in

2. If, after launching the installation file, you are prompted to reinstall or remove the existing CryptoPro Browser Plug-In software, this means that this software is already installed on the computer. Re-installation is not required. Close the window by clicking No. Skip this section of the instructions and go to the next step.

3. If the software has not been installed yet, follow the instructions. In the window that appears, click "Yes".

4. The process may take several minutes. After installation is complete, click "OK".

Step 7Configuring Internet Explorer
1. Launch the Internet Explorer browser (version 9.x or later).
2. From the main menu, from the Tools menu, select Internet Options.

3. In the settings window that appears, go to the "Security" tab and select the "Trusted Sites" zone to configure security settings. Set the security level for this zone to "Low"

4. In the input field, enter the following address "*.site" (without quotes), uncheck "All sites in this zone require server verification" and click the "Add" button, and then "Close".

5. Back in the "Security" tab, click the "Custom" button.

6. In the options of this menu, you must enable all ActiveX controls and plug-ins and click OK. In the notification that appears, you must agree to accept the changes by clicking the "Yes" button.


7. When you return to the main settings window, go to the "Privacy" tab, uncheck the box "Enable pop-up blocker".

8. When returning to the main settings window, go to the "Advanced" tab, uncheck the "SSL 2.0" item (if this option is present) and check the "SSL 3.0" and "TLS 1.0" boxes

9. Then click OK. Browser setup is complete.
Step 8Setting Up Google Chrome Browser
1. Open Google browser Chrome

3. If there is no “CryptoPro Extension for CAdES Browser Plug-in” in the list of extensions, go to the chrome web store and install it

If you experience the following errors when logging in to trading platforms using an EDS, then you have a browser installed Internet Explorer 11, which does not work correctly with EDS and other components necessary for working with electronic platforms. To restore work on electronic trading platforms, you must perform the following steps: 1. Install "CryptoPro EDS Browserplug-in". a) Download CryptoPro EDS Browserplug-in and save it on your computer. b) Install the plugin following the installation wizard instructions. c) Restart Internet Explorer (if you had it running). 2. Open the menu Tools - Compatibility View Options and enter the address http://etp.roseltorg.ru in the line add this website and click Add:

Roseltorg.ru will appear in the list of websites for which you have selected Compatibility View.
3. Go to Personal Area EDS platforms. This procedure can be repeated for all sites that have problems with logging in via EDS. If the above methods did not work, then in order to restore work on electronic trading platforms, it is necessary roll back version Internet browser Explorer up to 10 or 9 ( this decision not suitable for Windows 8.1). To uninstall the Internet Explorer 11 update, we recommend that you do the following: 1. Click the Start button, type Programs and Features in the search box,

and then click the View link installed updates in the area on the left.  2. In the Uninstall update section, navigate to Microsoft Windows.
Thank you very much, Mikhail, everything was done promptly and, most importantly, it was clear to me ... Since we found mutual language. I would like to keep in touch with you in the future. I hope for fruitful cooperation.
Olesya Mikhailovna - General Director LLC "VKS"
On behalf of the State Unitary Enterprise "Sevastopol Aviation Enterprise" we express our gratitude for the professionalism and efficiency of your company! We wish your company further prosperity!
Guskova Liliya Ivanovna - manager. SUE "SAP"
Thank you Michael for your help with the design. Very qualified employee +5!
Nadiya Shamilyevna - Entrepreneur IP Anoshkina
On behalf of the company "AKB-Avto" and on my own behalf, I express my gratitude to you and all the employees of your company for productive and high-quality work, sensitive attitude to customer requirements and promptness in the execution of ordered work.
Nasibullina Alfira - Senior Manager"AKB-Auto"
I want to thank the consultant Mikhail for the excellent work, timely and complete consultations. He is very attentive to the client's problems and questions, promptly solving the most difficult situations that would seem to me. It's a pleasure to work with Michael!!! I will now recommend your company to my clients and friends. Yes, and technical support consultants are also very polite, attentive, they helped to cope with the difficult installation of the key. Thank you!!!
Olga Sevostyanova.
Acquisition of the key turned out to be very easy and even pleasant. Many thanks for the assistance to the manager Michael. Explains things that are complex and massive to understand, concisely, but very clearly. In addition, I called the hotline free line and on-line, together with Mikhail left a request. I got the key in 2 business days. In general, I recommend it if you save your time, but at the same time you want to have an understanding of what you are buying and what you are paying for. Thank you.
Levitsky Alexander Konstantinovich Samara
Personal gratitude to the consultant Mikhail Vladimirovich for the prompt consultation and work on the accelerated receipt of the ES certificate. During the preliminary consultation, the optimal set is selected individual services. The end result is immediate.
Stoyanova N.L. - Chief Accountant LLC "SITECRIME"
Thanks for the quick work and expert help! I was very pleased with the advice!
Dmitry Fomin
LLC "Expert System" thanks the consultant Mikhail for the prompt work! We wish your company growth and prosperity!
Sukhanova M.S. - AppraiserLLC "Expert System", Volgograd
Thanks to the consultant, who introduced himself as Mikhail, for the efficiency in working with clients.
Ponomarev Stepan Gennadievich
Many thanks to the consultant Mikhail, for the assistance in obtaining the EDS. For prompt work and advice on issues arising in the process of registration.
Leonid Nekrasov
The company, represented by consultant Mikhail, does the impossible! Speed up accreditation in less than 1 hour! Payment upon rendering of the service. I thought this didn't happen. With full responsibility, I can advise you to contact the Center for issuing electronic signatures.