dnsnet login. How to bind a dynamic IP to a domain name
When you need to access your home or work computer via the Internet, use the free No-IP service.
A modern person, as a rule, has several computers with which he constantly deals. At a minimum, this is a home and work PC. And sometimes it happens that on one of them we forget some very necessary files...
For myself, I made it a rule to use an FTP server to store important data. However, its presence is usually associated with the need to have a registered domain and hosting, which not everyone can afford. Fortunately, you can install an FTP server on any computer, but then you may be faced with the question of accessing it from the Internet.
How DDNS works
Previously, when access to the Network was the privilege of a few, providers, most often, issued so-called static IP addresses. They were always "tied" to a specific computer and allowed, if necessary, to access a PC from the Internet (it was from that time that the popular threat "calculate by IP") went.
Today, providers buy a certain range of addresses and randomly give them to users. Now your IP is with you, in five minutes it may be with some Petya or Vasya, and after another ten with Masha or Dasha :) This phenomenon is called dynamic IP and it eliminates the possibility of direct access to your PC, since the external gateway address can belong to anyone on your ISP's network.

It would seem that in this situation it will not be possible to access your computer via the Internet. However, to overcome this inconvenience, back in the late 90s, services appeared dynamic DNS(DDNS), which, using a client program, created their own unique identifier for the computer, bypassing IP addressing, and this identifier was associated with a specific domain name.
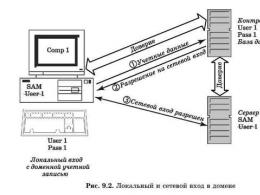
DDNS registers its domains on most of the world's DNS servers that support Internet addressing. Thus, if we enter a unique address issued by a DDNS service, the request goes directly to the global DNS, then it is redirected to the service, which, in turn, issues not your IP, but its own identifier associated with your PC. Accordingly, we get remote access to a local server installed on your computer:

There are quite a lot of DDNS services, however, only some of them are supported by the developers of equipment for accessing the Internet (modems, routers, etc.). One of those, which, moreover, has free features, applies no IP .
Registration on No-IP
The No-IP service has existed since 1999 and was one of the first to start providing DDNS services during world wide web. Today the company also provides a number of related services (registration of domain names, sale of SSL certificates, mailing lists etc.), however, dynamic DNS remains its main focus. Moreover, unlike other reputable DDNS services (such as DynDNS), No-IP has retained, albeit somewhat limited, but free tariff plan.
Before registering for No-IP, you need to make sure that your router or modem supports dynamic DNS functions. You can do this by entering the appropriate request on the Internet with the model of your device, or by entering its settings through the WEB interface (usually at 192.168.0.1 or 192.168.1.1). As a rule, in the settings menu you can find sections with the names "Dynamic DNS", "DDNS", "Dynamic DNS" or "DynDNS". If there is such a section, enter it and make sure that No-IP service is supported:

If the service is in the list of available DDNS on your device, consider yourself lucky and you can successfully use No-IP. To do this, you need to go through a simple registration procedure by filling out a special form:

Despite the fact that the form is in English, I think there will be no particular problems with filling it out. IN first three fields, we need to consistently indicate your E-Mail (it will receive a letter with a link to confirm registration), a password to access your account and the desired domain name with a choice of one of the available domain zones(I liked ddns.net). If you have not yet decided on the future domain, you can leave the third field blank, but instead check the box "Create my hostname later" below.
Next, there will be a comparative plate of a free and paid account, which we don’t really need, and under it is a checkbox confirming our agreement to the terms of use of the service, which should be noted (Terms of Service and Privacy Policy). After all these simple actions, click below right button"Free Sign Up"(NOT GREEN!), We receive a letter with a link to the specified mail and activate our account by clicking on it.
account settings
You will see the main section of the service control panel - "Dashboard":

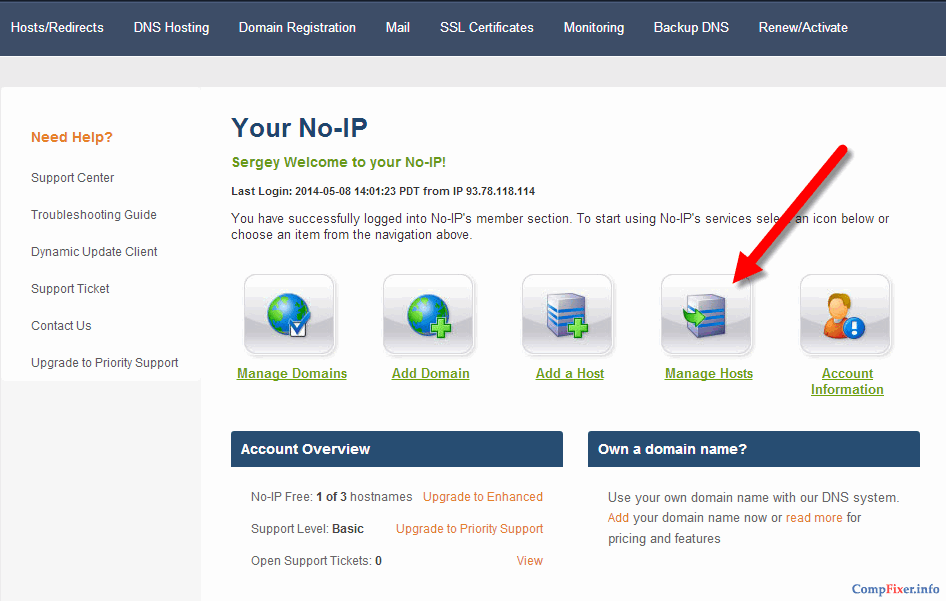
From here you can quickly get data about your current resources used, links to programs and tools for testing connectivity. We will return to the latter, and first of all, in the form of a notification, we will be asked to set the username and secret question in the settings to access No-IP. Click on the notification or go through left menu to section "Account" - "Account Info":

We add a login no shorter than 6 characters and in the drop-down list below, select our version of the secret question. I settled on the first one - "What is your fathers middle name?", that is, in fact - "Your father's middle name". Enter the answer to the selected question in the field next to it and click at the very bottom "Save" button. It is not necessary to fill in information about yourself in the "Personal Info" block!
In principle, to start the settings is quite enough. In the future, we will have to look into the control panel at least once a month in order to manually reactivate our domain associated with our PC. You will receive an email about the need for this, but you can, without waiting for it, go to the section "My Services" - "Renewal Management" and click there "Renew" button to renew your registration for 30 days:

Client installation
In order for No-IP to properly associate your computer with the domain name you registered, you need to install a special client program. Therefore, our last action in the control panel will be to visit the menu section Dynamic DNS - "Dynamic Update Client":

Here we select the version of the client, according to your operating system and click the "Download DUC" button. You can also watch a video on working with the client, but I think this is not particularly necessary, since it is quite simple to install and manage. IN established form the client occupies a little more than half a megabyte of disk space and practically does not consume the resources of your PC. At the first start, we will need to enter the login and password from our account, after which the program window will appear in front of us:

Ideally, we do not need to configure anything if all three sections of the main window are marked with green checkmarks. Misunderstandings may arise if your computer has several network cards. In this case, you must explicitly specify which of them the DUC should work with. To do this, go to the menu "File" - "Preferences" and in the window that opens, select the desired "network card" from the "Network Adapter" drop-down list:

In addition, after such an adapter change, in case of further problems, you must also cancel the automatic remote detection of the network address by setting the switch in the "IP Detection Method" group to the "Use the IP of my local network adapter" position.
On this client settings, you can finish and proceed to the installation local server, which you will access via the Internet, as well as opening access to your PC via DDNS in the control panel of your network device.
Setting up No-IP on a TP-LINK TD-W8961ND modem
I recently wrote about my favorite local chat MyChat. I installed it at work and have been using it successfully for several weeks now. However, initially I was interested in the question of whether it is possible to connect to the chat server not only from local network but also from the Internet.
There are two articles on the official website about this. One of them described a way to connect to a server with a static external IP, but this option didn’t work for me right away, since we didn’t have a dedicated address. In the second article, the situation was closer to mine. It just described how to bind a No-IP domain name to a chat server.
However, at the very beginning of the article there was a reservation regarding checking the visibility of a computer by external IP through the Network Tools ping service. Like, if the service, after trying to ping, issues a message "Timed Out", then you should not even try to configure the visibility of the server via the Internet. Unfortunately, this is exactly what happened to me. But I still tried to "shamanize" with the settings of our modem and I succeeded! Now I'll tell you how...
At work, my entire local network connects to the Internet through a brand new TP-LINK TD-W8961ND modem. On his example, we will consider everything that I did. Naturally, the first step was to find a function DDNS, which was found in the section "Advanced Settings". Here I activated Dynamic DNS, chose NoIP.com as the provider, entered the domain name, login, password and saved the whole thing:

But, alas, nothing happened... At first, I sinned against the modem's built-in firewall, which could block access to it from the Internet, but it was turned off. As it turns out, the problem was NAT settings(abbr. "Network Address Translation" - "network address translation"). Since, in the local network, several computers access the Internet through a single modem gateway, it simply "does not know" which PC to associate the No-IP domain name with! He needs to be "helped".
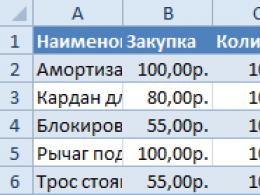
To do this, we need to directly specify in the NAT settings the IP address of the computer on which the server is located, as well as the ports through which it transmits data. In MyChat, all this can be viewed in the server admin panel. We go into it, go to the "Server Information" section and here in the "Services" group we see the required IP addresses and ports that need to be opened on the modem side:

Now let's go to the modem settings: "Advanced" - "Advanced Setup" - "NAT" - "Virtual Server". Here we have up to 12 rules for port forwarding. In the drop-down list, in order, select the sequence numbers of the rules and write in them the ports to be opened for the desired IP address:

It turned out that only 4 rules were enough for me to successfully access the chat server from the Internet, after which domain name No-IP began to open the start page of MyChat! To connect through the client program instead of the local IP server, it is enough to specify a link to the same No-IP domain.
Setting up No-IP on a TP-LINK TL-WR740N router
Inspired by the success at work, I decided to register another No-IP account and "suspend" access to files on my home laptop on it. At home, the Internet is distributed over the local provider's locale and as an access point there is a fairly common inexpensive TP-LINK Wi-Fi Router TL-WR740N. It also has support for the dynamic DNS service and among the providers there is No-IP (see the screenshot in the "Registration on No-IP" section).
Actually, I successfully filled out the No-IP connection form in the router settings and chose one of the simplest solutions - HFS as a server. This program allows you to quickly and practically without any configuration create an HTTP server for accessing files and folders on local computer. In addition, it initially has support for DDNS services, among which there is No-IP!
To connect No-IP to HFS, you need to switch the program to expert mode ( "Expert Mode") by pressing F5 on your keyboard. Then go to "Menu", find the section there "Dynamic DNS Updater" and choose "No-IP wizard". The No-IP connection setup wizard will start, where you will step by step enter the data from your account and specify the domain:

However, after adding information about my No-IP account, the server was still not available, although, in the router parameters, the test connection signaled a successful connection with the service. Keeping in mind port forwarding at work, I decided to look for similar settings on my home router and found a similar one in the section "Redirect" - "Virtual servers":

The standard port 80, which is used by the HTTP protocol, stubbornly did not want to be set for the prescribed IP (wrote that it was busy). Therefore, in the HFS settings and here, I registered an alternative port - 8080. After that, and also after restarting the program, the server finally started working and became available via the Internet!
However, it became interesting to me what was still occupying the 80th port and blocking access to it. I had to rummage through all the settings of the router, but in the end, luck smiled at me. As it turned out, in the "Security" section there was a subsection " Remote control"and port 80 was blocked by default in it! As soon as I changed it to an alternative one and rebooted the router, access to the port was freed up. True, I did not reconfigure anything :)

conclusions
The No-IP service can be a real salvation for those who want to have remote access to their computer or part of its functions for free. In fact, you can connect via the Internet to the local host of your PC (127.0.0.1), on which almost any server can "spin"!
If you want, like me, organize a chat or a personal "cloud" for storing files. If you want, deploy a full-fledged website (No-IP allows you to "attach" a real domain to your account), turning your computer into a web server (for example, using DENWER). Or you can even create your own game server. In a word, with No-IP, any server software will become available to you and you will be able to give it access to the Internet without any financial costs!
Try, experiment and share your experience in the comments below the article!
P.S. Permission is granted to freely copy and quote this article subject to indication of open active link on the source and preservation of the authorship of Ruslan Tertyshny.
- The ddns service will help you when you do not have an external permanent ip. With this service, you can link your computer + ddns + Another service, it can be a video camera or a video recorder. You can connect your server without an external ip, with your computer, or connect a domain and make an http server. The domain can be obtained in your account settings, no-ip . This video shows how to get a domain and set up the program on the computer itself. If you do everything as in the video, then the connection with your computer will be through this domain. You can register the settings in the router without installing the program on the PC, the domain + login + password from no-ip is entered. Actually, everything as you configured and indicated the authorization data, the same data will be required to configure the device with which you need to communicate without a permanent IP.
- 1. Once logged into the noip website, click on one of the green “Sign Up” buttons to proceed to the registration procedure.
- 2. Fill in the "Username", "E-mail" and "Password" fields. Please note that when you enter a password on the right, its strength is automatically evaluated. For the safety of your account, achieve the maximum level of "Strongest" reliability.
- 3. Check the "Create my hostname later" checkbox. If you do not want the newsletter to be sent to your e-mail, then uncheck the box "Send me newsletters & special offers" ("Send me a newsletter and Special offers"). Here you can compare the features of paid and free account("Enhanced" and "Free"), and select any of them as desired. In our example, a free account, select the "Sign Up" button.
- 4. After completing the registration, click on the "Sign In" in the upper right corner. On the page that opens, fill in the fields with your registration data, and click on the "Sign In" button.
- 5. Hitting Personal Area, use the "Add a Host" button to add a new hostname for the computer device you want to communicate with, if you did not add it when registering as in the video.
- 6. In the opened dialog for adding a host, select the type ("Host Type") - "Port 80 Redirect" ("Redirection of the 80th port"). Next, fill in the "Hostname" field with an arbitrary combination letters A-Z and numbers 0-9, and select any domain name from the "No-IP Free Domains" drop-down list. The "IP Address" field is automatically filled in with the address from which you entered the site. In the “Port” field, enter an arbitrary value for the HTTP port other than 80. The same value for this port will need to be configured on the router (router), another device that you want to configure to connect to the service.
- 7. At the bottom of the page, click the "Add Host" button to complete the procedure for creating a new host.
- 8. You will be notified about the successful creation of the host, and it will appear in the list of hosts sorted by domain. None advanced settings you don't have to do it on the site. If the HTTP port in your router settings has already been reassigned, then you can check the connection by connecting to the IP address indicated in the middle column. The connection should work successfully.
- This is not in a tricky way you can find your router or computer on the Internet without having a permanent external IP. The video shows how to set up a computer or laptop by installing the program. Below I will show how to configure the router to connect to the no-ip service and constantly monitor it if the external IP address changes. An example below using the TP-LinK AC-750 router, in fact, all routers are almost the same menu name, picture below:
- 1. Select the menu item "Dynamic DDNS" Dynamic DDNS.
- 2. Select the no-ip service from the drop-down list.
- 3. Enter the login as indicated on the no-ip service.
- 4. Enter the password, which was also indicated on the no-ip service.
- 5. Specify the domain name that you have chosen on the no-ip service.
- 6. Click the save settings button.
- 7. On some routers, including this model, you can check the connection, you have entered the data correctly.
- Actually, everything is simple if you watched the video and were attentive to the description, there should be no questions. This service will replace a paid external IP address, in its place your device does not matter if it can be found by the domain name.
Description of registration on the NO-IP service
When you connect to your ISP, the ISP gives you an IP address. Depending on the connection scheme, this IP address can be assigned to a modem, router, or directly to a computer.
The IP address issued by the Internet provider can be either static, which does not change when reconnecting, or dynamic - when a different IP is issued each time you reconnect.
What is dynamic DNS for?
Dynamic DNS (Dynamic DNS) is used to bind a specific domain name to a static IP address and update the binding in real time. Thanks to the dynamic DNS service, you can access your equipment by the selected domain name, for example, dmitriy-comp1233.no-ip.biz . In this case, you do not need to find out which IP address remote device has at the moment. By the way, the device can be a computer, smartphone, router, modem and other equipment. Most often, dynamic DNS is used on the router.
If you have a D-Link device, you can use the free dynamic DNS service by registering at http://dlinkddns.com. Also, there is a service no IP.
Binding a dynamic IP address to a domain name using the No-IP service
Registration in the service
Go to the site no-ip.biz and click on the button sign up now:
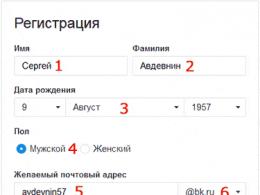
Specify login(1), email(2), password(3,4), hostname(5) and select domain zone(6):

after that press Free sign up:

Check mailbox specified during registration. Follow the link in the letter to activate your account in the No-IP service:


Fill in information about yourself:
- Surname
- Secret Question
- Answer to the secret question
and press Update Info(5):

Check that the hostname you added appears in the list.
Configuring the No-IP service on the router
This option is suitable for you if you have your own router.
Everything is simple here.
1 Find the Dynamic DNS tab.
2 In the list of dynamic DNS providers, select the No-IP service.
3 Enter the login that you specified when registering on the No-IP site.
4 Enter a password.
5 Enter the hostname (domain name) you registered on the No-IP site.
6 Check the box Enable DDNS.
7 Press login.
8 Press Save or Save to apply the settings on the router:

Setting up the No-IP service on a computer
This option is suitable if your computer is connected to the provider directly, i.e. you don't have your own router.

Click Download Now:

Run the downloaded file:

In the security warning window, click Run:

Click I agree:

And install:

After installation is complete, click finish:

Enter login (1), password (2) and click sign in(3) for authorization in the client program.

Such a window should appear.

Your IP is now mapped to the selected hostname and the corresponding domain name.
No-IP is best app in its class, which is also able to work with dynamic IP addresses. In fact, it doesn’t matter what Internet connection you use and what address you have, as well as what subnet it is from. With this program, users can easily visit the server installed on your computer. instead of four sets of numbers, you can be found by an easy-to-remember domain name.
Get a name for your computer that is very easy to remember.
As a rule, the IP addresses that are assigned to a computer are very difficult to remember. You do not type the address "66.218.71.113" in your browser in order to get to the page of one of the most popular search engines, which is available for viewing at yahoo.com? With this program, your computer will have a name, not just a numerical address. With this software you will be able to have servers on your computer that will be as accessible as the largest sites on the Internet.
Make your location permanent
If your computer is assigned a dynamic IP address every time you connect to the Internet, installing this program will solve this problem. But that's not all, regardless of where, when, to which provider and with what type of connection (Dial-up, DSL, high-speed cable connection or wireless connection) When you connect, you will always have the same address in the form of your chosen name.
Ability to shorten your favorite URLs
If you wish, you can shorten and simplify the links to your favorite web pages. For example, the link "www.someisp.com/subscribers/j/s/~jsmith" can be turned into a simpler version like "jsmith.hopto.org" for free.
Key features and functions
- possibility auto tuning network, which makes the installation process much faster;
- ease of use. The client downloads everything from the hosts that are associated with your account. Just check the ones you want to update;
- the ability to use encrypted data. When updated, requests are encrypted to ensure data integrity;
- can run as an NT service. You do not need to start the client every time you restart your computer.
Special requirements
- processor: 266 MHz or better;
- RAM: 64 MB;
- free hard disk space: 5 MB;
- Internet connection.
Note: No-IP is free for personal use only. If you are looking for high traffic or commercial use, then check out the No-IP Enhanced or No-IP Plus programs.
Beginning of the article:
Foreword
Since providers often give out a gray IP address, then before our file HTTP servers from global network Internet, respectively, access simply will not. But there are wonderful free services, which will help make our gray IP address permanent (white). In this case, we will consider, in my opinion, the simplest and reliable way implementation of our idea, through the NO-IP service.
Registration on the NO-IP website and creating a host
By typing in the browser in the address bar noip.com get to home page.
Note. I use Yandex Browser based on Chromium with default settings and I have this button. If you don’t have it, try digging into your browser settings and set it to offer a translation of the page and words, or maybe something else related to automatic translation ...

Scroll to the top and click "Register".

In the window that appears, we need to come up with and fill in our unique non-recurring name (as you will be represented on the NO-IP website), enter your Email, enter a password and confirm it. You do not need to enter the name of your future host, we will enter it later.

After filling in the fields, you must check the box "Create your host later". I apologize for the clumsy Google translation, but as you can see, this phrase was translated to us like this.
Note. Either my Opera browser somehow works wrong, or something else, but the checkmark in the “Create your host later” window did not appear after clicking the mouse. Anyway, we put it there.

After entering the registration data and hostname at the bottom of the page, click the "Free registration" button.

Open your mailbox and click on the link to confirm your registration.
![]()
After that, a window will appear with a notification of successful account activation on NO-IP.

We have passed the registration on the NO-IP server. It's time to create our host. We go to the main page of NO-IP and click "Login".

In the window that appears, enter your username and password, and then click the "Login" button.

So, click the "Add host" button.

We will enter a unique host name (you need to come up with a host name yourself, and so that the host is not occupied by anyone else) and its ending. In the example, I chose the hostname failovi-server and its ending no-ip.org. And in the future my address will be like this http://failovi-server.no-ip.org.
Note. You need to choose any host ending you like from the free hosts below, after the expression “No-IP Free Domains”. Since above - all hosts are paid.

After filling in the fields, click the "Add Host" button (Create a host).

Congratulations, you have created your host.

Half the job is done. It remains to configure your "Experimental" router.
Setting up a router for NO-IP service
Note. Since my main connects to the Internet TP link router TL-WDR4300, then I will make the DDNS settings on it (as in the figure below). But, it doesn't matter in principle where you configure the DDNS service on the main router or on the "Experimental" - everything will work. Or you can generally configure both on the main and on the “Experimental” routers to different registered domain names. If you are setting your only router to OpenWRT firmware, then for you the description of setting up the router for the DDNS service will be right after this figure ...

To set up dynamic DNS on OpenWRT firmware, you need to install the following package
luci-app-ddns
After refreshing the page, the "Services" tab will appear, and in it the "Dynamic DNS" tab. Fill in the required fields by entering our registration data.
Note. I have a Lan connection with the main router, which is why I specified it in the settings. If you are establishing a Wan connection, then you need to specify the event interface wang.

After filling in the fields, save the settings by clicking "Save and Apply".
Checking access to the file server from the Internet
So, we checked access to our file server via the Lan network in the previous article, we will check its performance via the Internet. Let's enter our address registered on NO-IP in the browser and specify the port http://failovi-server.no-ip.org:2221/ - this link worked at the time of writing this article, now it makes no sense to use it...
As you can see, everything works.

And they sing songs...

This completes the NO-IP service setup.