How to set up a zilu file. How to use FileZilla - step by step guide
To use the FileZilla program, you need to set it up by following the steps illustrated with images.
1. Run the FileZilla program, then in the top menu, click the item File Site manager.
New website.

Host- FTP server address.
Server type- FTP - File Transfer Protocol.
Login type- normal.
User- Username.
Password- password.
Encryption- Use plain FTP.

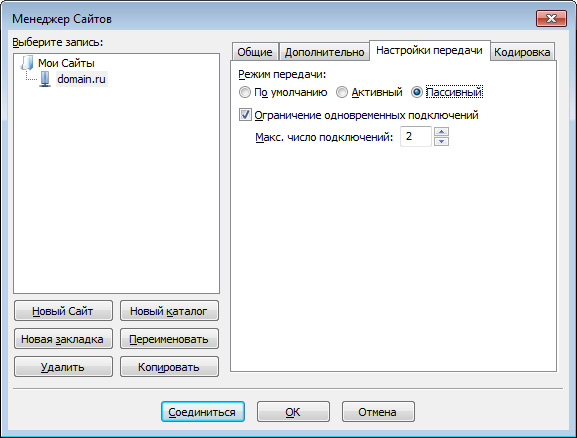
4.Go to the tab Transfer settings, select passive transfer mode, check the box Limitation simultaneous connections and install Maximum amount connections equal to two. Click the button connect.
Important: The content of your site must be placed in a folder /home/login/your_domain/docs/.

FAR
To use the FAR program, you need to set it up by following the steps illustrated by the pictures.
1. Run the FAR program. Specify in which panel you want to make an ftp connection. Let's say right. Then press Alt F2 and in the window that appears, select the line FTP.

2. Press Shift+F4, a window for entering connection parameters will appear.

3. Fill in the required fields. In field Descripton you can give any name to the custom ftp connection, mark the position passive mode.

4. After that, press the button Save.

5. On the panel of the FAR program you have chosen, we have it on the right, a line will appear with the newly entered ftp connection name. On this line, press Enter.

6. There will be a connection with the server and you can work in the usual two-panel mode file manager.

Total Commander
You can download Total Commander at http://www.ghisler.com.
1. Run Total program Commander, then in the top menu, click the item Network, in the menu that opens, select the item Connect to FTP server.

2. In the window that opens, click the button Add.

3. In accordance with the instructions, obtain and specify the connection parameters:
Connection name- come up with a name, for example, "Hosting login".
Server- FTP server address.
Account- Username.
Password- user password.
Set the flag Passive sharing mode (like a web browser).
After that press the button OK.

4.Select the created connection and click the button connect.

5. There will be a connection to the server, after which you can work in the usual mode of a two-panel file manager.
Important: The content of your site should be placed in a folder /home/login/your_domain/docs/.

Total Commander (version 6.53)
Russified version
1. Launch the TotalCommander program, then, in the top menu, click the Configuration item and select the line Setting: FTP

2. In the next window, you need to check the presence of a checkmark in the line Default to use passive mode and if it's not there, put it in.

After that, click OK and the window will disappear.
3. In the top menu, click FTP and select line Connect to FTP server.

4. In the window that appears, click the button Add.

5. A new window will appear in which you need to set the necessary parameters and check the box Passive exchange mode.

After that, press the button OK.
6. In the remaining window, click the button connect.

7. There will be a connection to the server and you can work in the usual mode of a two-pane file manager.

iWeb
After the site is created, the iWeb program window appears on the screen with the contents of your site.

In the left part of the window, click on the name of the site you want to publish. AT this example the site is called My site.

On the page that opens, enter the parameters required for publishing.
In chapter Publication:
Publish to: FTP
Site Name: The name of your site
Contact email: yours email box

In chapter Options FTP servers :
Server address: ftp.your_login.nichost.ru
User: username (usually your_ftp_login)
Password: your_password
Directory/path: your_site/docs
Protocol: FTP
Port: 21

Enter the address of your site as the URL.


In case of failure, check again the correctness of the entered parameters.
After the test is successfully completed, on the bottom panel, click the button Publish site.

In case of successful publication, a message will appear: "Your site has been published."

Important: By default, iWeb uses UTF-8 text encoding. Our hosting uses Windows-1251 encoding by default. For the correct display of your site, you need to go to the section Web server → Sites → your website and choose from the list Site encoding encoding UTF-8.
CuteFTP (version 7.0)
1. Run the CuteFTP program, then, in the top menu, click the item Tools

2. Select a line site manager.

3. In the window that appears, select the line Display Site Manager.

4. In the new window, click the button New.

5. Two submenu lines will appear at the bottom. Select line FTP Site.

6. A window will appear:

7. Complete the fields in this window.

8. Then, without leaving this window, click the button type.

9. In the changed window, in the section Data Connection Type select line Use PASV is the passive mode of data transfer.

10. Then, in the lower row of buttons, click on the button Connect.

11. There will be a connection to the server and you can work in the usual mode of a two-pane file manager.

FlashFXP
You can download the trial version here: http://www.inicom.net/pages/en.ffxp-download.php
After installation, there are several ways to connect to the server: By registering through Site Manager and Quick Connect.

Fast connection.
1. For a quick connection, you need to click on the lightning icon and select the item Quick Connect or press the F8 button.

2. Then, in the opened form:

3. Fill in the fields Server or Url, user name, Password.

4. This will open your FTP account.

5. After that, you will need to go to the folder with the name of your site and in it to the Docs Folder. After that, on the left side, go to the folder with the files necessary for the site,
Site Manager.
1. In order to enter the Site Manager, you need to go to the tab Sites→ site manager or press the F4 button


4. Enter the name of the site and click on the button OK. Next fill in the fields IP address, user name, Password

5. Replace test111 with your hosting ID. Then press the button apply. After that, by clicking on the lightning button in the drop-down menu, select the name of your connection.

6. By clicking on it, you will be taken to your ftp account.

Macromedia Dreamweaver 8
1. When the application starts, a window will open:


3. You will see the site manager window.


6. If everything goes well, then you should have a list of files on the right:
In this article, we will get acquainted with FileZilla Client- cross-platform FTP client open source code.
As a rule, programmers who create websites and WEB applications have to work with the FTP protocol.
Let's look at how to set up FileZilla so that you can start using its functionality as soon as possible in the process of developing your products.
You will find a description of FileZilla in the section Programs for working with the FTP protocol - FTP clients and servers.
First start:
Download and install the program, installation takes place in several simple steps. You can leave the default values suggested by the wizard, and then run the program.
After starting the program, we see on the left the files and folders of our local computer, and the file structure on the server will soon be displayed on the right, but for this you need to make some settings.
Setting up a connection to an FTP server:
FileZilla provides two ways to manage connections - quick connection and through the site manager.
When using a quick connection, you need to fill in the connection line, which is located directly below the toolbar, and click the "Quick connection" button (circled in green in the image below), after which you can work with a remote server and with arbitrary local directories.
If you have a copy of the files on your computer with the same structure as on the server, you can activate the synchronized view mode (the button is circled in red in the image above). In this case, navigating through the directories of the local copy will automatically open folders on the remote server, and vice versa. This function greatly facilitates navigation.
The connection settings are saved in the connection history. Subsequently, you can connect to various FTP servers by selecting the appropriate item from the drop-down menu.
Using the site manager:
Site Manager provides a more convenient way to work with both connections and local files and remote directories.
Let's start the setup by pressing the "Open Site Manager" button on the toolbar, or through the main menu: "File" -> "Site Manager ...".
In the dialog box that appears, click the "New Site" button and give it a name.
Next, on the "General" tab, enter the required data - the URL or IP address of the server you want to connect to, the login type, username and password. The value of the "Port" field must be entered only if your FTP server is not configured on the standard port 21.
On the "Advanced" tab, specify the appropriate local and remote directories. For convenience, you can enable the "Use synchronized browsing" option.
Click the "Connect" button.
All parameters are entered correctly and the connection is completed.
Also in the image, we can see that when navigating through the directories, the left and right browser windows are synchronized.
Hello, friends.
Today I'll show you how to use the FileZilla program and connect with your hosting provider with it, so that you can then download files to your computer or upload files to the hosting.
This program should be in the arsenal of every webmaster. It doesn't matter if you have a blog or a simple one-page website. Sooner or later you will need to edit your website files. And for this you need to download them to your computer, which will help the FileZilla ftp client.
And until I started publishing articles in which very often I have to do operations to edit files that are on the hosting, I am writing an article about this ftp client so that you can always refer to this material.
We will not study the program thoroughly. I will only show the main functions that are indispensable in my work. Download the program from the official site.
After going to the site, click on the next button.

We also get to the next page, where we also click on the button.

After clicking, it will transfer to the next page, where it will begin automatic download programs.

After downloading, immediately run the installer and install the client.
The client is free, so the installation is done in the usual way. I will not show the installation process. Everything is extremely simple there.
After installation, immediately run the program and begin to deal with it.
FileZilla Basics
If you have used file manager of Total Commander, then there will be no difficulties in mastering FileZilla, since the principle of operation is similar.
The program consists of 2 main work areas:
- An area that displays computer files (local site);
- The area where the content of the server is displayed (remote site).
As you understand, in the left area (1) you can navigate around the computer, as in a standard explorer operating system. In the second area, everything is similar, only we are on the server and see all the folders and files located in it.
In the screenshot above, I'm inside my hosted blog browsing through all my plugin folders. How to connect to any server via this client we consider below. And now I will show you how you can upload files from your computer to hosting and vice versa.
The first way is through right button mouse, selecting the "Upload to server" item in the context menu.

By selecting this item, the file will be uploaded to the hosting and the download process will be shown at the bottom of the program.

After the download is complete, the file will appear on the server. The file should appear in my place with the folders of all the plugins of my blog.

We can also upload files double tap left mouse button, as when opening folders in Windows. But, if we want to upload a folder, then this method will not work, since a transition will be made inside the folder. You need to use the method through the context menu.
It is also possible to upload and download files by simply moving files and folders while holding down the left button computer mouse. These actions are standard for any operating system. If you actively use a computer, then there will be no difficulties.
If you want to download files from a hosting to a computer, then everything is done in the same way. You can use any method. Only when using context menu, select "Download".

We have analyzed the process of managing file uploads.
It is also worth noting the program log area. When we connect to a server, the connection process is accompanied by a record of the actions that take place. The log window is located at the very top of the program above the workspaces of the FileZilla file manager.

This can be useful if you are unable to connect to the server while making a connection. You can look at the report and see what's wrong. Of course everything is in English. But, if incorrect connection data is entered, then you should understand everything.
We've covered the basics. Now let's start creating our connection to connect to the hosting or any other server.
Connecting to hosting ftp server

There are 2 options for connecting to ftp servers through FileZilla:
- Fast connection;
- Connection through the added connection in the site manager.
Consider first a fast connection.
This option will be useful when there is no need to constantly connect to some server. Here you need to connect 1-2 times somewhere. Then a fast connection is the best.
For such a connection, the ftp client has a special panel located under the main menu of the program.
When connecting in this way, you must fill in the fields:
- The host is the address of the server itself;
- Username - login to the server's ftp account;
- Password - password for ftp server account;
- Port - enter the port number (21) or leave the field blank.
Ask your hosting provider for the host, username and password. As a rule, these data are given immediately after registering a hosting account. For example, on TimeWeb hosting and Makhost, data comes immediately in the registration letter.
If you do not know this data, then write to the hosting support service. You will definitely be helped.
After entering the data, click on the "Quick connection" button, which actually happens after that. If everything is entered correctly, you should see the contents of your hosting account in the right window of the program, as well as an inscription about a successful connection in the program logs.

After that, we can do the necessary tasks of downloading files and so on.
One more moment. After making quick connections, they will be saved in the list, which is available by clicking on the arrow next to the "Quick connection" button.

I have right now this list empty, since I did not make fast connections.
Please note that as new quick connections are added, this list will change. New connections will appear in it, and older ones will disappear. Therefore, keep in mind that you will not always be able to use the list of quick connections.
Now let's move on to connecting to the server through the connection added to the site manager.
Advantages this method obvious.
- First of all, this compound you will always have at hand;
- Secondly, it will not be necessary to enter it every time or be afraid that it will suddenly disappear by itself.
To create such a connection, under the "File" menu there is a "Site Manager" icon.

By clicking on it, a window opens in which the connection (site) is added.

I already have 3 connections that I use all the time. Now you can easily add your connection. I will describe this process on an existing connection. Let's get started.
Click on the "New Site" button and enter the name of the connection (any name convenient for you).

Then select the type of login "Normal" and enter all the data (host, user and password) to access the ftp server. I leave the "Port" field blank.


After clicking on the "OK" button, the site manager window will close. We can re-enter it and see a similar picture, as before. The list will contain our added connection. Then we can try to connect to the server by clicking on the "Connect" button.

The connection will start. If everything is filled in correctly, then the connection process will complete successfully and in right area"Remote site" you will see the contents of your hosting account.
If, however, some errors were made when creating the connection, we can always edit them by selecting a site in the list and changing the data for it. After making changes, always save the settings by clicking on the "OK" button.
As in the case of the fast connection, we can connect to our servers using the connection list, which is available by clicking on the arrow next to the site manager icon.

At this stage, the connection process with ftp server using the FileZilla client we covered. Everything is quite simple here and I hope you do not have any difficulties. If something is not clear, then I wait in the comments.
Now I propose to consider another interesting feature which I use all the time on my website. It allows you to save a little time and saves you from uploading files to an unnecessary directory.
Synchronized View
This function is to simultaneously move through the folders of the file ftp manager client, when we ourselves make the move only in one area (on a computer or on a hosting).
Imagine that we have a folder with the engine of my site on our computer. And hosting also has it. Both of these folders have exactly the same contents in the form a large number subfolders and files. I'll show you exactly how it looks.
I constantly need to navigate within these folders, downloading files.
Let's say that I need to navigate in both areas to the wp-admin folder. To do this, I need to go to this folder in the left area, and then in the right. That is, you need to perform 2 identical actions.
The synchronized view, on the other hand, goes automatically to the same folder in the second area when you go to the first one (or vice versa). That is, I go to the wp-admin folder in the right area, and the synchronized view automatically picked up my actions and the program itself moved to the same folder in the left area.
It is very comfortable. Saves time. Allows you to save yourself from constant actions of the same type. And sometimes it saves you from uploading files to the wrong folder. It happens that you just forget to go in some window to the same directory.
But there is one but. This function works only if the name of all directories between which the movement takes place in both areas is identical. If I wanted to go to the "sales" folder on my computer, but the hosting does not have it, then the synchronized view will not work.
To enable synchronized browsing, you must enable the corresponding icon on the toolbar.

When this icon is active, you will be able to move between the computer and hosting directories and at the same time move only in one area. A very handy item. I use it constantly.
How synchronized viewing happens, I showed more clearly in the video below. It also showed how to use the FileZilla ftp client.
I hope now this program will become for you indispensable assistant and save your nerves and effort.
On this this article I will finish. One of the following articles will be about the Notepad editor. A very cool thing. In addition, there is a built-in ftp client that allows you to upload edited files directly to the hosting.
In the comments, I would like to know what programs you friends use to connect to the hosting? Also write ideas for reviews of new programs and other blog materials.
Thank you for your attention. Till.
Sincerely, Konstantin Khmelev.
Most PC users have at least once heard of the FileZilla application, which transmits and receives data via the FTP protocol through the client interface. But few people know that this application there is a server analogue - FileZilla Server. Unlike regular version, this program implements the process of data transfer via FTP and FTPS protocols on the server side. Let's learn the basic settings of the FileZilla Server program. This is especially true given the fact that there is only an English version of this program.
Immediately, after a fairly simple and intuitive installation process for almost any user, FileZilla Server launches a window in which you need to specify your host (or IP address), port and password. These settings are required to connect to personal account administrator, not FTP access.
The host and port fields are usually filled in automatically, although you can change the first of these values if you wish. But you will have to come up with a password yourself. Fill in the data and click on the Connect button.

General settings
Now let's move on to general settings programs. You can get to the settings section by clicking on the Edit section of the top horizontal menu, and then selecting the Setting item.

Before us opens the program setup wizard. Immediately we will be taken to the General Settings section. Here you need to set the port number to which users will connect, and specify the maximum number of them. It should be noted that the parameter "0" means an unlimited number of users. If for some reason their number needs to be limited, then put down the appropriate figure. The number of threads is set separately. In the “Timeout settings” subsection, the timeout value is configured until the next connection, if there is no response.

In the "Welcome message" section, you can enter a welcome message for customers.

The next section "IP bindings" is very important, since it is here that the addresses are put down, at which the server will be available to other persons.

In the “IP Filter” tab, on the contrary, they enter the blocked addresses of those users whose connection to the server is undesirable.

In the next section “Passive mode setting”, you can enter the operation parameters in case of using the passive mode of data transfer via FTP. These settings are quite individual, and it is not recommended to touch them without special need.

The "Security Settings" subsection is responsible for the security of the connection. As a rule, no changes are required here.

Minor settings are made in the “Miscellaneous” tab appearance interface, such as its collapsibility, and setting other minor parameters. It is best to leave these settings unchanged as well.

In the "Admin Interface Settings" section, settings for access to administration are entered. In fact, these are the same settings that we entered when we first turned on the program. In this tab, if desired, they can be changed.

In the "Logging" tab, the creation of log files is enabled. Here you can specify their allowable maximum size.

The name of the "Speed Limits" tab speaks for itself. Here, if necessary, the size of the data transfer rate is set, both for the incoming channel and for the outgoing one.

In the "Filetransfer compression" section, you can enable compression of files during their transfer. This will help save traffic. Here you should specify the maximum and minimum level compression.
![]()
In the "FTP over TLS settings" section, a secure connection is configured. Immediately, if available, you should indicate the location of the key.

AT last tab from the “Autoban” settings section, it is possible to enable automatic blocking of users if they exceed a pre-specified number of unsuccessful attempts to connect to the server. Here you should also specify what period of time the blocking will be in effect. This function aims to prevent server hacking or various attacks against it.

User access settings
In order to configure user access to the server, go through the Edit main menu item to the Users section. This will open the user management window.

To add a new member, you need to click on the "ADD" button.

In the window that opens, you need to specify the name of the new user, as well as, if desired, the group to which he belongs. After these settings are made, click on the "OK" button.


In the next section "Share Folders" we assign which directories the user will have access to. To do this, click on the "ADD" button, and select the folders that we consider necessary. In the same section, it is possible to set the rights for this user for reading, writing, deleting and changing folders and files of the specified directories.

In the "Speed Limits" and "IP Filter" tabs, you can set individual speed limits and blocking for a particular user.

After completing all the settings, click on the "OK" button.

Group settings
Now go to the section for editing user group settings.

Here we carry out completely similar settings to those that were performed for individual users. As we remember, the user was assigned to a specific group at the stage of creating his account.

As you can see, despite the apparent complexity, the settings of the FileZilla Server program are not so abstruse. But, of course, for a domestic user, a certain difficulty will be the fact that the interface of this application is completely in English. However, if you follow the step by step instructions this review, then users should not have problems setting the program settings.
It is impossible to properly manage the site if you do not have access to it file system on server. To connect to the file manager use special programs operating over the FTP protocol. The use of such programs is the basis of managing your own resource, which all beginners should master. In this article, we will analyze how to connect to the site's file system using FileZilla, what difficulties may arise when connecting to the server, and everything related to this.
How to get started with FileZilla and connect to the server
Through FileZilla it is very easy to get a connection to the site, because this application is very popular among webmasters. It is used by most of those who have their own site hosted by an outside hosting provider.
In addition, FileZilla is distributed free of charge, because it is loved by everyone, without exception, who at least once wanted to see a list of directories on the site, upload or download something from there.
To get started, you need to download FileZilla. It is better to download the installer from the official site, avoiding third-party file sharing sites that are infested with viruses. Next, go through a few steps of a standard installation, and then launch FileZilla on your computer.
Right after launching the application, you can try to create a fast connection to the server. To do this, enter in top panel in the Host field, the name of the host to which you are connecting, for example, host.ru, the username and password for it, and the port number if a non-standard value is used on the server. Note that if the server uses the SFTP protocol, then you will need to prefix the host name with sftp://.
In general, a quick connection to the site through FileZilla is necessary mainly to test the capabilities of the application. Although you can view the list of directories, it is much more convenient to use the normal FTP connection mode with the site. You can also add the created connection to the list of ready-made connections using the "Copy connection" button.
It is much more convenient to get a connection through the "Site Manager" in FileZilla. So you can get not only a list of directories, but also many other parameters from the server. In addition, you will be able to configure a lot of other features of the application that are not available in the quick connection mode. Therefore, it is much more reasonable to connect your FTP manager to the site not through fast mode, but through the standard.
Getting a connection to a local server through FileZilla
Sometimes you need to view the list of directories and files on the site through local network. This often happens when you are just testing a site on a computer, in order to later publish it on the Internet in finished form. In this case, the obvious question arises: “What hostname should I use if the site does not already have one?”. In this case, you will need Domain name resource, and the IP address on which you work. Or you can even specify the network name of the server computer - this is often enough to set up a connection. And in the event that you installed Denver on your computer and are both a client and a server, you can register localhost in the host name and this will be enough to get a list of directories and access to the file system.
How to Navigate the File System with FileZilla
Among the many directories inside the server, you can get confused if you do not understand the navigation. Immediately after connecting to the site, a special navigation will appear on the right side of FileZilla, which will not let you get lost among the directories. The file or folder you hover over will appear at the top of the control panel. To move from one directory to another, it is enough to use the mouse and double-click on the respective directories. Or you can use the directory name: enter it in the top field and press Enter to navigate through the file system. And the last way to navigate through directories is to click the plus sign next to the folder name.
Note that on the right side of the FileZilla control panel is the content of the site, and on the left side is your computer. To manage computer data, use the same methods as for the server. If you have directories on your computer that contain the same structure as on the server, then you can activate "Synchronous View". You can do this through the settings in the "Advanced" section. This will allow you to make changes to both the computer and the server at the same time, saving you the hassle of having to do it later. backup data.
You will also need the "Director Comparison" option, which will allow you to analyze the contents of the computer and the server for any differences. In order to activate this mode, change the option in the "View" tab to "Compare directories" and select the necessary directives. This way you can find files that have not yet been uploaded to the server. And in order to upload the necessary file to the server, or vice versa - download data from the host to the computer, you will only need to click on it and select the desired item from the menu.
Why is FileZilla not connecting to the server
Sometimes it happens that it is impossible to connect to the server using FileZilla, because the same error keeps popping up. This error says that "Timeout exceeded ...", but in reality the problem may be completely different. If this is your first time trying to connect to a site, then you may not be able to use the passive mode of the FTP manager due to the fact that all ports are already occupied or disabled by the firewall.
To get around this port blocking issue, it's best to use FileZilla's active mode. To activate it, you will have to dig a little in the application settings. To do this, go to the tab "Editing" and "Settings". You need to find FTP settings. There you will find the “Transfer Mode” item, where you can select one of the FTP manager modes. Since the program is set to passive mode by default after installation, problems arise when trying to connect to the site. Select Active Mode from the list and click OK. Now there shouldn't be any problems.
Sometimes the error occurs not during the first attempt to connect to the server, but after. In this case, either someone changed something in the settings for you, or there were some extraneous problems on the hosting. To find out for sure, try restarting the FTP services. As practice says, error 501 is just solved in such a simple way.
And if switching to active mode in FileZilla does not help you, then you can disable the firewall altogether. Then the ports will not be blocked and everything will work fine! However, don't forget to turn the firewall back on afterwards. Or write in the site manager the range of allowed ports that will open in the firewall.


