Learning HDR in Photoshop
This guide was originally written by me for Photoshop CS3, but over the course of a couple of years, the developers have released some big updates to Photoshop, and they have innovations related to HDR, and now Photoshop CC is available to us.
I studied the differences in the versions - old and new, and decided that it was time to update the manual. This tutorial will work for all versions, including CS6 and CC:
What is HDR and where can this technology be applied?
In this tutorial, we will look at the theory and practice of HDR - photo. HDRI ( High Dynamic Range Imaging) was originally used in 3D, but is now being fully applied in photography. The essence of the technology is to obtain several images with different exposures and combine them into one 32-bit image.
The camera allows you to reflect a limited number of tones in one photo ( we call this dynamic range, the range of tones that can be captured between pure black and pure white). That is, we cut off some of the elements of the photo when we set the exposure on the camera.
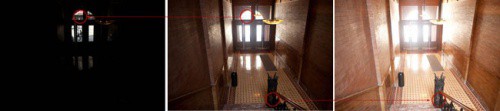
We measure it to display the most important elements of the scene. For example, let's take a look at a series of shots I took on the Bradbury Bridge ( Bradburry) under construction in Los Angeles. The central image, shot at a normal exposure, shows the camera's capabilities well in terms of the amount of detail that is rendered.
Note that outdoor detail is lost because there is so much light. And the details on the railing of the stairs are also lost, because it is very dark there. When you look at reality with your own eyes, you see much more detail than in a photo precisely because the human eye transmits a greater range of tones than a camera can reproduce in a single picture:
The solution to the problem is to take more than one shot by bracketing. Take a photo with a normal exposure ( central photo), then with a lower exposure (photo on the left) to capture details outside the window and with a higher exposure; the photo on the right is for detailing the shadow. And finally, we combine these shots into one to get an image with a large range of tones.
In this guide, I will show you how to do all of the above in the least amount of time.
Photo Tips
First we need to capture the sources on camera. Technically, this translates into the need to take at least two shots with different exposure settings to create HDR. Personally, I achieve good results with three shots. I like to do bracketing in 2 stops.
Yes, I know this is more of a bracketing than most people are used to working with. But for the types of HDR images I love to create ( mostly urban landscapes), this value is the most suitable. If you are photographing people, it may be worth reducing the difference in exposure between shots to one stop.
And sometimes you need to take more than 3 shots with different exposures. It really depends on the contrast of the scene. In the Bradbury construction example, I took a series of shots of Los Angeles from inside a dark building on a sunny day through window panes. It took me as many as seven photos, 2 stops apart, to capture the full dynamic range of the scene.
In some cases, such as foggy weather, it is possible to capture all the tones in a scene in one shot. But again, mainly for HDR photography, 3 shots are necessary and sufficient. I put the camera settings in auto bracketing mode and take pictures with an exposure interval of 2 stops, one at “+” and one at “-”.
Note that only the shutter speed changes. If you change the aperture value, the depth of field will also change, resulting in an unnecessarily "blurred" final image. Use a tripod if possible, otherwise lean against a wall or something stable to prevent movement between shots.
Note: For true HDR, it's not a good idea to use one raw image and expose it with different settings. That is unnecessary. The same result can be achieved by extruding shadows and highlights using Camera Raw or Lightroom.
This method is called single shot HDR ( Single Image HDR). This is the so-called pseudo HDR. You will not be able to do HDR - an image from a single SDR snapshot ( standard dynamic range). What is it like " stereo sound from one speaker". There simply is not enough digital information. This is pseudo HDR and should not be confused with true HDR.
HDR guide in Photoshop
Step 1
Let's start with three images. One is normal exposure, one is underexposed, and one is overexposed. In this particular case, I used 2-stop bracketing. Since I shoot a lot of cityscapes, I get by with two feet, because the subjects are mostly flat surfaces, and stripes and pasteurization are not a problem.
If you are shooting round or curved surfaces, you may want to lower the bracketing interval to get smoother transitions. Keep in mind that you will most likely get a lot of tonal matches, as a good DSLR camera can capture about 11 stops.
I set the bracketing interval on my camera to 2 stops. Then I set the shooting mode to "queue". When I hold down the shutter button, 3 photos will be taken at once. I shoot in RAW for as wide a dynamic range as possible. You can create HDR even if your camera doesn't support RAW, but keep in mind that JPG is an 8-bit file.
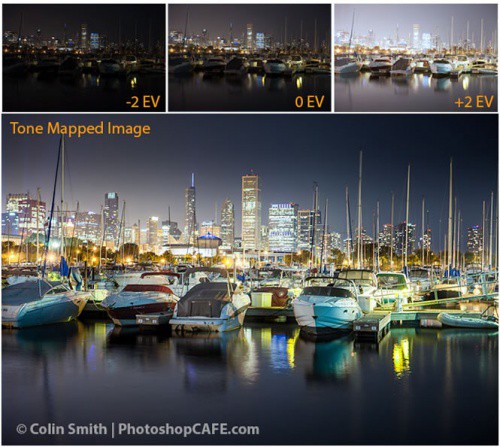
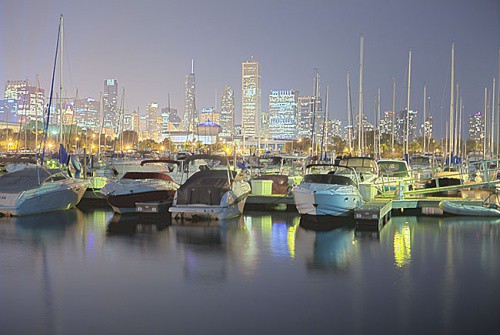
Make sure you shoot in aperture priority or manual mode. You need to bracket the shutter speed, not the aperture. If you change the aperture, then the depth of field will not be constant, and you will get additional blur. Also, avoid the movement of objects in the photo or get "ghosts" - parts of objects that appeared in only one photo, which will lead to the appearance of unnecessary details in the final photo. If you look at the three images I used, you can see a lot of detail in the middle one.
However, shadow detail is lost on boats and city lights are too bright, which also leads to loss of information. The left image is underexposed to capture detail in the bright part of the scene ( buildings in the background).
The photo on the right is overexposed 2 stops to get shadow details like boat hulls and water reflections:
Step 2
So, it's time to combine these photos into one 32 bit image.
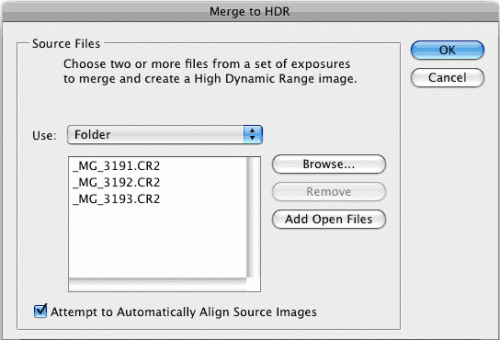
Go to menu File - Automation - Merge to HDR Pro (File>Automate>Merge to HDR Pro). This menu is available in versions of Photoshop CS2 - CS6 ( in CS2 there is no auto-alignment, but instead the "Merge to HDR" command in versions older than CS5).
Select all images or an entire folder. I put each set of photos in a separate folder, so I use the "Folders" value. Choose a photo to merge. Enable auto leveling ( Auto Align) in Photoshop CS3+ versions. Click OK. ( Photoshop uses auto leveling technology that allows you to create HDR images without a tripod.):
Step 3
Your images are now merged into one. You can exclude some photos by deselecting the green checkbox next to the frame. If unnecessary details appear there due to the fact that the camera moved during the shooting process, check the box “ Remove ghosting" ( Remove ghosts).
When you are working in 16 or 8 bit mode, the settings will look like this, and if in 32 bit, then like in step 4:
Step 4
The result of the merging is a 32-bit image. Change the mode to 32 bits. You can see the available tones by dragging the " Viewing white point settings» ( white point). Note that the slider does not change the image itself, it is only meant to show the full range of tones, because the monitor is not able to convey all the details of a 32-bit image at once:
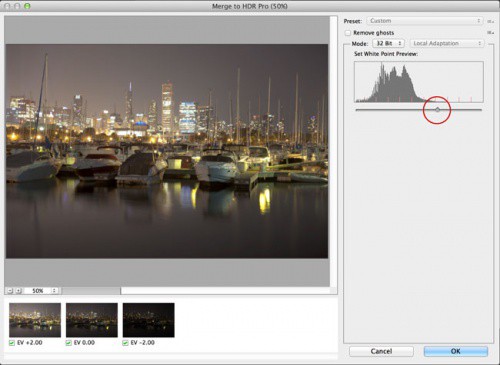
Note: Photoshop CC has a new option "" (""). CS6 didn't have this option. If you are using Photoshop CS6 or lower, skip to step 5.
If you have a CC version and there is a checkbox next to " Full Rendering in Adobe Camera Raw”, then dragging the slider will not work. Turn this setting off and you will be able to drag the slider bar. However, when this option is enabled, you will be able to use Camera Raw for toning instead of the HDR Pro settings. In this case, go to step 8b:
But I recommend that you explore both methods as they each have their own benefits. Toning in HDR Pro (Step 5+) gives you more control and allows you to create a surreal effect. ACR( Camera Raw) will help you achieve a realistic HDR effect without much effort.
Step 5
Shading can be done right away, but I prefer to save the 32-bit negative first. Click "OK" to merge the 32 bit image. Now you can save the file. Save as psd , tif or EXR .
If you are working in 3D and want to add IBL lighting to HDRI, then save the file as EXR ( for Maya and other 3D software that supports this format).
Step 6
Depending on how you want to use this image, you need to convert it to 16 or 8 bit. When converting, the so-called interpretation of the photo takes place. The reason for this lies in the fact that there are many ways to process a photo.
Whereas in a 32-bit image we have a huge dynamic range, but after conversion it will not be available. Based on personal experience, I advise you to always work with the 32 bit version and then convert it. Avoid resaving a 32 bit image. This is your original image and we may have to go back to it many times.
On the menu " Image > Mode» ( Image>Mode>) select 16 bit (or 8 bit ). Now let's experiment with the settings. Let's start with the Tone and Detail part. This is where almost all the creativity of the HDR creation process lies. ( If you want to make settings without conversion, then select the menu item “View - 32 Bit Preview Options” (view> 32 Bit Preview Options). You can use several Photoshop tools in the menu Image> Correction (Image> Adjustments menu). The most significant setting here is “ Exposure" ( exposure control).
The HDR Toning dialog box opens ( Toning Dialog box) (or "HDR conversion" (HDR Conversion) for versions below CS5). The best way to get the settings right is to set the gamma value first, then adjust the exposure value. If you need a very contrasty image, reduce the gamma value. For less contrast, increase. Finally, adjust the exposure to get the desired brightness:
Step 7
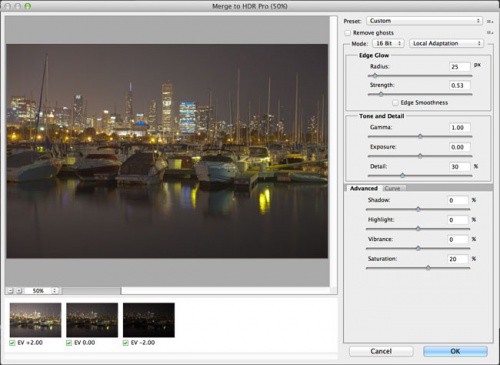
Change the way method) in meaning " Local Adaptation» ( local adaptation). There are 4 available methods in total, but only 2 of them are available for user customization.
With the help of local adaptation ( local adaptation), you will have access to several additional toning settings. The use of curves is desirable as they can help you fine-tune the parameters. If you are familiar with curves, turn this setting on.
Don't be afraid to cut off the histogram a bit because you're working with a lot of dynamic range. Keep the details of the image clear, but don't forget to add shadows, otherwise the photo will look flat and unnatural.
edge glow
Once you've set up the curves, start adjusting the radius ( radius) and intensity ( strength) to avoid ghosting in the photo. ( On poorly made HDR images, you will notice ghosting at the edges of contrast areas.). The Radius controls the blur mask, while the Intensity setting determines the amount of the effect applied.
Tone and details
Gamma: This is where you control the contrast. Extreme values wash out details or highlight them very strongly.
"Exposure" (Exposure): Overall brightness control.
"Details" (Detail): Here you adjust the sharpness of the image.
Additional settings
Shadow: Restores detail in the darkest parts of a photo.
Highlight: Restores detail in the brightest parts of a photo.
"Juiciness" (Vibrance): This setting makes the photo more colorful without over-saturating it.
"Saturation" (Saturation): Increases or decreases the total amount of color. Be careful not to oversaturate the overall picture.
Click OK to apply the settings:

Step 8
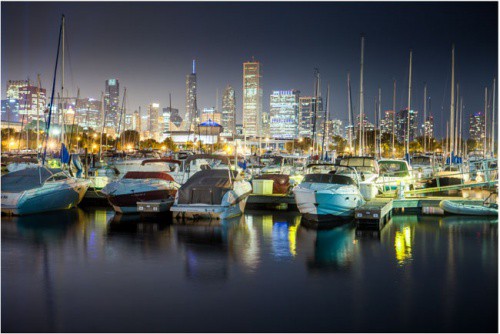
We got an HDR image. Photoshop is a great tool for creating realistic HDR images:
Step 8b
HDR, Lightroom and Camera RAW (Photoshop CC)
A new feature added in Lightroom 4.2+ and Camera Raw in Photoshop CC is the ability to work with 32-bit images. This is great because you can use the brush to fine-tune areas of the photo while working in a 32-bit environment. The image below shows the result of working with a brush in Lightroom. Notice how I was able to process the image. ( The same is possible in ACR).
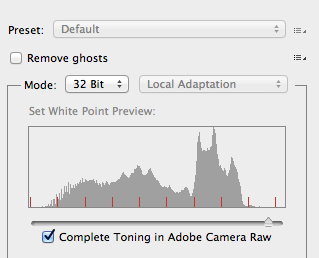
At step 4, we are in the Merge to HDR dialog box (Merge to HDR):
- Select "32 bit" from the "Mode" drop down menu ( mode) if something else is selected;
- Check the box next to " Full Rendering in Adobe Camera Raw» (“ Complete Toning in Adobe Camera Raw”). The button in the lower right corner will change the name from OK to " Tone in ACR»;
- Press the Tone to ACR button. The image will open in Camera Raw . You can apply all settings in Camera Raw, but only with the benefit of working in 32-bit. HDR - The image you get will have much more detail in light and shadow. ( Use the options for adjusting the settings for shadows and lights). You can also refer to the ACR manual;
- Click "OK" when finished;
- The image is still in 32-bit mode. If you're going to be toning, you can go back to step 5 and do it in advanced mode in Photoshop. By the way, you can do double toning.
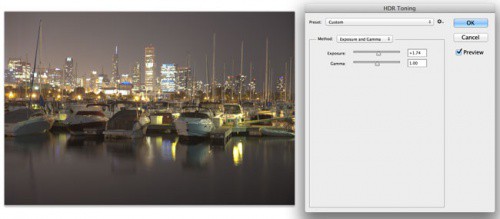
If you are satisfied with the result and do not intend to continue processing the image, convert the image to 8 or 16 bits. Select a menu command Image - Mode (« Image>Mode>”) 8 or 16 bits. A pop-up window with settings will appear. To keep the same settings that were exposed in Camera Raw, choose the " Exposure and gamma» ( Exposure and Gamma). Set "Exposure" ( exposure) to 0 and "Gamma" ( gamma) to a value of 1. Click OK. The image is ready!