Curves, working with vectors.
Despite the fact that Photoshop is a raster graphics editor, some vector tools are also provided in its toolset. Vector tools are designed primarily for creating editable curves - contours. In order to refresh your memory, we recall that the difference between raster and vector graphics is in the way of storing and describing graphic information. Vector drawings are stored in the form of mathematically described curves, which do not lose quality when scaling, and are subject to easy and flexible editing at any time. First, consider the principle of constructing vector curves.
Vector contours are built on segments that have key nodes and control points. Key nodes limit the segment from two sides, and control points allow you to control the bending of the curves.
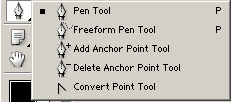
Group tools are used to create curves Pen. Tool pen tool designed to create curves by key nodes. The principle of operation of this tool is to specify the key points of the contour segment. If, when specifying a control point, without releasing the mouse button, move it, then a segment will appear at the key point containing checkpoint. Further mouse movements already directly affect the control point, and, in turn, the bend of the segment. The next left-click will set the next control point, and so on.
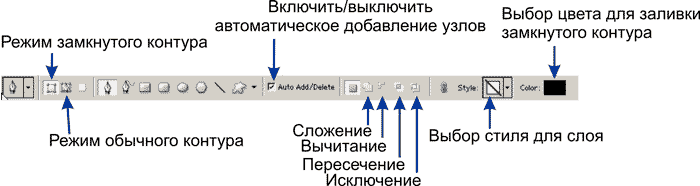
The Pen tool can work in two modes - creating curves and creating so-called shapes - closed vector areas. Switching between these modes is carried out by buttons - contour creation mode, - shape creation mode. If you are working in the form creation mode, then the contour you create will always be considered closed and, as a result, filled with the color you have chosen. Physically, in the Layers palette, a layer mask is created based on the vector drawing. The layer itself is filled with the color you choose (choose the color on the properties palette).
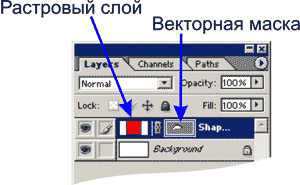
The principle of working with a vector mask differs slightly from the principle of working with a raster mask, only the means differ. If, in the case of working with a raster mask, you changed it using drawing tools, then in this case, changing the shape of the mask occurs using vector tools.
In order to convert a vector mask into a raster one, you need to call the context menu of the vector mask and select the item Rasterize Mask. As a result, you will get a regular layer mask. Otherwise, working with a layer mask in the vector version does not differ from working in a raster version.
Vector drawings are convenient because at any time it is very convenient to change the shape of the curves of this drawing. There are a number of tools for this. For example, the tool (adding key points - nodes) - adds key points on the curve in the place where you click. The tool can remove extra points on the contour by clicking on the point to be removed. In fact, switching to these tools is not necessary at all. Pay attention to the switch Auto Add/Delete on the properties palette. If this mode is enabled (checked), then the Pen Tool will automatically switch to the Add Point Tool (when you place it over the path) and the Point Delete Tool (when you place it over an existing point). If the mode is disabled, then deleting and adding points will be possible only when using the appropriate tools.
![]()
The bending of curves is controlled through control points. Use the tool to select a control point Direct Selection Tool. Selecting the node to be edited (clicking with this tool on the node being edited). Then by moving the control points you affect the curvature of the curve in the region of the selected node. You can also move selected nodes with this tool. Tool Path Selection Tool designed to work with the curve as a whole, as with an object - for moving and transforming. For vector objects, the Free Transform mode is applied, exactly the same as for raster areas.
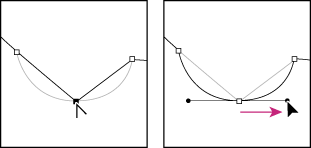
An important tool for working with key nodes is a tool called Convert Point Tool. The purpose of this tool is to transform node type. There are two types of key nodes in Photoshop vector graphics - smooth and corner. The meaning of smoothed key nodes is that the control points of two curves converging at the same node Always on the same virtual line.
Another type of node, as we said, is called a corner node. The meaning of this type is that virtual lines passing through the control point of one of the segments and the common key node of both segments can converge at any angle.
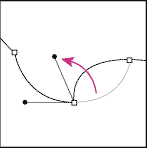
The type conversion tool works like this - if the node is smooth (and by default nodes are created smooth) then clicking the conversion tool will change the node's type to angular. If, after pressing the mouse button, do not release it, but simply drag it, you will be able to control the bending of the segment at a particular node.
We started by highlighting two modes of operation of the Pen Tool. The first is the shape creation mode, and the second is the outline creation mode. Let's dwell on the mode of working with contours.
In this case, your path will not automatically fill and form a vector layer mask and layer. In this case, your outline will be purely virtual and not related to layers. To work with such paths, there is a palette called Path. All operations with contours are concentrated in this palette.
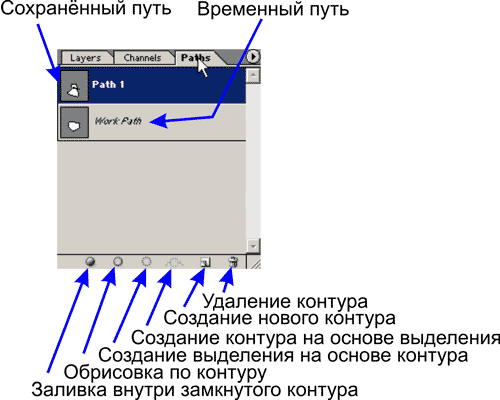
In the Path palette, paths (paths) are placed as layers in the Layers palette, and on one vector layer there can be several unrelated vector paths. Path controls are located on the bottom line of the Path palette. Painfully familiar pictograms with a trash can and a clean leaf have not changed their purpose in this palette either, i.e. respectively, this is the removal of the vector layer and the creation of an empty vector layer.
Until now, we have been thinking why in such an absolutely raster editor as Photoshop these vector tools are needed. A simple example of using vectors in Photoshop is again working with selections. As you can see from the figure, a number of Path palette icons are designed to convert a path (path) to a selection path and vice versa. In fact, after getting some skills in working with paths, you will realize that it is much easier to adjust a vector path to the shape of a selection than even using a fairly flexible quick mask. So if you want to edit the selection you can always convert it to a path (outline), then edit it and convert it back to a selection again. If you want to apply operations like Stroke and Fill, traditional for selection paths, then they are also at your disposal.
Boolean operations work somewhat unexpectedly. You can create paths in any of the logical modes, be it addition or subtraction. At this stage, you will not notice any action. But don't be fooled by the fact that you've found a bug in an almost flawless program. In fact, Photoshop remembers in which mode you created the path (the office writes ...) and as soon as you order the program to create a selection outline from your hodgepodge of paths, Photoshop will remember everything and perform all the operations that you prescribed to it when creating paths. The Create Selection Path from Path dialog box allows you to set the most important settings regarding selection paths (but only if you use the Make Selection command on the Path palette menu).
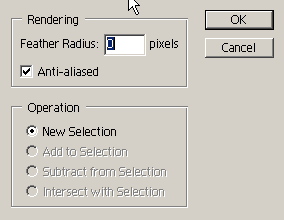
Please note that you can set the feather radius (Feather), enable or disable Anti-Aliased anti-aliasing. In the Operation section, you can set the logical mode for the newly created selection. The options in this section become available only if one selection path already exists. Accordingly, if you select the New Selection operation, the selection created will replace the existing selection; the Add to Selection option will add a selection created from a path to an existing selection; Substruct from Selection - will subtract the created path from the existing selection.
Tool Free Form Tool allows you to create a vector path in simple drawing mode, like a brush. Hold down the left mouse button and simply move the mouse to draw the outline you need. This tool has one main feature that makes this vector tool similar to the Magnetic Lasso tool, and that is the option Magnetic. The principle of operation is the same, the tool looks for contrasting borders and draws a contour only there. Otherwise, the contour created by this tool does not differ from the usual contour.
- Views: 55273