Vector in Photoshop
Tools for working with vector in Photoshop appeared a long time ago, but they began to be used in work relatively recently. This is due to the fact that for a very long time they were “raw” and because. The vector in Photoshop is not a specialized tool for work, and it has not been finalized. But everything changed with the release of Photoshop CC.
Why you need a vector in Photoshop
First I want to tell you why I use vector in Photoshop. There are many proven vector editors. The most common are Illustrator, CorelDraw, Xara. Most often I am engaged in web design, which means that my work is not the final result. Those. before becoming a website, interface, application, the layout will get to the layout designer. Most layout designers are fluent in Photoshop, but very superficially familiar with Illustrator. Therefore, the desire to “shove” everything into one file is quite logical. It's great when a layout designer receives one PSD which contains a complete layout, and even with the ability to edit elements. Change the button color, change the radius of the menu form, increase or decrease the block without losing quality - in 2 clicks and 1 minute! Vector in Photoshop allows you to do this without any special skills.
Features of working with a vector in Photoshop
If you have worked in any vector editor before, then a lot of things will seem familiar. But it takes a lot to get used to. All work in Photoshop is built with layers, this also applies to all vector tools.
1. To easily edit a vector in Photoshop, you need to place each shape on a separate layer.
2. Operations of “merge”, “subtraction”, “superimposition” are best applied to no more than two objects.
3. After the “merge”, “subtraction”, “overlay” operations, the contours of the original objects remain available for editing.
4. Raster styles can be easily applied to all vector objects. It is very comfortable.
5. You can apply transparency to vector objects and apply filters to them.
6. Individual layers and layer groups with vector objects can be easily cloned inside a document or copied to another PSD document.
7. Label each layer and group layers - this will save a lot of time.
Basic Primitives
As in any vector editor, the vector in Photoshop has ready-made primitives. Basic primitives:
“Rectangle”, “Rounded Rectangle”, “Ellipse”, “Polygon”, “Line”, “Custom Shape”. For each shape (at any time) you can set the thickness / type / color of the stroke and fill. Additional properties are available for specific primitives. For example, for a polygon, you can set the number of corners, and for a rectangle with rounded corners, you can set the rounding radius.
Basic Tools
To draw an arbitrary vector or edit an existing one (including the contour of primitives), you must use the tools “Pen” (draw an arbitrary contour), “Pen +” (add new anchor points to the finished contour), “Pen-“ (delete anchor points from the finished contour), “Free pen” (draw an arbitrary contour by hand), “Angle” (change the bends of the contour curves, set the types of connections between the anchor points). 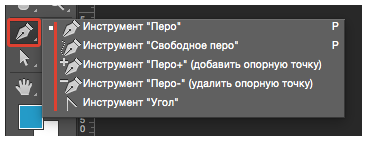
To illustrate the process, a short video from which you will learn:
1. How to create a primitive
2. How to draw an arbitrary vector shape
3. How to edit the outline of a primitive
4. How to edit the outline of an arbitrary vector shape
Basic Vector Operations in Photoshop
A total of 4 operations are available: “Merge shapes”, “Subtract front shape”, “Merge shapes in overlay”, “Subtract shapes in overlay”. All these operations are available through the main top menu. Layers > Merge Shapes, or through the “Properties” toolbar (top menu Window > Properties).
Attention! Before starting any operations to merge vector shapes, make sure that the layers of these shapes are selected in the “Layers” toolbar (turn it on F7 or Window > Layers).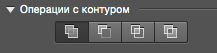
A short video illustrating the basic operations of "merging shapes" in Photoshop.
Change color, size and apply styles
Here we come to the most interesting. Vector in Photoshop allows you to resize both up and down without losing quality. To do this, select the desired layers in the "Layers" toolbar, press Ctrl+T (or Command+T if you have a MAC) and dragging the markers of the selected path with the mouse adjust the size. In order for the size to change proportionally, you need to hold down the Shift key. 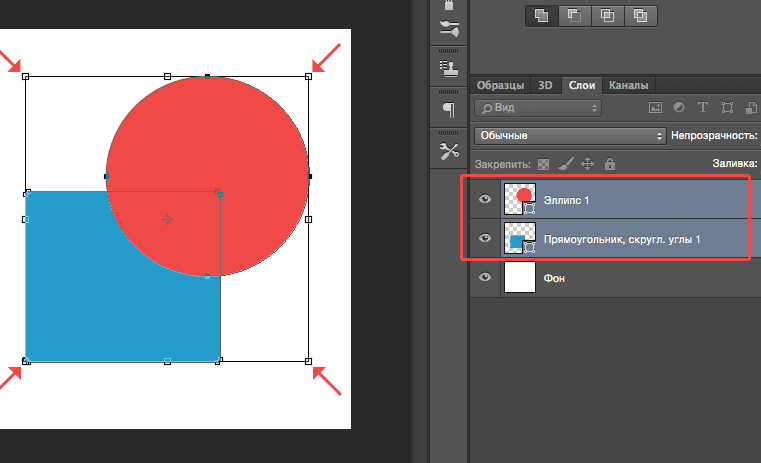
Short video:
1. Resize a Vector Shape
2. Change the Fill Color of a Vector Shape
3. Add Style to the Vector Shape
Download PSD Example (Free)
To make it easier for you to figure out how to use a vector in Photoshop and see how these tools can be applied in practice, I am posting an Infographic file made by me completely using vector tools.
Ask a Question
If something doesn’t work out for you or if you have any questions, write in the comments and I will help you figure it out. You can also watch videos using vector tools.