Replace dvd with ssd in laptop. Installing an SSD instead of a DVD drive in an Asus X550L laptop
Install since, he at times faster HDD, but I didn’t have it, and it’s expensive. I used what was at home.
There was a problem in the drive with a spring or something else, I'm not sure, in connection with this, the drive did not close. If you have something with the drive, or in any case decide to replace the drive with HDD then this article is for you.
To begin with, we need a special adapter (adapter), which looks like a DVD drive. I ordered this one in the Aliexpress store for 174 rubles, for those who are interested, here is the link.
In this way, you can replace a rather outdated drive with a hard drive or solid state drive.
How to choose a hard drive adapter?
The fact is that the size of the drive exists in two forms - 9.5 mm and 12.7 mm - this is the thickness. I recommend that you measure the thickness of your drive before buying, and then purchase an adapter.
You also need to pay attention to which interface the drive is connected to, if SATA, then using an adapter that has an adapter from this interface, you can safely install an HDD or SSD, if your DVD drive is connected via IDE, which is already outdated technology , then connecting an additional drive using this adapter is impossible.

As I said, the adapters differ only in thickness, while the width and shape are the same for all.
The adapter came to me in a regular plastic package, inside which lay the adapter itself, a bag of bolts and a screwdriver.
Replacing DVD to HDD in a laptop
The hard drive can now be inserted into the adapter. Do this carefully so as not to break the SATA port. Now we take the bolts that were provided to us and twist the disk on the sides.

Remove the drive from the laptop, of course, before that, you need to unscrew it from the back of the laptop. Usually it is held on by one bolt.

After that, you need to unscrew the drive mount and screw it to the adapter. This is necessary to fix the adapter in the laptop.

The appearance of this mount may vary depending on the laptop.
If we look at the adapter itself, or at the packaging, we can see the instructions for installation of hard disk into it, but we have already done that.
Install it on the adapter, there is a place for it.
A fully assembled hard drive adapter can be placed in the drive slot. Snap it in, and then fasten the bolt.
Connect the battery to the laptop and turn it on, see what we got. And it turned out that now we have an additional 1 TB hard drive.

If you have difficulty installing the adapter in a laptop, then watch the detailed video:
Greetings! A long time ago, I had a desire to make a small upgrade of my old laptop and breathe new life into it. On the this moment the best thing to do for my junk is to add RAM and replace the ancient HDD with a new SSD. Since I already have the maximum possible four gigabytes of RAM, the hard drive was to be replaced. Modern SSD drives are expensive, and there is never a lot of space. It was decided old disk install in place DVD drive. Installation, tests, conclusions - please under the cat...
Purchased SSD drive Samsung 750 EVO 250 GB was logically installed in place of a regular HDD drive. I had a native disk of 320 GB, which is not much more. Options for using the old hard drive weight. Sell and recapture some of the money for buying an SSD, buy a box with USB interface and use it like portable disk or just some kind of adapter or install it in place of the DVD drive, which I have not used for a long time. Having defeated the "toad", it was decided not to sell the disc. As portable HDD I already have, then the choice fell on the so-called Caddy or Optibay device.
Specifications
- Device Thickness Standard: 12.7mm
- Interface: SATA
- Disk size and interface: SATA(2.5")
- Dimensions: 12.6*12.7*1.27cm
- Caddy - 1 pc.
- Screwdriver - 1 pc.
- Bolts - 8 pcs.
- Sealant - 1 pc.
 The device itself is extremely simple. The form completely repeats the standard DVD drive. The only thing to consider is the thickness of the drive. Notebook DVD drives come in two sizes, 9.5mm and 12.7mm. So I strongly recommend that you take out your DVD and measure its thickness before purchasing a "pocket". But if you don’t want to disassemble the laptop once again, then you can go online and thus determine its size. Also don't forget to check which interface your DVD is using.
 The screwdriver is very cheap and not very convenient, but if you don’t have a tool at hand and you want to install the drive right now, then it will do its job.
The bolts were very helpful. They help lock the drive in place, but not in the traditional way. I will describe the installation a little later. The rubber, perforated bar, most likely, serves to more securely fix the disc in the pocket and to reduce vibration.
Disassembly
I decided to disassemble the body of the adapter a bit and see what else there is interesting. I didn't find any surprises. The tin body is reinforced with a plastic insert. The adapter board is extremely tiny, on which the SATA and mSata interfaces are located. I also found a strange kind of switch that has three positions. What function it performs remains a mystery to me. I would be glad to see in the comments version of his appointment.

Installation in a laptop
The first step is to get a standard drive for your laptop. Each laptop does this differently, but the principle is the same. In my case, it was necessary to unscrew the cover of the compartment, under which there was a drive mounting bolt. I unscrewed it and pressed a small pedal, the DVD moved out of its saddle a little. Now you can freely get it.  After we compared the dimensions and checked that the adapter fits freely into the place of the DVD drive, you can install the disc in the Caddy. To securely fix the disk into it, you need to screw in four bolts until they stop, put the disk in the “pocket” and slide it into the SATA interface. The bolts will rest against special protrusions on the adapter body. Thus, the disk will be rigidly fixed, but for greater reliability, it is required to install a rubber seal from the rear end of the disk.
In this form, you can already connect the adapter to the laptop and turn it on. But it will not be fixed, which is not safe. The adapter is attached to the laptop case using a special mount that you need to twist from your standard DVD drive and fix it on a new adapter. Such fasteners have a different shape, but at the same time they have standard arrangement mounting holes on the drive housing and our Caddy.  The final touch - you need to bring beauty. I remove a decorative trim with a button from the drive, which is held on by several latches, and install it on the Caddy. Here, too, everything is standard. All latch holes are in place. It remains only to install the adapter in its rightful place, fix it with a bolt to the laptop case and close the compartment. You can turn it on and enjoy :).
Testing
I conducted some simple tests and it turned out that I have the same revisions of the SATA interface on my laptop, both at the main laptop installation site and at the DVD drive connection site. Since my laptop is not the first freshness, the maximum that I could count on was SATA 3 Gb / s. And so it happened. In my case, it didn’t matter which interface I hooked up the SSD drive to, and which HDD. The speed of work is expected to be the same for both SSD and HDD drives.
findings
There are a great variety of such adapters at very different prices. I can't say exactly what the difference is between them. In my case, this is one of the cheapest of its representatives. The data transfer speed on an SSD drive does not differ from the speed of work in a regular place. Possibly working with SATA interface 3 there will be some difference, but I cannot verify this. I have no complaints about the build quality. Everything came up like native. I hope it will serve and please me for a long time.
I hope I helped you decide on the appropriateness of buying a product and, in particular, this adapter. If I missed something, I will try to answer everything questions asked in comments.
A small video review for greater clarity
That's all. Thank you all for your attention to my review! Happy shopping and good luck!
You can buy PLN adapters at
Good day! We all know that a PC is much more convenient than a laptop in terms of upgrades. To be honest, my PC case is over 10 years old. I only change the filling in it, and the monitor changed once. I wish laptops could also be easily upgraded, but often, if a laptop is outdated, it just has to be replaced with a new one. For some, this is not difficult. And someone has his laptop - it's a whole work station with many programs (perhaps licenses) and settings. In that case, go to new laptop a little problematic. And for a long time.
But, fortunately, we are not completely limited in terms of laptop upgrades. Something we can do. We can add RAM, we can replace it, sometimes we can replace the processor with a slightly more powerful one but from the same line. We can even connect if you want. All this sounds pretty harmless, except for replacing the hard drive, because the system will have to be configured again.
There is an exit! There is a great solution - you can insert secondHDD insteadDVD drive. By the way, it can also be. Do not feel sorry for the drive, I doubt that you are using it.
Replacing a DVD drive with an HDD (SSD drive)
In order to replace a DVD with an HDD, we need a special adapter (adapter ), which looks very similar to a DVD drive. When choosing this adapter, pay attention to its thickness. Drives are 9.5mm and 12.7mm thick, respectively, and adapters too.

Adapter (adapter) hard drive
When searching for an adapter, it's better to call it " hard drive adapter". You can buy it in specialized stores in your city. In this case, it will cost you about 1000 rubles. Or you can order it on aliexpress. It will cost you about 200 rubles, but you will have to wait 2-3 weeks. Approximately how much does it take to deliver, judging by the reviews. By the way, judging by the same reviews, the quality of the adapter is no worse than the one you would buy 5 times more expensive.
How to insert an SSD instead of a DVD drive in a laptop?
It's time to get down to business - repeat what I will describe in the order presented, and you yourself can establish SSD drive(or HDD hard drive) instead of a DVD drive. There is absolutely nothing complicated about this.
To begin, power off your laptop completely. That is, turn it off. Charger and take out the battery.
Remove the drive from the laptop. To do this, you will have to unscrew one screw on the bottom of the laptop that holds your drive. Finding and recognizing this cog is not difficult.

Unscrew and pull out the drive
Next, you need to carefully insert the SSD drive (or hard drive) into the adapter and fasten it with the screws that came with the adapter and additionally fix it with a special plug (it will also be included).

With fastening, everything is simple: unscrewed, screwed
After that, you will need to rearrange the mount and the outer panel from the DVD drive to the adapter. With fastening, everything is simple: unscrewed, screwed. And with the panel, act very carefully, because it is a fragile creature.
That's it. Slide the adapter into your laptop and screw it on. For everything about everything, you should have taken no more than 5 minutes. Let's summarize how to insert HDD or SSD instead of DVD drive:
- Power off laptop
- Remove DVD drive
- Insert HDD or SSD into adapter
- Transfer the mount and the outer panel to the adapter
- Insert and screw drive
In case you want to put an SSD drive instead of a DVD drive, then for the best performance of the laptop it will be useful to do a little castling. Place the SSD drive in the space reserved for the hard drive, and insert the hard drive into the adapter.
This is due to the fact that modern laptops have connectors for the drive. SATA 3, and for the drive it is usually limited to a connector SATA 1. Well, it is clear that in order to unleash the full potential SSD speeds drive, it will not be enough bandwidth SATA 1 connector. A little more about SATA types is written in the article about.
For today I have everything. I hope the article answered all your questions. If you still have questions, I will be happy to answer them in the comments.
Did you read to the very end?
Was this article helpful?
Not really
What exactly didn't you like? Was the article incomplete or untruthful?
Write in the comments and we promise to improve!
(early 2011) at home.
There is a crisis in the yard, and dreams of buying new Macbook disperse like smoke. In this harsh time, when a kilogram of ordinary cucumbers costs like a kilogram of Israeli apples, it's time to get a screwdriver and upgrade your faithful aluminum comrade with your own hands.
If there is no screwdriver, hands, or lack of courage, if you please, turn to the professionals of modding and repair. Proven masters live in the company modmac who, with unwavering hands, will ruthlessly dismantle any gadget, fix it and assemble it back without unnecessary remaining parts.
On a winter Saturday morning, by the pattern of clouds in the sky, I realized - it's time! Having made a backup, we are with my Macbook Pro, went to workshop for rejuvenation surgery. The plans included replacing the native HDD cable with a new one, as well as replacing the optical drive with a super-fast SSD drive using a special Optibay tray.
Few people know, but if you put an SSD drive instead of a native HDD, and install a native HDD as a second hard drive instead of a CD drive, then in this situation the system will work a little slower. It is better to stick an SSD drive in place of the optical drive, and leave the native HDD in its place. Performance will be higher.

Upon arrival, my laptop immediately passed into the hands of the master, and I got the small role of an impassive extra, who recorded on camera every movement of the specialist’s hands.
Training
So, the MacBook Pro is located on the table, turned upside down, revealing its defenseless belly to our eyes. With deft movements of a Phillips screwdriver, 10 screws were unscrewed along the perimeter of the back cover. And then, with little effort, the lid was removed and carefully set aside.


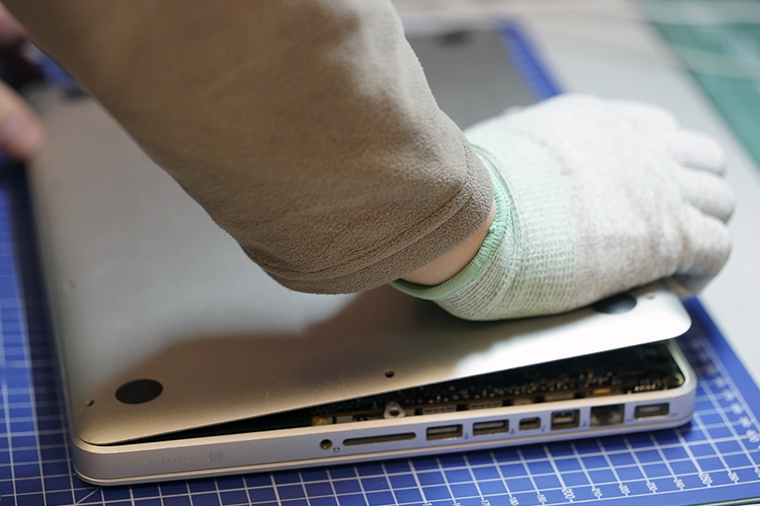
Once again, I marveled at the ergonomic arrangement of all components inside the brainchild of Steve Jobs. How fascinating all the stuffing is fitted to each other!

The first stage is successfully completed, we move on to the next level.
HDD cable replacement
In my MacBook, the hard drive is removed quite simply. In some models, for example, to pull out the HDD, you must first remove the battery, but this is not our case. So here's what you need to do, point by point:
1) Disconnect the cable leading from the battery to the board;


2) unscrew the two screws and pull out the clamping bar;


3) gently pull the hard drive by the special tab and with your fingers (pick, special plastic spatula) disconnect the cable from the hard drive.


The hard drive cable is very fragile, it is not recommended to pull, tear and twist it strongly.

Why you need to change the cable to a new one: sometimes (rarely, but still) after replacing an ordinary HDD with an SSD, the MacBook drive starts to behave strangely. It seems that disk utility sees the new SSD, formats it and does not find any errors; The operating system is downloaded, but all installation attempts are interrupted by a gray screen with a flashing folder icon or a question mark.

In this case, replacing the hard drive cable helps. The operation is very jewelry and requires confident movements and some skill in such actions. Here is how the HDD cable is replaced:
1) Carefully disconnect the cable connector from the board, unscrew the two screws that fix the cable in the case and the two screws that fix the black bar on the front inner wall of the case.


With your fingers, carefully pull out the black bar to which the HDD cable is glued and be horrified by the miniature size of the connector, which must be carefully removed.

At this stage, you need to gather all your concentration into a fist and disconnect the connector from the HDD cable with tweezers. You can’t swear at your mother, it’s desirable to breathe every other time.


After this dangerous procedure, you can exhale and relax, the HDD cable is completely removed.

So, at this stage, we have removed the native hard drive and completely disconnected its cable. To install a new cable, all the above steps must be repeated in reverse order. Again, the hardest part is connecting the small connector to the connector on the new HDD cable.
Replacing an optical drive with an SSD drive


Carefully disconnect the cable responsible for Airport/Bluetooth and the camera cable from the board. These cables (like most others) are very fragile and brittle.


Then carefully remove the cable around the perimeter of the CD drive and disconnect the antenna connector.


The easiest thing left is to unscrew the three screws holding optical drive, carefully remove it, and disconnect the cable connector. Everything, half the work is done, now you need to insert an SSD drive into the resulting void.
SSD and Optibay


Everything is simple here. An Optibay tray is taken, a new SSD drive is inserted into it, two fixing screws need to be tightened on the side, a short cable from the CD drive, which was removed in the previous step, is inserted into the tray, and the entire resulting structure is inserted into place. In conclusion, repeat all the above manipulations to remove the drive in reverse order.

At the very end, the main thing is not to forget to reconnect the battery cable, which was disconnected at the very beginning of this instruction article.
Note to the owner

After “pumping” the MacBook wizard from modmac can set up something like Fusion Drive.
Fusion Drive is a technology that combines a conventional hard disk drive (HDD) and solid state drive(SSD) with 128 GB of flash memory into a single logical volume. Mac OS X automatically manages its contents, so frequently used files such as applications, documents, photos (and so on) are dynamically moved to flash memory for faster access. For example, if a program is used frequently, it will automatically be moved to an SSD drive to speed up access to it. As a result, startup time is reduced, and as the system accumulates information about the computer usage profile, programs start up and access files faster.
– Wikipedia
Through cunning manipulations with terminal commands, the guys from modmac can configure the MacBook so that the system will see one shared drive, with a capacity of 768 gigs (total capacity of SSD and HDD drives) as if it were a single SSD drive.
Productivity grows, nerves are protected, the owner is happy. I highly recommend. The only caveat is that during the operation of the laptop, you need to avoid emergency shutdowns, the Fusion Drive may “crumble”, and you will have to restore all the information again ( so you should always remember about backup!).

Many laptops have CD / DVD drives, which, in fact, almost no ordinary modern user needs anymore. Compact discs have long been replaced by other formats for recording and reading information, and therefore the drives have become irrelevant.
Unlike desktop computer where you can install multiple hard drives, laptops do not have spare boxes. But if there is a need to increase disk space without connecting to a laptop external HDD, then you can go a more tricky way - install a hard drive instead of a DVD drive.
The first step is to prepare and take everything you need to replace:
- DVD > HDD adapter;
- 2.5 form factor hard drive;
- Screwdriver Set.
Adviсe:
- Please note that if your laptop is still under warranty, then such manipulations automatically deprive you of this privilege.
- If instead of a DVD you want to install a solid state drive, then it is better to do this: install an HDD in the drive box, and an SSD in its place. This is due to the difference in SATA port speeds between the drive (less) and the hard drive (more). The dimensions of the HDD and SSD for a laptop are identical, so there will be no difference in this regard.
- Before buying an adapter, it is recommended that you first disassemble the laptop and remove the drive from there. The fact is that they come in different sizes: very thin (9.5 mm) and regular (12.7). Accordingly, the adapter must be purchased based on the size of the drive.
The process of replacing the drive with a hard drive
When you have prepared all the tools, you can start turning the drive into a slot for an HDD or SSD.

In some cases, users who installed an SSD instead of an old HDD may not find a connected hard drive in the BIOS instead of a DVD drive. This is typical for some laptops, however after installing on an SSD operating system, the space of the hard disk connected through the adapter will be visible.


