Bios settings - Detailed instructions in pictures. Setting up BIOS on a computer What is BIOS
Hi all! My name is Sergey and in this guide I will try to tell you in detail how to set up Open Broadcaster Software(hereinafter referred to as OBS), how to launch it and consider all the settings in detail. The manual will contain images, so I think it will be easier for you to navigate.
If you have any questions about this topic, write in the comments, I will try to answer. I will collect interesting questions and answers to them and publish them under guidance in the form of an FAQ.
So, let's start from scratch?
First, I’ll answer the question:
What is Open Broadcaster Software (OBS) for?
OBS- This free program with open source code, which allows you to broadcast various multimedia information on the Internet and record it in video format.
Often, services such as Twitch, YouTube, DailyMotion, Hitbox are used for broadcasting.
OBS supports:
- encoding with H264 (x264) and AAC;
- Intel Quick Sync Video (QSV) and NVENC;
- unlimited number of scenes and sources (you will learn about this later);
- launching an RTMP stream (live broadcast) on Twitch, YouTube, DailyMotion, Hitbox and other projects;
- when recording video, we get MP4 or FLV format;
- Game capture using GPU for high gaming performance;
- DirectShow capture device;
- Windows 7/8/10, OSX and Linux.
In my case, the operating room will be used Windows system 7 Professional x64. Go...
Installing OBS:
Download the OBS program from the official website (download) or from our website (download).
view of the OBSproject website, current as of 11/08/15
If you downloaded the archive from our website, then unpack and run OBS_0_656b_Installer.exe, if you downloaded from the official website, then simply run the installer OBS_0_656b_Installer.exe. After launch, a welcome window appears:

welcome window
Press the button Next >, a window with the Agreement opens. Knowledge required to read in English.

agreement window
If you pressed I agree, then you have accepted the Agreement and continue with the installation. Installation time less than 10 seconds (at fast computer). If you don't agree, click Cancel, in this case the installation will stop.
And so, the installation is complete, the following window opens:

installation completion window
There is a checkmark opposite it Run Open Broadcaster Software 0.656b, this means that after pressing the button Finish the program will start automatically.

OBS on first launch
Great! Installation completed. Let's launch and proceed to setting up OBS.
OBS setup:
After launching OBS, go to settings. To do this, press the button Settings at the bottom of the window on the right or at the top in the menu Settings > Settings, there will be no difference.

The column on the left is the settings menu, on the right is the contents of the selected category.
Let's start, of course, with the very first category Are common.
Are common. Settings:
- Language: Russian.
- Program language.
- Profile: CyberFrags(any name, Untitled by default).
- Used to switch between Stream channels. That is, we have two channels on which we stream, for example, youtube.com/cyberfragscom and twitch.tv/cyberfrags.
- Important! Settings for each profile must be selected separately! TO general settings does not apply.
- Buttons Add, Rename, Delete.
- Allows you to manage profiles, you can add, rename or delete.
- Tray icon: Yes.
- Shows the program icon in the tray (displayed at the bottom right, near the clock).
- Minimize to tray: Yes.
- Minimizes the program to tray during broadcast.
- Show cursor on projector: Yes.
- Show log window when launching OBS: No.
- Install only in case of errors with OBS.

standard settings

our settings
Coding. Settings:
- Encoder: x264(IQS is not supported for me).
- Allows you to choose which technology you will use to encode video.
- x264- encoding using the processor.
- Quick Sync- encoding using GPU, using Intel Quick Sync technology built into the processor itself.
- NVIDIA NVENC- encoding using a video card. Supported NVIDIA video cards starting with GeForce GT 430.
- Allows you to choose which technology you will use to encode video.
- CBR (constant bitrate): Yes.
- Sets a constant bitrate within which the encoder will encode. If you select No, then in this case VBR (variable bitrate) is used.
- CBR padding: Yes.
- I couldn’t find the information anywhere, so I left it as standard.
- Quality: default.
- Encoding quality. If you choose VBR (I wrote about this in paragraph 2), then you can choose the encoding quality yourself.
- From 0 to 10, the higher the value, the higher the quality, the more more load per processor.
- Encoding quality. If you choose VBR (I wrote about this in paragraph 2), then you can choose the encoding quality yourself.
- Other buffer size: No.
- The buffer size is set by you, see point 7.
- Maximum bitrate (Kbps): 3000
.
- Used for broadcast quality (pictures). Each quality uses a different number of Kbps.
- See resolution/bitrate table below.
- Important! Do not use more than 80% of your outgoing connection speed.
- Buffer size (Kbit): default.
- Allows you to choose the buffer size yourself.
- If the maximum costs 3500, and in this line 5000, then viewers with good internet will see the best picture, and with weak internet there will be buffering.
- Allows you to choose the buffer size yourself.
- Codec: A.A.C..
- AAC - Advanced Audio Coding - an audio file format that has less loss of sound quality when encoding at the same bitrates.
- MP3 is an audio file format that has more audio quality loss when encoding at the same bitrates than AAC.
- Bitrate: 128
.
- Sound quality.
- For recording songs, 320 is just right.
- Sound quality.
- Format: 48kHz.
- Audio recording sampling rate.
- 44.1kHz - used in CD Audio.
- 48kHz - used in DVD, DAT.
- The difference will only be felt if you have perfect hearing and good speakers.
- Audio recording sampling rate.
- Channel: stereo.
- Mono is a single-channel recording and playback of sound.
- Stereo - two-channel or more.
Resolution/bitrate ratio table:
| Quality | Broadcast resolution | Minimum bitrate | Maximum bitrate | Optimal bitrate |
| 240p | 426 x 240 | 300 | 700 | 400 |
| 270p | 480 x 270 | 300 | 700 | 400 |
| 360p | 640 x 360 | 400 | 1000 | 750 |
| 480p | 854 x 480 | 500 | 2000 | 1000 |
| 540p | 960 x 540 | 800 | 2000 | 1000 |
| 720p | 1280 x 720 | 1560 | 4000 | 2500 |
| 720p | 1280 x 720 | 2500 | 6000 | 3800 |
| 1080p | 1920 x 1080 | 3000 | 6000 | 4500 |
| 1080p | 1920 x 1080 | 4500 | 9000 | 6800 |

standard settings

our settings
Press the button Apply, saving the current settings. Saved? Go ahead.
Broadcast. Setting:
- Mode: Live.
- Live broadcast - broadcast live.
- Local recording- recording to hard disk.
- Broadcast service: Twitch(consider an example with the Twitch service).
- Custom- user service
- Twitch- http://www.twitch.tv/
- Vaughn Live / iNSTAGIB.tv- http://instagib.tv/
- GoodGame.ru- http://goodgame.ru/
- Dailymotion/Dailymotion Games- http://dailymotion.com/
- YouTube/YouTube Gaming- https://www.youtube.com/
- CyberGame.tv- http://cybergame.tv/
- hitbox.tv- http://hitbox.tv/
- connectcast.tv- http://connectcast.tv/
- Azubu.tv- http://www.azubu.tv/
- FMS URL: EU: Frankfurt, DE.
- rtmp link to the service server. Each service has its own FMS URL.
- Play Path / Stream Key (if available).
- The broadcast key is not used in all services. More about him later.
- Auto reconnect: Yes.
- Necessary for reconnecting the stream if the connection is lost.
- Auto reconnection delay: 10
.
- The time after which the broadcast will be reconnected.
- Delay (sec): 30
.
- Delay in data transmission from you to the service.
- Used primarily for competitive gaming to didn't peek =)
- For chatting or streaming singles, it's best to use 0 to communicate with viewers.
- Delay in data transmission from you to the service.
- Low Latency Mode: No.
- Allows you to reduce the amount of time for data transfer.
- If Yes, then the delay is very minimal, a couple of seconds (I didn’t check exactly how long).
- If No, then the transmission delay will be: the delay you set in step 7 + a couple of seconds. In my case there is a 30-35 second delay.
- Allows you to reduce the amount of time for data transfer.
- Automatically saving the broadcast to a file: Yes.
- Saves the broadcast recording automatically to your computer.
- Continue recording when the broadcast has stopped: Yes
- Continues recording video when the broadcast has stopped.
- If you select No, then the video will be cut off by the same number of seconds as your delay.
- Continues recording video when the broadcast has stopped.
- The path to the file.
- Location where media files are saved. It's different for everyone.
- Replay buffer length (in seconds): 1
.
- Delay in seconds for replay recording.
- Path to the replay file.
- Where to save the replay.

standard settings

our settings
Twitch. Broadcast key:
Let's go to Twitch.tv. Log in to your account; if you don’t have one, create one. At the top of the menu, click on your login, a submenu opens. In it we select Information panel. Just below, there is another menu, in it we select Broadcast Key. Press the button Show Key. We agree that it should not be shown to anyone I Understand. And copy it, it looks something like this: live_*random numbers*_*random numbers and letters*.


Copied? Great, paste it into the field Play Path/Stream Key (if available) and press the button Apply.
Video. Setting:
- Video card: NVIDIA GeForce GT 640.
- Allows you to select the video card to capture.
- Custom: 1920x1080.
- Allows you to select the actual resolution. The larger the parameter, the better quality, the higher the load.
- Monitor: 1
.
- Allows you to select which monitor to broadcast from. You can choose if you have two or more of them. This uses the full screen resolution.
- Scale resolution.
- Reduces the image size, but increases the load on the system.
- Filter.
- Can only be changed when scaling is enabled. Allows you to improve the quality of the reduced image.
- Frames per second: 30
.
- Number of frames per second. Varies from 10 to 60. The higher the value, the smoother the video will be, but the load on the system will increase.
- For weak computers: 10-25
- For medium computers: 25-45
- For powerful computers: 45-60
- Number of frames per second. Varies from 10 to 60. The higher the value, the smoother the video will be, but the load on the system will increase.
- Disable Aero on startup: Yes.
- Disables window transparency in the operating system.
- For powerful computers there is no difference, the choice is yours.
- Medium and weak, it is better to turn it off.
- Disables window transparency in the operating system.

standard settings

our settings
Audio. Settings:
- Playback device: Default.
- By default, the playback device installed by the system is used.
- Device name - there may be several of them, depending on how many playback devices are connected.
- For example, your main output is to speakers, and Skype calls you receive through headphones, so the viewer will not hear the person you are talking to, but will hear you.
- Microphone: Default.
- Mute - mutes the microphone.
- By default, the microphone installed by the system is used.
- Microphone name - there may be several of them, depending on how many microphones are connected.
- Forced mono mode: No.
- Enables mono mode regardless of settings.
- Show only connected devices: Yes.
- Shows working devices that are connected to the computer.
- NiG Latency (ms): 200
.
- Delay for Push to Talk function.
- Application Boost (multiplier): 1
.
- Enhances the sound from applications, the value is multiplied.
- Microphone Gain (Multiplier): 1
.
- Increases microphone sensitivity, multiplied by value.
- Microphone offset: 0
.
- Microphone playback delay in milliseconds.

standard settings, we have the same ones
In principle, I didn’t change anything, if you set it up in your own way, press the button Apply.
Hotkeys. Setting:
- Use the Push to Talk feature: No.
- By holding down the button you place, you will speak into the microphone. We don't need it, it's not convenient.
- Click and Talk: No.
- holding the corresponding key.
- Push to Talk 2: No.
- Fallback option 2 points.
- Mute/Unmute microphone: Num1.
- Allows you to enable or disable the microphone, pressing the corresponding key. In my case, this is the Num1 button.
- Disable/Enable desktop sounds: Num3.
- Allows you to enable or disable desktop sounds ( system sounds), pressing the corresponding key. In my case this is the Num3 button. Why not Num2? To avoid accidentally muting the microphone.
- Start broadcast: Num 0.
- Allows you to start broadcasting, pressing the corresponding key.
- Stop broadcast: Num Del.
- Allows you to stop the broadcast, pressing the corresponding key.
- Start recording: No.
- Allows you to start recording the broadcast, pressing the corresponding key.
- Stop recording: No.
- Allows you to stop broadcast recording, pressing the corresponding key.
- Start replay: No.
- Allows you to start replay playback, pressing the corresponding key.
- Stop repeating: No.
- Allows you to stop replay playback, pressing the corresponding key.
- Save replay: No.
- Allows you to save a replay, pressing the corresponding key.
- Replay recording: No.
- Allows you to start recording from replay, pressing the corresponding key.

standard settings

our settings
Have you chosen your hotkeys? Save by clicking the button Apply and let's move on to the most interesting part, advanced OBS settings.
Extended. Settings:
- Multi-threaded optimization: Yes.
- Determines the number of processor cores and distributes the load evenly between them.
- Process priority: Average.
- Sets OBS priority over other programs.
- Scene buffering time: 500
.
- Scene loading time in milliseconds.
- Disable browsing encoding: No.
- Disables encoding during preview (does not affect broadcast).
- Allow system modifiers for hotkeys: No.
- Allows you to use modifiers for hotkeys.
- Preset x264 CPU: very fast.
- Sets the encoding level. The faster, the worse the quality, but the less load on the processor:
- slower - very slowly
- slow - slowly
- medium - average
- fast - quickly
- faster - faster
- very fast - very quickly
- superfast - super fast
- ultrafast - super fast
- Sets the encoding level. The faster, the worse the quality, but the less load on the processor:
- Encoding profile: main.
- high - for high definition broadcasting.
- main - for standard definition broadcasting.
- Interval key frames(sec, 0=auto): 2
.
- Determines the frequency of key frames.
- CFR (Constant Frequency): Yes.
- Allows the encoder to encode information at a constant frame rate.
- Additional settings x264 encoder.
- I don’t touch the field because I don’t understand it.
- Encode in full range: No.
- Increases the quality of encoding, due to the load on the processor, increasing the quality of the image.
- Allow 61-120 FPS in video settings: No.
- Allows you to use 61-120 FPS in broadcasting. Not all monitors can work with this number of FPS and this setting significantly increases the load on the processor.
- Adjust the sound to the timing of the video. Total Audio Offset (ms): 0
.
- Experiment if you have problems synchronizing video and audio streams.
- Improved microphone synchronization (QPC tags).
- Read subparagraph 12.
- Auto mode low latency: No.
- Interface binding: default.
- Degree of impact on latency: 20 .
- Disable TCP optimization: No.
- Use only if you have a poor connection to the streaming service. It's best to change server/stream provider.

standard settings

our settings
Ready! Basic settings are complete.
Noise gate. Setting:
I won't go into details here. This feature will allow you to adjust your microphone if there is “extra” noise.

And so, the settings are completed. All that remains is to connect to the stream service and start broadcasting.
I will describe how to start broadcasting via Twitch in the next guide.
I may have been wrong in some points, but I will be glad if you correct me. Happy streaming;)
Have you completed the first page? How do you know if it is working well and what can you do to make it work better? Let's run an A/B test.
What is an A/B test?
An A/B test is a competition. Each element, section or page can participate in a competition for maximum efficiency.
Someone said that red buttons on landing pages work better? Let's check! We run A/B testing of three identical pages with three different buttons: red, green and blue.
- Visitor #1 will see option #1 with a red button
- Visitor #2 will see option #2 with a green button
- Visitor #3 will see option #3 with a blue button
- Visitor #4 will see option #1 with a red button and so on.
As a result, each option will receive the same number of visitors, but not the same number of applications. We choose the one that received the most applications and begin the next testing!
So, it’s decided – we need an A/B test. Where to begin?
A/B testing stages
Stage 1. Preparation
A test is a great tool, but you need a hypothesis, a sufficient flow of visitors and a conversion level. Eat? Then the likelihood that the results will be reliable is higher.
Stage 2. Formulate a hypothesis and define a criterion
You think green buttons work better than red ones. Then we formulate: “The number of applications can be increased if the “Order” button is green.” This assumption can be verified using a test. And let’s define the criterion – conversion. If the number of visitors is approximately the same, the number of transitions - clicks on a green or red button - will be different. Let's focus on this figure.
Stage 3. Select a testing element
This could be a button like in our example. Can be title text or image.
Stage 4. Determine the sample and duration of the test
There are online calculators for calculations, for example, Optimizely or Evan's Awesome A/B Tools, but you can determine the sample and time yourself by calculating the average conversion.
Stage 5. Run an A/B test
Select the page where you are going to run the A/B test and click “Start A/B test”. Two identical versions of the page will appear.  We go to the editor of one of the options.
  In the top menu we see test options, you can switch them.
  We go to the second option, change, for example, the background of the first section and publish both options.
  A/B test launched. We are waiting for the first results to appear.
If you need an empty variant of the A/B test, click “Add variant”.
 If you need a version of the finished page, we create a copy.

Stage 6. Checking the test operation
To do this, you can log in several times from different browsers.  Or check from one browser in Incognito mode.
  Sometimes a white page appears when checking. This means that one of the test options was not published. We publish everything by switching the options in the upper left corner.
Stage 7. Checking the result
Statistics on a page with an A/B test can be seen in personal account in the “Statistics” section. We select a page and see A/B test options, the number of visitors, the number of applications and conversion. 
Stage 8. Completing the A/B test
In your personal account, in the “Pages” section, click “Complete A/B test”. Select the desired A/B test option: it will replace the main page, and the other options will be deleted. 
If you need to restore page variations after completing an A/B test, go to the “A/B Test History” tab and restore the one you need. There is information about the page title, creation and publication date, and the page view function is also available. To restore the required version, click on the “Restore” button and the current version will be replaced by the one you selected in the history.

So, we conducted an A/B test - we decided which button or background worked more effectively. What else could be improved? Change the title? Let's launch an A/B test!
Read other articles about setting up a website in the section.
Basic articles about the Platform editor -.
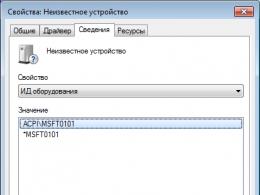
Surely almost every user has come across the abbreviation BIOS (a well-established designation in Russian computer world- BIOS). But not everyone knows what it is, how to properly configure the BIOS, and what functions this system performs. Let's try to understand the basic concepts and settings issues.
What is BIOS?
In general, the term BIOS itself, if you translate the abbreviation from English into Russian, means basic system input/output, but not in understanding such actions with information as such. BIOS serves as a layer for the interaction of system systems and computer hardware.
If you look at it, Windows can also be classified as a complex program (set of programs) that communicates between the computer and the user. But for these programs to work, you need not only device drivers, but also a BIOS system, which allows you to initialize absolutely all hardware components before starting the OS and check their parameters with the requirements for the correct operation of the operating system.
Feature Preview
Speaking about how to properly configure the BIOS on a computer or laptop, one cannot fail to touch upon the issue of basic functions. In addition to the above, you should pay attention to low-level testing of equipment before starting the system. If no problems are found, control of the hardware components is transferred to the operating system.
IN otherwise a corresponding notification appears on the screen. But many people have probably encountered such situations. For example, the keyboard on the computer is disabled for some reason. A message about its absence immediately appears. Or, let's say, there was a malfunction hard drive, to which the BIOS reacts instantly.

No less important is the function of saving device parameters, that is, the characteristics of the hardware of a computer or laptop, despite the fact that the BIOS’s own memory is only about 1 MB. But such data is not stored on the hard drive, but in a special chip located on motherboard. By the way, a person familiar with the settings in BIOS mode Setup can easily optimize the operation of any component, although, as practice shows, ordinary users practically do not resort to such procedures.
The most necessary parameters for computers and laptops
How to properly configure the BIOS on a laptop or computer in terms of basic parameters?
When entering the settings, you most often use a long press of the Del, F2, F10 or F12 keys (here everything will depend on the BIOS manufacturer and its current version). In any case, the main settings window looks identical on almost all devices. The only difference may be in the names of categories and menus (for example, Boot Sequence and Boot Priority, indicating the priority and boot sequence from specific device, which is installed first, second, etc. in the queue).

The first thing you should pay attention to when entering the main window is setting the system date and time. Remember, this installation is carried out here, and not in standard Windows settings. Many users who do not know about this may often have problems with installation software, because the installer is initially focused on the parameters set in the BIOS, and not in Windows. It turns out that even with the same date that was set in the system, the main one (in the BIOS) is different, which is why a conflict arises.
How to properly configure the BIOS to install Windows from a disk?
Now let’s touch on an equally important issue related to the initial installation of the “OS” from disk. How to configure the BIOS correctly in this case? The main point is to set the boot priority described above.

In other words, here the user needs the startup process to take place not from the hard drive, but from a removable CD/DVD media. In most cases, this is done from the download section, where you need to specify it as the first device (1-st Boot Device). You can change the boot device using the standard PgUp and PgDn keys, which are found on any keyboard. Next, you need to save the changes (usually the F10 key or the Save&Exit command), after which an automatic reboot will follow, and the start will be made from
Setting up BIOS for installing Windows from a flash drive
Now a few words about how to properly configure the BIOS if the system will be installed from a removable USB drive. Such situations most often occur when netbooks simply do not have a disk drive.

In principle, the question here also comes down to setting the priority device, but it will no longer be a disk, but a flash drive. Please note that the flash drive must be inserted into the appropriate USB port before turning on the computer or laptop, otherwise it simply will not be detected.
How to properly configure BIOS (Windows 7) after installing the system
Upon completion initial stage installation of the same Windows 7, however, like any other system of this family, the terminal is always rebooted. If you do not change the parameters of the priority device, the user will only be faced with the fact that the installation will be restarted.
The conclusion is the simplest: when rebooting, you should go into the settings and set the hard drive as the main (first) device. Basically, if the drive is the first, and the second is HDD, you just need to pull it out installation disk from the drive. But it’s better to change the settings right away. What if you play a game that requires the original disc, forget to remove it, and turn off your computer! When turned on, a message will be displayed that this disk is not a system one, and the settings will have to be changed again.
Next, let us pay attention to the question of how to correctly configure the BIOS on some laptop models from different manufacturers. Basically, the setup is almost the same, but there are some points that are worth dwelling on separately.
Setting up BIOS in ASUS laptops
So, how to properly configure the BIOS to ASUS laptop in terms of download priority? First, we enter the program by pressing the F2 or Del keys, after which we go to the Security section, find the section there Secure Boot Menu and in it disable the Secure Boot Control option (set it to Disabled).

We return to the Boot section and use the Launch CSM line that appears. Save the changes, reboot the laptop and enter the BIOS again. Now in the Boot section you can set a disk drive or flash drive as a priority device. The question of how to properly configure the BIOS (ASUS) should not cause any particular difficulties. By the way, these settings are enabled by default on almost all devices from this manufacturer.
Setting up BIOS in Acer laptops
Now let's look at how to properly configure the BIOS to Acer laptop. In principle, everything here looks standard, but some deserve the most important attention additional options. This is F12 Boot Menu. When this option is enabled, before booting the system, the user will be asked to choose which device to boot from, which saves the user from manually specifying priorities.
The second interesting option is D2D Recovery, which allows you to activate system recovery. But it is advisable to use it only if there is special utility Acer Recovery Management.

Finally, the third option, Power On Display, allows you to control whether the main screen is turned on or off when an external monitor is connected to the laptop.
Setting up BIOS in Hewlett Packard laptops
It’s also worth saying a few words about how to properly configure the BIOS on an HP laptop. There are some interesting moments here too.
Immediately after turning on the device, press the Esc key, after which the Startup Menu will appear on the screen. Why is it interesting? Because it has two items: F9 Boot Device Options and F10 BIOS Setup.
The first option is selected for a one-time start with device selection, the second allows you to enter directly into the BIOS settings. Here in the system configuration section you need to go to the Boot Options parameters, where you should use priority setting (Boot Order). Only scrolling devices up and down is done with the F5/F6 keys. However, to download from optical media It's better to set the priority option directly in the BIOS. The manager should be left to select starting from a flash drive.
Some features in setting up BIOS for emergency situations
Naturally, the BIOS functions and settings are not limited to this. For example, in a situation where problems arise with hard drives, a full check may be required, which includes surface diagnostics.
Regardless of which utility will be used (their own Windows tool or a third-party program), it is advisable to perform a full check when changing the SATA controller parameter from AHCI to IDE mode.

Among other things, if anyone doesn’t know, the BIOS also allows you to control some other parameters, say, processor temperature, hard drive spindle speed, and device memory capacity. With this program, you can set different parameters for IRQ interrupts, enable or disable devices, boot the system over the network, etc. Although, if you look at it, the average user practically does not need such settings (except perhaps with rare exceptions), and there is no need for BIOS without special knowledge, as they say, is better not to go into it at all.
Conclusion
That's all regarding the question of how to properly configure the BIOS. As is already clear, specific settings that may be needed in emergency situations were not considered in this material. But some interesting parameters were still touched upon. However, if someone has a desire to study the BIOS settings, so to speak, in a larger volume, it will not be difficult. At the very least, you can read the technical documentation or use the tips that are usually displayed on the right side of the screen when entering a particular menu. But the settings themselves are almost always automated and set to use the best default values.
Well, the problem of setting priority devices for downloading date and time, I think, will not cause any particular difficulties, since the actions are identical even in devices from different manufacturers. The most important thing here is to find the appropriate section, and to understand the names you will need minimal knowledge of the English language.
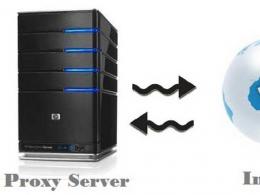
One of the most important wireless network settings is “Operation Mode”, “Wireless Network Mode”, “Mode”, etc. The name depends on the router, firmware, or control panel language. This item in the router settings allows you to set a specific Wi-Fi operating mode (802.11). Most often, this is a mixed b/g/n mode. Well, ac if you have a dual-band router.
To determine which mode is best to choose in the router settings, you must first understand what it is and what these settings affect. I think it would be useful to take a screenshot with these settings as an example TP-Link router. For the 2.4 and 5 GHz range.
At the moment, there are 4 main modes: b/g/n/ac. The main difference is maximum speed connections. Please note that the speed that I will write about below is the maximum possible speed (per channel). Which can be obtained in ideal conditions. IN real conditions connection speed is much slower.
IEEE 802.11 is a set of standards on which everyone works Wi-Fi networks. Essentially, this is Wi-Fi.
Let's take a closer look at each standard (essentially these are Wi-Fi versions):
- 802.11a– when I wrote about the four main modes, I did not consider it. This is one of the first standards operating in the 5 GHz band. Maximum speed 54 Mbit/s. Not the most popular standard. Well, he’s already old. Now in the 5 GHz range the ac standard is already ruling.
- 802.11b– operates in the 2.4 GHz band. Speed up to 11 Mbit/s.
- 802.11g– we can say that this is a more modern and modified 802.11b standard. It also works in the 2.4 GHz band. But the speed is already up to 54 Mbit/s. Compatible with 802.11b. For example, if your device can operate in this mode, then it will connect without problems to networks that operate in mode b (older).
- 802.11n– the most popular standard today. Speed up to 150 Mbit/s in the 2.4 GHz band and up to 600 Mbit/s in the 5 GHz band. 802.11a/b/g compatible.
- 802.11ac – new standard, which only operates in the 5 GHz band. Data transfer rates up to 6.77 Gbps (with 8 antennas and MU-MIMO mode). This mode only available on dual-band routers that can broadcast the network in the 2.4 GHz and 5 GHz bands.
Connection speed
As practice shows, most often the b/g/n/ac settings are changed in order to increase the speed of the Internet connection. Now I will try to explain how it works.
Let's take the most popular standard 802.11n in the 2.4 GHz band, when the maximum speed is 150 Mbit/s. This is the number most often indicated on the box with the router. It may also say 300 Mbit/s, or 450 Mbit/s. This depends on the number of antennas on the router. If there is one antenna, then the router operates in one stream and speeds up to 150 Mbit/s. If there are two antennas, then two streams and the speed is multiplied by two - we get up to 300 Mbit/s, etc.
These are all just numbers. In real conditions, the Wi-Fi speed when connected in 802.11n mode will be 70-80 Mbit/s. Speed depends on a huge number of different factors: interference, signal strength, performance and load on the router, settings, etc.
Since they have many versions of the web interface, let's look at a few of them. If in your case the web interface is light like in the screenshot below, then open the “Wi-Fi” section. There will be a “Wireless mode” item with four options: 802.11 B/G/N mixed, and separately N/B/G.


Or even like this:

Setting "802.11 Mode".
Radio frequency range on the Netis router
Open the settings page in your browser at http://netis.cc. Then go to the "Wireless" section.
There will be a menu "Radio frequency range". You can change it Wi-Fi standard networks. The default is "802.11 b+g+n".

Nothing complicated. Just don't forget to save the settings.
Setting up Wi-Fi network mode on the Tenda router
The settings are located in the "Wireless Mode" - "Basic WIFI Settings" section.
Item "Network mode".

You can install both mixed mode (11b/g/n) and separately. For example, only 11n.
If you have a different router or settings
It is simply impossible to provide specific instructions for all devices and software versions. Therefore, if you need to change the wireless network standard, and you did not find your device above in the article, then see the settings in the section called " Wireless network", "WiFi", "Wireless".
If you don’t find it, write the model of your router in the comments. And it is advisable to attach a screenshot from the control panel. I'll tell you where to look for these settings.