Boot device priority does not see the disk. How to set the BIOS to boot from a disk or USB flash drive? What to do if there is no boot from a USB flash drive in the BIOS
Hard drive not detected in BIOS for many reasons, if you yourself connected HDD, you first need to check whether you have connected the interface cable and the power cable correctly. Let's first look at the interface for connecting a hard drive to an outdated IDE (parallel interface for connecting drives), but much of what will be said will also work for hard drives SATA interface. Friends, if this article does not help you, try or.
Power cables run from the power supply to motherboard, hard drives, we are interested in the hard drive power cable, it ends with a connector that fits into the plug on the hard drive, if connected incorrectly, the hard drive activity indicator on system block will burn constantly. It should connect freely, without the use of force. The interface cable for connecting a hard drive has a special key, the photo shows the cable, it is missing one contact, and below the controller from the motherboard it is also missing there, as if broken or in other words, there is a special protrusion on the cable, and on the IDE connector in the motherboard The board has a special slot.
Pay attention to the interface power cable on the left, it has the far right conductor marked in red, which points to the hard drive power connector located on the right, this tells us that everything is connected correctly.

Hard drive not detected in BIOS
Connected correctly and hard drive not detected does not matter.
- We are trying to connect our hard drive to another SATA or IDE controller (connector) on the motherboard, replacing the SATA interface cable sometimes also solves the problem, try also using a different power supply cable.
- Do not forget that sometimes, due to low power or, you will not be able to detect the second connected hard drive, and problems may also arise with the first one.
- If you are using IDE to SATA adapters try replacing them.
- Problems with determining the hard drive in the BIOS may arise due to numerous.
- Trying to load BIOS settings in optimal settings. How to do this is our article Load Setup Defaults ..
- Pro hard drives outdated IDE sample, know one thing, no matter what modern motherboard you have, if the manufacturer left at least one IDE controller on it, and this usually happens, then such a hard drive should work in your system unit.
- Next, we look to see if we have the IDE controller itself enabled in the BIOS, pay attention to this Ami BIOS, you may have an Award BIOS, but the meaning is the same.
Today I will tell you how to enable booting from a USB flash drive in BIOS of various manufacturers. It doesn't matter which version you have, the order of gestures will be as follows:
1. Insert our bootable flash drive into the USB port of your computer. I recommend inserting it into the port located directly on the motherboard, i.e. from the back of the system unit.
2. Turn on the computer and press the key Delete(or F2) to get into the BIOS. Depending on the manufacturer and BIOS version, other keys (Esc, F1, Tab) may also be used, so you need to carefully read the prompts on the screen.
In BIOS, we can only navigate through the tabs using the keyboard.
Below I will detail this process on the example of the most used BIOS versions.
Attention! Remember that if you are installing the operating system from a USB flash drive or CD and have selected a boot device in the BIOS, and not in the boot menu, then after the first automatic Windows restart you need to enter the BIOS again and return the boot from hard drive. If this is not done, autoload from a USB flash drive or CD will work again, and Windows will again begin the first stage of the procedure. installation.
Configuring Award Bios to boot from a USB flash drive
Award Bios:
First, let's check if the USB controller is enabled. We go to "Integrated Peripherals". We go down with the arrow on the keyboard to the item “USB Controller”. Press the “Enter” key and in the window that appears, select “Enable” (also using “Enter”). Opposite “USB Controller 2.0” should also be “Enable”.
 Exit this tab by pressing Esc.
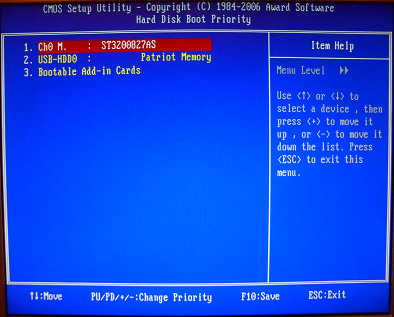
Then we go to “Advanced BIOS Features” – “ hard drive Boot Priority".Now in my example, the hard drive is in the first place, and the flash drive should be.
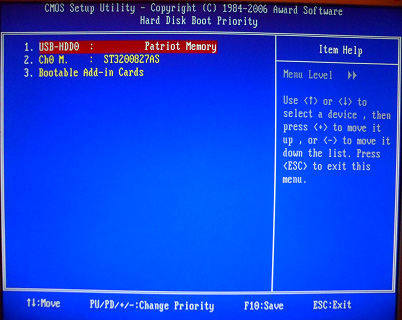
 We stand on the line with the name of our flash drive (Patriot Memory) and raise it to the very top using the “+” key on the keyboard.
 Exit here by pressing "Esc".
Setting AMI Bios to boot from flash drive
If, upon entering BIOS, you see such a screen, then you have AMI Bios:
 First, let's check if the USB controller is enabled. Go to the tab "Advanced" - "USB Configuration".
 Opposite the items “USB Function” and “USB 2.0 Controller” should be “Enabled”.
 If this is not the case, we stand on this line and press the “Enter” key. From the list that appears, select “Enabled” (also using “Enter”).
Then exit this tab by pressing “Esc”.
Go to tab "Boot" - "Hard Disk Drives".
 Now I have a hard drive in the first place, but I need to put a USB flash drive here. We become on the first line, press “Enter” and in the window that appears, select our Patriot Memory flash drive.
 It should be like this:
 We leave from here through "Esc".
Select "Boot Device Priority". Here, the first boot device must be a USB flash drive.
 Press Esc.
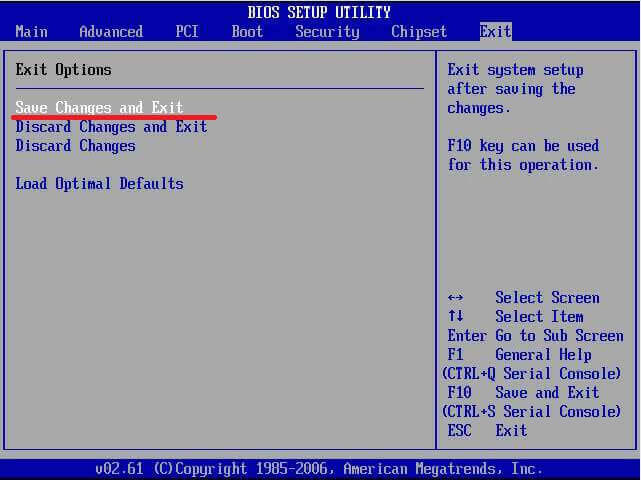
Then we exit the BIOS, saving all the settings made. To do this, go to "Exit" - "Exit & Save Changes" - "OK".

Setting up Phoenix-Award Bios to boot from a USB flash drive
If, upon entering BIOS, you see such a screen, then you have Phoenix Award BIOS :
 First, let's check if the USB controller is enabled. We go to the “Peripherals” tab - opposite the items “USB Controller” and “USB 2.0 Controller” should be “Enabled”.
 Then we go to the “Advanced” tab and opposite “First Boot Device” we set “USB-HDD”.
 After that, exit the BIOS, saving the changes. To do this, go to "Exit" - "Save & Exit Setup" - press the key "Y" - "Enter"
 That's practically everything you need to know in order to boot from a USB flash drive. In my article, I described the process of setting up the Bios of the most popular versions: Award and AMI. The third example shows Phoenix Award Bios, which is much rarer.
AT different versions BIOS described procedure may be slightly different. But the main thing is that you understand the principle of tuning itself.
By the way, I would also like to add: in order to choose which device to boot your computer from, it is not necessary to change the settings in the BIOS. You can call up a special menu immediately after turning on the computer to select boot devices (this can be done by pressing F8, F10, F11, F12 or Esc). In order not to guess with the keys, we look carefully at the monitor immediately after turning it on. We need to have time to see an inscription like this: “Press Esc to selest boot device”. In my case, it was necessary to press “Esc”.
Modern laptops are getting rid of CD / DVD drives one by one, becoming thinner and lighter. Along with this, users have a new need - the ability to install the OS from a flash drive. However, even with a bootable flash drive, not everything can go as smoothly as we would like. Microsoft specialists have always loved to throw curious puzzles at their users. One of them - the BIOS may simply not see the media. The problem can be solved by several sequential actions, which we will now describe.
In general, there is nothing better for installing an OS on your computer than a bootable USB flash drive made with your own hands. You will be 100% sure of it. In some cases, it turns out that the carrier itself is made incorrectly. Therefore, we will look at several ways to make it for the most popular versions of Windows.
In addition, you need to set the correct parameters in the BIOS itself. Sometimes the reason for the absence of a drive in the list of disks can be exactly this. Therefore, after we deal with creating a flash drive, we will look at three more ways to configure the most common BIOS versions.
Method 1. Flash drive with Windows 7 installer
In this case, we will use .

This method Suitable for Windows 7 and older. To burn images of other systems, use our instructions for creating bootable USB flash drives.
AT the following instructions You can see ways to create the same drive, but not with Windows, but with other operating systems.
Method 2: Setting the Award BIOS
To enter the Award BIOS, press F8 during boot operating system. This is the most common option. There are also the following combinations for entering:
- Ctrl+Alt+Esc;
- Ctrl+Alt+Del;
- delete;
- Reset (for Dell computers);
- Ctrl+Alt+F11;
- Insert.
Now let's talk about how to properly configure the BIOS. In most cases, this is the problem. If you have an Award BIOS, do this:

So you've decided to install new system, or use some utility to work with the same system, but it must be written to a USB flash drive. You insert a USB flash drive into a USB port, and then you have a question, why the bios does not see the bootable USB flash drive?
You have created a bootable flash drive, but the BIOS does not see it. Many factors play a role here, for example, you made the bootable USB flash drive incorrectly, the BIOS needs to be reset or even updated, the program with which you created the bootable USB flash drive turned out to be damaged, and much more. Let's try to solve this problem.
What to do if BIOS does not see a bootable USB flash drive
How to make a bootable USB flash drive and how to do it right
First you need to make sure that the flash drive really does not work with your computer. You can check this using a drive on another PC or laptop, if the same is there, then you probably created the bootable USB flash drive incorrectly.
I want to note that if you just threw the files onto a USB flash drive and think that it will work, then I hasten to upset you. To record the distribution kit of a system or program, you need special utilities. I will list them now:
- WinSetupFromUSB
- Rufus
- Windows USB/DVD Download Tool
- WinToHDD
- Windows To Go
- UltraISO
And this is not all programs, but I have listed the most basic tools. For each I have a review. For example, if you want to make a bootable Windows flash drive, then use Rufus or WinSetupFromUSB. If the first one does not work and the USB flash drive is not visible in the BIOS, then use another one.
I will list articles that talk about creating a bootable USB flash drive. Many of the ways you probably know.
If you have used all of the above utilities and the flash drive still does not work, make sure it is working properly, try formatting it in NTFS or FAT32, and try to boot from another computer. And if this does not help, then use another flash drive.
How to set up the BIOS for a bootable flash drive
First you need to understand that the flash drive is not visible at all in the BIOS, that is, there is no line “USB name of the flash drive”, or there is a line, but when you click on this item, you have nothing but a black screen.
There are two options for why this happens - your flash drive is faulty or you burned the image incorrectly, or there are problems with your BIOS, so the BIOS does not see the bootable flash drive.
The best option is to boot from a USB flash drive -. It can be entered using the ESC key or F8. On the different devices differently because . Having opened boot menu your eyes will see a list of devices from which you can boot - flash drives, hard drives, CD-DVD. You need to find something like USB Kingston 8 GB or similar, depending on the brand of your flash drive.
If you do not have a Boot Menu, or it is disabled, then in the BIOS on the tab Boot or Advanced you need to rearrange your flash drive in the first place. This is done using the F5 and F6 keys, but I repeat, the parameters may differ for each BIOS model, you will have to figure it out yourself, or write in a comment so that I can help you.


After you put the bootable USB flash drive in first place in the BIOS, press the key F10 to save the current BIOS settings. Or on the tab exit choose an option Save Changes and Exit.
Finally, you can if none of the above helps. Follow the link and read about it. Usually the reset option is located on the Exit tab and is called Load Optimal Defaults or a little different.
Let's summarize all of the above and say why BIOS does not see the bootable flash drive:
- The flash drive is defective. Use a different flash drive, or try using it on another PC.
- The wrong program was selected to create a bootable USB flash drive.
- The image written to the USB flash drive is damaged and needs to be replaced.
- The BIOS settings are incorrect, you need to reset it.
- The BIOS does not support booting from flash drives (it happens sometimes), then the BIOS needs to be updated.
If you have such “misunderstandings” with a flash drive, then try creating a disk with Windows or the right program. As for what I want to note, you need to be extremely careful. Firstly, you need to find the correct firmware that fits your motherboard, if the wrong version is selected, or from another board, then there is a high probability of failure of the entire system board and you certainly don't want that.
Each System Administrator should know how boot computer from usb stick. Most often, this skill is necessary when installing the operating system. After all Windows distribution does not have to be on a CD. And, for example, installing Windows on a netbook in a different way will not even work, because. it usually does not have a floppy drive.
Today I will tell you how to set the boot from a USB flash drive in the BIOS of various manufacturers. Regardless of which version you have, the procedure will be as follows:
1. We insert our bootable USB flash drive into the USB port of the computer. It is advisable to insert it into the port located directly on the motherboard, i.e. from the back of the system unit.
2. Turn on the computer and press the key Delete(or F2) to get into the BIOS. Depending on the manufacturer and BIOS version, other keys (Esc, F1, Tab) can be used, so you need to carefully watch the prompts on the screen.
In Bios, we can navigate through the tabs and rows only using the keyboard.
Next, I will describe this process in detail using the example of different BIOS versions.
Configuring Award Bios to boot from a USB flash drive
Award Bios: First, let's check if the USB controller is enabled. We go to "Integrated Peripherals". We go down with the arrow on the keyboard to the item “USB Controller”. Press the “Enter” key and in the window that appears, select “Enable” (also using “Enter”). Opposite “USB Controller 2.0” should also be “Enable”.
  Exit this tab by pressing Esc.
Then go to "Advanced BIOS Features" - "Hard Disk Boot Priority". Now in my example, the hard drive is in the first place, and the flash drive should be.  We stand on the line with the name of our flash drive (Patriot Memory) and raise it to the very top using the “+” key on the keyboard.
  Exit here by pressing "Esc".
Now on the line “First Boot Device” press “Enter”. We have selected “CD-ROM”, but you need to set “USB-HDD” (if suddenly the boot from the USB flash drive does not work, come back here and try to set “USB-FDD”). Let the second device be “Hard Disk”.  Exit this tab by pressing Esc.
Now exit the BIOS, saving the changes. To do this, click "Save & Exit Setup" - press the key "Y" - "Enter". 
Configuring AMI Bios to boot from a USB flash drive
If, upon entering BIOS, you see such a screen, then you have AMI Bios: First, let's check if the USB controller is enabled. Go to the tab "Advanced" - "USB Configuration".
  Opposite the items “USB Function” and “USB 2.0 Controller” should be “Enabled”.
  If this is not the case, we stand on this line and press the “Enter” key. From the list that appears, select “Enabled” (also using “Enter”).
Then exit this tab by pressing “Esc”.
Go to the tab "Boot" - "Hard Disk Drives". 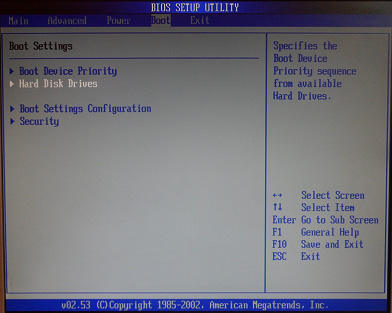 Now I have a hard drive in the first place, but I need to put a USB flash drive here. We become on the first line, press “Enter” and in the window that appears, select our Patriot Memory flash drive.
  It should be like this:
  We leave from here through "Esc".
Select "Boot Device Priority". Here, the first boot device must be a USB flash drive.  Press Esc.
Then we exit the BIOS, saving all the settings made. To do this, go to "Exit" - "Exit & Save Changes" - "OK". 
Setting up Phoenix-Award Bios to boot from a USB flash drive
If, upon entering BIOS, you see such a screen, then you have Phoenix Award BIOS: First, let's check if the USB controller is enabled. We go to the “Peripherals” tab - opposite the items “USB Controller” and “USB 2.0 Controller” should be “Enabled”.
  Then we go to the “Advanced” tab and opposite “First Boot Device” we set “USB-HDD”.
  After that, exit the BIOS, saving the changes. To do this, go to "Exit" - "Save & Exit Setup" - press the key "Y" - "Enter"
 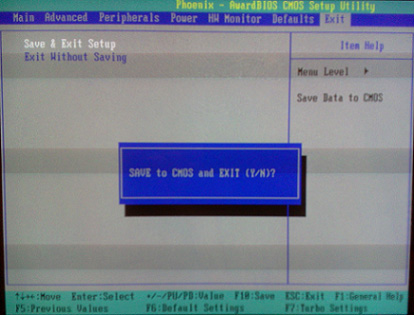 That's practically everything you need to know in order to boot from a USB flash drive. In my article, I described the process of setting up the Bios of the most popular versions: Award and AMI. The third example shows Phoenix Award Bios, which is much rarer.
In different versions of the BIOS, the described procedure may be slightly different. But the main thing is that you understand the principle of tuning itself.
By the way, I would also like to add: in order to choose which device to boot your computer from, it is not necessary to change the settings in the BIOS. You can call up a special menu immediately after turning on the computer to select boot devices (this can be done by pressing F8, F10, F11, F12 or Esc). In order not to guess with the keys, we look carefully at the monitor immediately after turning it on. We need to have time to see an inscription like this: “Press Esc to selest boot device”. In my case, it was necessary to press “Esc”.  If on your computer BIOS UEFI, and you need to boot from a USB flash drive - you can familiarize yourself with.
If you need reset forgotten password user using a bootable USB flash drive - how to do it.