VideoLAN - VLC media player. Video playback on terminals
Enabled by a line in the config: application = vlc
Only works in WTware for x86 and only with video=...(U) . There is no way to launch VLC if video=...(F) or video=...(X) . If none of the video drivers from the (U) set starts on your machine with 1024MB of memory, we will fix it.
In the UEFI build of WTware and in WTware for Raspberry Pi, VLC has not been done yet.
The simplest example
To just start VLC and see that it works, write three lines in the configuration file:
Application = vlc vlc_files = vlc.jpg vlc_cmdline = /vlc_files/vlc.jpg --image-duration=-1
With such a configuration file, an orange-green picture will appear on the screen with the text "VLC for WTware test screen." What does each of the lines of the configuration file mean:
Application=vlc
Enables the VLC player instead of the regular RDP client.
vlc_files = vlc.jpg
Tells the terminal to download the vlc.jpg file from the VLC directory on the TFTP or HTTP server (most likely the full path is C:\ProgramData\WTware\VLC). The file will be downloaded to the terminal memory and available as /vlc_files/vlc.jpg
vlc_cmdline = /vlc_files/vlc.jpg --image-duration=-1
Tells the VLC player to open the file //vlc_files/vlc.jpg , and the --image-duration=-1 magic word tells it to show the image indefinitely.
VLC and virtual screens
The VLC player can be placed on a second virtual screen. Details about virtual screens are written in the documentation. An example of a configuration file, in which the connection to the RDP server 192.168.1.1 is on the first virtual screen, and the VLC player with a test picture is on the second. Switch between screens with the Win-1..Win-2 keys, Win-arrows or via the pop-up menu at the bottom right:
Server=192.168.1.1 next screen application = vlc vlc_files = vlc.jpg vlc_cmdline = /vlc_files/vlc.jpg --image-duration=-1
Video from terminal memory
The picture is not the video. Not interested. You can write a video file to the VLC directory and specify its name instead of vlc.jpg in the vlc_files= and vlc_cmdline= parameters. Then the VLC player will play the video. The files specified in the vlc_files= parameter will be loaded into the terminal's RAM upon boot. You should not specify gigabyte files: it will take a long time to load and there may not be enough RAM. Files download faster if you set HTTP downloads.
To loop the video indefinitely, remove the --image-duration=-1 magic word in the vlc_cmdline parameter and add another --loop magic word. Example:
Application=vlc vlc_files=yourvideo.mov vlc_cmdline=/vlc_files/yourvideo.mov --loop
RTSP broadcast, video source setting
VLC can receive broadcasts via RTSP protocol. This protocol is used by CCTV cameras, and WTware can be configured to receive images from cameras. Or you can set up broadcasting a video stream to the network from a Linux machine and display the same, synchronous video on several terminals with WTware.
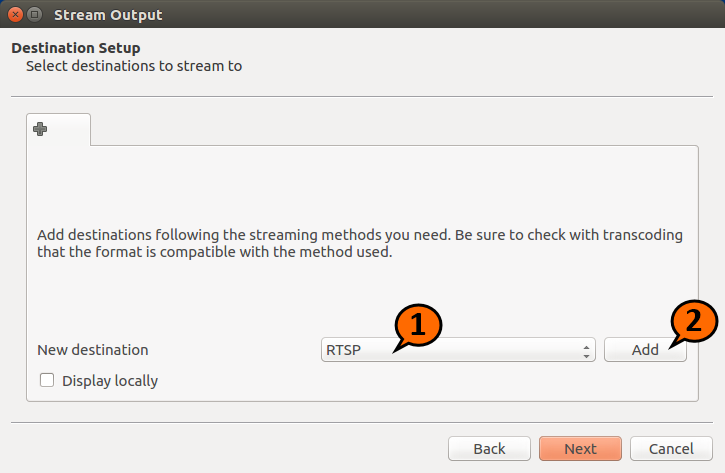
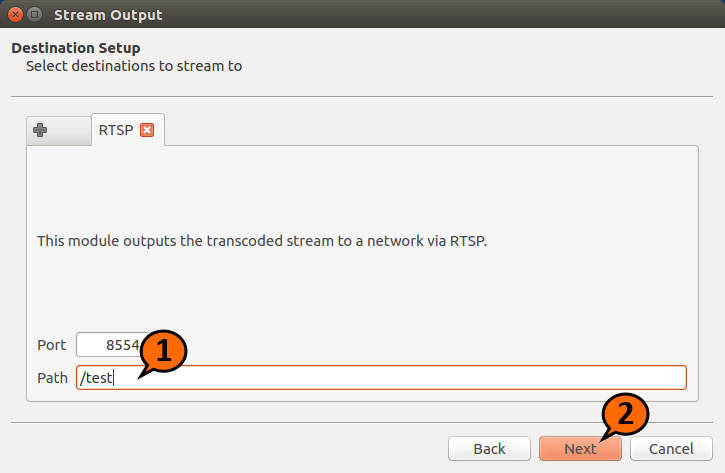
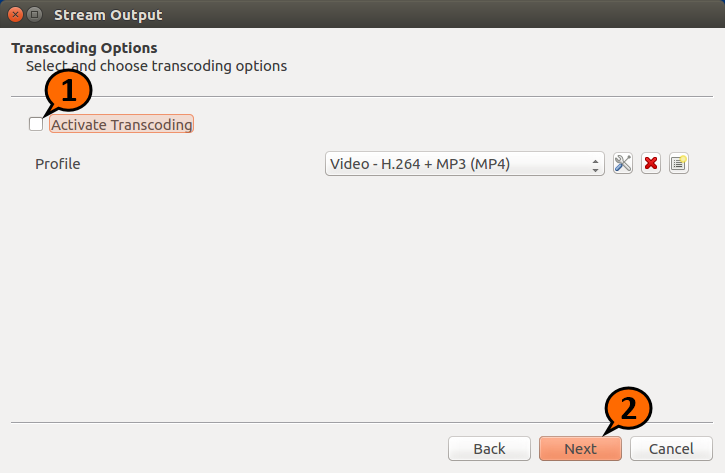
As a source of RTSP broadcasting, it is a Linux machine that is needed, with Windows it turns out badly. Take any fresh Linux. A live USB in a virtual machine is fine. Below are screenshots of the broadcast launch taken from Ubuntu Linux. The screenshots included in the Ubuntu distribution VLC. Nothing complicated:

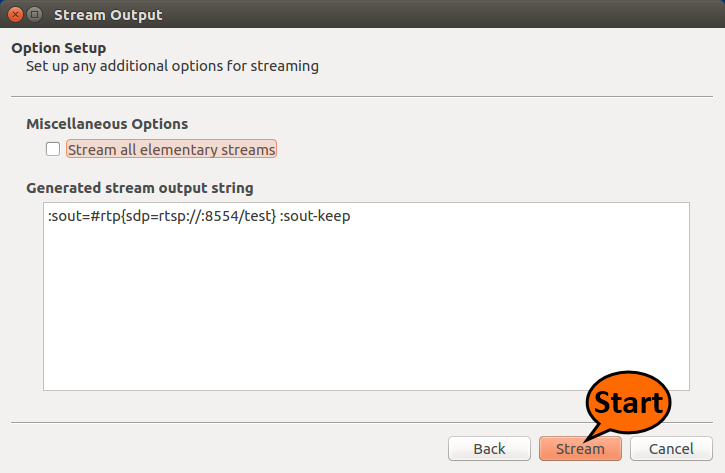
RTSP broadcasting, terminal settings
Configuration file of the terminal that receives RTSP broadcasts:
application=vlc vlc_cmdline=rtsp://10.1.1.32:8554/test
Instead of 10.1.1.32, you need to specify the IP of the Linux machine on which broadcasting is running. Just like the screenshots above. Port 8554 and path /test are shown in the screenshots. A video should appear on the terminal screen. It is possible to run multiple terminals with the same settings and they will all show the same video streamed via RTSP from a Linux machine.
Receive broadcasts from a surveillance camera in the same way, the port and path must be taken from the camera settings.
VLM config file
Complex configuration of the VLC player is more conveniently performed through a special VLM configuration file. First, the simplest example, VLM for a picture. We write this text to the test1.txt file in the VLC directory:
New c1 broadcast enabled setup c1 input /vlc_files/vlc.jpg control c1 play
In the WTware configuration file we write:
Application = vlc vlc_files = test1.txt, vlc.jpg vlc_cmdline = --vlm-conf=/vlc_files/test1.txt --image-duration=-1
The screen should display a picture with the text "VLC for WTware test screen."
Mosaic. Four broadcasts per screen
A more complex example of configuring the VLC player using the VLM config file. First you need to start broadcasting video to the network on a machine with Linux as shown in the screenshots above. Then we write the text to the test2.txt file in the VLC directory, replacing 10.1.1.20 with the IP of your Linux machine:
New c1 broadcast enabled loop setup c1 input rtsp://10.1.1.20:8554/test setup c1 output #mosaic-bridge(id=1,width=300,height=224) control c1 play new c2 broadcast enabled loop setup c2 input rtsp://10.1.1.20:8554/test setup c2 output #mosaic-bridge(id=2,width=300,height=224) control c2 play new c3 broadcast enabled loop setup c3 input rtsp://10.1.1.20: 8554/test setup c3 output #mosaic-bridge(id=3,width=300,height=224) control c3 play new c4 broadcast enabled loop setup c4 input rtsp://10.1.1.20:8554/test setup c4 output #mosaic -bridge(id=4,width=300,height=224) control c4 play
We write the following lines in the WTware configuration file. Note that everything after vlc_cmdline= is one long line:
Application = vlc vlc_files = test2.txt, vlc.jpg vlc_cmdline = --sub-source=mosaic(width=640,height=480,xoffset=10,yoffset=10,rows=2,cols=2,keep-picture) --vlm-conf=/vlc_files/test2.txt /vlc_files/vlc.jpg --file-caching=2000 --image-duration=-1
You should get this picture:

Four fish are four times better than one fish! You can specify different video sources, for example, from different CCTV cameras.
About the sizes. Mosaic works like this: first, video streams are scaled, their sizes become equal to those specified in width= and height= in the #mosaic-bridge() construct. The streams are then superimposed on the background image. And after that, the background image with video streams is stretched to the entire screen of the terminal. In order not to get confused, instead of our vlc.jpg image, we need to use a background image of the same size as the physical resolution of the monitor on the terminal, and specify the size of this image in width= and height= inside the mosaic() construct.
Industrial operation
Two 1920x1080 monitors with nine CCTV cameras with:

VLC shutdown timeout
By default, WTware turns on the VLC player only after the user switches to the appropriate virtual screen. And turns off when the user switches to another screen. This allows you not to load the processor and the network with video playback when VLC is running in the background. But with network video broadcasting, the picture is completely drawn a few seconds after starting VLC. It is inconvenient if you have to switch screens often. This line in the WTware configuration file:
vlc_timeout = 30
tells the terminal not to turn off VLC for 30 seconds after the user switches to another screen that can run an RDP client. This will allow, for example, to quickly make a record in the database and, switching back to video surveillance, immediately see all the cameras without delay. Possible values are from 0 (default) to 300 (5 minutes for VLC to run in the background). You can prevent the terminal from turning off the VLC player:
vlc_timeout = off
VLC Interface
For those who understand. These lines in the config file:
Application=vlc vlc_cmdline=-I qt4
will launch VLC with interface. Using it is inconvenient, but you can go to the player settings or see the list of installed plugins.