App development apps: How to make an iOS and Android app yourself. Mobile Application Development: How We Do It at Live Typing Main Stages of Mobile OS Development
Mobile applications are developed, promoted, sold and become more and more popular. Statistics show that by 2021, mobile app revenue will reach more than 200 billion USD, and the number of downloads will increase to 350 billion.
Indeed, there are currently 2.8 million apps available on the Play Store (Google), and App Store(Apple) - 2.2 million more, and these numbers are growing from year to year. As the dominance of mobile over desktop continues to increase, mobile apps are clearly here to stay. Especially in the world of business and technology.
Naturally, many businessmen, having become acquainted with this area, want to know: how much time and effort does it take to create mobile applications? Let's figure it out.
Mobile application development takes 3-5 months
Every year, 1 million new apps are published on the Google app and App Store. But finding specific data describing how long it took to develop one of them is very difficult. The authors of numerous articles on this topic do not bother to confirm the terms of development.
We found two interesting studies that, in our opinion, most accurately describe the development time of mobile applications.
First, the Kinvey study. In 2013, they surveyed 100 mobile app developers. During the study, the experts had to estimate how long it would take to create the main components of the application (MVP) for Android or iOS.
After averaging the data, Kinvey determined that it would take about 18 weeks (i.e. 4.5 months) to create a “native MVP application”, of which 10 weeks would be spent developing the “backend” and 8 weeks for the “frontend”.
The second study worth mentioning is a 2017 GoodFirms publication. It describes numerous surveys about the structure of applications, analysis of the time and costs associated with the creation of mobile applications. Similar to Kinvey, GoodFirms polled dozens of tech companies, asking participants to estimate how long (and how much money) it would take to develop apps like Instagram, Tinder, and Uber, then averaging the responses.
Based on surveys, GoodFirms claims that with a full development team:
- "Multifunctional high-load apps" like Instagram and Uber take 4.5 to 5.5 months to develop;
- "Medium-difficulty apps" like WhatsApp or QuizUp take about 4 to 6 months to create;
- "User-friendly apps with less functionality" like Tinder and Periscope take 3 to 4 months.
Both studies show that the development of a mobile application is approximately a 3-5 month process. Naturally, depending on the complexity and scope of the application, these terms may vary; in general, this period of time is typical.
Let's now look at the main stages of creating an application in order to understand what factors affect the development time.
Key stages of mobile app development or why it takes so long
Mobile app development is an "iterative process" where you can move seamlessly between the various stages of research, development, testing, customization, and release of the app. But we think it would be useful to define a few basic steps.
Stage 1: Research and planning
In the past, we discussed this stage with you, we will repeat a little. The very first step in creating a mobile application involves answering two main sets of questions:
- Why do I want to create this application? Why should it exist? What benefit will it bring to the world? Do people really want to use it? What people? What for?
- Do applications of this kind already exist? If so, why do I think I can beat my competitors? How will my application be different, and why will it be better than what is already available?
In essence, in order to deeply understand your target market and audience, you need to answer the following questions: “What should my application do?” "Why does it exist?" and “How can I beat my competitors?”
You should conduct extensive research on market demand and customer needs, making sure you: a) identify and justify monetizable customer pain, b) calculate your market size, and c) validate your product idea.
It is rather difficult to determine exactly how long it will take to collect and validate this important data. Most likely, you need to take 2-3 weeks for this.
Stage 2: Functions and features
After analyzing the needs of your target audience, understanding its pains, determining the volume of demand in the market, it is time to form the functionality of the mobile application and determine its key features.
This is the stage at which you should determine how the application should function:
- What should it do?
- What tasks, functions and operations should it perform (integration with other applications, chat, etc.)?
- How will it process the data? Will it collect raw data from users or use existing structures?
This is the point where you will be creating the "visual prototype", i.e. "a representation of the application's user interface showing screens of content and the relationship between those screens". The prototype will help identify usability issues and improve user interface.
At this stage, you will also develop "use cases" - templates for understanding how your the target audience will interact with the application. Remember: "the more features you add, the more complex your product will be, and the longer it will take to create your application."
One of the most important decisions you will have to make at this stage is whether your application will support multiple operating systems and/or devices, or alternatively be limited to just one. operating system and/or device. In practice, this usually means that you need to decide if your app will be available for iOS, Android, and/or Windows.
Why does this choice matter in terms of timing?
2 simple truths:
- Developing an app for more than one operating system and/or device almost always takes longer.
- Although the difference becomes less pronounced over time, this moment, Android app development typically takes 20-30% more time than iOS app development.
Usually iOS is the platform of choice, due to the small number of target devices and OS versions. It is much easier to make sure that your application works flawlessly on each of them than to test it by developing a solution for several operating systems at the same time. In addition, the application is almost impossible to optimize for every Android device, because now there are more than 12,000 different types.
Thus, building and testing Android apps will take longer if you don't limit the number of supported devices and screen resolutions. When creating an application for both platforms, the duration and budget of your project can double.
If you intend to develop an application for both iOS and Android (and possibly Windows), you can follow one of two paths:
- Use programming languages specific to each particular platform; or
- Use a cross-platform development tool (eg Apache Cordova, React Native, etc.) to create both versions at the same time and thereby streamline the process.
Even after that, it is impossible to predict development time with certainty. You should allow 3 to 5 weeks to find out the main functions and features of the application.
STAGE 3: Technical capabilities, design and development
So, you have determined how the application should work and what you expect from it. The next step is to make sure that these functions and features can actually exist and work properly. In simple words, you and your technical team need to be sure that you can ensure back-end and front-end compatibility.
Gives a useful description of these two interrelated structures:
“Front-end developers are involved in code analysis, design, and improvement. They control what people first see in their browser or app. As a front-end specialist, you are responsible for appearance, logic and site design.
Back-end refers to the server side of development and is mainly focused on how the site works. Usually consists of three parts: server, application and database. Code written by back-end developers passes information about the database to the browser or application.”
Technically, Front-end processes include caching, synchronization, prototyping, UI design, UI development, and user interface debugging. Data storage, user management, back-end logic, data integration, push actions, and versioning belong to the Back-end.
It is extremely important that back-end and front-end developers keep in constant communication with each other, in otherwise you run the risk of creating a situation in which the work of some in the application will conflict with the work of others.
A critical part of creating an application requires access to the underlying data that everything will run on.
Will you be using public API keys? Or will you create a unique code?
API is "Interface application programming”, in other words, it is a set of ready-made classes, procedures, functions, structures and constants provided by an application (library, service) or operating system for use in external software products. Used by programmers when writing all sorts of applications.
The largest apps in the world - from DropBox, Facebook and Instagram to Skype, Twitter and Uber - have public APIs that developers can use to build their own apps.
As an example, Tinder uses the Facebook API: Tinder users log in through their Facebook profiles, eliminating the need for the app to create its own user audience from scratch.
Determining front-end and back-end compatibility (as a precursor, or as a task done together) requires involvement in UX and UI design, including prototyping.
Part of UX design, a “wireframe” is “a two-dimensional illustration of a page or app interface that specifically focuses on space allocation and content prioritization, available functionality, and intended user behavior.”
Wireframe is a set of gray blocks that help:
- Connect application information;
- Clarify consistent ways to display information in the user interface;
- Define the intended functionality in the interface;
- Prioritize content by determining how much space to allocate for a given item and where to place that item on the screen.
Prototyping (wireframing) can be performed at different stages of the product creation and refinement cycle.
For example, some people prefer to develop a wireframe early in the feature definition phase.
Others believe that wireframing is more appropriate to use in the design and development stage, considering it in conjunction with front-end and back-end compatibility studies.
Once prototyping is complete, a graphical user interface (GUI) should be created where specific fonts, colors, themes, and icons are created/added.
The result is a clear visual direction along with mockups that show your engineers the intended end product and how interaction should happen and feel within your application.
Technical specifications related to the actual development (i.e. writing the mobile application code) are outside the scope of this article.
However, it is worth making one brief but important remark on this topic.
You can create a new application using specially designed software platforms, but we recommend working with professional development companies who, having experience, help entrepreneurs successfully realize their ideas. Development (creating product code) is undoubtedly one of the most complex and difficult stages of building mobile applications.
The development stage is undoubtedly one of the most complex and difficult stages of creating mobile applications. Our experience proves that the best solution for developing your application is to contact a company of experienced developers. Companies like INOSTUDIO have teams of expert developers and designers, managers and testers who will definitely help you create a reliable, stable, attractive and high-performing application. And your users will definitely like it.
In general, all activities of the 3rd stage will take at least 1-2 months.
Phase 4: Testing and Refinement
The final stage associated with the creation of your application (with the exception of the actual launch and related marketing activities) is testing and refinement.
At this stage, in a sense, testing is part of the development phase, as your programmers and alpha testers will constantly try to "break" your application during the creation of the application in order to find and fix bugs in the code before launch.
This type of testing is internal to your organization because your staff (whether employees or contractors) will perform standardized diagnostics before your application gets into the hands of real end users.
However, on the other hand, testing can be an independent stage, as soon as internal command has tested the alpha version of the app, it will be sent to a limited audience so it can be tested in the real world.
Beta testing is stress testing an application "outside the lab" to find out how your target audience will use it. They will be able to use the app the way they like, not the way you planned.
At this point, you no longer need to define how the application reacts when you try to use it the way it was intended to be used; instead, beta testing is about how your app holds up when "regular people" download it on their phones and get the freedom to use it however they want.
Alpha testing uncovers major bugs and glitches, while beta testing should uncover previously unthinkable issues and glitches that can occur "in free flight".
Alpha and beta testing are essential steps in building a robust and successful app. If you have completed a round (or several rounds) of alpha testing, then your beta testing stage should not take much time, so we allocate approximately 3-4 weeks for testing and finalization.
And finally
Summing up the time calculated for each of the four main phases described in this article, we identify the time period for creating a mobile application - at least 4-5 months.
Thus, we see that the creation of an application is a rather long and complex process that requires a lot of preparation, patience and dedication in order to do everything properly.
In this article, we will try to reveal the main stages of developing a program written in any programming language.
Specification (determining the requirements for the program):
At this stage, there is detailed description initial data, the formulation of requirements for the result is carried out, all possible behaviors of the program are considered in the event of special cases (for example, if incorrect data is entered), the development of dialog boxes, which will provide interaction between the user and the program itself.
Algorithm development:
At this stage, the programmer determines the sequence of necessary actions that must subsequently be performed to obtain the desired result.
If a situation arises when the task can be solved in several ways, then, of course, many different variants of the solution algorithm are possible. Then the developer of the program, according to some important criterion (for example, the speed of solving the algorithm), makes the choice of a more suitable solution.
The result of this stage of program development is a detailed verbal description of the program algorithm, or a flowchart of the algorithm. You can learn in detail about how to develop an algorithm for any program by studying this article.
Coding:
After carrying out the specification and drawing up the solution algorithm, the algorithm used will eventually be written in the required programming language (Pascal, Delphi, C ++, etc.). The result of the coding stage is the finished program.
Stages of program development. Debugging:
At this stage, the programmer is debugging the program, that is, finding and eliminating errors. The latter are divided into two groups: algorithmic and syntactic (errors in the text of the original program). Of these two groups of errors, syntax errors are the easiest to eliminate, while algorithmic errors are quite difficult to detect.
The debugging stage is considered complete only when the original program works correctly and correctly with one or two sets of primary data. You can find out what compilation of any program is and what main tasks it performs by reading this article.
Testing:
Program testing is very important, because in most cases programmers do not create programs for personal use, but for others to use their program. At the testing stage, the developer checks the behavior of the program with a large number of input data sets, both correct and specially selected incorrect ones.
Creating a help system:
If a programmer is developing a program for others to use later, then the programmer needs to develop a help system and install for the user easy fast access to this help system while working with the program. Modern programs have help information in the form of CHM or HLP files.
except background information reference system contains the necessary instructions for installing the program. Usually they are presented as a Readme file of different formats: *.doc, *.txt, *.htm. This stage of program development will be described in more detail later.
Creating an installation disk (CD-ROM):
The developers create an installation disk (CD-ROM) so that users can install it themselves, without the help of a programmer. this program to your PC.
As a rule, in addition to the program itself, the installation CD-ROM contains help files and instructions for installing the program. It should be noted that most modern programs, including programs developed in Delphi environment, in many cases, even by simple copy files cannot be installed on the user's computer, since the correct operation of these programs requires the presence of special libraries, as well as components that may not be present on a particular user's PC.
What is the Android development process like? Let's highlight a few basics:
- In Java files, you describe the program logic - what you want your application to do.
- In XML files, you design layouts - appearance.
- Once the application is written, a build tool must be used to compile all the files and package them together into an .apk file that can be run on Android devices and/or publish in Google Play.
- All utilities and files that are used to create an Android application are combined into an integrated development environment (IDE). An IDE is a program that you open to edit your code files and compile and run.
- Previously, Eclipse was the standard IDE for Android development, but now it has been replaced by a more functional one. android studio is a Google product.
You will of course find deeper processes going on behind the scenes of the above steps. For example, advanced users will want to know the role of the Dalvik virtual machine. At the end of the article, links to useful resources that every Android developer should be familiar with will be listed. The first one is the official documentation from Google.
- Download and install Android Studio.
- Learn about running and testing applications on Android devices and emulators.
- Let's create a simple Android application that displays the inscription "Hello World" on the screen of a mobile device.
At the end of the article, you can find useful recommendations for novice developers from the company.
Installing the Android Studio development environment
It's really tempting to start reading documentation and writing code to find out what the platform is capable of. And we will do it soon! However, to get started with Android platform you need to set up your development environment.
For newcomers to Android programming, it is especially important to take your time and follow each step methodically. Even if you follow the steps correctly, you may need to fix a small issue with your environment setup depending on your system configuration or product version. To do this, use search services. The StackOverflow resource can be especially highlighted.
It is important not to let any pitfalls get in the way of your ultimate goal of learning Android programming. It is known that even professionals sometimes experience certain problems with setting up a working environment. In such cases, it is important to know command line. If you'd like to get more familiar with this tool, there's a link to a good introductory one at the bottom.
Along with syntax training, it's important to train yourself to think like a successful programmer that won't accept the message of error file X not found final verdict. Such thinking is easily trained by you in cases where you do not give up and look for a solution to a problem that has arisen.
Go to the Android Studio page developer.android.com/studio/index.html and find the download button latest version for your platform.
Click on the download button and you will be asked to read the terms and conditions of use software product. After careful reading (as you always do) and acceptance, the download begins. It will probably take a few minutes. After that, you can install Android Studio just like any other program. On the home page The download contains installation instructions for Mac and Windows.

Now that you've installed Android Studio, let's get it up and running! Launch Android Studio. The program will ask if you want to import your settings. Since you are starting from scratch, just select the second option and continue.

You should see a beautiful loading screen in Material style design.

Upon completion of the download, you will be taken to the welcome screen.

Even if you just downloaded Android Studio, you may not have the latest version. To avoid future version issues, click the "Check for updates now" button and, if necessary, follow all the instructions to get the latest version. Sometimes Studio will automatically inform you that there's an update with a screen like this:

In this case, always select Update and Restart. Fine! We have successfully completed the installation of the development environment.
Creating the first Android project
It's time to create the first project. Let's start simple. It is customary for programmers to call the first program "Hello World". Let's follow this tradition and then make a few small changes to make the app use your name for greeting. At the end, you can download it to your device and show it to your friends. Android Studio has a small step by step tool to help you build your project. Click "New Project" on the start screen:

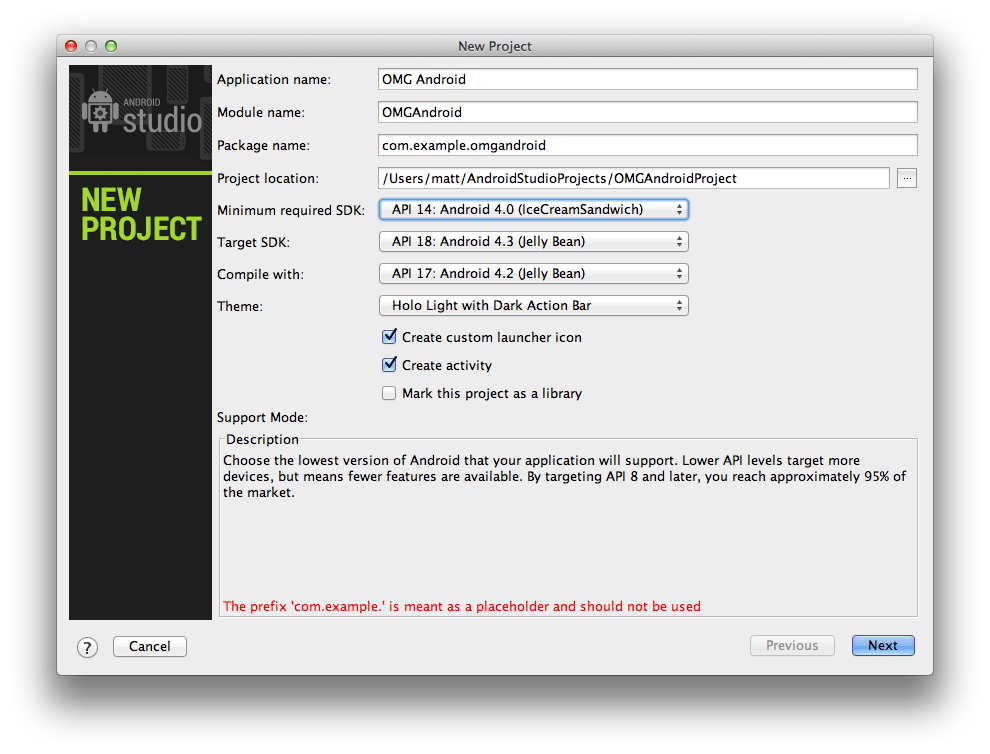
Fill it out like this. Feel free to replace "example" in the package name with something else to remove the warning at the bottom of the screen. You can also set the project location by pointing to any folder on your hard drive
For drop-down SDK versions, note the Description section at the bottom of the dialog box. It explains what each setting is for.
Install the minimum required SDK as shown in the screenshot. This sets the minimum android version required to run the application. Choosing this value for your own projects is a matter of balancing the SDK features you want with the devices that will be supported.
For more information about API versions and their usage, there is a dedicated Dashboards page on the Android developer site https://developer.android.com/about/dashboards/index.html.

After selecting a version, the start template selection screen appears. You can create an app that already interacts with the api google maps and displays the map. In our test example, select the Empty Activity and click the "Next" button.

And now you are at the last step of the application creation process. Before clicking "Finish", there are a few things to note. Here, for the first time, you come across mentions of the main architectural components of any application.
- - this is the first, but not the last mention of the word Activity. In the context of Android, an Activity is usually thought of as a "screen" in your application. This item is very flexible. When Android Studio creates the MainActivity class, it inherits it from the Android SDK's Activity class. Those who are familiar with object-oriented programming understand this concept, but for beginners, this basically means that your MainActivity will be a custom version of the Activity.

- Layout Name- the layout of what will be shown to the user is defined in a special as Android xml. You will soon learn how to read and edit these files.
Click Finish. It will take some time to create and load the project. After some android time Studio will complete the build of your project. Of course, the project is still empty, but it has everything you need to run on an Android device or emulator.

After loading the project, you view the XML layout file. Before moving on to Android programming, let's talk about how we can run this application. It's time to say "Hello world!".

Running the application on the emulator
Now it's time to say a few words about the emulator. Android Studio comes with software capable of emulating an Android device for running apps, browsing the web, debugging, and more.
This feature is provided by the Android Virtual Device (AVD) Manager. Optionally, you can set up multiple emulators, set the screen size and platform version for each new emulator. This functionality is very useful, as it saves developers from having to buy several devices for testing programs.
Click on the Run button in the form of a green arrow.

You will have to wait a while for the emulator to load and once it is ready you will see something like this:

Congratulations! You have made your first Android app!
And so… Why and how did it work?
To start making changes and adding interesting features, it is necessary to gain a working knowledge of what is going on behind the scenes. Take a look at the Android Studio project section with files and folders on the left side of the screen. You may need to click the small tab at the edge (see below) if the project explorer is not visible at the moment.

Look through the folder structure for a few minutes and double-click on files to see their contents in the main window. If this all looks cryptic, don't worry!
Android project structure: Team
Every good team is made up of people who fill their assigned roles. Do you want to get the job done right? You need the right team. There are several key elements in Android projects, and each of them has a role to play:
Java: Professional
This is the part of your code that is responsible for the application logic. Your code will be in the src\main\java directory in the main project folder. To learn Java, you can recommend Bruce Eckel's book "Java Philosophy";
Resources: Artist
It's not enough just to do android application, it should also be stylish. Your app will never stand out if it doesn't have crisp icons and images, well-designed layouts, and maybe even smooth animations.
When initialized, the folder contains the following folders:
- drawable, which holds the icons. Now there is only a standard application icon.
- layout with XML files, which are screen designs.
- menu with XML files of lists of items that will be displayed in the action bar.
- values with XML files containing sizes, colors, string constants, and styles.
AndroidManifest.xml: Boss
This XML file informs your system of the application's hardware and software requirements and contains its version name and icon. The manifest also contains information about all the activities in the application. Do you need work done by your application? Talk to your boss first.
Alteration
Go to res/values/strings.xml and double click on the file. When you open the file, you will see two string resources in the XML.
These resources are used in different places, but it's very convenient to have all the text used in your application in one file. If you need to translate it, or if your marketing colleague asks you to remove any redundant links, it will be easy to make all the changes here.
Change the hello_world string that the application displays on the screen. Change its content to something more personal, such as using your own name. You will get something like:
Click Run. The application should restart and you will see a personalized message:

We congratulate you - you have made your first project and learned how to edit source. The first step in Android programming is done. We wish you good luck on this difficult, but insanely interesting path! If you need professional Android application development, please contact Infoshell specialists.
The 21st CENTURY is the era of the heyday of mobile technologies. It is difficult now even to imagine a person without a mobile device, and even more so a business person. Mobile technologies present in almost all areas of business. Mobile ecosystems are changing and evolving daily through constant experimentation. Hundreds of applications are created daily for business, education, entertainment, and more. Each of these apps has a specific visual style and tone, depending on the direction and context of the app.
But what does the process of developing mobile applications consist of?
This is of course an IDEA. Actually initial stage it is necessary to carefully consider the meaning of the future mobile application and what it will be used for. Then you need to decide on which platform it will be used. As a rule, now applications are written for two IOS and Android platforms at the same time, but if this is useless or not in a hurry, then the company's specialists will help you make a choice in favor of one of the platforms after analyzing the demand/supply market and competition.
2. TERMS OF REFERENCE
Before starting development, it is necessary to obtain technical specifications from the customer. If it is not there, then the customer is given a brief to fill out. Particular attention is paid to this stage, since TK directly affects technical features result. At this stage, the following types of work are performed:
- A description of the functionality of the mobile application is drawn up;
- The terms of development are determined and agreed upon;
- Financial costs are calculated and a model of the settlement procedure is developed;
- A contract is drawn up with the customer;
In order to understand how the user will work with the mobile application, a graphical map of the interaction between different screens programs. At this stage, almost all the functionality of the mobile application is being developed. At the UI design stage, specialists determine the principle of the application, the placement of functions and buttons on each of the screens. At this stage:
- The functionality of the application is being developed;
- Application screen layouts are being developed;
- The connection of application screens and transitions through them is thought out;
The design of all screens of the future application is created and various states are drawn for all usage scenarios. After the design concept is approved, internal buttons and icons are drawn, as well as all other graphic elements. As a rule, rendering of a mobile application design involves usability studies to make sure that the developed design concept is as simple and convenient as possible and will help users solve their tasks as quickly as possible.
5. DEVELOPMENT
The developers are given technical specifications and application design layouts and they begin to “create”. Programmers "transform" a static picture into an interactive working model. The first version of the application is released.
6. TESTING
The mobile application undergoes thorough testing, as a result of which a table of checks is created in which all errors are indicated and described in detail. In the application design process, it is impossible to foresee all the errors of real operation. At this stage, a list of errors, shortcomings and shortcomings of the application is formed and the deadlines for their elimination are determined. Then the application is released with bug fixes and, if necessary, with modified functionality, which is indicated in the tables after trial testing.
7. RE-TEST
The application is installed on test devices and works exactly the same as if it were downloaded from Google Play or the AppStore. Before the application appears in the official software catalog, it is necessary to make sure that users do not encounter development errors during the installation and use of the program. Therefore, at this stage, the logic of the product is checked once again, the operation of its server part, the application is tested in a variety of conditions and on various versions operating systems.
8. DEVELOPMENT OF BRAND ICONS
An app icon is the “face” of any modern mobile app. A mobile app icon is a stand-alone graphic element. The creation of this element is a multi-stage procedure with drawing an image in several sizes, as well as testing it on various models devices. After the icon is approved, the mobile application is launched.
9. PLACEMENT OF THE MOBILE APP IN APPSTORE AND GOOGLE.PLAY
The application is submitted to the AppStore and/or Google.Play for publication. Each application is reviewed before publication. Google teams and Apple. Publishing on Google.Play takes no more than a day, which, of course, is much faster than the AppStore, where publishing an application takes at least 7 working days.
Development of mobile applications is a difficult and very time-consuming process, which is a full-fledged development software. To make it easier for you to understand how we create mobile applications, we will briefly describe each stage of our work.
People come to our company to realize their idea of a mobile application, web resource or automate business processes. We conduct a free business expertise, advise the client and refine the ideological component of the project, taking into account the needs of users.
Conducting an interview. Purpose and value of the application? The target audience? Main functionality? Platforms? Requirements for the application development process? Criteria for choosing a contractor? Overview of similar solutions: functionality, number of users, ratings, reviews, monetization. User analysis.
Additional questions. Connection of technical specialists. Statement of requirements for the implementation of the application.
The project is evaluated by the development team. After that, the client receives a preliminary offer for application development: application development stages; terms and cost; specialists; guarantees.
We conclude an agreement in which we describe in detail the stages of work and our obligations. You will be legally protected. Each stage of the work is absolutely transparent, all the main points are discussed with you in as much detail as possible.
Understanding what users expect from the application, we begin the process of prototyping. A well-designed interface is a guarantee that the user will quickly find out how the application will help solve his problem. You get the opportunity to see the functionality of the future application without the software part.
We draw the design of all screens and element states. We use the recommendations of Google and Apple for the design of the application. We make sure that graphic solutions are understandable and convenient. You get a design that will make you stand out from your competitors.
Terms of Reference - a document developed on the basis of an approved interactive prototype and product design, necessary for developers, test engineers to develop and test the project.
Programming a web resource or a mobile application is carried out according to the SCRUM methodology - phased planning of tasks and breaking down their implementation into sprints (sprints).
Demonstration of results to the customer in 2 weeks. The team analyzes risks and problems, completes the sprint, optimizes the further process of developing the application.
The difference between our work is that we not only develop applications, but also take them for promotion. Our clients receive a company that is responsible for all stages of work: from the first button to downloading the application and grateful user reviews.
Interview
We conduct interviews in person or via Skype. The interview can last several hours. This phase of application development is important. How accurately and completely the client answers the questions depends on how the product will turn out.
The main questions we ask are: project objectives, existing business process, target audience, competitors. At this stage, future functionality is discussed.

mindmap
We create MindMap - an intellectual map that allows you to structure all the information received from the client. This is a visual diagram of the project, thanks to which all data about the application is in one place.

Analysis


hand sketching
We study the applications of competitors. We analyze where users may be uncomfortable or where they stumble while performing their tasks. We do this to determine how the new application will differ from existing analogues.

Prototype development
Based on the sketches, we create wireframes - block diagram application pages. This is the skeleton of the design, where every detail of the future product is depicted.
A UX specialist works on page schemes. The process of creating wireframes is discussed with the art director.


After its approval, a clickable prototype is made, which is sent for approval to the technical department.

User Interviews
We test the finished prototype on users - employees of our office or groups of volunteers. We show the prototype and ask questions: “What do you think this button is?”, “How would you add an item to the cart?” etc.
This helps to detect moments that are incomprehensible to users and correct errors at this stage of mobile application development.

Presentation of the prototype to the client
We make a presentation: we show the prototype to the client, explain what will work and how. If necessary, we make changes, refine. We agree on all the details and approve.

Design concept development
At this stage of mobile application development, we make several design concepts. The concept that the customer chooses will form the basis for the design of the entire application.

Design of all screens and states
At this stage, all screens and element states are drawn. On average, 120-150 screens are obtained. This helps to take into account all scenarios and not increase the time when programming.


TK and client-server architecture
When we have a design ready, we start developing terms of reference. It describes all scenarios, screen transitions, and screen states. At this stage, the specialist works out the hi-level architecture of the project and the data storage model.

This is an important step. It depends on how it will be built. software part, the speed of the application, the configuration of "client-server" requests. Where do we get data from, where do we write it, how do we write it, etc. The TOR includes all systems with which it is necessary to synchronize.

Programming and Testing
Work passes into the hands of programmers. The development process is based on the Scrum agile development methodology. Formed full list tasks (the so-called "back-log") and is divided into small sections (called "sprints").

Programming step by step and demonstrating the result after each sprint. When the software part is ready, we send the application for testing. Testers check the product for possible errors. If necessary, the application is returned to programmers for revision.

Application publishing
The main stages of mobile application development have been completed, it remains to prepare the application for publication. To do this, we make a product description and graphics that comply with the rules of the Google Play and AppStore stores. If they are not followed, the application will not pass moderation.


In stores, the first thing a user sees is the app icon, so it's important to make it attractive.

When creating graphics for application descriptions, we check whether the authors have permission to use certain images, whether there are celebrity faces in the photo, as well as compliance with other store requirements.


Product Support
Projects after delivery go to the stage of technical support.