Puppy operating system is the best build. An in-depth look at Puppy Linux
PuppyRus Linux- a project of the Russian-speaking community, initiated by Viktor Melekhin on September 5, 2007. Initially, the project was conceived as localization and Russification for Russian-speaking users of versions Puppy Linux. The project creates a family of distributions with a common name PuppyRus Linux. In addition to localization and Russification of the system, the original distributions are replenished with additional utilities and programs.
Name: PuppyRus Linux
Version: XlupuRus-510, LupuRus-510, LupuRus-520-rc4
Latest Program Version: XlupuRus-510, LupuRus-510
Architecture: 32-bit
Disk type: CD
Treatment: not required
Medication type: not required
The size: 450 MB
PuppyRus Linux It is focused on computers with x86 architecture, optimized for maximum performance, and due to low hardware requirements, it can breathe a “second” life into outdated models.
PuppyRus Linux spreads on Live USB and Live CD, easily installed on any kind of storage media. Small size (120-180 MB depending on the version) allows you to fully load the distribution into RAM. The entire OS is located in three files and unpacked into a full-fledged file system while loading. Another file stores the user's metadata, this simplifies the process Reserve copy and transferring the OS from computer to computer, to minimize system recovery time.
PuppyRus Linux today it is a large well-coordinated team of developers, which, together with the localization of the original distributions, improves the work of auto-configuration scripts, adds programs that are not in the "parent" distribution, and runs several projects in parallel.
XlupuRus-510
Kernel: 2.6.33.2
Size: 146,974,720 bytes
Description:
such as the:
Control Panel;
Crushed plugins in Abiword;
Xlupurus 510 differs from lupurus in that it removed rox, jwm, icewm and replaced them with xfce4-4.62.
to work on the Internet are available
browser midori-2.2
LupuRus-510
Kernel: 2.6.33.2
Size: 143,060,992 bytes
Description:
The distribution is based on lupu-510 with kernel 2.6.33.2 and glibc2.11.1
The distribution kit is not only Russified, but additional applications have been added.
such as the:
Control Panel;
Programs for hot plugging sfs;
File manager Midnight Commander with support for pet packages and sfs files;
Crushed plugins in Abiword;
Added support for xz archives;
Added uninstall script.
Distributions have many useful programs for all occasions.
You need to edit Text Document- please can you use word processor abiword-2.8.6 also you can use text editors geany_0.18 and nicoedit-2.5.1 also have console text editors.
To work with spreadsheets there is gnumeric-1.10.1 for calculations there are several calculators.
From system programs can be noted hardinfo 0.5.1 - system information and gparted_0.5.1 disk partition manager
to work on the Internet are available
browser midori-2.2
managers ftp downloads and torrent client
Of the programs for working with multimedia, gnome_mplayer-0.9.6 and pmusic-1.0.1 should be noted
has an organizer graphic programs, programs for working with disk images and recording them, and many other programs.
Distribution builder: Igor Berlov
LupuRus-520-rc4
Kernel: 2.6.33.2
Size: 151,064,576 bytes
Description:
The distribution is based on lupu-520 with kernel 2.6.33.2 and glibc2.11.1
The distribution kit is not only Russified, but additional applications have been added.
such as the:
Control Panel;
Programs for hot plugging sfs;
File manager Midnight Commander with support for pet packages and sfs files;
Spell checking in Abiword has been suppressed;
Added support for xz archives;
xarchive replaced with fileroller
Added uninstall script.
Added the ability to select from the boot menu in which environment to work: xfce or openbox and jwm. Those. in one iso you kind of have LupuRus and XLupuRus.
The distribution has many useful programs for all occasions.
You need to edit a text document - please you can use the word processor abiword-2.8.6 also you can use the text editors geany_0.18 and nicoedit-2.5.1 there are also console text editors.
To work with spreadsheets, gnumeric-1.10.1 is available for calculations, there are several calculators.
Of the system programs, one can note hardinfo 0.5.1 - system information and gparted_0.6.2 - disk partition manager
to work on the Internet are available
browser midori-2.2
ftp download manager and torrent client
Of the programs for working with multimedia, gnome_mplayer-0.9.6 and pmusic-1.0.1 should be noted
there is an organizer, graphics programs, programs for working with disk images and recording them, and many other programs.
Distribution builder: Igor Berlov
MD5 sums
File name: XlupuRus-510-5.iso
Size: 146,974,720 bytes
MD5:
Filename: lupurus-510-4.iso
Size: 143,060,992 bytes
MD5:
File name: LupuRus-520-rc4.iso
Size: 151,064,576 bytes
MD5:
Puppy Linux is a small distribution created by Barry Kauler. Its main task is to be similar in use to Windows, to contain all necessary programs, but be extremely small and simple. The distribution works great on both new and old hardware and is very fast.
Its peculiarity is that you can get a full-fledged system simply by writing a small installation image to a USB flash drive and running it in LiveCD mode. If you think that other distributions can do this too, then no, there is a session saving feature that allows you to save all the data that you have worked with.
The distribution also contains very a large number of utilities and tools for system configuration, with which you can configure anything you want and in configuration files you don't have to climb very often. The last release was in 2015, it was Puppy Linux 6.3, codenamed Slacko, based on Slackware 14.1, but the distribution is still in development. In this tutorial, we will look at how to install Puppy Linux on HDD as a complete operating system.
System requirements
Requirements to hardware puppy linux is a little surprising. It looks like it can run on almost any hardware. The system needs 64 megabytes to run random access memory and processor with clock frequency 333MHz.
Step 1: Download the image
First of all, we need to download the installation image. The most latest version available on the official website. But there are two versions available here 6.0.5 based on Ubuntu 14.04 and 6.3 based on Slackware. We will install the latest.
Select the desired system architecture and download the image. The image weighs about 200 megabytes, so the download will be fast. Over time, there may be more distributions of Puppy Linux. The fact is that this distribution can be created on the basis of other distributions, and be compatible with their package base. These distributions contain the same set of puppy utilities and are all considered official. For example, Puppy Linux is currently in development, based on Ubuntu Xenial Xerus.
Step 2. Burning the image to a USB flash drive
Developers advise using the dd utility to write to a USB flash drive. The terminal command in Linux will look like this:
dd if=~/slacko64.iso of=~/dev/sdb bs=5M
Here /dev/sdb is the device name of your flash drive, you don't need to add any numbers there. In the operating room Windows system You can use the Windows version of this utility. Here the command will look like this:
dd if=slacko64.iso of=\\.\f: bs=5M
Here f: is the drive letter of your flash drive. Don't forget to run command line You need administrator rights.
Step 3Setting up the BIOS
When the flash drive is written, restart the computer. During the BIOS splash screen, press F2, F8, Shift+F2 or del, to open the setting. There, go to the Boot tab and in the item 1st boot device select your flash drive:

Step 4Setting Up the Bootloader
At the first stage of loading the image, you can enter the kernel parameters, if there is nothing to change, just press Enter or wait:

Step 5: Booting the LiveCD
Wait for the download to finish:

Step 6 System Setup
Immediately after the start, such a system settings window will open, it makes no sense to configure anything now, because after installation the settings will still fail:


So just close this window.
Step 7Run the Installer
There is no installer shortcut, as we are used to, the installer is located in the main menu, in the Setup section. The menu item is called universal.
Step 8: Selecting an Installer
At this step, we can choose which installer to use, for a flash drive, for a flash drive with the f2fs file system or a universal one, we need a universal one:

Step 9. Selecting the device type
In this window, we have to select the type of device to install. When installing to a hard drive, select Internal (IDE or SATA):

Step 10: Choose a device
Select the device on which we will install the system:

Step 11. Prepare the section
The system is installed on one partition. If the selected device already has partitions, you can select one of them. Otherwise, click the button with the Gparted icon:

Step 12Create Partition Table
If your disk is not already partitioned, open the Deices menu and click Create Partition Table:

Step 13Creating a Partition
Create one new section sufficient size. One or several gigabytes is enough to install and fully use the entire system. The file system for the partition can be vfat, ntfs or ext4 and other Linux compatible ones.
In the first case, you will not be able to install a complete system. The installer will create an empty file, make the necessary file system there, and only then proceed to the installation. But this option does not suit us, so we will use ext4.
Step 14 Applying Changes
When finished, open the menu Edit and press Apply All Changes to save changes.

Step 15 Boot Flag


Here check the box next to Boot and press Ok. After that Gparted can be closed.
Step 16Device Selection #2
Once again, select the device:

Step 17 Selecting a Partition
In the upper right corner, select the newly created disk:

Step 18Confirm Partition
Confirm the installation on this particular partition:

Step 19Extra Disk
If you have an additional disk with puppy linux files, you can now mount it:


Step 20 Installation Method
You have two installation options. Installing puppy linux as a file, recommended when installing on ntfs or vfat, as well as a full installation (FULL). In this article, we will use the full installation:

Step 21 Final Confirmation
Confirm that the system definitely needs to be installed on this drive:

Step 22Install Puppy Linux
Wait until the files are copied to the disk partition:

Step 23Installing the Bootloader
Select Yes if you want to install the bootloader. Grub4dos will be used as bootloader:

Step 24Setting Up the Bootloader
Select the partition on which the bootloader will be installed, and also set additional parameters if necessary:

Step 25Kernel Options
Enter additional kernel parameters if necessary, also here you can choose the name of the menu item for windows:

Step 26: Confirm Boot Loader Installation
Confirm that the bootloader needs to be installed in the MBR. Now the installation of puppy linux is completed, it remains to restart the computer.
Step 27: Reboot
Reboot the system using the corresponding button on the panel:

Step 28. Starting the system
Select the first item in the bootloader menu and wait for the download to complete:

Step 29 Setup Menu
After starting the system, the menu will open again in front of us. initial setup. Here you can set the language, time zone and many more system settings.

First select the language you want to use the system in:

Then, in the box below, select your time zone:

Step 29Localization
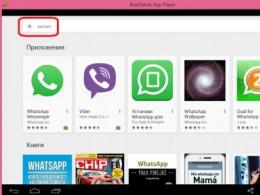
To localize the system, it is not enough just to select the language, you also need to install the package with translations through the package manager, so start Puppy Package Manager from the menu.

In the list of repositories, go to puppy-noarch, then search for langpack. When the packages are found, select the langpack_ru package and double click on it, then click Do It in the top corner to start the installation:


After the installation is complete, it remains to reboot the system. Then everything will be in Russian.
findings
That's all, now you know how to install puppy linux on your hard drive and are a little familiar with the features of this distribution. As you can see, this is not an ordinary linux distribution, it can be run both in normal mode and using a LiveCD, and in both cases you get a full-fledged operating system. If you have any questions, ask in the comments!
Video with puppy linux installation process:
Puppy Linux - small, fast and functional Linux distribution. The size of the distribution kit is only about 300MB. Contains a large set installed programs and has a complete GUI. Able to run from LiveCD and run entirely from RAM. Not demanding on computer resources.
LiveCD completely out of RAM
Puppy Linux can be run from LiveCD or from USB flash drives, but unlike regular LiveCD distributions, Puppy Linux boots entirely into RAM (in RAM), and you can remove the disk from the drive and use the drive.
The LiveCD image of the system resides entirely in RAM and applications open at lightning speed, as RAM is much faster than hard disk or CD.
Puppy Linux can be used on computers without internal permanent memory, the distribution will run in RAM. Another important feature of this distribution's LiveCD is that it can save data to CD-RW/DVD-RW discs; when you turn it off, the system itself will prompt you to choose the location to save the data (CD, USB, hard drive or any other available media).
An important feature of the distribution is that all data is stored in a single file named pup_save.3fs. Even the apps you install end up in this file.
The basis
The Puppy Linux distribution is not based on any other distribution. The developers created the distribution from scratch file by file - from scratch, based on the Linux kernel, of course.
Installation
Puppy Linux can be installed on a USB stick and run from it. All data will be stored on USB and you can always have a LiveUSB flash drive with you with your system and data.
JWM Graphical Environment
By default, Puppy uses the JWM (Joe's Windows Manager) graphical environment, and Fvwm95 is also supported. There are enthusiasts who have provided support for IceWM, Xfce , but they don't ship in an official build. The JWM theme reminds Windows interface 95.
For whom
The Puppy Linux distribution is suitable for beginners. The developers are trying to make it as friendly as possible. The distribution comes with large quantity documentation. There are several active Puppy forums on the web.
On the official website www.puppylinux.com you can find many useful information and documentation, including installation instructions.
There is a PuppyRus project - a version of Puppy Linux with Russian language support: http://uco.puppyrus.org
Creator and origin of the name Puppy Linux
The name of the creator of the Puppy Linux distribution is Barry Kauler, he is a pensioner born in 1950. He now lives in Western Australia. Barry named the distribution after his Chihuahua puppy, who is now the mascot of Puppy Linux (puppy means puppy). Unfortunately, Barry Kauler writes that one day the puppy ran away and never came back. Photo of Barry's house and himself on the right with a hat: