How to make a menu for loading operating systems. Editing the Boot of Multiple Windows Operating Systems
For those who do not understand what is at stake, I will show everything in pictures:
This is what the boot menu looks like when installing the latest Windows 8.
And this is how the menu looks like when installing the latest OS Windows Vista, 7.

Prior to Windows Vista (Windows 2000, XP), all boot changes were made to the file boot.ini. Boot.ini is a system file containing information about installed on the computer operating systems ah Windows. This data is displayed while the computer/laptop is booting up. In order to change the boot options, just open the boot.ini files with any text editor and make changes.
Starting with the Windows Vista operating system (Windows 7, 8, 10), the boot.ini file has been replaced by the Boot Configuration Data (BCD) file. This file is more versatile than boot.ini and can be used on platforms that use other means than the BIOS to boot the system.
But how to make changes to boot options in Windows Vista 7, 8, 10? To do this, there are two ways provided by the Windows developers:
1 Using GUI;
2 Using the command line.
Change boot options using GUI in Windows Vista, 7, 8.
To use this method, press the key combination "Win" + "R", In the "Run" line, type msconfig, and press the Enter key.


I must say that quite a few settings are available in this way, but for most users this will be enough. This tool will allow:
1) Get information about the current and default boot systems.
2) Edit time (timeout). After this time, the default operating system will be loaded without user intervention. To do this, specify the time (in seconds) in the "Timeout" field.

3) Change the default boot system. To do this, select which system you want to boot by default (without external intervention) and click the "Use by default" button.

4) Remove unwanted entry from boot menu. Select the entry you want to delete and click the "Delete" button.

All changes will take effect after pressing the "OK" button and rebooting the system.
Change boot options using the command line (bcdedit) in Windows Vista, 7, 8.
The bcdedit utility provides more options for changing boot options. Bcdedit is a command line tool for managing boot configuration data. It can be used for various tasks: Create new repositories, modify existing repositories, add boot menu options, and more.
In order to get to know this command better, launch a command prompt with administrator rights and run the command:
/bcedit/?
In this article, I would like to dwell in more detail on examples of using the bcdedit command. .
An example of using bcdedit.
Before you start making changes to the Windows bootloader, you first need to create a backup copy of it. To do this, create a BootBackup folder on any drive and enter the following command at the command prompt (command prompt must be run as Administrator):
bcdedit /export D:\BootBackup\bcd
If you feel that something has gone wrong, in order to return everything to its original state, issue the BCD restore command:
bcdedit /import D:\BootCopy\bcd
Where D:\ is the drive where the BootBackup folder is located.
The next step is to find out the basic information about your BCD. To do this, run the command bcdedit.

Where:
identifier– ID of this or that record;
device- shows the partition on which the boot files are located (this can be the operating system or the BOOT folder);
osdevice- shows the section on which they are located system files operating system. Usually, the values of the device and osdevice parameters are equal;
path– if device defined a disk partition that contains operating system files, then this parameter specifies the rest of the path to the operating system loader;
default– shows the ID of the operating system loaded by default, if the operating system in which the command line was launched is loaded by default, the value (current) is assigned to the default parameter;
displayorder- shows the order in which the entries about bootable systems are located;
timeout– timeout (see above), the value is shown and set in seconds;
locale– indicates the language of the boot menu or advanced boot options menu;
description- shows the name of the operating system displayed in the boot menu.
How to change the default boot operating system.
Specify the /default value and the ID of the OS that should boot by default.
bcdedit /default (ID)
Now the operating system with the specified (ID) will boot by default.
How to change the download delay value
To change the value of the delay after which the operating system starts loading, run the following command:
bcdedit /timeoutXX
where XX is a number in seconds, the default is 30 seconds.
Removing an Entry from BCD and Boot Manager is done with the command:
bcdedit /delete (ID)
There is a feature of command execution: if a known entry is specified as an ID, for example (ntldr), then the command must be executed with the /f switch:
bcdedit /delete (ntldr) /f
If the ID is written in alphabetic digital code, the /f switch is not needed.
In order to get more detailed information about the capabilities of the bcdedit utility, you must use the help bcdedit /?
Microsoft engineers have implemented a boot store, also known as Boot Configuration Data (BCD), and a boot menu in Windows. The first contains the bootloader identifiers of all operating systems available on the PC, and the second reads them and displays them as a list of OSes available for launch. This greatly simplifies the life of a user who has several systems on his computer. He does not need to be smart about something to switch between them. It is enough to restart the computer and select the one you need from the list presented. Like other parts of the Windows OS, the boot menu is customizable. This guide lists available ways editing this section.
Note: almost all the actions described in this manual must be performed from under account with administrator rights. V otherwise you must know the password for it.
Editing the Windows 10 boot menu in the bootloader window
The Windows 10 boot menu has a small settings section. It provides a minimal set of options - changing the value of the timer auto start the main system, changing the OS loaded by default, as well as an additional section with system startup modes and a computer shutdown function.
Editing the Windows 10 Boot Menu in System Options
In the additional system settings, which can be accessed through the OS properties, there is a section. It stores a small list of functions for editing the boot menu, which is suitable for undemanding users. So with its help you can choose which operating system will be loaded by default, set the display time of the list installed systems or turn off the timeout altogether, as well as activate the output of recovery options.

To get to the specified section, you need to do the following:

Editing the Windows 10 Boot Menu in System Configuration
If you need a little more customization, you can try the utility system configuration. In addition to the mentioned settings, it offers the function of deleting boot entries of operating systems, an option to display information about the OS, the ability to start Windows without a graphical shell, select boot options safe mode and a few other minor features.
You can edit the boot menu using System Configuration as follows:

How to Edit Windows 10 Boot Menu Using EasyBCD
EasyBCD- free utility, which provides a wide range of options for editing the boot menu. In comparison with it, all standard system tools (except the Command Line) look very primitive.
This compact program allows you to:
- Remove OS from the list of available to run.
- Add new entries Windows (including obsolete), Linux / BSD, Mac.
- Add entries to install systems using ISO images or individual hard disk partitions.
- Rename operating system entries.
- Set system as default.
- Change the position of entries in the list.
- Set boot menu language.
- Select bootloader interface shell (Metro or earlier from Windows Vista / 7).
- Set the timeout duration.
- Back up and restore boot storage (BCD) settings.
- View BCD content and boot menu.
The program interface is completely localized into Russian, and the program itself is quite easy to use and does not require any supernatural abilities from the user.


How to rename the system entry in the boot menu

How to move the system entry to the boot menu

How to choose a default boot system

How to change the boot menu display time

How to change boot menu language

How to Edit Windows 10 Boot Menu Using Command Prompt
If you don't trust third party programs and try to use exclusively system tools, then you should try out ways to edit the Windows 10 boot menu using the command line.
Create or restore a Windows Boot Store backup
Before doing all the steps, back up your download storage so that you can restore it if necessary. You can create a BCD backup in the following way:

How to add a system entry to the boot menu

How to remove the system entry from the boot menu

How to change the order in which systems are displayed in the boot menu
To edit the position of entries in the loader, use the command bcdedit /displayorder (ID2) (ID1) (ID3). Instead of all ID specify the actual entry codes in the order in which you want to see them during computer startup. 
To select and start the operating system during computer boot, a specialized program is used - the bootloader. The most popular bootloader is Grub. When installing multiple operating systems, such as Linux over Windows, the last installed OS will be the first in the bootloader menu.
This will not cause problems for users who use Linux as the main system, for them it is even the preferred option. But if you're still a beginner and you want to use Linux as your second system, and Windows is still your primary system until you get comfortable, you'll probably want Windows to be your first system. In this article, we will look at how to make Windows boot first in Grub. Let's consider two ways: using the Grub Customizer program and manually, through the Grub bootloader configuration files.
Grub Customizer
Grub Customizer is a program that allows you to customize various settings of the Grub bootloader. Including the position and order of loading points. You can install the program from the official repositories. For example, in Ubuntu you need to use ppa:
sudo add-apt-repository ppa:danielrichter2007/grub-customizer
$ sudo apt-get update
$ sudo apt-get install grub-customizer
To run the program, open a terminal (Ctrl+Alt+T) and type grub-customizer:
For the program to work, you need root permissions, on some systems you may need to use the following command:
gksu grub-customizer
The program can also be launched from the main menu. The main window looks like this:
A few seconds after launch, the program will scan the installed operating systems, then in the same window we will be able to transfer the Windows boot to the first place. To do this, click on the desired item. right click to open the context menu:

Select an item from the menu Move Up. This action will need to be repeated several times until Windows is first on the list. It will now boot windows default grub.
If you later want to drop Windows back down, there is reverse action - Move down.
To save your settings, simply click the Save button. Ready. You can restart your computer and see what happens.

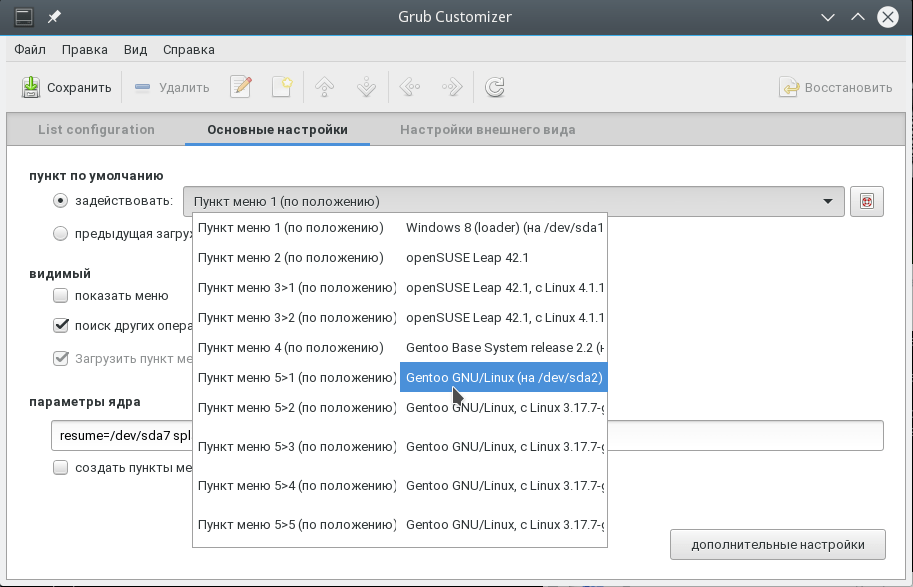
But I want to touch on a couple more settings that might be useful. Instead of making Windows boot first in Grub, you can change the default startup item. Go to the tab basic settings:
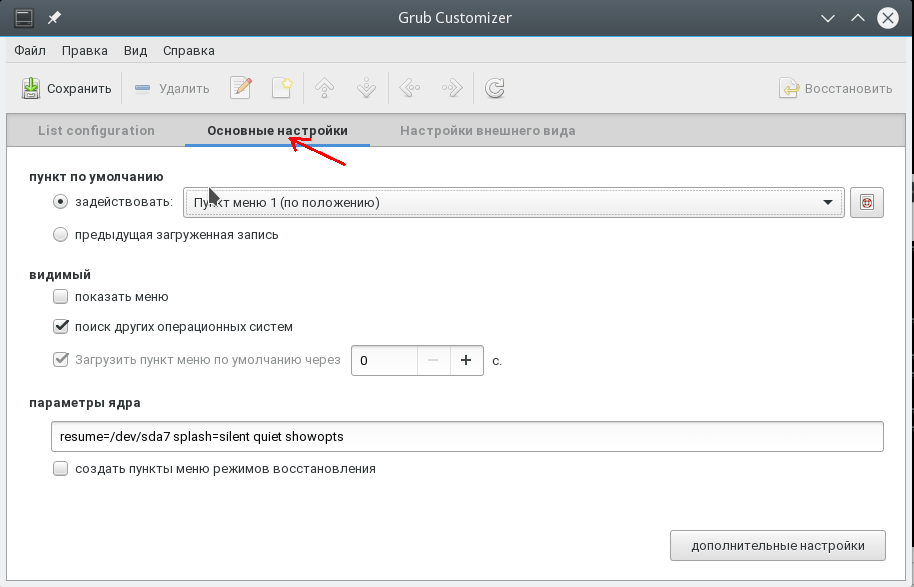
There is a list here to select the default item Engage:
In addition, you can load the last loaded OS by default, there is a checkmark for this:

Changing Grub boot order via terminal
As I promised, now let's look at how to make WIndows boot first in Grub using configuration files. The Grub configuration is located in the /boot/grub/grub.cfg file.
gksu gedit /boot/grub/grub.cfg
Typically, menu bars look like this:
menuentry item_name --options (
...
For example the Windows item:
menuentry "Windows 8 (loader) (on /dev/sda1)" --class windows --class os $menuentry_id_option "osprob
er-chain-FC324E26324DE66C" (
....
Now, to change the order of menu items, just cut everything up to the back closing bracket, along with this line, and paste it before all other items. You can then save the file and you're done. Reload and see. Windows boots up by default. Only minus this method is that when updating the Grub configuration, all settings will be lost.
In the same way as we configured the item that is loaded by default in Grub Customizer, this can also be done in the terminal.
Open /etc/default/grub.
gksu gedit /etc/default/grub
Here we are interested in the line:
Replace 0 with the desired item to download, you can also specify the name of the item instead of a number, for example:
GRUB_DEFAULT="Windows 8 (loader) (on /dev/sda1)"
You can view the available download points without opening the configuration file with the command:
sudo grep menuentry /boot/grub/grub.cfg
You can also configure the boot of the last booted system, for this add the line
GRUB_SAVEDEFAULT=true
And in GRUB_DEFAULT specify saved:
GRUB_DEFAULT=saved
The obvious advantage of this method is that the settings will not be lost during the update of the Grub configuration, since during the update the information is taken from this file. Now let's update the configuration and save the settings with the command:
This option does not work on all systems, so you can use another command:
grub2-mkconfig -o /boot/grub/grub.cfg
That's all. Now you know how to make Windows boot first in Grub. But the information presented in this article can be used for a broader purpose. It will be useful not only for Windows, but also for any other several systems whose boot order needs to be controlled.
Related posts:

In this article I will answer questions about the bootloader for linux os - Grub. You will learn how to set the default bootloader, how to edit Grub, how to return boot partition, fix the boot record, and more. others
Here complete list Questions that I will try to cover in this article:
Usually, when you boot your computer, only one operating system is loaded. As long as she's alone, there's no problem. If there are several systems, a boot menu is displayed at boot, which is not always optimally convenient for booting. A trifle, right? But in reality, everything is not so when the computer is rebooted a dozen times a day.
Loader- it software, which is set to the first sector boot disk(MBR stands for master boot record). For each operating system, it has its own, and not otherwise. And each of them has its own characteristics and "relationship" to other loaders and operating systems. For example, when Windows installation XP (or Windows Vista) on Ubuntu, the bootloader of the latest OS is overwritten without any warning, and Ubuntu becomes unusable. Problem? Problem. After all, in fact, the operating system continues to exist, and it is impossible to load it.
Nobody is going to scare you. We've posed a few problems and will try to find possible ways their decisions. Two options: free and paid. In the first case, we will do all the configuration manually, in the second - we will install boot program Acronis OS Selector or free editors bootloader.
One, two, three... how many?
The functionality of one operating system is enough to solve simple everyday tasks. Need more features - install additional software.
When installing two operating systems, a certain compromise is reached between paid and free software. What for Windows platforms offered for money, Linux puts at your disposal, usually for free (open source software). True, many professional packages are designed for only one environment, mainly for Windows. Examples with Adobe, Nero Express, OpenOffice, unfortunately, are still rare to say the opposite. There is software that has no analogues and cannot yet be in one OS or another.
Each system has both its remarkable advantages and disadvantages. For example, in our opinion, Windows is a more "entertaining" environment, Linux is working system, conceived for resource-intensive tasks, data manipulation, etc. It is impossible to optimize Windows to work like Linux. However, judging by the distributions of Ubuntu, Fedora and other "friendly" operating systems of the family, one can only partly agree with the greater "multimedia" of Windows.
Three operating systems is, in most cases, overkill. True, and here there are some nuances. Sometimes difficult situations arise when it is impossible to do without the presence of three operating systems on one computer. You don't have to be a "computer genius" to do this. And this is hardly something that can surprise anyone ... For example, what if, by the nature of your job, you are constantly changing the environment (Ubuntu / Vista / XP) to conduct any reviews or tests? Every time "demolish" one and install another OS in its place? Yes, there is such a "pass-through" option. To do this, you need to install Windows XP on one drive (for example, C:\), and Vista or Ubuntu on the other (D:\). Every time you need to change the OS, you put the desired OS on D:\. The only question is time.
The easiest way is to stop at two, and, even better, on one operating system. But we will go the other way.
Note. There are ported versions of the operating system Mac systems OS X, which are quite successfully installed on the PC platform. In this material, we do not consider OS X for the following reasons:
- this is not the original, but an illegally modified version of the OS
- the audience of readers using these distributions is extremely small. Enough to imagine the number of users of Apple products.
Priority of actions
If you need a super-functional computer with a workable bootloader, you need to worry about the correct installation sequence for each of the operating systems in advance. After all, if you put the same Vista last, then the Ubuntu bootloader, GRUB, will be erased from the MBR. XP just doesn't stack over Vista, so it can't be left for last. Based on the foregoing, all actions are performed on the computer in the following order:
1) Windows XP. Installed on a disk with a boot sector. All bootloaders in the future will be automatically installed on the partition with this label. How can I find out what drive it is on? Specialized programs for working with the disk subsystem will help with this - Norton Partition Manager, Acronis Disc Director, Acronis Partition Expert and many others.
A disk marked as "Active" must have a boot sector.
2) Windows Vista. Install it on a drive other than where XP is located. After installing Vista, there should be two items in the boot menu: Vista itself and "Earlier operating systems" ("Previous operating system"), which means XP. That is, if XP was installed before Vista, it will be successfully detected and added to the list.
3) Ubuntu (this rule applies to any OS of the Linux family). Since this operating system is installed last, the bootloader installed by it will become the main one. At the last stage Ubuntu installations do not change the settings ("Advanced" button) so that GRUB is installed on the disk with boot label.
Need to say, GRUB very "tolerant" in relation to its "competitors": it correctly determines the systems available on the computer and makes them into its own list. With XP and Vista, GRUB does not remove the Windows bootloader. And when you select the menu item that comes after the inscription "Other operating systems" ("Windows Vista / Longhorn loader"), a second screen will appear where you can select one of the Windows operating systems.
Subsequently, the list created by GRUB can be corrected by changing the names, deleting redundant boot items, or changing their order. Fortunately, the documentation for GRUB is present in sufficient volume. In general terms, this is a perfectly configurable, documented, user-friendly (user-friendly) loader.
Where to download and how to install Grub
GRUB sources can be downloaded from ftp://alpha.gnu.org/pub/gnu/grub .
Next, unpack the downloaded distribution using the command “ tar -xvzf filename.tar.gz ”. If we take into account the name of the file grub-
0.5.96.1.tar.gz, the list of operations will look like this:
# tar -xvzf grub-0.5.96.1.tar.gz
So we've unpacked the contents into a directory called " grub-0.5.96.1 ". We perform the following steps:
# ./configure
You can change certain options during compilation:
# ./configure --help
This will display all available options. You can use the --enable prefix or -
disable , which provides support certain devices bootloader.
To start compiling, type
#make
Installation occurs after entering the following command:
# make install
A little about editing GRUB
Linux traditionally uses the LILO (LInux Loader) or GRUB bootloader. If a few years ago something else was said about LILO (and it was present in considerable numbers), now the leadership belongs to GRUB.
In fact, this "monopoly" is only a plus, because initially GRUB is more functional. All its features are available from the command line or through editing configuration file. In addition, it is very important that this loader can be directly edited directly in command mode. Why is it good? Let's say there was a deplorable situation when, due to your actions, the bootloader broke down. After reading the relevant documentation, you can manually debug GRUB directly from the menu. The method of "scientific poke" here, alas, will not work, as in all Linux.
Immediately after installation, GRUB prescribes several additional items in the menu, such as: backup boot, memory test. Only about three or four points of low importance. If the OS that you need is loaded by default, and you are not embarrassed by the variety in the menu, you can leave everything “as is”. By default, Ubuntu is set to boot first.
In Mandriva or OpenSUSE this menu can be edited during installation. In our case, we will have to go a more "tricky" way - change a few lines in the menu.list configuration file. It is located at /boot/grub.
Open the terminal (Programs -> Utilities -> Terminal and enter the command ($ - the designation of the beginning of the command, which is not entered into the terminal):
$ sudo cp /boot/grub/menu.lst /boot/grub/menu.lst.old
This way we will save a backup copy of the file. In Ubuntu, it is simply necessary to do this so that in the event of a serious error there is an opportunity to return to the previous settings. Here, however, you should take note of the following: restoring the bootloader without access to the OS session is not an easy task. To avoid such situations, be especially careful with the bootloader configuration file. If you are not confident in your abilities, it is not worth the risk. Let Ubuntu run for as long as possible...
$ sudo gedit /boot/grub/menu.lst
When you enter given command, v text editor Gedit will display the contents of menu.lst. We will look at a few of the most important settings in this configuration file. It is commented in detail, so what is not said, you will figure it out on your own. All comments follow the pound sign #, they do not affect the download in any way and can be removed.
Parameters:
- timeout 10 - menu display time. After 10 seconds, the default operating system is loaded. Replace "10" with any number
- hiddenmenu - if you uncomment this line, the GRUB menu will not be displayed, the OS will be loaded by default
And here are the settings directly related to the output of menu lines in GRUB. They can be freely edited and deleted. Of course, knowing the purpose of this or that item. Changing anything other than the first line is contraindicated! The same applies to Windows. The block that starts with "title Windows XP" should remain intact.
How to change the boot order of Windows and Linux
If you need to change the boot order from Ubuntu to Windows, just swap the blocks that start with "title" in places. After editing menu.lst, save the document (remember, this can only be done in administrator mode) and reboot the system.
About configuring XP and Vista bootloaders
The "weakest" bootloader, which can only overwrite the existing one Ubuntu bootloader. Since we can't officially install XP over Vista, we can't actually change the bootloader from Vista to XP. The downside of these two bootloaders is the lack of any documentation, plus the easy access to the settings.
If you installed Windows Vista before Ubuntu, then when you select "Windows ..." in GRUB, a second menu appears. You can temporarily or permanently disable one of the submenu items - then it will disappear. To do this, go to the properties of "My Computer", open the "Advanced" tab, the "Startup and Recovery" section, the "Options" button and change the menu. Here, delete that (and only that!) line in which the extra menu item is located.
The described setup procedure applies to Windows XP, but for Vista it is almost the same.
Programs for working with loaders
Fortunately, all the routine methods we have described today can be avoided. There are several programs that greatly simplify the handling of the bootloader, making it intuitive. In case of Acronis OS Selector the developer of the program will have to pay, since the demo version does not allow you to use the features of the full one. EasyBCD and VistaBootPRO are free programs.
Program: Acronis OS Selector
Distribution terms: shareware
A program for low-level download management. Here is an excerpt from the official website:
WITH Acronis OS Selector you can:
- install several different operating systems on one computer;
- download them from any section of any hard drive;
- boot any installed operating systems directly from Windows;
- install multiple operating systems on one partition;
- hide any of the operating systems on your computer from strangers or set a password to boot them;
- duplicate existing operating systems by copying and create the necessary boot configuration for each of them.
The program supports a large list of operating systems. All kinds of Windows distributions and Linux. Unfortunately, the program is no longer distributed separately, as it was before, but is included in Acronis Disk Director Suite, a fairly large (40 MB) package. The program is paid, and in the limited version it is impossible to apply changes. Can be downloaded separately old version via a direct link, but this is a demo version, again, not intended for direct use.
After installation, OS Selector will ask you to reboot. During boot, the program, with your permission, will be installed on the boot sector, as regular bootloader. If you refuse, the system will continue to boot and the program will simply stop reminding you of itself - neither after nor before the OS is loaded.
What else is the advantage of this program, besides simplicity? The most convenient thing is that a list of all installed operating systems immediately appears in the boot menu. There is only one bootloader - and it is installed by Acronis OS Selector. The names are correctly defined, and if desired, they can be easily changed. In addition, you do not need to press the Enter key twice in the menu. It also includes several additional service utilities, which will be extremely useful for restoring any of the OS.
EasyBCD
Interestingly, instead of GRUB as the default bootloader, you can make it from Windows Vista. After installing EasyBCD, first of all you need to go to the "Manage Bootloader" section and then select the "Reinstall the Vista Bootloader" option. GRUB will be overwritten. The Vista bootloader can now be configured to add Ubuntu to the boot menu.
In addition to working with Linux, EasyBCD recognizes BSD bootloaders and Mac OS X. Works in Windows environment.
VistaBoot PRO
Distribution terms: freeware
We wrote about VistaBootPRO not so long ago in a program review. It works in the Windows environment and is intended purely for editing. Windows boot loaders. Moreover, you can replace one bootloader with another by uninstalling the extra one. It is easy to remove unnecessary menu items in the program. We must not forget about backup, which can and should be done in one of the settings sections!
How to restore the boot menu?
If, after the actions you performed, an error occurred, after which loading the menu becomes impossible, do not despair. Like any software, it can be reinstalled. True, it is not as easy as described in words. After all, logically, if you can’t boot the OS, you can’t restore the bootloader? In such cases, as always, rescues boot disk. Of the three operating systems, we need to restore either Vista or Ubuntu, XP is out for the reasons described above.
For Ubuntu. The easiest way is to restore the GRUB bootloader for Ubuntu. Fortunately, Ubuntu is a live distribution that can be used for any kind of recovery. After loading the OS (the version does not matter), you need to open the terminal and enter the following commands there:
// start boot manager $ sudo grub
// display information about the partition with the bootloader $ find /grub/stage1
As a result, information about the location of the bootloader will appear.
Substitute the obtained values by changing X and Y to the given numbers:
$ root (hdX,Y) $ setup (hdX)
For Windows Vista. You can learn more about repairing the Vista bootloader in the Windows online help.
So, for recovery, you need a boot disk with Windows Vista (from which you installed the OS). The course of action is the following.
- Boot from installation disk Windows vista.
- Select the installation and input language. It is recommended to select the US input language.
- Select "System Restore".
- Select the operating system to restore and click Next.
- Select " Command line". Enter the command in the line
E:\boot\Bootsect.exe /NT60 All
Main boot Windows entry Vista restored.
Warning. The author is not responsible for your actions. By producing actions on the bootloader, think about whether you will cope with the assigned task successfully and whether you can prevent a possible breakdown. The article is addressed only to sufficiently experienced users.
How to swap windows.
Hello everyone, today we’ll talk about how to swap windows on boot if 2 operating systems are installed on a computer or laptop.
I know several ways, I'll start with the first, where you only need to be able to work with administrator rights and a couple of mouse clicks. We will work directly from Windows, you will not need anything other than built-in tools.
Let's say that two operating systems are installed on a computer or laptop. And you want to swap windows so that the default one is now loaded, to access which you had to select the arrow in the boot menu. Not comfortable? Let's fix...
Swap windows. FIRST OPTION.
We need Homepage Control panels:

Select button Additional system settings:


And save the changes. As you can see, the Startup and Recovery window also offers to change the countdown time before loading windows by default. Before loading, you have to wait half a minute - you are free to change it at your discretion.
Swap windows. SECOND OPTION.
The option is even faster. Click Start - in the Search programs and files field, type the command msconfig. In the configuration utility window, select the tab. In it, in the same manner, select the system you need from a small list, press the buttons in sequence Use by default – Apply – OK. You can reboot and see what you've done.
Swap windows. THIRD OPTION.
It will require the installation of the EasyBCD program. It just serves such tasks and can do much more than just swap windows. So, it is successfully applied to your computer. After installation, you need a button Edit Boot Menu(Edit Boot Menu):

This menu will allow you not only to swap systems at boot, but also to change their name or even delete the system entry from the menu if it is not needed, after which the faulty and deleted system will not boot.
I wish you success
Read: 201