Web CD Live is a boot disk for OS recovery. Dr.Web LiveCD - detailed instructions Download doctor web disk image
There are cases when malware blocks the system, extorting money from the user, or corrupts system files so much that it is no longer possible to boot. Here comes help powerful tool by Dr.Web - Live USB, which can be written to a USB flash drive, booted and cured Windows. Here complete instructions on using a bootable flash drive Doctor Web.
How to use Dr.Web LiveUSB?
The healing flash drive Doctor Web allows you to return the work of an infected system from which it is impossible to boot. If viruses or other malicious programs have damaged system files, then using Dr.Web LiveUSB (LiveCD - written to disk) you can boot from a USB flash drive and cure the OS, remove malware and try to restore important files.
How to download Dr. Web Live USB?
You must have come across such sites where you can download Dr.Web Live USB from a torrent or any file hosting service - you don't need to do this! Download only on the official website of Dr.Web, all further instructions will be on the example of the official website.
And so, we go to the Dr.Web site, and more specifically to the library free utilities Doctor Web, here - http://free.drweb.ru/
On the top panel you need to click on Dr. Web Live Disk
The Dr.Web LiveDisk page will open with a choice for downloading - LiveCD or LiveUSB. We select the second item - for recording to a USB-drive (LiveUSB).
In principle, there is no difference here, just LiveCD is an ISO image that can also be written to a USB flash drive. But the second option (LiveUSB) is EXE file, by running which it will be easier to install on a USB flash drive automatically, without using third party programs(such as UltraISO), as, for example, for LiveCD.
From the previous paragraph, it became clear how these two files differ and I think everyone chose LiveUSB, unless, of course, they are determined to write the antivirus to a USB flash drive, and not to a disk. Next, you need to take license agreement to download the utility, scroll down the page and click on the button.
Installing Dr.Web LiveUSB on a flash drive
Now, finally, the file for installing Dr.Web LiveUSB on a USB flash drive has been downloaded. There are some points to consider before writing the anti-virus utility to a USB drive:
Your BIOS must support booting from a USB-HDD (most likely this will not be a problem)
In new computers, UEFI comes to replace the BIOS, and the problem is that you just can’t boot into UEFI from a USB flash drive. If you have exactly UEFI, then a little further you will find a detailed solution on this issue, while doing everything according to the instructions.
We connect the flash drive to the computer, if there are important files on it, they must be moved to another location, the flash drive will be formatted ..
We launch our downloaded Dr.Web LiveUSB utility. The utility installer window will open. In the drop-down menu, you need to select a flash drive on which Doctor Web Live will be recorded.
Below, put a tick under the item "Format the drive before creating Dr.Web LiveUSB".
Click the "Create Dr.Web LiveUSB" button. We agree with the warning about formatting the drive.
We are waiting for the process of writing the utility to a flash drive. This will take some time. Further after the end, you will be notified about it.
Here, at last, we have reached the point of loading a computer with Doctor Web Live in our instructions. Now you need to make sure that the computer boots from the USB drive, and not from the HDD where the system is installed.
We insert the USB flash drive into the USB port of the computer / laptop and turn off the computer.
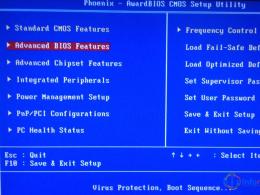
Now we need to enter the BIOS, how to do this is described in detail in this article. Usually this is the Del, F1, F10 key on the keyboard. There may be combinations with the Fn key (often found on Lenovo laptops). Immediately after turning on, press this key or combination (it is better to press it many times and quickly until the system has time to boot).
Next, as you entered the BIOS, you need to find the item responsible for booting the computer from USB devices. Also, there is a detailed article on how to boot a computer from a USB flash drive. In short - we find the desired tab, usually "Boot", and put USB in the first place. That's it, press F10 and wait for the download. If this happened, then it is better to put the HDD back in place, in the same way as above, naturally after finishing working with LiveUSB.
In most cases, when starting the computer, you can simply press the key to select boot (usually F12) and select the device from which you want to boot (USB drive) from the list. In this case, you don't have to return anything, subsequent downloads will be the same as before (with hard drive).
For those with UEFI
It's not so easy to boot from a flash drive on new UEFIs, as it can be done in old BIOSes. This will disable the feature. secure boot.
How to find out if UEFI is on a laptop? And is Secure Boot enabled?
Everything is simple. Press the combination Windows keys- Ctrl+R, type msinfo32 and press Enter.
Now we look at the line "BIOS Mode", if there is UEFI, then you have new bios. Now we look at the line "Secure Boot Status", if "disabled", then the Secure Boot function is disabled in the BIOS of your laptop.
What to do if Secure Boot is enabled? Will not go deep here, this is a separate topic, here detailed instructions to disable Secure Boot in UEFI.
Now, we have completely figured out how to boot from Dr.Web LiveUSB on a computer or laptop, be it the old Bios or the new UEFI. Now let's move on to the instructions for use. boot utility Doctor Web.
Dr.Web LiveUSB is a handy application that will come in handy if you need emergency recovery operating system your computer damaged by viruses. As the name suggests, the program allows you to create an autoload partition on a USB drive. It, in turn, must be used when loading the operating system in the usual way fails due to infection with viruses or other malware. In order to create bootable flash drive, the user just needs to connect it to the computer, and then run the setup wizard, which will help to record required files on the drive in several simple steps. Dr.Web LiveUSB is able to independently determine writable drives, as well as implement them preformatting. In general, the entire process of working with the program is almost completely automated. After restarting the computer, you will be able to scan the system for viruses without starting it. It is also important that Dr.Web LiveUSB is distributed completely free of charge.
Key features and functions
- allows you to create a bootable USB flash drive in a few steps;
- has a modern intuitive interface;
- detects most known types of threats;
- distributed completely free of charge;
- independently determines the appropriate drive and performs preliminary formatting.
Doctor Web Live USB is a program for creating and launching an emergency recovery disk from a USB flash drive that allows you to "cure" a computer after a powerful virus attack that caused a system crash.
Often downloaded from Dr Web Live USB
Dr.Web Live USB is a utility designed to resuscitate operating systems after malware infection. As a result of a powerful virus attack, situations often arise when you boot your computer in a standard way impossible. In this case, it makes sense to run the Rescue Disk from a USB drive. To do this, you need to download DrWeb LiveUSB and save it on a USB flash drive. Next, you need to make sure that Computer BIOS supports USB-HDD, that is, a device connected via a USB port can be used as a bootable one.
You can download Dr.Web Live USB for free in Russian from this page.
Main features of Dr.Web LiveUSB:
- safe start of an infected computer
- search for malicious objects on the computer
- disinfection of infected files and registry
- built-in browser
- file manager.
The principle of operation of the application is built according to the following algorithm. After connecting the flash drive, the user will be required to run the drwebliveusb.exe file. Next, you need to click the "Create Dr.Web Live USB" button and select the launch mode - normal or text. We recommend choosing the first - graphic. The Dr.Web Control Center in the Linux interface will appear on the screen. In the Center menu, the most interesting item is "Scanner". At this stage, you can specify which disks should be checked. After starting the scan, Doctor Web will start scanning for viruses.
Upon completion of the process, the program will provide a list of infected files. Here you will find the option "Cure", which we highly recommend using. Also, among the mandatory actions, select the menu item "Disinfect registry". Since the system has "welled up", such an operation can be vital for your PC. After that, it is enough to restart the computer - it should work like new.
Recently, developers have renamed the utility to Dr Web LiveDisk and release it in two versions - for CD and DVD and for USB drives. If you are interested in starting rescue disk recovery via USB port, you can download Dr Web Live USB for free and without registration. After resuscitation of the system, we recommend installing a reliable antivirus in order to prevent such situations from happening in the future.
Dr.Web LiveDisk on CD/DVD or USB is a free anti-virus help to a computer when a system affected by malware cannot be started normally.
Dr Web LiveDisk for CD, DVD and USB - based on virus scanner by Dr. Web. It is offered in the form of an ISO image of a boot disk that allows you to clean the system of suspicious or infected objects, with the ability to disinfect important infected files.
The trend of increasing virus attacks through the Internet began to disturb regular users of the World Wide Web. Today, having enlisted the support of malware, attackers are trying to lure money out of gullible users, for example, through SMS messages for unlocking an infected system.
Dr Web LiveDisk will help you to protect your personal device from all sorts of viruses or to “revive” the system if a precedent has happened.

The program runs directly from the disk. The utility can be used in two versions: standard (using a graphical interface) or safe (loading a scanner with command line loading).
What situations is the free Dr.Web LiveDisk intended for?
If the actions of malicious programs have made it impossible to boot the computer under Windows control, restore the affected system for free using Dr.Web LiveDisk. System disaster recovery occurs from a CD/DVD or a bootable USB drive.

Please read the How It Works section of the link below carefully. How Dr.Web LiveDisk works:
- Download ISO file to burn to disk, or EXE to install on a USB drive.
- Write down ISO image on a CD or DVD in the special "Image Burn" mode, and not just drop and burn the file to disk. Or you insert a USB drive and run the EXE, the installation will start automatically and write everything you need to the USB.
- Restart your computer and boot from the burnt CD or USB.
Download Dr.Web LiveDisk absolutely free of charge and burn it to a CD or DVD disc, or to a USB drive, because the software not only catches and cures infected objects, but also allows you to perform certain urgent manipulations with file system, registry, view various documents, web pages and emails.
I wanted to publish this product, as it can be really useful to many. So, in front of you is a bootable anti-virus disk from Dr.Web, as you already understood everything. It will help you restore the operation of the operating system if it was hit by various viruses and loading became impossible, it works with Windows and Unix, I hope how to create installation disk you know, but from our site you can download Dr.Web LiveCD in full news.

Let's look at everything point by point. After you have downloaded this archive and unpacked it, you need to use special program burn the resulting image to CD or DVD media, for this, both the Nero Burning ROM tool and a large number of others that can be easily found on our project. After you have done everything, you need to boot the computer from Dr.Web LiveCD, that is, you need to go to the BIOS and change the boot priority there, or you can press F8 if my memory serves me and select the CD drive to boot.

Next, you will see the Dr.Web LiveCD boot screen, after which a dialog box will appear in which we are prompted to select the boot mode, if you want to work through the graphical interface, then you need to select the normal boot mode, but if you need to work in text mode, you select the appropriate item from the menu. Please note that you can also select Start Local HDD, then the boot will be made from the computer’s hard disk, and our disk will not start, there is also the Testing Memory item - I think it’s clear that when you select it, the utility will start to check random access memory computer.

Actually, I think after loading from GUI you can figure it out yourself, there is also a scanner, it is possible to change appearance interface, you can view the quarantine zone, and so on, and if possible, you can set up a network connection and use a browser, in general, everything is very convenient in this Dr.Web LiveCD and the reviews on the boot disk are not the worst on the network, it really helped someone deal with threats. Of course, I hope that this image will not be useful to anyone, but if such a moment comes, I again hope that it will help you, enjoy using it!
Developer:"Doctor Web"
License: freeware
Language: Russian
Size: 773MB
OS: Windows
Download.

