Windows 10 recovery image. Every Windows user should have such a flash drive.
Windows 10 like previous versions this operating system is not completely protected from failures, impacts computer viruses equipment failure and other problems. Therefore, if you have problems operating or loading the OS, you can use the built-in tools to return the operating system to operational state.
Restoring Windows 10 can be done in several ways.
If the computer boots:
- Using a restore point.
- File history.
If the computer does not boot:
- Using the recovery disk.
- Via installation disk.
Now let's look at these recovery options in more detail.
Method 1 – Using a System Restore Point
Windows periodically saves information about programs system settings, drivers, registry, and drivers in system restore points. This happens before significant changes to the OS, such as installing programs, drivers, or updating the system. You can also create a restore point manually. You can read how to do this in .
It is worth noting that after the restore, your data will remain intact, and the drivers, programs, and updates installed after the restore point was created will be deleted.
1. Launch the system properties window (keyboard shortcut Windows+Pause) and open the item "".
2. Press the button Restore”, and then “Next”. In the list of available restore points, select the desired item and click "Next" again.

3. Check the selected options again, click the " Ready” and then “Yes” in the warning window. The recovery process will begin and the computer will restart.
Method 2 - Reset to factory settings
In Windows 10, there is an option to return system settings to the initial state. At the same time, you can do full reset or with saving user files. The advantage of this method is that if you want to reinstall the system, you do not need to install Windows from scratch, just a reset is enough.
To use this feature, you need to go to the following section: " Computer Settings -> Update & Security -> Recovery -> Reset PC and click the "Start" button.

In more detail, we examined the process of resetting to factory settings in this article:
Method 3 - File History
This method is not directly related to system recovery, but in combination with other methods, it can also be useful.
"File History" allows you to do backups your files in automatic and manual mode. You just need to activate this function and specify which folders you want to save. The system will automatically make backup copies of your documents at intervals that you can configure. If necessary, you can easily restore the files of the version you need.

How to enable, configure and use this tool you can read in this article:
Method 4 - Using a recovery drive
If Windows 10 won't boot, you can try a system recovery using a recovery disc, which will allow you to access advanced startup options.
If you don't have a recovery disk yet, follow these instructions:
After booting from the recovery USB drive, go to " Diagnostics -> Advanced Options».
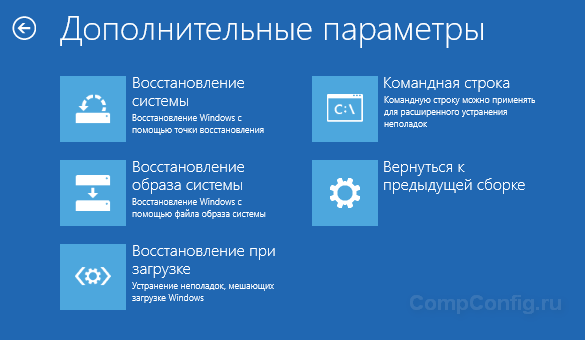
Here you can use several options for resuscitation of the computer:
- Restore Windows using a restore point. We have already considered this option above. Its meaning is the same, only the launch is performed in a different way.
- Restoring a system image. This method has been known since Windows 7. If you previously created a system image in Windows, you can easily restore it using the recovery disk. How to create a system image in Windows 10 can be read here:
- With the help of the following paragraph, you can try to automatically fix errors during the download.
- For more advanced users, there is an option to launch a command prompt for system restore or other purposes.
- Well, the last option is the return of Windows to the previous build.
It should also be noted that if, when creating the system recovery disk, you have written system files to a disk, you will be able to reinstall Windows from that disk. But if you bought a computer with Window 8 (8.1) pre-installed with a hidden recovery partition, then the version of the system that originally came with the computer will be restored.
Method 5 - Using the installation disc
If Windows won't boot and you don't have a recovery disc, you can use the installation disc to revive your computer.
The installation disc can be burned to a USB stick or DVD using the media creation tool that can be downloaded.
After booting from the installation media, you will see a window in which you need to select language options and click the "Next" button.


- Return the computer to its original state. A factory reset will be performed with or without user files. We have already considered this tool above (method 2).
- Extra options. Just like on the system recovery disc, a list of tools will open with which you can return Windows to working order using restore points, a system image, etc.

We have covered the main ways Windows recovery 10. Usually they are quite enough to return the system to a working state. A clean installation of Windows could also be added here, but this is already an extreme measure and is indirectly related to system recovery.
Windows 10, the restoration of which can return the computer to its original state, has several options this action Let's take a look at recovery Windows systems 10!
Since the OS itself is a rather complex structure, the frequent occurrence of problems and errors is understandable. On the other hand, as in any complex system, Windows also has tools for its recovery, knowledge of which can help you relatively easily and without significant loss "revive" your computer and save important data.
How to restore Windows 10
Of course, the notorious Windows 10 system recovery tools differ in the specifics of their work and in terms of the end result. They will be discussed below.
To begin with, it is necessary to specify the situations in which it makes sense to return the OS to the previous state.
Windows 10 does not work correctly, an update (regular to the OS itself or a driver) or some application has also recently been installed.
Most likely, the reason is precisely what was recently installed. In this situation, you can. You can do this in several ways:
V command line run the command as administrator, type rstrui - the return to the point interface will open.
You can also access this window through the control panel - Recovery.

Pressing "Starting System Restore" The familiar interface will open.


After selecting a point and clicking on the "Next" button, the return process will begin, which takes several minutes (from 10-15 or more). This process affects installed applications and user files modified since the point was created.
In order to be able to perform Windows recovery 10 using restore points, you need to make sure that they are created automatically. To do this, in the Control Panel - Recovery window, select "Setting up system recovery".

In the table of available disks, you need to check if OS protection is enabled. If enabled, restore points are created automatically. If not, the point will only be created manually. To create a point, click "Create" and specify the name of the point to be created.

To enable automatic creation of points (Windows OS protection), you must click "Configure ..." and select "Turn on system protection". 
If you cannot log in, you can use this function through recovery environment (WinRE). There are several ways to get there:
- On the lock screen (password entry), you must click "Shutdown", hold down the key. After reboot, select "Diagnostics" - "Advanced options" - "Command line"– run the rstrui command.
- Turn the computer off and on repeatedly using the power button (not the most safe way). These manipulations will also allow you to enter the recovery environment and take further actions.
Windows 10 is not working properly, but no updates or apps have been installed recently.
This option is already more ambiguous. Cause incorrect work system may not be so obvious. In this case, resetting Windows 10 may help. To do this, open Settings, then "Update and Security".


To start the process, you must click "Start".

If the system does not boot, then you can enter the recovery environment () and select "Diagnostics" - "Reset the computer to its original state".
At the same time, we may be offered options for restoring the Windows 10 system:
- Keep files - as a result, the OS will be reinstalled with the preservation of all personal files, however, they will be deleted installed drivers and applications, any changes made to the settings and all applications preinstalled by the manufacturer will also be removed (If you purchased a computer with Windows 10 installed, applications from the computer manufacturer will be reinstalled).
- Delete all - the result will be executed reinstalling windows 10 with the removal of personal files, installed applications and drivers will be removed, all changes made to the settings and all applications preinstalled by the manufacturer will also be removed (If you bought a device with Windows 10 already installed, then applications from the computer manufacturer will be automatically reinstalled). This option it is also better to use if you are going to scrap or sell the computer, disk cleanup can take several hours, but after that it will become very difficult to get the data back.
- Reset to factory settings(if available) - this will reinstall Windows 7/8/8.1/10, remove personal files, remove installed drivers and applications, remove any changes made to settings, and reinstall all applications preinstalled by the manufacturer.
Important! After completing this procedure, the option to return to the previous assembly will no longer be available.
The system does not boot and you previously created a recovery disk.
To use this option, you must connect the drive to your computer. Next, after loading the recovery environment (WinRE), you need to select "Troubleshooting" - "Advanced Options" - "System Restore". As a result, recently installed programs, updates to the system or Office, as well as drivers that can cause problems on the computer will be removed, but personal files will remain intact.
Also, if there is a disk, it is possible to perform a reset (see the previous paragraph).
Learn how to create a recovery disc.
The system does not boot and no recovery disk has been previously created.
In this situation, installation media can help - a disk, a USB drive from which you can perform a clean installation of the system. If there is no such carrier at hand, then it must be created. You can do it this way:
- On a working computer, open the Microsoft Software website.
- Click "Download tool now", wait for the tool to be downloaded and run it.
- Select "Create installation media for another computer".
- Configure the required settings - language, edition, and architecture (64-bit or 32-bit system).
- Follow the instructions for creating installation media until the process completes.
- Connect the newly created installation media to a non-working computer and turn it on.
After that, you need to boot from the installation media and select the option "System Restore". Further, the set of possible actions is similar to the previous paragraph of this article.
Computer won't boot, no recovery disc was created, and reset failed.
In this situation, there are no options other than doing clean install. To do this, you will need to create installation media (how to do this is described in the previous paragraph of the article). In general, the installation process of the system, although it is global for the computer, is still not complicated. The main thing is to correctly configure the boot from the installation media. After downloading from it, you must select the item "Install Now". At the next stage, you will be prompted to enter a key to activate the system - you can enter it here or click on the button "I don't have a product key" to continue the installation of the system, activation in this case will need to be carried out immediately after the appearance of the desktop. Afterwards, you will be asked to license agreement and accept it to continue. The next step is to press "Custom Installation". After that, a window will be displayed with sections into which the HDD. You must select the appropriate section and click "Next". During the installation process, the computer will restart several times. As a result, a clean system will be installed, all applications and drivers will be removed. The files will be saved in the Windows.Old folder on drive C, if you wish, you can transfer them from there.
Within a month after upgrading to Windows versions 10 (and within 10 days after the build update) it is possible to rollback to the previous build - this will return the computer, programs and files to the state in which the device was immediately before the update. Run this process you can either through the "Settings" (section "Update and Security" - "Recovery"), or through the recovery environment (WinRE, the login methods are described above).
In general, the options described above allow, if not completely returning the computer to its usual state, then at least returning it to working capacity. All of these options differ in execution time and the use of each of them depends on the initial problem.
Have a great day!
The regular ability to create a Windows 10 emergency recovery disk was inherited from the "seven". They create such a disk in case there are difficulties in the operation of the OS that prevent loading and contains tools such as:
- Automatic troubleshooting that prevents system boot;
- Restoring from a previously created image (backup);
- Returning the OS to the rollback point.
How to create a rescue disk with regular ones Windows tools 10 and how to apply it in practice in case of problems with system boot? These issues will be discussed in detail below.
When is a recovery disk needed?
A recovery disc can only be created for computer devices that have a CD/DVD drive in their assembly. Unlike bootable rescue media from third-party developers, most of which provide for recording to a USB flash drive, a rescue disk can only be burned to a CD / DVD disc. But this is by no means an infringement on the capabilities of owners of devices without a CD / DVD drive. The fact is that the recovery disk is not the only means of accessing the standard Windows resuscitation capabilities. The system recovery environment can be accessed using a Windows 10 installation disc, which can also be created using a flash drive.
To reanimate the current OS using its installation disk, no financial costs will be required. The distribution kit with Windows 10 on the Microsoft website is available for free. It is supplied through the utility Media Creation Tool, you need to download and run it.

Utility in a single process and Windows distribution 10 downloads, and immediately creates a bootable USB flash drive. If you have problems booting the system, you need to boot from the USB flash drive and, at the stage of starting the installation of a new OS, select the item indicated in the screenshot below. Access to the toolkit does not require a product key.

As you can see, the rescue disk is so essential tool hardly call. However, its presence is welcome if there is no other computer in the house with which you could quickly create a bootable USB flash drive with installation files systems.
Preparing to restore Windows
An emergency recovery disk is created for a certain bitness of Windows 10. In this case, the universal rule applies, as for programs installed inside the system - 32-bit bitness is suitable for both 32-bit and 64-bit Windows 10. Whereas 64-bit the rescue disk is useful only in the case of the 64-bit version, respectively.
There will be little use from the rescue disk if a rollback point is not created inside the OS itself or a system image (backup) is not prepared.
Create a recovery drive
The emergency recovery disk is part of the standard toolkit for backing up OS files. This functionality is located in one of the sections of the control panel. You can get to the backup section not by wandering around the control panel, but by in a simple way- using internal search. In Windows 10, the search button is located right in the taskbar, so it’s a sin not to use this convenience.
Enter in the search field key query the desired partition and directly get to the system backup settings.

Click the "Create System Image" button. Select the CD / DVD drive in the drop-down list, if there are several. Next, click the "Create Disk" button.

We will see a notification, which, in particular, refers to the bitness of the OS.

Creation completed.

The Windows 10 recovery disc is suitable for computer devices based on both regular BIOS firmware and UEFI BIOS.

Now the rescue disk can be put somewhere in a secluded place. His further fate is to wait for a critical failure of the system.
Boot from rescue disk
Let's say Windows 10 won't boot. Now is the time to use the emergency equipment. We take out the recovery disk and put it in BIOS boot from a CD/DVD drive. We confirm by pressing any key to boot the device from CD / DVD.

The interface is in Russian, but you can choose any other keyboard layout. In our case, just confirm Russian.

The choice of action is the "Diagnostics" section.


In the next window, we will see all the available Windows 10 recovery tools.
Boot recovery
To try to solve the problem with Windows 10 not booting, you can first use the boot troubleshooting method. This is a mode to automatically fix problems that prevent the OS from starting.

Don't put too much hope in this tool. Like the in-system automatic troubleshooting tool, the boot troubleshooter won't do much good. After a short diagnosis of the computer, in most cases it will be declared inability to solve the problem.

Rollback to a restore point
The rollback point is the most convenient toolkit that allows you to, with minimal data loss. Naturally, it is necessary that rollback points are periodically created - either manually by the user, or automated (using the task scheduler). The process of creating a rollback point takes much less time than the process of creating a system image (backup). And the rollback point saves space on the PC. However, the rollback point is more vulnerable than a backup that can be stored on an alternative hard drive and will come in handy if the main drive fails.
In order to roll back to an earlier state of the OS in the face of serious problems with the system, we boot from the emergency disk, go through the path to additional parameters and select the first option in a row.


Select the current rollback point from among the existing ones. The most complete list of them will be available after setting the option to show other points. Click "Next".

Click "Finish" in the rollback confirmation window.

We additionally confirm the launch of this process.

After the system rollback is complete, the computer must be restarted. After the reboot, we will find the system exactly in the state in which it was at the time the rollback point was created.
Restoring from a system image
If it was previously created using the regular backup functionality, and the OS suddenly stopped loading, it's time to use this image by booting from the recovery disk. Having reached, as indicated above, to the menu of additional parameters, respectively, we select the second option.

We leave the image found by the system by default or select another one using the appropriate option in the first window. Click "Next".


Click "Finish".

We confirm the decision with the "Yes" button.

As with the rollback point, the system will be returned to the state it was in when the image was created.
Have a great day!
Hello! I remember in one of the articles, Vladimir noticed that there is a very simple way to restore the Windows 10 bootloader using an installation disk or flash drive with Windows 7 and you don’t even need to enter any commands on the command line, I would like to know the details.
How to automatically repair Windows 10 boot using a Windows 7 installation flash drive
Hello friends! Yes, there is such a way, it is very simple and does not involve the command line.
We all know that Windows 7, like Windows 8.1, 10, has a tool automatic recovery operating system boot - recovery environment, given environment is created automatically during system installation and is located in the root of the drive (C:) in the Recovery folder.
- Note: In Windows 8.1, 10, the recovery environment is in a hidden partition System Reserved, volume 350-500 MB).
- If you have new laptop with BIOS UEFI and installed Windows 8.1, 10, then this article will not suit you, but this article will do: ""
If on initial stage Windows 7 boot fails, Startup Repair automatically runs and attempts to determine the source of the problem by identifying the cause, Startup Repair automatically fixes the errors, and Windows 7 boots. The exact same recovery environment is located on the Windows 7 installation disk or flash drive and is capable of restoring the bootloader not only of Win 7, but also of Windows 8.1 and Windows 10.
I do not argue, at the installation Windows disk 10 has its own recovery environment and its own Startup Repair tool, but here's the strange thing, often it cannot restore a damaged Windows bootloader 10, but Windows 7 can.
I give an example. Let's format on a hard drive with Windows 10 installed - hidden section System Reserved (Reserved by the system), the volume of 350-500 MB, containing the operating system boot files, and then we will use the Windows 10 and Windows 7 Startup Repair tool for recovery (we will see the difference).
Disk management of a computer with Windows 10 installed on an MBR disk.
V Windows 10 operating system bootloader files are in a hidden partition System Reserved (Reserved by the system), the volume is 500 MB.
Formatting this section and then try to restore it.
We boot the computer from the Windows 10 installation disk and enter the keyboard shortcut in the initial installation window"Shift + F10", a command line window opens, enter the commands:
diskpart
lis vol (display the list of sections hard drive and we see that "Volume 1" is a hidden partition System Reserved (Reserved by the system), the volume is 500 MB, it contains the Windows 10 download files).
sel vol 1 (select Volume 1)
format fs=NTFS (we format the hidden System Reserved partition, all files on it are deleted)
Close the command prompt window and reboot.

Naturally, Windows 10 boots up with an error stating that there is no operating system on the hard drive.

We are trying to restore the boot of Windows 10 using bootable flash drive Windows 10
Again We boot the computer from the Windows 10 installation disk, in the initial installation window, click on

"System Restore"

We enter the recovery environment, select "Troubleshooting"

"Extra options"

« Boot recovery»

Computer diagnostics and troubleshooting.


And then we are waiting for a message that the Startup Repair tool was unable to restore our computer. And we can complete the job or return to the advanced options again.

Restoring Windows 10 boot using Win 7 bootable flash drive
We boot the computer from the boot Windows flash drives 7, in the initial installation window, click on

"System Restore"

The recovery tool automatically searches immediately installed systems Windows on hard drive if the search for systems did not start, then there is no active partition, see detailed video
https://yadi.sk/i/ciN3-vBpkziDB

Problems have been found in the boot options for this computer.
Click on "Details"

We see that the Windows 7 recovery environment has found Windows 10 installed on the hard drive and can restore its bootloader.
"Close"

"Fix and restart"

Reboot the computer with installation flash drive Windows 7 and select System Restore.
Search for installed Windows systems on the hard drive.
Windows 10 found and restored.

"Launch Recovery"

The Startup Repair tool runs system diagnostics.

The process of fixing problems related to loading Win 10.

Click on the button " Display diagnostics and problem description» .

Root cause found:
The download manager is missing or corrupted.
Correction: File recovery.
in all operating rooms Microsoft systems Various system recovery tools are provided. With its new operating system, the company has provided more options for recovering Windows 10. When deleting system files, an inexperienced user may need to restore the system, as well as in many other cases when the OS is unstable or does not start at all. In this article, we will describe all the available recovery tools for the Windows 10 operating system, as well as describe how to use them and on what principles they operate.
Restore Windows 10 with new operating system features
As many PC users know, operating system Windows 10, what is implemented in it two control panels computer. The first is the familiar Control Panel"and the second - new" Parameters". In this example, we will use the new panel " Parameters". To get in new panel can be through the menu Start" by clicking on the item " Parameters” or through the notification area by clicking on the button “ All options».
Once in the panel Parameters", the next step is to go to the tabs" UPDATE AND SECURITY» - « Recovery».

Now in the window that opens, we are interested in the only button Start. By clicking on this button, a window with a choice will open in front of you.

This selection menu offers the user two options: keep or delete personal data. First option completely saves all personal files of the user and completely cleans the system. Second option deletes all data on the computer, including user files, OS settings and all applications. In our case, we will choose the first option " Save my files". After this action, Windows will display a message about which programs will be removed from the PC.

Also the message mentions if your apps are installed from Windows Store 10, they can be quickly restored, including their settings. In the last window, the wizard will warn you what actions will be taken. To confirm reset Windows 10 to its original state, press the corresponding button Reset.


This method is very convenient when you need to reinstall Windows 10 without an installation DVD or when you don't have a bootable flash drive at hand. Judge for yourself, at the end of this reset on your personal computer there will be a net ten, including only personal data.
Restoring Windows 10 using a recovery drive
Now consider an example create an optical recovery disc tens. To make this disc, we need a blank DVD and a PC with a DVD drive. Now let's go to the regular panel Windows controls to create it. Find and open the control panel by clicking on the menu " Start» right click mouse and select the option we need.

In the panel itself, you need to follow these links " system and safety» - «».


There is only one button in the wizard Create disc. Therefore, after pressing it, the recording of the disc will immediately begin.

Now let's try to boot from the newly created disk. To do this, insert it into the drive and, when loading, select it through BOOT MENU BIOS.

If you select " Diagnostics", then we will get to the menu" Extra options» recovery. In this menu, you can restore the bootloader or OS image. In addition, you can call the command line in administrator mode, which has many commands for restoring the system. You can also call the Restore Checkpoint Wizard. Especially interesting is the use of the command line in administrator mode. Using the command line in special privilege mode, you can run, for example, a console program BOOTREC. On the command line, the BOOTREC utility can write a new boot sector. Also on the command line, BOOTREC can fix MBR record, as well as look for the lost Windows installation , which the BIOS does not see when the computer boots.
Full restoration of dozens through the image
For this example, we will use the hints of the previous one and go to " Control Panel by the same links. Now in the right part of the panel window, click on the link "". Such an action will launch a wizard in which we will create an image of the entire operating system.

As in the previous example, we will use optical discs to store information. In our case, this is one blu-ray blank. You can also save the image to a regular USB flash drive. Saving to a USB flash drive is especially important for computers that do not have optical drive, especially since the price of a large-volume flash drive is now very low. Now let's continue with the wizard.

In the wizard window that appears, a message appears that 46 gigabytes may be required to archive the entire system to an image. By clicking the Archive button, the preparation of archiving the OS into an image and burning it to a DVD will begin.

The saved image can be launched both in the control panel add-in we opened, and directly from the DVD when the computer boots.
This example will be of particular interest system administrators who need to quickly restore jobs and not bother installing drivers and various programs.
It is worth noting that you can set automatic backup creation archives.
The configuration is carried out in the same control window where the wizard was launched using the link " Tune backup ". The setup is very simple. After choosing where to save the archives, whether external drive or network resource, the system will automatically make backups. Automatic creation of archives prevents you from losing data if the hard drive is broken, so you should pay attention to this.
Checkpoints
Restore Windows with Checkpoint It was still possible in Windows XP. In the top ten, the implementation of these points is the same as in Windows 7 and 8. The developers have not even changed the interface of the point recovery wizard. It is also worth noting that the developers have disabled the automatic creation of control points (In the seven it is enabled by default). To enable automatic creation of restore points, just go to " System properties» to the tab « System protection". You can quickly move there using the systempropertiesprotection command in standard program «».

Once on the desired tab, you need to click on the button Configure .... This action will open a window in which you need to enable system protection, as well as specify how many gigabytes on the screw can be used for all points in the OS.

As you can see, enabling protection is quite simple. Immediately after that, the system will start automatically creating checkpoints.
operating room Windows system 10 does not make restore points spontaneously, but only at some event.
For example, you installed the driver sound card in OS or installed heavy software. Also, in addition to automatic creation, you can make points manually. To do this, on the same system protection tab, we will find a button named Create .... By clicking on this button, we will launch the restore point creation wizard. First of all, enter the name of the point and click the Create button.

The time to create each of the points in manual mode depends on the volume installed programs and OS settings on the computer. Rollback to the previous point is carried out by calling the wizard using the Restore ... button.

In the next window of the wizard, you can detect all created checkpoints, both automatically and manually.

By selecting one of the points, you will restore the state of your OS at the moment when the point was created. This type of recovery is especially it is convenient to use when the operating system is unstable, there are constant freezes, death screens and spontaneous reboots. In addition to recovering using the wizard from under Windows 10, you can use the recovery disk if the OS does not want to start.
Advanced PC users will also be interested in ways to create points using PowerShell in administrator mode. The following is a demonstration of the PowerShell console running in administrator mode, running the following command: Checkpoint-Computer -Description "InstallBetaMicrosoftOffice"

This command creates a restore point named BetaMicrosoftOffice Installation. When creating breakpoints using PowerShell, you must wait for the console to complete the command, but if you do not, the checkpoint will not be created. And running PowerShell in administrator mode is easy enough. Just find it in the search engine and right-click on the item " Run as administrator". PowerShell can also be launched immediately through the command line, which is launched in administrator mode. To do this, at the command line, just enter the command " PowerShell».

It is worth noting that in Windows 10 you cannot delete a specific checkpoint, but only delete everything at once.
To help in this situation, such a popular utility as CCleaner. CCleaner can remove unwanted breakpoints thus freeing up a lot of hard disk space.
Finally
It can be seen from the above examples that developers new Windows 10 decided to keep most of the built-in recovery features that were in previous OSes, and also supplemented the system with new ones. Besides standard ways recovery, we advise our readers to pay attention to such a program as Acronis True Image 2017.
>> Download Acronis True Image 2017
This program can quickly make backups of the entire OS, as well as quickly restore it. A distinctive feature of the utility, in addition to rich functionality, is cloud storage data. That is, you will not need to save backups on external drive. You can also use Acronis True Image 2017 to encrypt all archives with a 256-bit key, which provides increased data storage security.
Related videos


