Creating a flash drive for flashing BIOS. Create a bootable flash drive (easy way) Favorites
There are sometimes quite unpleasant situations when the operating system crashes. Restoration requires the original disc. If this is not available, you can write the image to a regular USB flash drive. But here's the problem - what to do when there is no boot from a USB flash drive in the BIOS? Many users simply do not know what to do, and are lost in this matter. Let's try to dot all the i's.
How to enable in BIOS the simplest method?
To set these parameters, you must first decide how exactly you will enter the BIOS. The most common way is to use the keys Del, F2, F12, etc.
However, on the same Sony Vaio laptops, access is via special button ASSIST placed on the keyboard panel. On some laptops, access to the BIOS can only be obtained by calling the primary boot menu using the Esc key.

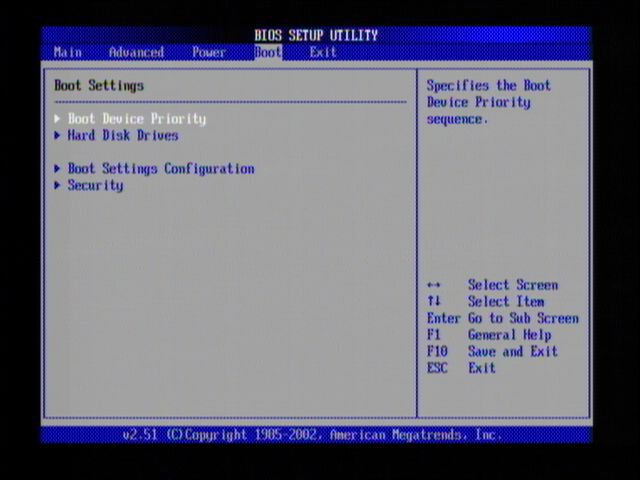
How do I set the BIOS to boot from a flash drive? Yes, very simple. After calling the I / O system, you need to go to the boot section (Boot). Here you need to find the boot priority line, which may have different names, depending on the developer and manufacturer of the BIOS (Boot Device Priority, Boot Sequence, etc.). In any case, something like this will be present. But that's not the point.
What to do if there is no boot from a USB flash drive in the BIOS?
It also happens that the bootable USB flash drive is not recognized by the primary I / O system. With what it can be connected? There are usually several reasons for this:
- incorrectly written image or installation distribution;
- damage to the USB stick itself.
To make sure that all the steps for booting from a USB flash drive are completed correctly, you need to take a few steps. For now, let's leave the question of how to enable booting from a USB flash drive in BIOS in the background, and move on to pressing problems.
Checking in Device Manager
Let's start with last point. When checking the device itself for its functionality, there can be two options: either it is faulty in itself, or the accompanying driver is missing or incorrectly installed, which is responsible for recognizing the flash drive by the operating system.
In case of malfunctions, everything is clear. The device will simply have to be replaced. But what to do when it is in working condition (at least it is detected on another computer or laptop)? You need to check its functionality. And for this, in the simplest version, you just need to insert it into the appropriate USB 2.0 / 3.0 port, and then call the standard "Device Manager" through the "Control Panel" or use the devmgmt command in the "Run" menu bar (Win + R).

Suppose that after inserting it into the port, it may either not be displayed in the manager, or it may be displayed with a yellow icon on which it is present. In the second case, everything is simple: you need to install or reinstall the driver. It may very well be that the system itself does not find a suitable driver, although it should do it automatically. But this mostly applies to non-standard devices. Flash drives like Transcend are usually recognized immediately.
If the device is not displayed in the corresponding manager, there may also be two reasons: either the corresponding driver for the universal USB controller is not installed, or the port itself is faulty. Again, you should install the driver (the controller is indicated in yellow or not in the manager at all), or try plugging the USB flash drive into another port. It should be noted that if the device is designed exclusively for data transfer with only USB 3.0 support, it will not be detected when connected to a standard 2.0 port.
Formatting Partitions on a USB Device
Let's leave aside the question of how to boot from a USB flash drive in BIOS for now, and move on to the procedures, without which even writing an image to install the system on a device may be in vain.

First of all, if the device has problems in operation or nothing can be done with it, you should first format it. In this case, it is undesirable to do a quick cleaning of the table of contents, but it is better to do a full formatting. Only in this case, the file system contained on it will ensure the correct transfer of data and their reading.
Such an operation is performed in the standard "Explorer". On the device, you just need to right-click, and select the appropriate line from the menu. In a new window, be sure to uncheck the quick format line, and then activate the start of the process. Depending on the total volume, this may take a long time.
Creating a bootable distribution
If we consider the question of how to set the boot from a USB flash drive in BIOS, even wider, we cannot ignore the issue of creating boot image and transfer it to storage. This can be done using the UltraISO utility or the like.

However, the source must use the original installation Windows disk. Actually, it is not so difficult, so there is no point in dwelling on this in detail. And if there is no boot from a USB flash drive in the BIOS, in the future it all comes down to correctly transferring the image or unpacked distribution files to the drive. Here you have to tinker a little.
Media preparation
If you use the system's own tools, even after formatting with a USB device, you need to perform a number of additional actions (it is assumed that the image has already been created from the original disk using the same UltraISO programs or even 7-Zip, and the flash drive is in working order and is connected to a computer or laptop).
First we call command line(cmd in the "Run" menu), always on behalf of the system administrator. In the console that appears, enter and press the enter button.

After that, we use the list disk command, again, followed by pressing the Enter key, after which we look at the available disks and remember the number of the USB device. To accurately check the USB drive number, you can use the diskmgmt.msc command from the Run menu.
Now in the console you need to enter the select disk command and specify the number of the disk you are looking for, separated by a space. Next, the device should be cleared of the contents with the clean command.

The next step is to create a primary boot partition. This is done using the create partition primary command followed by input. After confirmation of a successful operation appears on the screen, use the select partition 1 command, then - active (to activate the selected partition) and finally - format fs = ntfs quick to format with a choice If you want to create a file FAT systems 32, uses a similar format command fs=fat32 quick.
The next step is to assign a name to the device using the assign command (the name will be assigned automatically). Finally, we enter exit and exit. The bootable USB device is ready to go. It remains only to correctly transfer the distribution files to it.
Transferring data to a flash drive
At this stage, configuration is no longer required. We don’t need BIOS to boot from a USB flash drive yet, but we need the 7-Zip program. In the simplest version, it can be used to correctly copy the installation files to the media (roughly speaking, extract them from the image).

We launch the Zip File Manager utility from the standard "Explorer", then select the image of the installation distribution kit that was previously created or downloaded from the Internet, specify the USB flash drive as the final device and confirm the actions by pressing the OK button. At the end of the process, the media will be completely ready for use.
Start download
And now let's move on to the question of how to install boot from a USB flash drive in BIOS directly. We reboot the system and at the initial stage we press a key or a key combination to enter the BIOS settings. Usually this is Del, F2, F12 (for ASUS laptops, BIOS loading from a USB flash drive is done exactly like this), but other keys or combinations described above can also be used. Depending on the manufacturer of the equipment, you may first need to call up the main menu. This situation is typical for laptops like HP - booting from a USB flash drive (BIOS) is set up a little differently, although the operations themselves are very similar.
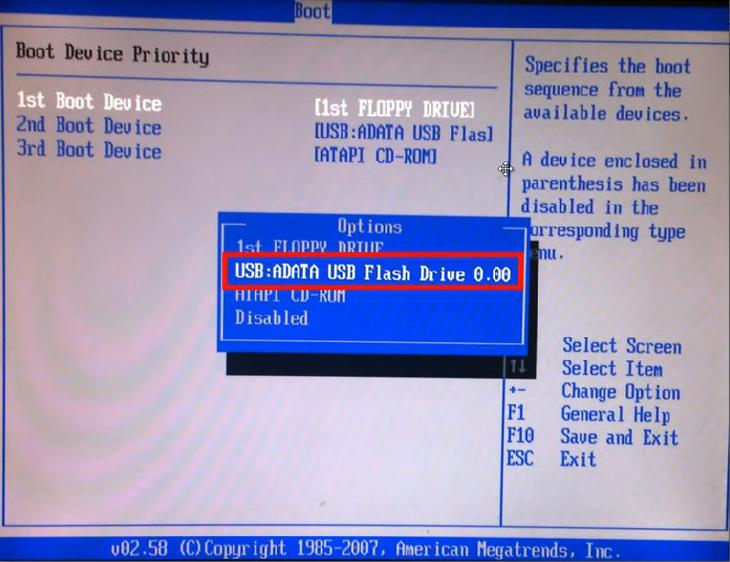
In the boot section (Boot) look for the item Boot Device Priority and look at the line 1-st Boot Device. By pressing the PgDn key, select the desired device, after which we exit with saving the parameters (as a rule, this is done using the F10 key). This is followed by a reboot, and the installation starts automatically.
However, it is not enough to know how to choose to boot from a USB flash drive in BIOS. It is important to remember that you should only call up the settings of the primary I / O system when a USB device is connected before the computer or laptop starts to boot. V otherwise The flash drive just won't show up.
How to fix problems?
Now let's look at a situation where the device seems to be working, since all the above steps are supposedly performed correctly, but in fact there is still no boot from a USB flash drive in the BIOS. How to proceed in this case?
We use the same command line. Let's assume that the USB device in the system is denoted by the letter F, and optical drive- E. Now you need to write the command E:\Boot\bootsect.exe /nt60 F: (F is a flash drive in our case, and E is a drive).
Alternative Method
If that doesn't work, enter the following one by one:
F:\Boot\bootsect.exe /nt60 F:
After that, everything will definitely work as it should.
Compatibility Issues
If none of the above methods helps, you should first pay attention to the status of the drivers. In the best case, you can use programs like Driver Booster, which are able to update drivers automatically.
If they are OK, the reason may be that the user is trying to install a 32-bit system over a 64-bit one. In addition, the file system on a USB drive and the installation distribution may also differ in bit depth. Actually, the flash drive itself may not support USB ports 3.0 in which it is included. Here you need to be very careful.
Instead of total
That, in fact, is all that concerns how to set the boot from a USB flash drive in the BIOS. Of course, many users may have questions about the advisability of using the system's own tools for preliminary actions, because automated programs make this much faster and easier. But here I would like to note that such knowledge is extremely important, and programs in case of failures in access to the Internet are also not always at hand.
But prerequisite, as already understood, is a disk image that is created based on the original or downloaded from the Internet. Without it, nowhere. It remains to add that attention should also be focused on the bitness of the installed system, since the 32-bit version will not be installed over the 64-bit one without formatting the system partition. This is due only to the fact that for OS versions of 32 bits, and for 64-bit modifications, a minimum of NTFS is required. And on the flash drive itself, the corresponding FAT or NTFS file systems must be present, and not UDP, as is sometimes the case. As for the volume, 4 GB will be quite enough for any system, including even the tenth modification, which is gaining popularity.
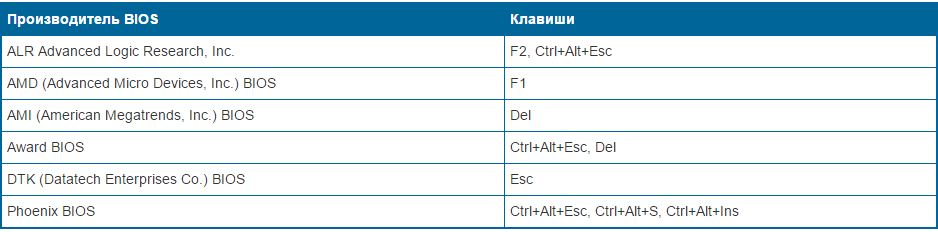
There are many types of BIOS: Ami, Award, Phoenix Award, UEFI. Let's figure out which buttons to press when loading a computer or laptop in order to go to BIOS and put the boot from the USB flash drive to install windows. I want to note that the traditional key delete, F2 to enter bios. Below are button combinations on how to enter BIOS to boot from a USB flash drive.
Buttons for entering bios from laptop and computer manufacturers.
Buttons from BIOS manufacturers
How to boot from a USB flash drive in BIOS to install Windows
To begin with, it is not always necessary to go into BIOS to swap the bootloader for installing windows. For this, there is a so-called launch menu. To go there, you need to turn on the computer, sometimes a key is written. In this case F12. Press the key that is written in the word boot menu.

What will we start the computer with: USB flash drive or other devices. The next step is to install windows.

How to boot from a USB flash drive in Ami Bios
- Click device priority.
In line 1st Devise set priority from the flash drive. This is usually all, but many have come across why I did everything right, but the computer does not start from a USB flash drive. It is just necessary to indicate sometimes, in addition to priority, forced loading in the line hard drive drives.
- V Hard Disk Drives we set a forced launch from a flash drive.
- V 1st drive choose a carrier.
- Press F10 to save.
It turned out that in the settings of 1st Devise and Hard Disk Drives there is a bootloader with USB Flash those. we put a priority option, tried and failed. Then we set a forced launch and everything worked out for us. And so in all versions of the BIOS, if the priority boot did not work.

How to boot from a USB flash drive in Award Bios
- Go to advanced features.

- Click First Device, v context menu set from which bootloader we will start the computer. We have selected the primary devices to launch.

- Hard Disk Priority put the flash drive in 1st place. (If in First Device chose to start from the drive, then you need to put a USB flash drive in Hard Disk Priority).
- Award is ready, press F10 to save.

How to boot from a USB flash drive in Phoenix Award Bios
- Setting Advanced, in line First boot device put a flash drive or other device.
- Click F10 to save.

New UEFI BIOS in which you can control the mouse.
- Line Boot Priority, change places by dragging with the mouse. Can be done through advanced settings > Exit/Advanced mode and choose advanced mode.

- presses Boot and choose in Boot Option #1 loader.

It turned out to be very simple to go into BIOS and boot from a USB flash drive to install Windows, you just need to change just the type of boot. And remember about the priority and forced bootloader.
Today we will look at:
BIOS is not an operating system, like Windows, which every user who has a laptop or computer faces. Despite this, you must know the knowledge and understanding of how to flash a BIOS if you want to run a modern one on an old “machine”. software or have more "levers" to control the PC system.
In this topic, you will learn how to create bootable flash drive BIOS for further firmware. We will not talk about the firmware itself, since this is a topic for another material. Today we’ll only talk about bootable flash drives and writing BIOS firmware on them.
Setting the motherboard model
Before creating a bootable BIOS flash drives, you need to clarify the motherboard model.
Finding out this information is pretty easy:

Copy or write down the information from the fields, as in the screenshot, as we will use it later when downloading the firmware.
Firmware installation
When the motherboard model becomes known, open a browser and in any search engine enter the model name of the board you are using.
On the manufacturer's website, you will need to find the "BIOS" tab and download current version firmware. When you do this, you can continue creating a bootable USB flash drive for the BIOS firmware.
Prepare an empty flash drive with the FAT32 file system. You can check the type of the current file system of the flash drive in its properties. Change file system to another, you can select formatting right click mouse and specifying the required type of file system.
When the flash drive is ready, unzip the firmware you downloaded earlier onto it.
Outcome
As you can see, for all this you do not need any to create a bootable BIOS flash drive - everything is very easy to do manually. To run a BIOS update using installed firmware, you need to insert the USB flash drive into the computer and enter the BIOS for further settings. We will tell you later how this is done.
At this time, you can prepare everything you need and practice creating a bootable BIOS flash drive. If you encounter difficulties along the way, let us know in the comments below so we can help you.
The reasons for updating BIOS versions can be different: replacing the processor on the motherboard, problems with installing new equipment, and eliminating identified shortcomings in new models. Let's look at how you can perform such updates yourself using a flash drive.
You can perform this procedure in several simple steps. It is worth saying right away that all actions must be performed exactly in the order in which they are given below.
Step 1: Determine the motherboard model
To define a model, you can do the following:
- take the documentation for your motherboard;
- open the case of the system unit and look inside;
- use Windows tools;
- use special program AIDA64 Extreme.
In more detail, in order to view necessary information using software Windows Tools, do this:
- Press key combination Win + "R".
- In the opened window "Run" enter the msinfo32 command.
- Click "OK".
- A window has appeared that contains information about the system, and it contains data about installed version BIOS.

If this command fails, then use AIDA64 Extreme software, for this:

As you can see, everything is quite simple. Now you need to download the firmware.

When the firmware is downloaded, you can install it.
Step 3: Installing the update
You can make updates in different ways - through BIOS and through DOS. Let's consider each method in more detail.
Updating via BIOS is as follows:

Sometimes for BIOS reinstallation you need to specify boot from a flash drive. To do this, do the following:

Read more about this procedure in our tutorial on BIOS setup to boot from a USB stick.
This method is relevant when it is not possible to make updates from operating system.
The same procedure via DOS is done a little more complicated. This option is suitable for advanced users. Depending on the motherboard model, this process includes the following steps:

More detailed instructions instructions for working with this method can usually be found on the manufacturer's website. Major manufacturers such as ASUS or Gigabyte constantly update the BIOS for motherboards And for this they have special software. Using such utilities, it is not difficult to make updates. 
A slight glitch in the update will break the system. Do BIOS updates only if the system is not working properly. When downloading updates, download full version. If it is indicated that this is an alpha or beta version, then this indicates that it needs to be improved.
It is also recommended to flash the BIOS when using a UPS (uninterruptible power supply). Otherwise, if a power outage occurs during the update, the BIOS will crash and your system unit will stop working.
Before performing updates, be sure to read the firmware instructions on the manufacturer's website. As a rule, they go in the archive with boot files.
If download iso image With Windows distribution and even spell it correctly DVD disc or creating a bootable USB flash drive using the same UltraISO is practically not difficult for anyone. Then with the second stages, directly installing the operating system from a disk or flash drive on a PC, many have difficulties.
There are three ways I know how to start installing Windows.
1) the simplest and most unreliable is to open an image through a virtual drive with Windows already running and start the installation, but there are many factors that can interfere and give an error at some stage of such an installation.
2) Insert the flash drive we created into USB connector or a DVD disc with Windows into your drive, no matter what version, either windows 7 or windows 10, even win95. This works for everyone. Then, when you turn on the PC, call BOOT menu, this is a list with media from which you need to boot, select the media we need and press ENTER. You can read more about how to install Windows through the BOOT menu here.
3) It differs from method 2 only in that we specify what we want to boot from not through the boot menu, but in the BIOS of our device.
In this article, we will talk in detail about how to install Windows from a USB flash drive via BIOS or Windows boot 7 from the BIOS flash drive.
Booting Windows 7 from a BIOS flash drive
Installing Windows from a flash drive through the BIOS begins with a call BIOS menu or else it's called Setup, this is most often done with the Delete button immediately after turning on the laptop or computer, press continuously until you see blue screen with some text, but it happens that you need to press another button, it's F2 or F10 or Esc. You can try all the options until you see the desired result, or you can read a text like "Press DEL to run Setup" in the welcome window of the mother firmware, it tells us that in order to get into the BIOS, you need to press DEL.
And so, after we got into the BIOS SETUP UTILITY, we look for the Boot tab and use the arrows to go there. We need a line boot device priority
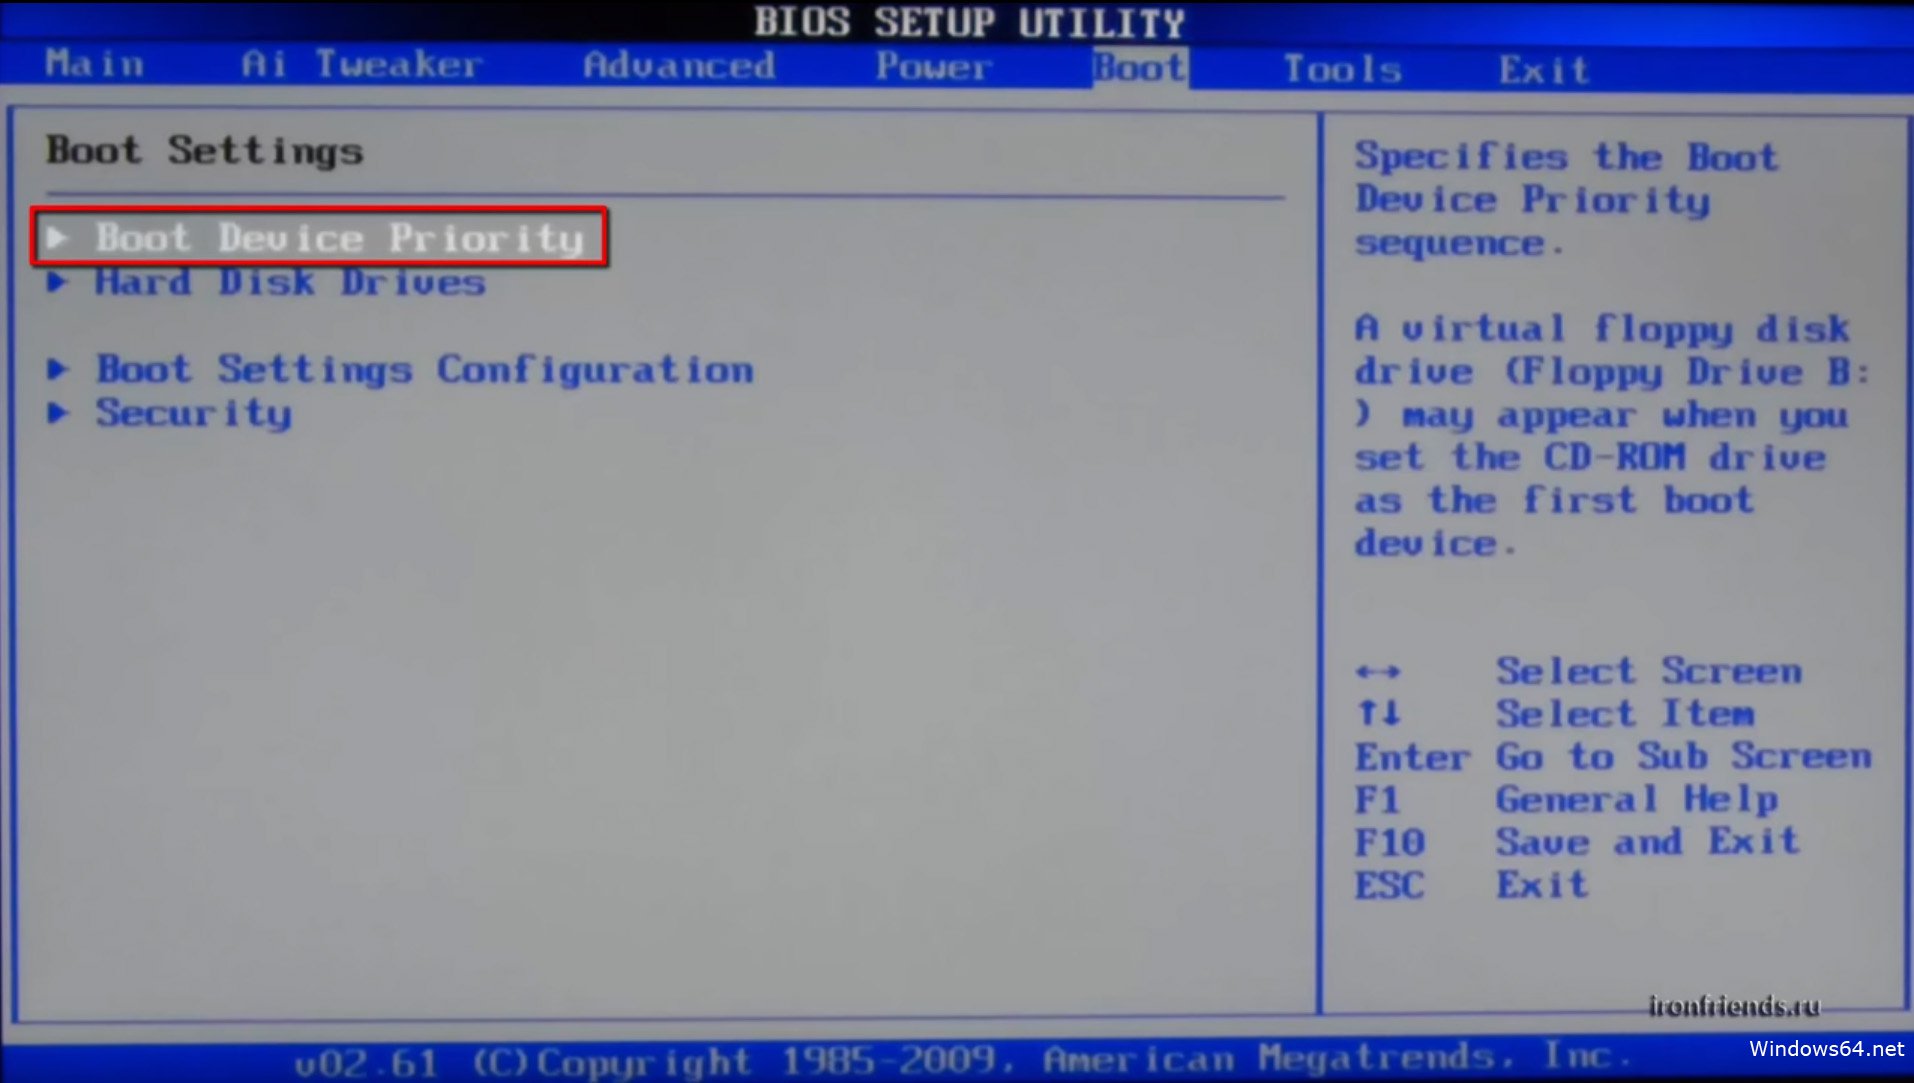
Here the logic is simple, the higher the device in the list, the higher the priority in the download queue. That is, the top one in the list is loaded first, and so on in turn until the system boots.

And so, using the arrows, select the first drive in the list and press ENTER, we see a list of all possible devices from which the computer can boot.

If we want to choose to boot the BIOS via a USB flash drive, then select USB interface, this is Removable Dev or something with the text "USB" included, or if the flash drive is already inserted, then the name of the flash drive manufacturer will be written. If you need to select a DVD drive, then as a rule this line begins with the words CDROM: or DVDROM: or it can also be written by the manufacturer of the DVD drive.
If you make a choice, then press ENTER and in the same way select the second device in turn, the second in the list should be your HDD on which Windows will be installed. If the BIOS does not see the USB flash drive, then try inserting the USB flash drive into another USB connector and do everything again.
In order for all changes to be saved in BIOS Setup, you need to go to the Exit tab before leaving and select the Exit & Save Changes line and press ENTER.

After that we can windows bios install via flash drive or dvd drive. bios with a blue screen is no longer available for everyone. In 2017, more and more often you can see the new generation BIOS, it is more graphically thought out, there are pictures of the icon for an understandable association, if you are not strong in English so as not to be mistaken. But essentially all the settings are the same.
Attention!- after our changes in the BIOS, now the computer will always boot first from a USB flash drive, then from hard drive, so it is important for Windows installation after the first stage of the installation, when the laptop or PC restarts, you MUST HAVE TO PULL THE FLASH DRIVE FROM the USB connector, or remove the disk from the DVD-roma. Otherwise, the first stage of the installation will be repeated indefinitely.
Now we know how to set up the BIOS to install windows from a USB flash drive. And with a bootable flash drive with way WINDOWS 7 or 10, we will be able to install or reinstall the OS on any device without any problems.


