How to start Windows boot disk. How to boot a Windows system through BIOS from an installation disk
Good day.
Each user puts a different meaning into the concept of “quickly”. For one, turning on a computer in a minute is fast, for another, it is extremely long. Quite often, questions from a similar category are asked to me ...
In this article, I want to give some tips and tricks that help me [usually] speed up my computer's boot time. I think that by applying at least some of them, your PC will start to boot a little faster ( those users who expect a 100 times speedup can not count on this article and not write angry comments later ... Yes, and I’ll tell you a secret - such a performance increase is unrealistic without replacing components or switching to other operating systems).
How to speed up computer boot Windows control (7, 8, 10)
1. Fine-tuning the BIOS
By default, in optimal BIOS settings check of the possibility of booting from flash drives is always enabled, DVD discs etc. As a rule, such an opportunity is needed when Windows installation(a rare time when treating viruses) - the rest of the time it only slows down the computer (especially if you have a CD-ROM, for example, a disk is often inserted).
What should be done?
1) Enter the BIOS settings.
To do this, there are special keys that you need to press after turning on the power button. Usually it is: F2, F10, Del, etc. I have an article on my blog with buttons for different manufacturers:
Rice. 1. BIOS - Boot Queue ( Dell laptop Inspiron)
3) Enable the Fast boot option (in new BIOS versions).
By the way, in new BIOS versions there is such an opportunity as Fast boot (accelerated boot). It is recommended to enable it to speed up the boot of the computer.
Many users complain that after enabling this option, they cannot enter the BIOS (apparently the boot is so fast that the time given by the PC to press the button to enter the BIOS is simply not enough for the user to press it). The solution in this case is simple: press and hold the BIOS entry button (usually F2 or DEL) and then turn on the computer.
HELP (Fast boot)
A special PC boot mode, in which the OS receives control even before the equipment is checked and ready (it is initialized by the OS itself). Thus, Fast boot eliminates double checking and initialization of devices, thereby reducing computer boot time.
In the "normal" mode, the BIOS first initializes the devices, then transfers control to the OS, which does the same again. Bearing in mind that the initialization of some devices may take relatively long time- then the gain in download speed is visible to the naked eye!
There are also back side medals...
The fact is that Fast Boot transfers control to the OS before USB initialization has passed, which means that a user with a USB keyboard cannot interrupt the OS boot (for example, to select another OS to boot). The keyboard will not work until the OS is loaded.
2. Cleaning Windows from garbage and unused programs
Slow operation of the Windows OS is often associated with large quantity junk files. Therefore, one of the first recommendations for a similar problem is to clean the PC from unnecessary and "junk" files.
There are a lot of articles on this topic on my blog, so as not to repeat myself, here are a few links:
2) Then, in the system configuration window that opens, select the ““ section. Here you need to disable all programs that you do not need (at least every time you turn on the PC).
In Windows 8, you can configure autoload in the same way. You can, by the way, immediately open " Task Manager"(CTRL + SHIFT + ESC buttons).
4. Windows OS optimization
Significantly speed up Windows work(including its download) helps setting up and optimizing for a specific user. This topic is quite extensive, so here I will only give links to a couple of my articles ...


Rice. 5. HDD(SSD) - Kingston Technology SSDNow S200 120GB SS200S3/30G.
The main advantages over conventional HDD:
- Speed of work - after replacing the HDD with an SSD, you will not recognize your computer! At least, this is the reaction of most users. By the way, earlier, before the advent of SSD, the slowest device in a PC was an HDD disk (within Windows boot);
- No noise - there is no mechanical rotation as in HDD drives. In addition, they do not heat up during operation, which means that a cooler is not needed to cool them (again, noise reduction);
- Great impact resistance of the SSD drive;
- Lower power consumption (not relevant for most);
- Less weight.
Of course, such disks also have disadvantages: high cost, limited number of write/rewrite cycles, impossibility* of data recovery (in case of unforeseen problems...).
PS
That's all. Everyone fast work PC…
Being a special type of computer diagnostics, safe mode involves starting operating system with the exception of virtually all unnecessary components. This mode It is very common in the course of restoring the health of a user computer after the appearance of certain breakdowns and malfunctions of a different nature. System malfunctions happen quite often, so proper knowledge of the safe mode startup procedure will be a significant advantage for the computer owner.
How to start safe mode windows 7
There are two commonly used options for opening Safe Mode in Windows 7. The first involves logging in during system startup, the second is enabled during system operation. The first option will work even in cases of serious computer malfunctions, because there is no need to fully boot the OS, the user enters safe mode and performs the required repair and recovery manipulations. A prerequisite The second option will become a running and active OS, because this method is not applicable in all situations, consider how to start windows 7 safe mode:
- When the computer is turned on, you should restart it (if the PC is off, you need to turn it on).
- Before the start of the operating system, the display shows information about BIOS versions, it is at this moment that you need to press the F8 key several times (pressing more than two or three times is recommended).
- A screen will open with a window for selecting advanced OS boot options.
- Use the arrow keys to select the " Safe mode" and pressing the "Enter" button.
When instead of a special window with a choice of options for starting the system, the inscription “Windows 7” appears, which means the normal boot of the OS, the user should try again to enter security mode. It should be noted that the F1-F12 keys may have been disabled earlier, in which case, the F8 button should be pressed while holding the Fn key (often on laptops).
Consider the launch option during the active OS environment:
With the OS running, press the key combination "Win + R", enter the query "msconfig".
The above settings will bring the user to an interface that will prompt you to restart the PC. The owner of the computer can enter safe mode by clicking the "Restart" item.  If you select "Exit without reboot", the entry into the required mode will take place after turning off / on the PC or after its first restart.
1. Features of Windows 10, how to enter safe mode?
An innovative modification of Windows 10 did not include the outdated method of opening Safe Mode by using the F8 key. There are three ways to activate it, the first pair of which is used during OS boot. The last option involves the failure of the system to start in the user's usual operating mode.
Starting safe mode using "msconfig" configuration:

Safe mode can also be started using the command line:

If the PC refuses to boot, you can activate safe mode as follows:
- Must have boot disk Or a flash drive with Windows 10.
- Boot from this disk or flash drive, select the required interface language and other parameters.
- In the window that appears, which prompts you to install the OS, you need to press the "System Restore" button located at the bottom of the window.
- Go to the "Diagnostics" section and in the "Advanced options" subsection, run command line.
- In the window that opens, enter "bcdedit / set (globalsettings) advancedoptions true".
- Wait for the message that the operation was successful and deactivate the command line by clicking "Continue" after that.
- After restarting the PC, a menu with available modes of operation will be displayed, select "Safe Mode". (It can be disabled with the command "bcdedit /deletevalue (globalsettings) advancedoptions").
2. Windows 8, how to enter safe mode for correct troubleshooting?
Specificity Windows interface 8 suggests not the most familiar method of launching safe mode against the background of other systems. Consider the main options for entering this mode.
The first option is to log in using the F8 button.
However, this method may not work on all modifications of computers, its sequence is as follows:

How to start Windows 8 Safe Mode by changing boot options?
The method is considered to be quite effective; for its implementation, the following series of actions are used:
- Press the key combination "Win + R", enter the command "msconfig".
- Go to the section called "Download". In the item "Boot Options", you should check the box opposite the inscription "Safe Mode".
- Set the selector opposite the entry "Minimum", and then click "OK".
- A window opens in which the user needs to confirm the restart of the OS.
- After the reboot, safe mode will become active. After solving and troubleshooting, it is important to uncheck the previously checked box next to the "Safe Mode" item in the settings of the boot itself.
Another common way to activate Safe Mode in Windows 8 includes the following steps:

With bootable media.
Of course, including the possibility of a complete failure of the operating system, there is an option to enter safe mode using a boot disk or flash drive:
- Insert bootable flash drive on the PC and run from it.
- Select date, time and other options.
- In the installation window that appears, click on "System Restore".
- Go to the "Diagnostics" item and select the section called "Advanced options".
- In the "Command line" section, enter the task "bcdedit / set (globalsettings) advancedoptions true", then press "Enter".
- Close the command prompt, and then press the "Continue" key.
- After rebooting the OS, in the window that opens, press the F4 button.
- Login in safe mode. To window with possible options system startup did not appear after each subsequent shutdown / on or restart of the PC, you must enter the following into the command line: “bcdedit / deletevalue (globalsettings) advancedoptions”.
3. How to enter safe mode in Windows XP?
Considering the outdated, but still relevant version of Windows XP for many users, let's consider the process of starting safe mode on it:

How to run safe windows mode XP from the system? In some cases, this option may be an alternative to the above. Consider the sequence:

Automatically launching a program when the computer boots is a handy feature and worth using if available. basic set applications that you always keep open. Some programs have their own settings in which you can set them to start automatically with each new Windows boot, others do not have such functionality, but the operating system allows you to do this. In this article, we will see how to disable autoload programs. Windows tools and, if necessary, include automatic start individual applications.
Starting with Windows 7, the standard "Task Manager" of the operating system has a lot of useful features and serves not only to terminate frozen programs and diagnose the workload of computer components. In particular, the "Startup" item appeared in the "Task Manager", which displays all programs that automatically start when Windows boots. To get to this point, call the task manager by pressing the Ctrl + Alt + Del keys and select the “Startup” tab at the top of the window that opens.
To disable the startup of an application in Windows through the "Task Manager", you must click on a specific program in the list right click mouse and select Disable. 
Please note that the Task Manager also displays the impact of a particular application on the operating system startup speed. Through the "Task Manager" you can not add new programs to automatic download when starting the computer.
How to enable or disable autorun programs through the registry
The registry allows you to access almost any function of the operating system. In particular, through it you can configure a list of programs that are automatically loaded when Windows starts. To do this, you need:
- Press the key combination Windows + R on the keyboard and write the command regedit;
- Next, in the registry, go to the following path:

It should be noted that according to the instructions above, the parameters for autoloading programs are set for the user on behalf of which this moment the registry is being edited. If you want to set the settings for all users, in the left part of the registry editing window, right-click on the Run folder and select "Go to the HKEY_LOCAL_MACHINE key". Then follow the procedures to add or remove a program from the startup list.
You can enable autoloading of individual applications through a special folder. It is enough to place a shortcut to the program in it so that it automatically starts every time you boot Windows. To go to this folder, just press the key combination Windows + R on the keyboard and enter the command in the Run window shell:startup.
It should be noted that this folder does not contain all programs that are set to automatically start when the operating system starts. Through it, you can not disable system applications.
How to perform a "clean" boot?
During a normal Windows boot, it automatically starts and runs in background various programs. These may include third party antivirus programs and system utilities. When you try to launch a game, these programs may interfere with the operation of the game or its connection to the network, or reduce its performance.
Important note: A clean boot is not recommended as a permanent solution to problems - it is only suitable for diagnosing problems and finding their sources.
Why is this needed?
During a "clean" boot, most programs and services that are not critical to the operation of the system, which usually start automatically when Windows starts, are disabled.
Important note: before performing a clean boot, it is strongly recommended to update the system and fully scan it with anti-virus and anti-spyware programs to make sure that there are no infected files (active or dormant) in it - after all, a clean boot can temporarily disable them as well.
What should you expect from a clean boot?
Remember that a clean boot is only a temporary measure. By and large, it is needed only in order to check whether problems arise when only the bare minimum of programs is running.
Subsequently, if there were no problems during a clean boot, you should restart the computer in normal mode and try to identify the source of the problems among previously disabled programs.
Important note: Performing these steps may cause your system to slow down.
How do I clean boot my computer?
To do this, you need to run the program "MSCONFIG"("Microsoft System Configuration Tool") according to the following instructions:
How to run MSCONFIG:
Click in windows button"Start" and click on the search input field or select "Run" ("Run..."). Windows users 8 Gesture from the right edge to the left and click the "Search" field with the mouse.
Type "MSCONFIG" (without quotes) in this field and press Enter. Note for Vista/Windows 7 users: If you are asked to account name and administrator password or confirmation of actions with administrator authority, enter the appropriate data if necessary, and click the "Continue" button.
When the "System Configuration" window opens, select "Selective Startup" in the "General" tab and uncheck "Load Startup Items" ):

Then open the "Services" tab and select the "Hide all Microsoft services" checkbox there. This is a very important step!

After checking the "Hide all Microsoft services" checkbox, click the "Disable all" button on the right side of the window.
After disabling the services, press the OK button, and when a prompt message appears on the screen, select Exit Without Restart. After that, close everything running programs, complete all downloads, save and close all open files, then restart your computer.
The so-called. clean boot and the message "You have used the System Configuration utility..." will appear on the screen. Click the "OK" button.
To restore the normal boot mode of Windows, you need:
1.Run System Configuration (MSCONFIG) again.
2.On the General tab:
3.Select "Normal Startup".
4.Press "OK".
5.Select the "Exit with Restart" option to restart your computer.
Hello! Today I rested all day, Sunday. But towards the evening I thought that I needed, I needed to write something useful on the blog. I began to think what I had not written yet, and what could be useful to you in the process of solving various computer breakdowns, and then the thought came that I had already written about that, and how I also wrote in it, but there is still a way that when you turn on computer can select device to download without having to go into the BIOS. I will write about this, I am sure that this advice will be useful to many.
You often have to choose from which device you want to start the computer. For example, you want to, or just boot your computer from a boot disk, to scan your computer for viruses. And for this you have to go into the BIOS, look for where this item is located in which the boot order is set, and also on different computers it's all done in different ways, and many at this stage abandon the idea of \u200b\u200bfixing a computer on their own.
If, for example, you need to boot from a CD / DVD disk or flash drive once, then you can do without changing the settings in the BIOS. And now I will tell you how to do it.Choose a boot device when you turn on the computer
We insert the disk into the drive, or connect the USB flash drive. We restart the computer and as soon as it starts to boot, press the key F11.

A window will appear “Please select boot device:” , in which, using the up and down arrows, select the device we need from which we want to boot, and confirm our choice by pressing “Enter”. As you can see, I have the opportunity to boot from the drive, flash drive and of course the hard drive.
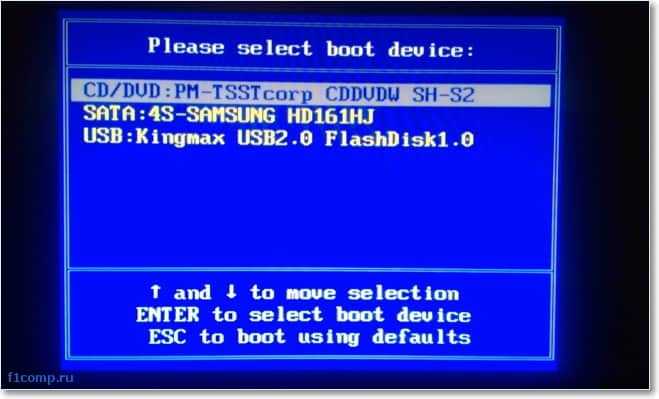
Which device you choose, from this the download will go. As you can see, everything is much easier than digging into BIOS settings. If nothing happens when you press F11, then there are at least two options:
- You USB keyboard, and in the BIOS settings, support for such keyboards is disabled when the computer starts. You need to connect a regular keyboard, and use it to enter the BIOS and in the Integrated Peripherals item, find USB Keybord support and set the Enable value. After that, your USB keyboard should work.
- And the second case, it's just that you have another key set to call the boot device selection menu when you turn on the computer, or simply this function is disabled in the same BIOS. For example, in Acer laptops in BIOS there is an item “F12 select boot device” (or something like that), which you need to enable by setting Enable . After that, the menu will be called up by pressing the F12 key.
It seems to have written everything, there will be questions, ask. Good luck!