Partitioning a hard drive into s and d. Partitioning a hard drive into sections
Dear friends, today I want to tell you how smash hard windows disk 7 into partitions without formatting it. Each computer clicking on the icon saw that there were hard drives "C" and "D", I will not dwell on removable media. The standard situation is when on drive "C" we have, and on "D", those who take care of their documents, we store photos, videos, movies, music files and of course install them there various programs and games. Whoever installed the operating system on the computer himself, during the installation saw that you were prompted to format the hard drive and configure hard drive, i.e .
It would seem then that there is nothing complicated, formatted "C", if you want to split it into sections, but if you want to put the system on the whole. But this is "C", but what about "D"? You can’t create a partition without formatting, but I’m not going to format it either, I have data collected on it for almost a whole year.
Yes, in general, why did he give up this section? I began to search the Internet for information on how I can partition the "D" drive without losing data. Sea of articles - format and split. Or split without formatting using such, such, and such a program. In general, everything is as usual.
I will not load you with unnecessary information, but I will describe in detail, with pictures how to partition windows 7 hard drive into partitions without formatting it.
Go to the Start menu and type "Computer Management" in the search bar. Select the "Computer Management" tab. A window will open in which you need to click on the "Disk Management" item.

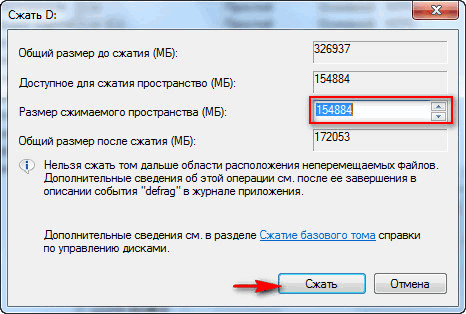
In the window that opens, click right click mouse on the disk you want to partition. In the pop-up window, click on the line "Compress volume".

Scanning for free space will begin.

A window with settings will open, that is, you will see how much maximum space you can take away from the disk (most likely "D", you will not compress the volume on the "C" drive, where operating system) for the disk you are creating. You can safely set the maximum value (without going beyond the limits suggested to you), if compression is not possible, then reduce the volume for compressing the partition. Do not be afraid - on the partitioned disk, in addition to your files, after these actions there will also be a lot of free space. Click the "Squeeze" button.
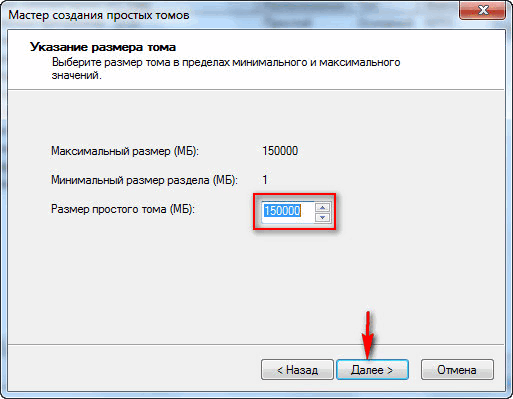
You will see that there is free space. Right-clicking on it, in the "Create a simple volume" window that opens. The Create Simple Volume Wizard opens. We press "Next".

Here, set the proposed maximum value that you have chosen. Click Next.
Here you will be prompted to assign a drive letter. Select a partition letter and click Next.

After choosing a letter, you need to format the created partition. All this "Master ..." will do himself. It remains to click "Finish".

We restart the computer. Everything! You have appeared new section(new volume). . If you do not like the name of the partition you created - "New Volume", then right-click on it and click "Rename". Just remove the inscription "New Volume". The computer will then call it " local disk» by adding the letter you assigned.

Well, that's all, now you know how to break HDD windows 7 simply and easily. Good luck to all!!!
The vital activity of modern man is closely connected with the use of computer technology. The computer has long been the main assistant, allowing you to successfully perform functional duties at work. It also helps to relax after a hard day at work, listening to your favorite music or watching your favorite movie once again. The PC allows you to keep abreast of all important events, to search. However, the most important and useful information the user must save on the hard drive, which often turns out to be unpartitioned.
Each user tries to create separate sectors for different types activities
Experts guide users to the mandatory division of it into parts, since this will contribute to speed, and also help protect data from loss if the operating system at some point gives a serious failure and there is an urgent need to reinstall it. The user will be able to independently carry out the technical tasks that have arisen, but only after he has studied the rules on how to divide the hard disk into partitions. You can count several options for actions that allow you to correctly divide the hard drive into parts, defining as a tool either the standard tools contained in the installed operating system, or downloaded and installed programs.
Armed with a great desire to comprehend how to divide a hard drive into two partitions, it is useful for a PC owner to know that Windows latest there are enough generations useful utilities, using which it is easy to carry out such operations. You can also split the hard drive into parts during the boot of the operating system.
Using utilities for dividing a hard drive
Windows 7, 8, and 10 contain utilities that act as standard means, using which, it is easy to divide into several parts the only logical disk with the operating system installed on it. Even despite the fact that not only important, but also system files are stored on the hard drive, the operation is not only realistic, but even quite simple.

Be sure to take into account that the size of the created partition should not exceed the size of the existing system partition.
Initially, they launch a utility that acts as a successful tool that allows you to feel each stage, to understand how to divide a hard disk into 2 parts. Thanks to the utility, it is possible to successfully implement everything in practice.

After pressing two keys, Win + R, the Run dialog box will appear. In the proposed line, enter diskmgmt.msc, after which a new "Disk Management" window will appear, in which all disks that are parts of a single hard drive will be displayed.
Moving on to the next stage, the user will have to decide which particular section he will split. Right-click on it, calling context menu, and select the Shrink Volume submenu.

The utility will ask you to enter data on the size of the partition being created, respectively, the system will immediately show the space that is not included in any partition. This space is automatically labeled "Not allocated". The user must click on it, again calling up the context menu, but this time they will have to stop their choice on the "Create a simple volume" submenu.
The utility automatically sets the size equal to the unused space, but if you want to create not one, but several partitions, the PC owner must manually set the desired size, and then create the required number of partitions in the same way.

At the next stage, the utility will ask you to assign a letter to the created partition, as well as select file system. For beginners, it is more rational to agree with the options offered by the utility.

After the user confirms the correctness of the selected actions, the utility starts and successfully completes the process, as a result, after rebooting, the desired number of partitions can be observed on the hard drive.
Unfortunately, it is impossible to do the opposite operation, connecting several partitions into one, using Windows tools.
Partitioning a disk when installing Windows
If you purchase a computer on which the OS has not yet been loaded, it is better to familiarize yourself with another option, how to divide the hard disk into partitions.
This option is quite clear, so even a beginner who has not encountered such operations before can easily figure out how to divide a hard drive into two or more partitions.
By inserting the boot optical media into the drive, the PC owner must initially carefully observe what is displayed on the screen. You should wait until a window appears prompting you to select the partition on which the operating system will be installed. To divide an existing partition, you should click on the "Disk Setup" button, calling additional options, among which the "Delete" and then "Create" buttons are successively pressed.

In the case when Windows is loaded on the purchased new computer, the owner has nothing to fear. If Windows is reinstalled, then after such actions all data on the computer will be ruthlessly erased, so it is advisable to save the information to another medium before loading the OS.
By clicking on the "Create" button, the system will ask you to specify the desired size of the new partition. If there is a desire to create another section, the steps are repeated in a similar way. It remains only to click on the "Next" button, the OS will continue to load, and upon completion of the process, you can see for yourself that the hard drive is divided into parts.

Understand how to partition a hard drive while Windows boot XP, also not difficult, although purely outwardly dialog boxes that accompany the boot process are slightly different.

During the boot of Windows XP, all the presented partitions are initially deleted by pressing "D". The system will ask for confirmation just in case, therefore, to continue the running process, you should press "L". Now, when only the unallocated area is displayed on the screen, you should press "C", which will allow you to go to the window where it is important to indicate the size of the partition to be created.

This completes the actions associated with dividing the hard drive into parts, then actions will be performed aimed at loading the operating system.
Partitioning a disk using software tools
However, not all users want to divide the "screw" into parts using standard tools, and even more so, focusing on the mandatory reinstallation of Windows.
Experienced PC owners prefer a slightly different way. In particular, they want to be helped to carry out planned activities. special program. You can divide the hard drive into several parts by downloading the necessary software in advance.
There is more than one program that can successfully partition a hard drive into several partitions; you can find several options by choosing the most successful one for yourself.
Free AOMEI Partition Assistant
Internet resources offer a lot software tools allowing you to perform a variety of tasks. The AOMEI Partition Assistant program is a free Russified software tool that allows you to successfully divide a hard drive into the desired number of parts.
The program is equipped clear interface, so it’s easy to figure out exactly how to make the division. It is enough to click on the logical disk with the right mouse button, select the "Partition Partition" submenu. Next, a window will appear prompting you to set the dimensions of the created parts, while it is enough to either manually type the required number, or move the slider, watching the display at the bottom of the resulting size.

If all actions were carried out correctly and the expected result suits, the user must press the "OK" and "Apply" buttons in sequence, after which the program itself will automatically carry out the splitting process. After the reboot, all changes will be successfully applied.
Using Acronis Disk Director
Dividing a hard disk into several partitions can be done using this commercial product like Acronis Disk Director.
The program needs to be installed, so after purchasing, the user must install it on the computer.
Actions can be followed in manual and automatic mode. Experienced users recommend using the manual mode, which is easier to monitor and adjust if necessary.
In the program window, select the disk to be partitioned. By calling the context menu, go to the "Split volume" submenu, then specify the size of the new volume and click the "OK" button, confirming your actions.

However, all pending operations are transferred to the pending status. To start the partitioning process, click on the "Apply Pending Operations" button. After the computer restarts, the changes will take effect and the hard drive will be divided into parts.

So, splitting a hard drive into separate parts is not only correct, but also quite important, because it is much easier and faster to defragment each partition separately.
Information resources offer a variety of opportunities through which you can carry out the process of breaking the hard drive into parts, so the user must choose the option that is acceptable to him.
Partitioning a hard drive is a way to organize the storage of information, comparable to putting things on the shelves in a closet.
In this article, you will learn how to partition a hard drive and why.
Most users prefer to divide disks into 2-3 partitions for the following reasons:
- not to mix operating system files and personal files in case of OS reinstallation;
- for the convenience of manual information search;
- to install more than one operating system on a computer;
- so that each user, if there are several of them, has his own “corner” for personal files;
- to hide some information from other PC users (together with the section).
Note! When installing operating systems, service partitions are created - boot, recovery, for the paging file, etc., which are not visible in Explorer. These areas are hidden because changing or deleting their contents breaks the OS.
Some people think that it is necessary to partition a hard disk into sections: so, they say, personal files will not be affected in the event of a system failure, they will be less fragmented, and, therefore, open faster.
In fact, the files will not disappear anywhere, even if the OS completely crashes. And this will not affect the performance, especially since modern systems defragment themselves without user intervention.
On the contrary, the system partition tends to fill up quickly, and if there is not enough space on it, the computer will first slow down, and then completely stop loading due to the fact that the system has nowhere to turn around.
Think you still need an extra section? Then read how to create it.
Two ways to divide a disk into partitions in Windows 7, 8, 10
Installed system capabilities
Starting with Windows 7, you can partition disk space using the OS itself, both during installation and after.
There is only one condition: when splitting an existing partition, it is important that the partitioned part has no less free space than the one that will be separated.
Consider how to partition a hard drive into partitions in a running Windows 10.
- Go to the context menu of the Start button and launch Disk Management.
- Open the context menu of the section you want to split. Click Shrink Volume.
- The window that opens after that shows the total size of the compressible area and the space available for compression. From the last one, select the part that will be the new section.
As you remember, it should not exceed half of the value specified here. Then click the "Compress" button.
- After compression, unallocated space will appear in the list of volumes - it will be your new partition. Right-click on it and select "Create a simple volume". The Create Simple Volume Wizard utility will launch.
- In the wizard window, specify the size of the new volume. If you leave the default value (which is equal to the entire unallocated area), the entire area that you detached will become a new partition.
If you specify a lower value, one part will become a volume, while the other part will remain unallocated. Click "Next".
- Assign a letter to the new volume if you want it to appear in File Explorer, or mount it as a folder. If you decide to do it later, select "Do not assign drive letter or path".
- Next, the wizard will prompt you to format the volume and assign a label to it. A label is a short name for a section, explaining what is there. Leave this line blank if you wish.
After formatting, the unallocated space will become a full-fledged partition.
Creating a volume when installing Windows
Creation of new partitions during Windows installation differs from the method that we discussed above in that the shared disk will first have to be deleted, that is, completely cleared of information.
And then build a new partition structure from the unallocated space.
The breakdown is made at the stage when the program asks you to specify the location of the OS installation. What to do next:
- In the window "Where do you want to install Windows?" click the Disk Setup button.
- Mark the section you want to split and delete it. Instead, unallocated space will appear.
We showed the process of creating logical volumes using the example of installing Windows 7. On Windows 8 and 10, this is done in exactly the same way.
During the installation of Windows, it is not necessary to allocate the entire disk space, it is enough to select the area where the system will stand. You can mark up the rest of the free space later, when you want.
These are not the only ones, but only the most available ways partitioning disks.
Own functions for working with disk space, which are in all Windows versions starting with the “seven”, it is enough in almost any situation, so the need to use third party programs, such as Acronis Disk Director or Paragon Partition Manager, are no longer available.
Dividing a hard drive into partitions in all Windows systems Above Vista happens on the same principle. Only the login procedure differs, but we will use the universal method.
Command line for partitioning disks
For our purpose, you can also use the console, for those who are used to working with the command line.

Partitioning a disk during installation
Another convenient way is to create volumes at the time of system installation.

We use third party software
You can also use specialized utilities, to create partitions. From standard Windows tools they are distinguished by advanced functionality and more stable operation. Also, such software is able to split partitions without deleting data from them.
The first application I would like to mention is mini tool Partition Wizard Free. As the name implies, the application is completely free, while boasting quite powerful functionality.
All actions are intuitive. When the application loads, right-click on the section and select the desired action. For example, to partition a disk, select Split.
Then, moving the slider or entering the values manually, specify the required size and confirm changes. When the process is completed, the disk can be used. 
Another powerful free app – AOEMIPartitionAssistant. The interface and functionality are very similar to the above app.
Run the program and select desired drive. Click on it with the right mouse button and get the available actions.
If you have never divided a hard desk into parts, then you are probably wondering why this is done at all. In fact, there are quite a few reasons - from banal convenience to security. Why divide (partition) a hard drive? Once upon a time hard disks were of small volume - 20-40 Gb. Although even then, many began to break them into 2 parts: the operating system and user files. Today, in the "terabyte" era, this is especially true. High-quality videos and music can take up hundreds of gigabytes - why not have their own section? Work files and study are much more important and therefore also a separate storage. Also, several people can use the computer - each has its own space. Or an example parental control: restrict access to discs with games and movies - just study. It's convenient! In addition, there are users (I am one of them) who have several operating systems on their computer at once, for example, Windows and Linux. And here, partitioning the hard drive into a certain number of partitions is a natural necessity. A bit of theory
. What are the sections? It is desirable to know this information in order not to get confused. Firstly, a partition can be unallocated: this is when you seem to have allocated space for a new partition (“bite off” a piece from the “C” drive, for example), but the system does not see it. Don't worry - your hard drive hasn't gotten smaller and you haven't done anything irreversible. Most likely, this section is simply not marked up yet. So what are sections? · "Primary", "Primary", "Primary partition"- something like this. If you have only one partition and the operating system is on it, then it is the primary one. It must have a file system (NTFS, FAT). There can be up to 4 such partitions on a hard drive. It happens that you bought a laptop, but you cannot add a new partition. Perhaps there are already 4, and some of them are hidden (recovery- hidden section with backupWindows serving for recovery). · "Additional", "Advanced", "Eextended partition". By itself, an extended partition has neither a letter label nor a file system. If you seem to have created a partition, but it is NOT displayed in the system, then most likely it is advanced. An extended section can only be in a single copy. It is one of the main sections - that is, if you have an extended one, then you can have 3 more main sections in addition to it. So why is it needed then? - you ask. I answer. That's why the extended section was invented - so that you can bypass the restriction on 4 sections. It is "inside" the extended partition that you can create as many as you like. logical drives. But in the system you will see only these drives along with the main partitions - they will all have their own letter designation and file system. The extended section will exist hidden. Here confusion can arise due to the fact that different programs can use different names. Or, for example, completely “forget” about them - what is the sin of the system utility in Windows 7. But now, I hope, you understand this structure at least in general terms. I'll try to visualize: - Main section “C:” (Logic 1 NTFS or FAT) - Main section “D:” (Logic 2 NTFS or FAT) - Main section "Advanced"(No letter and no file system) - Logic 4"F:"(NTFS or FAT) - Logic 5"G:"(NTFS or FAT) - Logic 6"H:"(NTFS or FAT) - Main section “E:” (Logic 3: NTFS or FAT) Letter designations for partitions can be any - not necessarily in alphabetical order. File systems, too. FAT and NTFS are just commonly used on Windows. If you have less than 4 sections, then let them all be the main ones - there is no point in making an extended one. Disk partitioning methods How many programs - so many ways. It should be noted that there are a lot of funds, most of them - paid programs. But in general, the methods of partitioning a disk can be divided into 3 main areas. Method number 1. Systemic The system utility is quite simple and not very functional. You will be able to do some basic partition operations such as resizing, creating a partition. The easiest way to do this is to do this: the "Computer" icon on the desktop (it is still in the "Start") - right-click. Then select "Management" (you must have administrator rights). In the window that opens, in the left column, select the "disk management" utility. We wait a few seconds.  And here are our wheels. Disk 0- and there is our hard drive with its partitions. What is in the CD-ROM does not interfere with us, but only sets us in the right mood. As you can see, the system utility is all 6
partitions of the hard disk considers simple and basic. Although in reality it is not. The program does not see that the last 3 partitions have other file systems (not FAT or NTFS) and that these are logical partitions inside an extended partition. This is a big minus. The program still does not know how much, but it can quickly and easily do basic operations on partitions. For example, we can very simply create a new main partition by “pinching off” a piece from the “D” or “C” drive.
And here are our wheels. Disk 0- and there is our hard drive with its partitions. What is in the CD-ROM does not interfere with us, but only sets us in the right mood. As you can see, the system utility is all 6
partitions of the hard disk considers simple and basic. Although in reality it is not. The program does not see that the last 3 partitions have other file systems (not FAT or NTFS) and that these are logical partitions inside an extended partition. This is a big minus. The program still does not know how much, but it can quickly and easily do basic operations on partitions. For example, we can very simply create a new main partition by “pinching off” a piece from the “D” or “C” drive.  I forgot to say that the very first section is, as a rule, on Windows 7, the so-called. “
recovery”, which I mentioned at the very beginning. You shouldn't touch him. This is generally a hidden section. It will help you return your laptop or computer to a factory state by cleaning the entire hard drive and returning Windows 7 from initial settings and software package.
I forgot to say that the very first section is, as a rule, on Windows 7, the so-called. “
recovery”, which I mentioned at the very beginning. You shouldn't touch him. This is generally a hidden section. It will help you return your laptop or computer to a factory state by cleaning the entire hard drive and returning Windows 7 from initial settings and software package.  To separate a part from an already existing volume, right-click on it and select "Compress volume ...". This window appears, where you just need to select the required size for the new partition. I chose 1000 MB - I'll delete it later anyway. You must choose the size yourself.
  After that, we had an unallocated area of 1000 MB in size. Right-click on it and select "Create Simple Volume".
  What are you waiting for? Click "Next"! Since we need the section completely, we leave maximum size.
  Next, assign a letter (any from the list) and go "Next".
  We select the file system - there is no way without it. What we need is selected - NTFS, so we complete with the "Next" button.
  We get a table with a preliminary summary and click "Finish" to complete the procedure.
  All. The new volume has been created. Congratulations! And now I, as the owner of a well-established system, have a reasonable question: “Why did I do this ???”. That's right - to show you. But now this new 1 GB volume is like a fifth wheel for me. Therefore, we will immediately analyze the procedure for returning the “bitten off” disk space to its place. Suddenly you will need it too. First, let's delete the volume we just created (right button, "Delete volume"). Now, instead of a volume, there is an unallocated area. Let's go further. So, right-click on the disk from which we "stole" some space. And select "Expand Volume".
  By clicking "Next", we see a completely new window.
  We do not touch the size settings. Actually, we don’t touch anything, but move on - after all, our unallocated area called “Disk 0” has already been added to the “Selected” column. Again we get a preliminary summary and complete the process with the "Finish" button.
  That's all. Everything is back to normal! Method number 2. When installingWindows 7 Unfortunately, I can not provide screenshots of this method, but everything is quite simple there, in Russian. I'll give you just a few tips. And remember that during installation you will not be able to read the instructions if you do not have another device with the Internet at hand. So it's better to print or write down all the steps. I will describe the sequence of actions. After you start installing Windows 7 and go through the language selection window, accept the license terms and select "Full installation", a window will open with a choice of partition for installing Windows. In this window, you will see if you have an unallocated space. There will also be a "Disk Settings" button, click it - tools for working with disk space will appear. Here you can format the disk or disks, as well as create new ones by clicking on the button of the same name, set the desired disk size. All changes will take effect after clicking the "Apply" button. That's actually all you need. If you did something wrong, calmly delete the partitions and create anew. Provided, of course, that there is no data there, otherwise formatting or deleting the partition will kill them. Method number 3. Specialized programs To tell about all the programs that help to break the site, the whole site is not enough. I'll just list which programs are the most popular today. Their functionality, as a rule, allows a lot. But we are only interested in partitioning the disk, so if the program is in Russian, you can easily figure out how to create the partition structure you need if you carefully read the article. So, programs for working with disk space: · Acronis Disc Direktor; Paragon Partition Manager Partition Magic; Ranish, etc. I hope you manage to conveniently and correctly allocate disk space. Good luck!


