Raid 0 out of 2 disks. RAID disk arrays: what is it and why is it needed? What is Raid array
Today we will talk about RAID arrays. Let's figure out what it is, why we need it, what it is like and how to use all this magnificence in practice.
So, in order: what is RAID array or simply RAID? This abbreviation stands for "Redundant Array of Independent Disks" or "redundant (backup) array of independent disks." To put it simply, RAID array this is a collection of physical disks combined into one logical disk.
It usually happens the other way around - one physical disk is installed in the system unit, which we divide into several logical ones. Here the situation is the opposite - somewhat hard drives first they are combined into one, and then the operating system is perceived as one. Those. The OS firmly believes that it physically only has one disk.
RAID arrays There are hardware and software.
Hardware RAID arrays are created before the OS boots via special utilities, wired into RAID controller- something like a BIOS. As a result of creating such RAID array already at the OS installation stage, the distribution kit “sees” one disk.
Software RAID arrays are created by OS tools. Those. during boot, the operating system “understands” that it has several physical disks and only after the OS starts, through software disks are combined into arrays. Naturally, the operating system itself is not located on RAID array, since it is set before it is created.
"Why is all this needed?" - you ask? The answer is: to increase the speed of reading/writing data and/or increase fault tolerance and security.
"How RAID array can increase speed or secure data?" - to answer this question, consider the main types RAID arrays, how they are formed and what it gives as a result.
RAID-0. Also called "Stripe" or "Tape". Two or more hard drives are combined into one by sequential merging and summing up the volumes. Those. if we take two 500GB disks and create them RAID-0, the operating system will perceive this as one terabyte disk. At the same time, the read/write speed of this array will be twice as high as that of one disk, since, for example, if the database is physically located in this way on two disks, one user can read data from one disk, and another user can write to another disk at the same time. Whereas, if the database is located on one disk, the hard disk itself will perform read/write tasks of different users sequentially. RAID-0 will allow reading/writing in parallel. As a consequence, the more disks in the array RAID-0, the faster the array itself works. The dependence is directly proportional - the speed increases N times, where N is the number of disks in the array.
At the array RAID-0 there is only one drawback that outweighs all the advantages of using it - the complete lack of fault tolerance. If one of the physical disks of the array dies, the entire array dies. There's an old joke about this: "What does the '0' in the title mean? RAID-0? - the amount of information restored after the death of the array!"
RAID-1. Also called "Mirror" or "Mirror". Two or more hard drives are combined into one by parallel merging. Those. if we take two 500GB disks and create them RAID-1, the operating system will perceive this as one 500GB disk. In this case, the read/write speed of this array will be the same as that of one disk, since information is read/written to both disks simultaneously. RAID-1 does not provide a gain in speed, but provides greater fault tolerance, since in the event of the death of one of the hard drives, there is always a complete duplicate of information located on the second drive. It must be remembered that fault tolerance is provided only against the death of one of the array disks. If the data was deleted purposefully, it is deleted from all disks of the array simultaneously!
RAID-5. More safe option RAID-0. The volume of the array is calculated using the formula (N - 1) * DiskSize RAID-5 from three 500GB disks, we get an array of 1 terabyte. The essence of the array RAID-5 is that several disks are combined into RAID-0, and the last disk stores the so-called “checksum” - service information, designed to restore one of the array disks in the event of its death. Array write speed RAID-5 somewhat lower, since time is spent calculating and writing the checksum to a separate disk, but the reading speed is the same as in RAID-0.
If one of the array disks RAID-5 dies, the read/write speed drops sharply, since all operations are accompanied by additional manipulations. Actually RAID-5 turns into RAID-0 and if recovery is not taken care of in a timely manner RAID array there is a significant risk of losing data completely.
With an array RAID-5 You can use the so-called Spare disk, i.e. spare. During stable operation RAID array This disk is idle and not used. However, in the event of a critical situation, restoration RAID array starts automatically - information from the damaged one is restored to the spare disk using checksums located on a separate disk.
RAID-5 is created from at least three disks and saves from single errors. In case of simultaneous occurrence of different errors on different disks RAID-5 doesn't save.
RAID-6- is an improved version of RAID-5. The essence is the same, only for checksums, not one, but two disks are used, and the checksums are calculated using different algorithms, which significantly increases the fault tolerance of everything RAID array generally. RAID-6 assembled from at least four disks. The formula for calculating the volume of an array looks like (N - 2) * DiskSize, where N is the number of disks in the array, and DiskSize is the size of each disk. Those. while creating RAID-6 from five 500GB disks, we get an array of 1.5 terabytes.
Write speed RAID-6 lower than RAID-5 by about 10-15%, which is due to additional time spent on calculating and writing checksums.
RAID-10- also sometimes called RAID 0+1 or RAID 1+0. It is a symbiosis of RAID-0 and RAID-1. The array is built from at least four disks: on the first RAID-0 channel, on the second RAID-0 to increase read/write speed, and between them in a RAID-1 mirror to increase fault tolerance. Thus, RAID-10 combines the advantages of the first two options - fast and fault-tolerant.
RAID-50- similarly, RAID-10 is a symbiosis of RAID-0 and RAID-5 - in fact, RAID-5 is built, only its constituent elements are not independent hard disks, and the arrays are RAID-0. Thus, RAID-50 gives very good speed read/write and contains the resilience and reliability of RAID-5.
RAID-60- the same idea: we actually have RAID-6, assembled from several RAID-0 arrays.
There are also other combined arrays RAID 5+1 And RAID 6+1- they look like RAID-50 And RAID-60 with the only difference being that basic elements The array is not RAID-0 tapes, but RAID-1 mirrors.
How do you understand combined RAID arrays: RAID-10, RAID-50, RAID-60 and options RAID X+1 are direct descendants of the basic array types RAID-0, RAID-1, RAID-5 And RAID-6 and serve only to increase either read/write speed or increase fault tolerance, while carrying the functionality of basic, parent types RAID arrays.
If we move on to practice and talk about the use of certain RAID arrays in life, the logic is quite simple:
RAID-0 We do not use it in its pure form at all;
RAID-1 We use it where read/write speed is not particularly important, but fault tolerance is important - for example, on RAID-1 It’s good to install operating systems. In this case, no one except the OS accesses the disks, the speed of the hard disks themselves is quite sufficient for operation, fault tolerance is ensured;
RAID-5 We install it where you need speed and fault tolerance, but don’t have enough money to buy it more hard drives or there is a need to restore arrays in case of damage without stopping work - spare Spare drives will help us here. Common Application RAID-5- data storage;
RAID-6 used where it is simply scary or there is a real threat of death of several disks in the array at once. In practice, it is quite rare, mainly among paranoid people;
RAID-10- used where it is necessary to work quickly and reliably. Also the main direction for use RAID-10 are file servers and database servers.
Again, if we simplify further, we come to the conclusion that where there is no large and voluminous work with files, it is quite enough RAID-1- operating system, AD, TS, mail, proxy, etc. Where serious work with files is required: RAID-5 or RAID-10.
The ideal solution for a database server is a machine with six physical disks, two of which are combined into a mirror RAID-1 and the OS is installed on it, and the remaining four are combined into RAID-10 for fast and reliable data processing.
If, after reading all of the above, you decide to install it on your servers RAID arrays, but don’t know how to do it and where to start - contact us! - we will help you select the necessary equipment, as well as carry out installation work for implementation RAID arrays.
The article presents general structure and organization of RAID systems. The necessary theoretical part is briefly reviewed, after which the practical aspects are shown. Anyone who doesn’t know what a hard drive is can read the article because... To create a Raid array you will need a couple of hard drives.
The value of information as such only increases over time, while the cost of methods that ensure its reliable storage regularly falls. For example, motherboards equipped with the ability to create RAID arrays were very expensive ten years ago, but today almost all motherboards on the iP55 chipset (which is only a pre-top set of system logic) are equipped with chipset support for RAID systems.
RAID arrays, by the way, due to their excellent price-quality ratio, are today one of the most popular ways to reliably organize data. If we translate the abbreviation RAID from English, then this is a redundant array consisting of independent disks. Due to the low fault tolerance of a separate hard drive, a concept was developed that allows hard drives to be combined into one array. Management of this array was entrusted to a separate controller (today this could be a microcircuit on the board itself, or software tools that use CPU resources). RAID systems are initially focused on fault tolerance (except for RAID level 0), so theoretically, if one of the HDD arrays fails, the information as a whole recorded on the volume remains available, at least for reading.
There is a fairly extensive gradation of RAID levels (methods of organizing data in an array); in order to create a RAID system, you must have at least a basic understanding of its operating principles; in fact, this is the topic of a separate article; we will limit ourselves to only brief sketches of the most relevant ones.
RAID0.
Data is written alternately to different drives (in stripes), thanks to this, in the end we can get an almost twofold increase in linear reading speed. There is no fault tolerance; if at least one hard drive fails, all data in the array is lost. Typically used for fast work with information that can be sacrificed if something happens, for example, for temporary Adobe Fotoshop folders... Some people use this for the OS (gamers, enthusiasts, etc.).
Mirroring. It's simple. The more hard drives the higher the cost of the usable volume, but the higher the fault tolerance. In its classic version, there is no performance gain. Modifications of the type RAID 1e are outside the budgetary focus, so we will skip consideration of them.
Levels 2,3,4 have practically lost their former popularity. Today, the most current RAID array that combines performance and fault tolerance is RAID 5. As in the case of RAID 0, data is alternately written to different drives (also stripes), but supplemented with checksums. As a result, the useful capacity of a RAID 5 consisting of n disks is equal to n-1 disks. If one hard drive fails, the information remains available, but if two or more fail, it is lost.
RAID10 (or RAID 1+0).
The most popular representative of composite RAID systems. In order to somehow speed up the operation of a classic mirror, the idea arose of combining them into a fast array. It is a combination of mirrors (RAID 1) into one large stripe (RAID 0). The main disadvantage is the higher cost of the useful volume, the advantages are more high speed data processing, in addition, increased fault tolerance. Theoretically, two drives can fail at the same time, but from different subarrays.
As I wrote above, to organize RAID systems you need a controller. There are software and hardware controllers.
Consider the hardware.
As in the case of video cards, this area is also divided into integrated (into the motherboard) and discrete. Integrated ones can be divided into chipset controllers (implemented via a “south bridge”) and controllers made by third-party developers (an additional non-chipset chip is soldered onto the motherboard). The latter are most often extremely primitive; as a rule, only RAID levels 0 and 1 are supported.
Chipset variations are more interesting and can compete with a number of discrete analogues in their functionality. For example, the latest chipsets from Intel allow you to implement RAID levels 0,1,5,10.
Discrete solutions for organizing RAID arrays, again, like video cards, there are expensive and cheap (budget) ones. They differ, of course, in accessible functionality, reliability, and means of “rebuild” (internal restructuring - self-healing).
In the photo 1,2,3


representatives of Low-end, Middle-end and High-end sectors.
It should be noted that a number of budget discrete variations, as well as all integrated solutions, are very often called software due to the greater requirements for CPU resources compared to expensive analogues. The powerful processor (in-house) of an expensive discrete RAID controller almost completely independently services the array, while the Low-end class, due to its weak capabilities and very often primitiveness, increasingly appeals to the capabilities of the CPU, thereby additionally loading the system.
But if integrated versions have at least some kind of basic chip, the functionality of which can be based on, then pure software solutions do not have this at all.
Software solutions.
Everything is very simple here, the RAID array is created using OS tools. Due to greater reliability, server variations of operating systems are usually used. For the OS, RAID is seen exactly the same as its regular hardware counterpart. The main advantage of this kind of solution is the cost: there is no need to buy an expensive controller. There is, of course, a minus, which sometimes completely cancels out the plus described above - low reliability. If suddenly something happens to the OS (viruses appear, for example), then you can lose all data along with the “blue screen”. Therefore, if anyone else organizes solutions of this kind for work so far, then only level 0 (for the OS, or for fast buffers) or 1. “Construction” of software RAID is carried out using the built-in partition manager.


(photo 4, 5)
Now let's look directly at installing a hardware RAID array.
Case one. If we have any solution integrated into the motherboard, then we need to use it. This is done through the motherboard BIOS, usually by simply switching to the “Enable” position.

(photo 6)
Case two. If we have a discrete RAID, then we simply insert the board and connect hard drives to it.
As in the first and second options, after turning on the computer and going through the “POST table”, the machine should see the controller and offer to press some key combination to enter the BIOS, but this time the controller. It will be something like Ctrl+A, Ctrl+g, etc. Click and enter.

(photo 7)
If we use an expensive RAID, then the BIOS will be radically different.

(photo 8)
You can even use a mouse here.
All interfaces are intuitive, the only thing that can confuse you is the English language. General principle is as follows: select the necessary hard drives and initialize them in the RAID of the level you need.

(photo 9)
After creation, you can begin installing the OS (if required), this process is described in detail in the article regarding installing XP on a laptop, the principle is the same. The only difference is relevant for Windows Vista and similar OS is the ability to use a flash drive, i.e. necessary drivers for the controller, you can copy it to a USB drive, and then simply specify the path during installation, or integrate the drivers directly into the distribution package using vLite (www.vlite.net).
RAID solutions are gradually moving from the elite category to the “for everyone” category, thereby becoming an increasingly accessible means for reliable work with data. When upgrading your computer and choosing a motherboard, you should pay attention to the availability of RAID support. Perhaps this will someday save your “those photos”...
As promised, today I will write an article on how to make a RAID array of two disks. For those who haven’t read about it, read the link. So, these arrays are capable of solving the most important problems in the system. As an example, we can use arrays to protect important data in the event of a failure of one of the hard drives and increase the speed of the system. In a previous article about RAID arrays, I said that this technology is used mainly on servers in various companies, but nothing prevents us from using it on home computers, especially since you don’t need much for this (a motherboard that supports arrays and two disks with identical characteristics).
So, let's start creating RAID arrays. I’ll say right away that you need to transfer all the most important data to another medium, because during the creation process the disks will be cleared.
How to create a RAID array using the built-in controller?
If your motherboard supports the creation of raids, then read these instructions. We will work on the basis of ASUS boards with support, but the principle of creation is the same almost everywhere. Go.
To begin with, we need, on ASUS motherboards they usually press the key DEL. Now you need to go to the section where the parameters for the SATA controller are located.

Normally, the position is switched to ACHI, but you have to move it to position RAID. As I said in the previous article, your disks must be completely identical, in absolutely ALL parameters. Now, as usual, save the settings and restart the computer.
While the computer is rebooting, that is, before the system is loaded, you need to press the combination CTRL-I or CTRL-F, sometimes this is not required.

In our experiment with an ASUS board, we see the following window, which contains the following parameters:
- View Drive Assignments– the parameter allows you to view the disks that we can use to create a RAID array.
- LD View / LD Define Menu– this parameter shows already created arrays.
- Delete LD Menu– here I think it’s clear. Deleting created arrays.
- Controller Configuratio n – various settings.
In our case, we select item 2. Press key 2 on the keyboard and get into the next window.

Here, as already mentioned, there are already created RAIDs. To view the settings, just press the key Enter. Combinations Ctrl+V allows you to see disks located outside the arrays. Using the keys Ctrl+C we can create new arrays. We need to create an array, so we click Ctrl+C.
In the next window we will see a menu in which raids will be created, it is located at the top. Disks that are not yet used as raids are located at the bottom. We can switch parameters with a spacebar, and the items of these parameters with arrows on the keyboard.

Reminder! If you don't remember then RAID 1 We are responsible for duplicating disks, that is, if one fails, then all the information will remain on the second. This creates data security. RAID 0 is responsible for increasing system performance because the disks work simultaneously, which creates maximum read and write speeds.
The screenshot just above already shows the parameters for creating RAID 1, but there was nothing special to ask there, since the parameters were basically default, just the raid type and disks were selected.
Once all the necessary parameters are set, press the keys Ctrl+Y.

Then, you can press any key, then the raid name will be set by default, or press Ctrl+Y again and specify your name. The second option looks like this:

After this, a warning will appear stating that all data from the disks will be destroyed. If you are sure that you have saved all the necessary data, then click again CTRL+Y.

Next, a window will appear where you will need to select a size for the array, or it will take up all the disk space. You can select the entire space, there will be nothing wrong with that. To do this, press any key.
That's all, we have created a RAID array, now we reboot the computer.

Now you need to distribute space on the raid and initialize it. This can be done in the Disk Management Wizard, which is located along the path: Control Panel — Administration — Computer management — Disk management.

You still need to create partitions and distribute places, but here I think you won’t have any problems. Just click on the unallocated partition right click mouse and select "Create Simple Volume".

Actually, although the article turned out to be voluminous, I wrote it quite briefly. Therefore, ask questions in the comments if anything is not clear. I will write more articles about RAID arrays, so stay tuned for site updates.
If you want to double the performance of your operating system, then our article is for you!
No matter how powerful your computer is, it still has one weak link, this HDD, the only device in the system unit that has mechanics inside. All the power of your processor and 16 GB random access memory will be nullified by the outdated operating principle of a conventional HDD. It’s not for nothing that a computer is compared to a bottle, and a hard drive to its neck. No matter how much water there is in the bottle, it will pour out through a narrow neck.
There are two known ways to speed up your computer, the first is to buy an expensive solid state drive SSD, and the second, make the most of the capabilities of your motherboard, namely, set up a RAID 0 array of two hard drives. By the way, who is stopping us from creating RAID 0 array of two SSDs!
How to set up a RAID 0 array and install Windows 10 on it. Or how to double the performance of a disk system
As you guessed, today's article is about creating and configuring a disk array RAID 0 consisting from two hard drives. I conceived of it several years ago and specially purchased two new SATA III (6 Gb/s) 250 GB hard drives, but due to the complexity of this topic for novice users, I had to postpone it then. Today, when the capabilities of modern motherboards have reached such a level of functionality that even a beginner can create a RAID 0 array, I am returning to this topic with great pleasure.
Note: To create a RAID 0 array, you can take disks of any size, for example 1 TB. In the article, for simple example, two 250 GB disks were taken, since there were no free disks of a different size at hand.
It is important for all computer enthusiasts to know that RAID 0 (“striping” or “striping”) is a disk array of two or more hard drives with no redundancy. This phrase can be translated into ordinary Russian as follows: when installing two or more hard drives into a system unit (preferably of the same size and from the same manufacturer) and combining them into a RAID 0 disk array, information on these drives is written/read simultaneously, which doubles the disk performance. The only condition is that your motherboard must support RAID 0 technology (nowadays, almost all motherboards support the creation of raid arrays).
An attentive reader may ask: “What is lack of redundancy?”
Answer. RAID data virtualization technology is designed primarily for data security and starts with, which provides double reliability (data is written to two hard drives in parallel and if one hard drive fails, all information remains safe on the other HDD). So, RAID 0 technology does not write data in parallel onto two hard drives; RAID 0 splits the information into data blocks when writing and writes it to several hard drives simultaneously, due to this, the performance of disk operations doubles, but if any hard drive fails, disk, all information on the second HDD is lost.
This is why the creators of RAID virtualization technology, Randy Katz and David Patterson, did not consider RAID 0 to be any RAID level and called it “0”, since it is not secure due to the lack of redundancy.
Friends, but you must agree that hard drives do not break down every day, and secondly, with two HDDs combined in a RAID 0 array, you can work like a simple hard drive, that is, if you periodically make an operating system, you will insure yourself from possible problems 100%
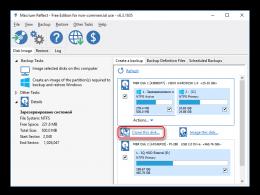
So, before creating a RAID 0 array, I suggest installing one of our two new hard drivesSATA III (6 Gb/s) into the system unit and check it for read-write speed with utilitiesCrystalDiskMark and ATTO Disk Benchmark. After creationWe will check the RAID 0 array and installation of Windows 10 on it againread write speed using the same utilities and let's see if it actually this technology will increase the performance of our operating system.
To conduct the experiment, we will take a far from new ASUS P8Z77-V PRO motherboard built on the Intel Z77 Express chipset. The advantages of motherboards built on Intel Z77, Z87 and newer H87, B87 chipsets lie in the advanced Intel Rapid Storage Technology (RST), which is specially designed for RAID 0 arrays, even from SSDs.

Looking ahead, I’ll say that the test results are quite normal for a regular HDD with the most modern interface SATA III.
CrystalDiskMark
Is oldest program to test the performance of hard drives, you can download on my cloud storage, link https://cloud.mail.ru/public/6kHF/edWWJwfxa
The program performs a test of random and sequential reading/writing on the hard drive in blocks of 512 and 4 kB.
Choose the required drive, for example, our HDD under the letter C: and click All.
The final result. Maximum speed writing information to the hard drive reached 104 MB/s, reading speed - 125 MB/s.

ATTO Disk Benchmark
The final result. The maximum speed for writing information to a hard drive reached 119 Mb/s, read speed - 121 Mb/s.

Well, now we set up our RAID 0 array in the BIOS and install the operating system on it Windows system 10.
Setting up a RAID 0 array
Connect to our motherboard two identical in volume (250 GB) hard drives SATA drive III: WDC WD2500AAKX-00ERMA0 and WDC WD2500AAKX-001CA0.


Our motherboard has 4 ports SATA III (6 Gbit/s), we will use No. 5 and No. 6


Turn on the computer and enter the BIOS by pressing the DEL key during boot.
Go to the Advanced tab, SATA Configuration option.

Set the SATA Mode Selection option to RAID

To save the changes, press F10 and select Yes. A reboot is in progress.

If you have enabled RAID technology in the BIOS, then the next time you boot, the monitor screen will prompt you to press the keyboard shortcut ( CTRL-I), to enter the RAID Configuration Control Panel.
This window also displays our WDC hard drives connected to ports 4 and 5, which are not yet in a RAID array (Non-RAID Disk). Press CTRL-I and enter the settings panel.

In the initial window of the panel, we need the first tab Create a RAID Volume; to enter it, press Enter.

Here we make the basic settings of our future RAID 0 array.
Name : (RAID array name).
Press the spacebar and enter a name.

Let it be “RAID 0 new” and press Enter. Move down using the Tab key.

RAID Level: (RAID Level).
We create RAID 0 (stripe) - disk array of two hard drives with no redundancy. Select this level using the arrow keys on your keyboard and press Enter.

Scroll down using the Tab key.
Stripe Size:
Let's leave it as is.

Capacity: (volume)
Set automatically. The capacity of our two hard drives is 500 GB, since we use RAID level 0 (stripe) and our two hard drives work as one. Click Enter.

We don’t change anything else and move to last point Create Volume and press Enter.

A warning appears:
WARNING: ALL DATA ON SELECTED DISKS WILL BE LOST.
Are you sure you want to create this volume? (Y/N):
WARNING: ALL DATA on the selected drives will be lost.
Are you sure you want to create this volume? (Y/N):
Press Y (Yes) on the keyboard.

The RAID 0 array has been created and is already functioning, with the Normal status. To exit the settings panel, press the Esc key on your keyboard.

Are you sure you want to exit (Are you sure you want to exit? Press Y (Yes). A reboot occurs.

Now, every time you boot the computer, information about the state of our RAID 0 array will appear on the monitor screen for a few seconds and a prompt to press the key combination (CTRL-I) to enter the RAID configuration control panel.

Installing Windows 10 on a RAID 0 array
Connect to our system unit, reboot the computer, enter the BIOS and change the boot priority to the flash drive. Or you can simply enter the computer boot menu and select boot from installation flash drive Windows 10 (in our case Kingston). In the boot menu you can see the RAID 0 array we created with the name "RAID 0 new".
At the end of last week I bought components for a computer and encountered a number of problems when setting up the equipment. New computer intended for storing databases in the office of one company, therefore a RAID array was needed. The budget was about 20,000 rubles, so I collected AMD platform. ASUS M4A88TD-M motherboard and two identical ones hard drives WD 500 Gb. To configure the RAID array, the HDD was connected to the SATA0 and SATA1 connectors. Created a RAID 1 array, combining hard drives with increased reliability and fault tolerance. When hard drives mirror each other. The recommendations described below are suitable for setting up RAID0 and increasing disk speed.
First, I went into the BIOS. For my motherboard, pressing the DEL button when loading, for motherboards from other companies it may be F2. In the configuration settings SATA switched IDE mode on RAID. Pressed F10 to save the settings and restarted the computer.

Second, you need to enable the RAID array. This is the first moment at which I fell into a stupor. The instructions for the ASUS motherboard do not say a word about this. While the computer was booting, I pressed Ctrl+F. Opened the Option ROM Utility menu. Here I selected the second item by pressing 2.

In this menu, pressed Ctrl+C to create a RAID. Going step by step, I turned on the RAID Mode functions to the RAID1 position, opposite the Y drives. Then I pressed Ctrl+Y twice, entered the name of the RAID array and saved the settings. Exited and rebooted the computer.

Now, when you boot the computer, you can see that the system has a RAID1 array connected.

Third, I determined the priority of the download queue from different devices. To do this, I had to enter the BIOS again. DVD drive, followed by my RAID, and the last one to connect, i.e. flash drives.

Windows 7 was installed on the RAID array. In principle, the following tips are suitable for installing Windows XP, Vista, Server 2008 and Windows 8 on the RAID array. Before starting the installation, I went to the ASUS website from another computer and downloaded the AMD RAID driver. RAID driver loaded onto a flash drive, it does not need to be inserted into the USB connector before selecting hard drive partitions. Windows image was on DVD. After that I moved on to installing the OS.


Fourth, I used the driver from the flash drive when I got to the partition selection. Inserted the flash drive, clicked Download and Browse.

In the pop-up menu, select the driver directory, operating systems and bit depth. In my Windows case 7 64bit.

Windows Installer detected AMD driver AHCI Compatible RAID Controller. It was enough to see hard section disk. Removed the flash drive from the USB port.

Here the second snag awaited me, when Windows 7 was not installed. I chose standard way Create, the installer defined the entire volume of the disk as Primary. Clicked Next and received an error. The installer was unable to create a new one or find an existing one. system partition. additional information and so on. When Windosw does not install due to a partition, the solution is to partition the disk yourself. I deleted all partitions. Pressed Shift+F10.

Fifth, pressing Shift+F10 brought up the command line. Shift+Alt returns the English keyboard layout on the Russian distribution. Entered diskpart, the command to call the disk utility. The next command is list disk. I saw two disks in the system: disk 0 is a flash drive, disk 1 is a RAID array. I selected disk 1 with the select disk 1 command. Then I entered create partition primary size=131072, creating a system partition of 128 GB in size. The create partition primary command is responsible for this. The size command is used to determine the disk size.

The second part of the disk was defined as a partition using the create partition extended command. Didn't use size to include all the remaining space in the second disk. Which in the future will allow you to create a Logical Disk.

I selected the first partition with the select partition 1 command. And with the active command, the partition was marked as active. After that I closed the window command line. Clicked the Update button.

After updating the list of partitions, I saw two disks with a capacity of 128 GB and 337 GB. Selected the first section and clicked Next.

The hotly awaited message Installing Windows... Windows installation proceeded as usual.

I did this several times over three evenings. Some attempts were made with errors, which increased the time. If you have any questions, write in the comments. For example, you need to restart the computer after partitioning the disk into new partitions if the flash drive was inserted before installing Windows. All of the above was repeated at once to ensure that the five-point algorithm was correct. Installing Windows 7 on RAID works, tested!
Read also:
Didn't you wait? Gundonography or how to shoot underwater with your phone Review e-book Pocketbook Touch Review of the AdvoCam FD4 GPS video recorder